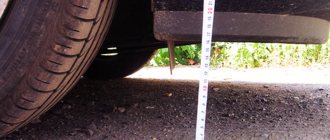
Many farmers cannot imagine working in the fields without a tractor. They are interested in how to make a trailer for a walk-behind tractor with their own hands from the rear beam 2108 for transporting building materials or other items.
Rear suspension device
The rear wheel suspension is torsion-lever type.
Its design is simple and reliable, and maintenance during vehicle operation is reduced to a minimum and consists of inspecting suspension components and parts to check their condition and fastening. The guide element of the suspension is a beam consisting of two longitudinal arms 2 (Fig. 74) and a connector 19, welded together through reinforcements. The lever connector is significantly shifted forward from the wheel axis; it has a U-shaped cross-section, which has high bending rigidity and low torsional rigidity. Due to the displacement of the lever connector from the wheel axis and thanks to the specified cross-section, the connector, twisting, works like a torsion bar, ensuring partial independence of the movement of each wheel.
Rice. 74. Rear suspension assembly:
1 — rear wheel hub; 2 — rear suspension lever; 3 — suspension arm mounting bracket; 4 — rubber bushing of the lever hinge; 5 — hinge spacer; 6 — suspension arm mounting bolt; 7 — body bracket; 8 — support washer for fastening the shock absorber rod; 9 — upper suspension spring support; 10 — spacer spring; 11 — insulating gasket for the suspension spring; 12 — rear suspension spring; 13 — shock absorber rod mounting cushion; 14 — compression stroke buffer; 15 — shock absorber rod; 16 — shock absorber protective casing; 17 — lower support cup of the suspension spring; 18 — shock absorber; 19 — lever connector; 20 — wheel hub axis; 21 — hub cap; 22 — wheel hub fastening nut; 23 - sealing ring; 24 — bearing washer; 25 — hub bearing; 26 — brake shield; 27 — retaining ring; 28 — dirt-reflecting; 29 — suspension arm flange; 30 — shock absorber bushing; 31 — lever bracket with an eye for attaching the shock absorber; 32 — rubber-metal hinge of the suspension arm.
Behind the lever connector, a space is formed in which the spare wheel and a spacious gas tank are located. This is another advantage of the front-wheel drive car's layout and the adopted rear suspension design.
Trailing arms 2 are made of pipe. Welded to the rear of the levers are brackets 31 with eyes for attaching shock absorbers, as well as flanges 29 to which the rear wheel hub axles 20 and wheel brake shields 26 are bolted. At the front, each lever has a welded bushing into which a rubber-metal hinge 32 is pressed, consisting of rubber 4 and metal 5 bushings. A bolt 6 passes through the spacer sleeve 5 of the hinge, connecting the suspension beam arm with a stamped bracket 3, which is attached to the body bracket 7 with welded bolts, nuts and washers.
The spring 12 of the suspension is made of spring steel of round section. It is installed on shock absorber 18. Its lower part rests on cup 17, welded to the shock absorber reservoir, and its upper part, through an insulating rubber gasket 11, rests on the upper support 9, which is welded to the inner arch of the body.
The compression stroke buffer 14 is made of polyurethane. It is mounted on the shock absorber rod inside the suspension spring. From above, the buffer rests against the cover of the protective casing 16, and when put into operation, it rests against the buffer support, which is put on the upper part of the shock absorber reservoir. The casing 16 protects the shock absorber rod 15 and the compression stroke buffer from mechanical damage and contamination.
Legal requirements
To drive on public roads, a trailer for a passenger car made from a VAZ 2109 beam must meet the requirements set out in a number of documents, some of which are available only to official manufacturers and inspection point inspectors. One of such documents is OST 37.001.220-93, based on OST 37.001.220-80, which was in force during the Soviet era. However, various documents set out general requirements for the following parameters of a towed vehicle:
- dimensions;
- form;
- weight;
- weight distribution;
- pressure on the towbar;
- equipped with brakes;
- equipping with light indication devices.
A discrepancy in any of these parameters will make it impossible to register a home-made vehicle, and therefore unsuitable for driving on public roads. We have made a selection of the basic requirements for such homemade products:
- maximum width – 230 cm, but does not exceed the width of the tug by more than 200 mm;
- maximum length – 8 m, but not more than 1.5 times the length of the traction vehicle;
- maximum height – 3 m, but not more than 1.8 BTS gauge;
- maximum registration and gross weight depend on the vehicle, but the total curb weight of the vehicle with an empty trailer must not exceed 3.5 tons;
- brakes (if necessary) inertia;
- brake lights installed;
- Turn signals installed;
- sign illumination installed;
- side and fog lights installed;
- the design and shape of the drawbar must correspond to the trailer hitch installed on the towing vehicle;
- the load on the trailer hitch, regardless of how loaded the trailer is, should not exceed 25–100 kg and correspond to this parameter.
Legal requirements for trailer
The weight and size parameters of the BTS directly depend on what vehicle the trailer is intended for.
Rear suspension parts
1 – wheel hub; 2 – suspension arm mounting bracket; 3 – silent block; 4 – shock absorber casing; 5 – compression stroke buffer; 6 – casing cover; 7 – support washer; 8 – shock absorber cushions; 9 – spacer sleeve; 10 – shock absorber; 11 – rubber gasket; 12 – rear suspension spring; 13 – lever connector; 14 – lever of the rear suspension beam; 15 – shock absorber mounting bracket; 16 – lower spring support cup; 17 – rod; 18 – upper spring support cup.
The third stage of replacing silent blocks: purchasing and preparing the necessary tools
Let us outline a list of materials and tools that should be prepared in order to positively implement all the advice on how to change the rear silent blocks on a VAZ 21099.
- A set of new silent blocks for the VAZ 2109 car (purchased at the discretion of the car owner, his views on the quality and price of the product, delivery availability)
- A set of socket heads and wrenches, sometimes you have to select them at the work site, so it’s worth stocking up on them for all unforeseen cases.
- Set of spanners. They occur during installation work.
- Special kit for removing rear silent blocks (industrial standard recommended). On the market, the seller can call it: “Ball joint and joint remover.” It costs on average 500-1200 rubles. But you can use the old-fashioned method - a hammer and chisel.
- Wire brush. It will be needed during the period of cleaning parts, seats from dirt, rust and other foreign deposits that interfere with the operation of the suspension system.
- Mount. Necessary for performing power work, mainly for the installation of beams and large segments of the rear of the machine.
- Jack (2 pieces).
- Wrenches for wheel bolts. They will be needed if you plan to remove the tires in order to provide better access to the repair site. Although it is not necessary to remove the wheels, for repairs it is enough to use jacks to protect the car from rocking.
- Sledgehammer, hammer, chisel, if you have to forcefully knock out old parts.
- Wooden blocks (2 pcs.) or metal stands for the car. Their task is to fix the car body in the desired position.
Tools
Thus, there is a lot of preparatory work to do to collect information about the faulty part, study all the features of the suspension device in order to clearly know and understand how to change the rear silent blocks on a VAZ 2109 yourself. And is it worth taking on, maybe it’s better to trust a specialist, especially if there are very few tools accumulated in the garage, and you should buy more or beg them from friends.
Description of design
The rear suspension is with 12 coil springs and 10 double-acting hydraulic telescopic shock absorbers.
The main load-bearing element of the suspension is a beam consisting of trailing arms 14 and a connector 13, welded together through reinforcements. At the rear, brackets 15 with eyes for attaching shock absorbers 10 and flanges for attaching the rear wheel axles and brake shields are welded to the suspension arms. At the front, the levers 14 are equipped with welded bushings with silent blocks 3 pressed into them. A bolt passes through the central bushing of the silent block, connecting the lever to the bracket 2. Three welded bolts are provided to secure the bracket to the body spar.
The suspension spring 12 rests with its lower end on a cup welded to the shock absorber reservoir, and with its upper end, through a rubber gasket 11, on a support welded from the inside to the body arch.
The lower eye of the shock absorber is bolted to bracket 15 of the suspension arm, and its rod is secured to the upper support of the suspension spring through two rubber pads 8 (one at the bottom of the support, the other at the top) and a support washer 7 (under the nut).
The rear suspension springs are divided into two stiffness classes according to their length in the free state and under load: A (more rigid, “high”) and B (less rigid, “low”). Springs of the same class must be installed on the front and rear suspensions. But in exceptional cases, if class A springs are installed in the front suspension, class B springs can be installed in the rear suspension (but not vice versa!). The quality of the springs can be fully assessed by the performance of the suspension on the car. If the suspension often “breaks through” to the bump stops on uneven roads or sags under load, stiffer springs should be installed. When replacing springs, do not forget to check the serviceability of the shock absorbers - after all, it is the shock absorber-spring pair that largely determines the characteristics of the suspension.
What is a trailer for?
Passenger cars are not well suited for transporting long or heavy loads, because their design is optimized for the comfortable transport of people, and the trunk can only accommodate a few large boxes. If you need to deliver bulk or dirty cargo from point “A” to point “B,” you can’t do without a towed vehicle, because it has a higher carrying capacity, and it’s much easier to wash it. Therefore, the trailer significantly expands the capabilities of a passenger car in the field of transporting any cargo, especially those that do not fit well with the upholstery of the passenger compartment or trunk, as well as those that exceed the carrying capacity of the vehicle.
design features of the rear suspension of VAZ 2108, VAZ 2109, VAZ 21099 cars
The rear suspension beam consists of two trailing arms 13 (Fig. 6.4) and a connector 12, which are welded together through reinforcements. In the rear part, brackets 14 with eyes for attaching shock absorbers and flanges 15 are welded to the suspension arms, to which the rear wheel axles are bolted together with the wheel brake shields. In front, bushings 16 are welded to the rear suspension arms, into which rubber-metal hinges 1 are pressed. Bolts pass through the hinges connecting the suspension arms to stamped-welded brackets 2, which are attached to the body side members with welded bolts. The suspension springs 11 rest with one end on the shock absorber cup 9, and with the other end, through an insulating rubber gasket 10, in a support welded to the inner arch of the body. The rear suspension shock absorber is hydraulic telescopic, double-acting. The rear suspension shock absorber is attached with bolt 9 (Fig. 6.5) to the suspension trailing arm bracket. The rod is attached to the upper support 5 of the suspension spring through rubber pads b and a support washer 3. The shock absorber parts are shown in Fig. 6.6. Hub 13 (see Fig. 6.5) has a double-row angular contact bearing 12, similar to the front wheel hub bearing, but smaller. Unlike the front wheel hub, on which the inner bearing ring is installed with guaranteed interference, on the rear wheel hub, bearing 12 on axle 14 has a transitional fit.
Rice. 6.4. Diagram of the rear suspension of a VAZ 2108, VAZ 2109, VAZ 21099:
1 — rubber-metal hinge; 2 — rear suspension arm mounting bracket; 3 — shock absorber casing; 4 — compression stroke buffer; 5 — casing cover; 6 — support washer; 7 — shock absorber cushions; 8 — spacer sleeve; 9 — shock absorber; 10 - insulating gasket; 11 — rear suspension spring; 12 — lever connector; 13 — rear suspension beam arm; 14 — shock absorber mounting bracket; 15 - flange; 16 — lever bushing
Rice. 6.5. Mounting the rear shock absorber VAZ 2108, VAZ 2109, VAZ 21099 - rear suspension device:
1 - protective casing; 2 — compression progress buffer; 3 — support washer; 4 — spring insulating gasket; 5 — upper support cup of the suspension spring; 6 — shock absorber rod mounting pads; 7 — lower spring support cup; 8 – rear shock absorber; 9 — rear shock absorber mounting bolt; 10 — wheel hub axle mounting bolt; 11 — brake drum; 12 — hub bearing; 13 — wheel hub; 14 — hub axis; 15 — hub nut; 16 — retaining ring; 17 - locating pin
Rice. 6.6. Rear shock absorber device for VAZ 2108, VAZ 2109, VAZ 21099:
1 — compression valve body; 2 — compression valve discs; 3 — throttle disk of the compression valve; 4 — compression valve plate; 5 — intake valve spring; 6 — compression valve cage; 7 — recoil valve nut; 8 — recoil valve spring; 9 — recoil valve plate; 10 — washer; 11 — recoil valve disc; 12 — throttle disk of the recoil valve; 13 - piston; 14 — piston ring; 15 — bypass valve plate; 16 — bypass valve spring; 17 — restrictive plate; 18 — spacer sleeve; 19 - reservoir; 20 - rod; 21 — compression buffer support; 22 - nut; 23 — oil seal cage; 24 — rod protective ring; 25 — oil seal; 26 — sealing ring of the tank; 27 — rod guide bushing; 28 - cylinder; 29 — silent block
The second stage of replacing silent blocks: choosing the material
Before visiting a car market or online store page, decide which silent blocks you need. The following products are offered:
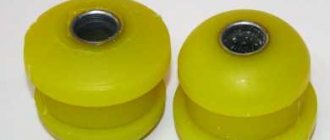
- Rubber silent blocks. The first type of product is affordable in terms of price, but loses in terms of service life, because its service life is short, the rubber wears out very quickly, and cracks appear on it, especially if you drive aggressively and “cut” off-road. But there are also advantages of a rubber silent block - they have a gentle effect on suspension parts and do not injure them.
Rubber silent blocks
Polyurethane silent blocks. Most often they are suitable for Lada 2108, 2109, 21099 and have a lot of advantages. Firstly, if the time has come to think about what and how to change the rear silent blocks on a VAZ 2109, then we make a choice in favor of the durability of the product, which is polyurethane silent blocks. They are not subject to deformation due to changes in temperature and pressure. Secondly, polyurethane products do not deform, maintaining their factory geometry even under extreme driving conditions. Note that the part can withstand heavy loads, is not susceptible to abrasion, and provides better shock, vibration and noise absorption. But there is one “but”, let us draw your attention to it. The polyurethane part is very rigid and can have a negative impact on the suspension, especially on a well-worn set that has been used for many years.
Sequence of actions when replacing a VAZ 2110
- The car is installed above the inspection hole, then the lower protective cover of the VAZ 2110 engine compartment is removed.
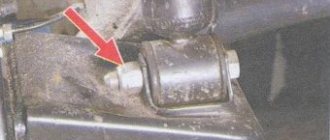
- The fastening nuts on the front arms are unscrewed, then the nuts of the front stabilizers are unscrewed (this is done using a 17 wrench).
Mounting nut removed
Unscrewing the nut on the extension
Unscrewing the second nut by 24
Removing the old block with a chisel
Stripping the eyelet with a knife
Pressing in the silent block with a vice
Video example of replacing silent blocks of front control arms
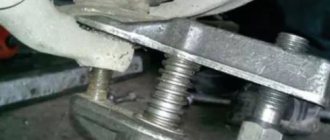
Making a puller with your own hands
As mentioned above, silent blocks are tightly pressed into the levers and into the so-called “stretch” on the suspension. You can press the new silent block into the extension using a regular chisel and hammer. But pressing the silent block into the suspension arm is a very labor-intensive procedure and cannot be done without a special device (puller). You can look for a puller in a car dealership, or you can skip wasting time on searching and make it yourself; fortunately, it’s not difficult. To make a puller, we need a bolt (M12), the length of the bolt is at least 180 mm. You should select a nut for it, and it should be high - at least 20 mm. You will also need a bushing. Length - at least 60 mm, internal diameter - 39 mm (such a sleeve can be made from a piece of pipe suitable in diameter) and two or three wide washers. What should happen in the end can be seen in the photographs below.
Homemade puller option