Depending on how loaded the vehicle is, the headlights can be directed higher or lower. To adjust the light flux, special devices are used - hydrocorrectors. If the car is loaded, the headlights should be turned down so that the flow of light is directed not upward, but onto the road. This ensures the necessary illumination of the road surface and prevents the driver of an oncoming car from being dazzled. In the case of a minimal vehicle load, when the rear part of the frame is raised, the headlights should be turned upward.
Design of headlight hydraulic correctors
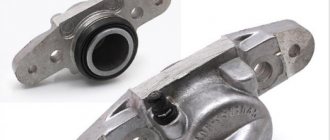
As a rule, the following components are included in the design of a hydraulic corrector:
- master cylinder mounted on the dashboard;
- actuator cylinders mounted on the headlights;
- connecting pipelines that are fixed with clamps;
- working fluid with increased frost resistance.
Typically, hydraulic correctors are made in the form of a non-removable structure that cannot be repaired. Therefore, if, for example, the hydraulic corrector of the VAZ-2114 headlights fails, it is repaired by replacing it with a new set.
The manufacturer provides a maximum operating pressure in the normal state of the corrector. To direct the luminous flux of the headlight downwards, the pressure in the system is reduced, as a result of which the actuator cylinder rod is retracted and the optics are rotated downwards. Thus, most of the time the device is under increased pressure.
Quite often, when temperature changes occur, especially in winter, the structure of the seals is damaged due to the poor quality of the rubber, which leads to leakage of the working fluid. In turn, this leads to jamming of the cylinder pistons in one of the positions.
Structurally, all hydraulic correctors that are installed on VAZ vehicles are made according to a similar design, with the exception of some differences in size, layout of cylinder fastenings and pipelines. Today the following modifications of hydraulic correctors are supplied to the market:
- “2105-3718010” - for VAZ 2105-2107;
- “2108-3718010” - for VAZ 2108-21099;
- “2110-3718010” and “2110-3718010-10” - for VAZ 2110-2112;
- “2114-3718010” - for VAZ 2113-2115;
- “21213-3718010” - for 21213 “Niva”.
How to repair a hydraulic corrector on a VAZ 2110 - 2115
Repair of the VAZ-2110 headlight hydraulic corrector is not provided by the manufacturer. Therefore, if it fails, the entire device, complete with pipelines and cylinders, is replaced.
If the angle of inclination of the optics is not adjustable when the vehicle load changes and it is not possible to achieve the optimal luminous flux using the adjusting screws on the headlights, you should check the functionality of the corrector as follows:
- First of all, it is necessary to inspect the device for the integrity of the pipelines and the absence of liquid leakage.
- If after these measures no malfunction is detected, we proceed to checking the performance of the actuator cylinders. To do this, remove them from the headlight unit and measure the stroke of the rods. Normal operation of the cylinders is ensured when the rod stroke is within the range of 6.5-7.5 mm.
- Since repair of the VAZ-2110 headlight range control is not structurally provided for, we replace the non-working device with a new device included in the kit.
Replacing the device
It is not difficult to replace a broken headlight range control unit with your own hands. The sequence of work is as follows:
- unscrew the screws securing the pipeline clamps to the mounting brackets;
- remove the handle from the main cylinder;
- unscrew the nut securing the main cylinder to the instrument panel;
- disconnect the main cylinders from the headlamp;
- we push the actuator cylinders into the cabin along with the seals;
- install the new unit in the reverse order of assembly.
Replacement
Many motorists, instead of the standard hydraulic headlight leveler provided by the manufacturer, install a more efficient and practical electric leveler. It differs from hydraulic in that electric motors act as the drive. For VAZ cars, a standard electrical corrector of the Silich-Zenit type is provided. It can be easily installed in the same places where the hydraulic corrector is located. The installation process is like this:
- disconnect the negative terminal from the battery;
- turn the main cylinder counterclockwise and dismantle it;
- change the o-ring;
- install the electric corrector in place of the main cylinder;
- dismantle the main cylinder lever in the cabin;
- connect the positive terminal to the socket of block 20;
- We fix the negative terminal on one of the body studs under the instrument panel;
- instead of pipelines, we lay the corrector wiring or along the electrical power harness;
- connect the negative terminal to the battery.
After all this, you just need to check the functionality of the device.
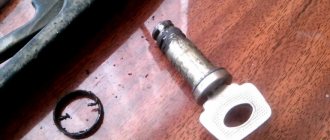
Adjusting the headlight range control rod
Sometimes a malfunction of the headlight adjustment system can be caused by a misalignment of the adjustment lever with the lampshade rod. Therefore, if, for example, the hydrocorrector of the VAZ-2112 headlights does not work, do not rush to repair it by replacing it. First, make sure that the connection between the lever and the rod matches the operating position.
The rod of the corrector actuator cylinder rests on the lever, which, in turn, acts on a similar rod rigidly fixed to the headlight dome. The lever passes through the adjusting bolt, which is its fulcrum. The adjustment mechanism works on the principle of a swing. The corrector swings the lampshade, and the adjusting bolt allows you to raise or lower the support point of this swing. If the bolt is turned to the maximum position, the reverse end of the lever in the form of a ball may slip out of engagement with the lampshade rod.
In order for the VAZ-2115 headlight hydraulic corrector to work again, the device must be repaired by returning the lever to a special recess on the rod. To do this, first tighten the adjusting bolt until it stops, then press the lampshade down and insert the lever ball into the desired position.
Causes of hydraulic corrector malfunction, repair
Most often, the corrector stops working during periods of sudden changes in external temperatures, when the rubber seals on the cylinders can crack and leak. Damage to the connecting tubes can also lead to loss of fluid from the system. Whatever the reason, the working cylinders freeze in one position and do not respond to switching.
It will not be possible to repair the hydraulic system itself, since the manufacturer does not provide such a possibility. Therefore, if an all-season fluid leaks, the hydraulic corrector assembly must be replaced with a new one. However, there may be a situation when the reflectors stop rotating due to something other than a faulty corrector. This occurs if the adjustment lever that transmits force to the headlight reflector loses contact with the working cylinder rod. The presence of such a malfunction can be suggested by the fact that one of the reflectors has stopped turning.
Adjusting the hydraulic corrector rod
In order to eliminate such a breakdown, it is necessary to restore the engagement of the working rod (there is a recess on it) with the spherical end of the adjustment lever. You should do the following:
- Tighten the bolt that regulates the position of the lever fulcrum until it stops.
- Move the reflector to its lowest position.
- Align the lever ball and the rod notch, then unscrew the adjusting bolt to the required position.
The lever ball slipping out of the stem recess is the only problem that can be corrected. If the tightness of the hydraulic system is damaged, the corrector must be changed.
Replacing the hydraulic corrector for VAZ 2110, 2111, 2112 headlights
Replacing a faulty corrector yourself is not difficult. The replacement sequence is as follows:
- unscrew the screws securing the pipeline clamps to the mounting brackets;
- remove the handle from the master cylinder;
- Unscrew the nut securing the master cylinder to the dashboard;
- We disconnect the actuator cylinders from the headlamp;
- we push the actuator cylinders together with the seals inside the cabin;
- install the new unit in reverse order.
Many car enthusiasts, instead of the standard hydraulic corrector provided by the manufacturer, install a more practical and efficient electric headlight corrector. Its difference from a hydraulic device is that electric motors are used as a drive. For VAZ cars, a standard electrical corrector of the Silich-Zenit series is provided. It is easily mounted in the same places as a conventional hydraulic corrector. The installation procedure for the electrical corrector is as follows:
- disconnect the negative terminal from the AC;
- turn the master cylinder counterclockwise and remove it;
- replace the o-ring;
- install the electric corrector in place of the main cylinder;
- dismantle the master cylinder lever in the cabin;
- We connect the positive terminal of the corrector to the socket of block No. 20;
- We attach the negative terminal to one of the body studs under the dashboard;
- we lay the corrector wiring instead of pipelines or along the power supply harness;
- connect the corrector's electrical wiring to the actuators;
- connect the negative terminal to the battery;
- We check the functionality of the corrector.
After installing the corrector yourself, you will have an idea of how this device works. If necessary, repairing the electrical corrector will not be difficult.
Electromechanical headlight range control for VAZ 2113, 2114, 2115
The headlight hydraulic corrector is used to change the angle of the headlight beam. The fact is that depending on the load of the car, the direction of the headlights changes and it may happen that it is not directed at the road surface, but directly into the eyes of the driver of oncoming traffic, which creates a dangerous situation when driving. The headlight hydraulic corrector for the VAZ 2114 consists of a main cylinder, which is located on a panel board, and working cylinders, they are located directly on the headlight housing and are connected to the main cylinder by connecting tubes. Inside the cylinders and tubes there is a special composition that is resistant to low temperatures. This liquid does not come into contact with air at all. It is worth noting that the hydraulic corrector is an integral mechanism; it cannot be disassembled and, in the event of a breakdown, cannot be repaired. During operation of the VAZ 2114, jamming of the pistons in the cylinders or leakage of fluid from the tubes or cylinders may occur. So when a car’s hydraulic leveler fails, it makes sense to replace it with a more modern electromechanical headlight leveler.
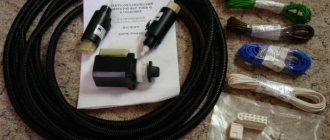
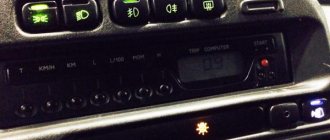
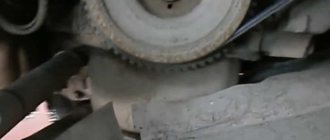
The electrical manifold kit includes the headlight leveler, several O-ring actuators, and a wiring harness. Let's begin installing the equipment in the interior of the VAZ 2114. First, you need to dismantle the dashboard light switch handle and the hydraulic corrector handle, if available. We take a thin flat screwdriver and pry up the lining with the corrector scale, thereby removing it. Then, using a Phillips screwdriver, unscrew the self-tapping screw securing the light guide for the corrector scale backlight and remove this light guide. We take the 21 socket and unscrew the nut securing the main cylinder of the corrector, to do this we press on its rod and press it into the hole that is on the instrument panel of the VAZ 2114. Open the hood of the car and disconnect the working cylinders of the corrector from the headlight housing, press on the latch and turn the working cylinder the cylinder counterclockwise, thereby freeing it from the fastening, now it can be pulled out from the body. Using side cutters, we cut through the tubes and remove the right cylinder. Using the same actions, we release the left cylinder from its mounting.
To make it more convenient to work, it is recommended to disconnect the battery terminals. We lay the wiring harness blocks of the electric headlight range control of the VAZ 2114 through the seal. We lay the wiring of the corrector along the standard wires of the car. We install the electric corrector into the hole in the headlight housing and connect it to the right and left headlights. Now we go into the car interior and connect the negative wire of the electrical corrector to ground, and connect the supply wire to the wire that supplies voltage to the low beam filament. We connect the electrical corrector wiring harness block to the regulator, and assemble the regulator itself in the reverse order of removal. So, we installed an electric headlight range control on a VAZ 2114 car with our own hands.
next article:
Route (on-board) computer for VAZ 2113, 2114, 2115
If you are the owner of a VAZ 2114 car, you have probably noticed that there is a special socket on the instrument panel for
Rating 0.00 [0 Vote(s)]
Features of restoration of hydraulic correctors for VAZ 2107—2109
As a rule, on cars of the VAZ 2107-2108 series, a manual hydraulic headlight leveler is installed. With it, the driver can manually change the direction of the light flux depending on the load of the car, moving the headlights up or down within small limits.
The design does not provide for repair of the VAZ-2107 headlight hydraulic corrector, therefore, if it fails, it is replaced with a new device. The only thing you can try to do if it is impossible to adjust the angle of the headlights is to adjust the operation of the corrector in the order indicated above.
There are no fundamental differences in the optics adjustment device in the “nine” compared to other models. Therefore, the VAZ-2109 headlight hydraulic corrector is repaired using the replacement method.