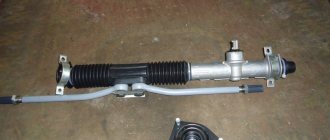
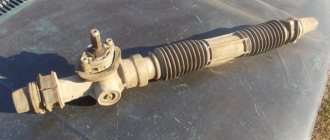
Steering rack VAZ 21099 without power steering
The steering rack on the VAZ21099 is the basis of the steering, it performs the following functions: increases the effort applied to the steering wheel; transmits these forces to the steering drive; ensures spontaneous return of the steering wheel to the middle position (neutral) after removing the load. However, its mechanism causes a lot of trouble for owners of front-wheel drive VAZ models; increased backlashes appear, which are the source of knocking noises, as well as poor vehicle handling. At service stations, some workers recommend changing the rack immediately (the majority of them), others assure that adjustment is enough, and you can still drive and drive. Our instructions will help you figure it out yourself, carry out repairs or replacements yourself, and also save your money.
Pulling and eliminating play in the VAZ 2109 steering rack
The causes of play or knocking can be:
- loosening of the steering rack;
- natural wear and tear of the transmission pair;
- wear of ball joints of steering rods and so on.
I warn you that tightening the steering rack may not solve the problem with play. Only an autopsy can show the degree of wear of parts. But you should always start with the simple, i.e. with braces.
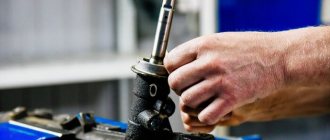
What will you need? Special key - available in many auto parts stores. I got mine for 55 rubles.
Next, open the hood and get to the adjusting screw at the bottom of the rack.
We remove the rubber plug/plug and, without fanaticism, try to tighten the adjusting screw a little (half a turn was enough for me). At the same time we pull the steering rod. We seize the moment when the bullshit disappears. Next, you should take a ride and make sure that the steering wheel is light and returns from a turn to a straight position.
It's a bit tight - loosen the screw a little. As a rule, the first tightening of the rack helps to get rid of knocking and play.
Of course, major repairs are not necessary in every case, and replacement of component parts is also not always necessary, because:
- On the VAZ 2109, the steering rack is adjustable, and if you know how to tighten the steering rack mechanism, then you can remove steering knocks without any financial investment at all
- This is possible, of course, if the knocking is caused by operational or factory control play
- To adjust, you should use a trestle or inspection hole, find the adjusting nut under a layer of dirt, then use a special wrench “17” to tighten it
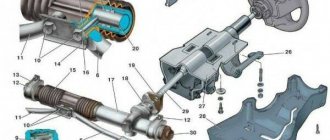
Features and device
Let's start studying the mechanism with its structure (photo below).
Front-wheel drive steering device of a VAZ car
This type of mechanism is the most common installed on passenger cars:
- The rack and pinion mechanism includes the steering rack and pinion
- The gear is located on the steering wheel shaft and is constantly in mesh with the rack.
The mechanism works as follows:
- When you turn the steering wheel, the rack moves left or right
- Together with the rack, the steering rods screwed to it move, they turn the steered (front) wheels
Distinctive features of this mechanism are:
- Simplicity of the device
- High efficiency
- High rigidity
- Tendency to vibration
- Increased sensitivity to impacts (shock loads) that arise from uneven road surfaces
This type of mechanism is installed only on front-wheel drive vehicles that have independent suspension of the front (steered) wheels.
Removing the steering rack
To remove the steering mechanism you will need an inspection pit or a lift. Once under the car, you need to unsplit the steering pin nuts and knock the pins out of the steering arms.
After this, you need to unscrew the spline joint locking bolt located in the pedal area. Also remove the plastic casing that covers the steering shaft. After this, using a 13mm socket, unscrew a pair of nuts on each side that press the steering mechanism to the car body.
Carefully remove the brackets securing the steering mechanism. After this, we disconnect the drive gear from the steering shaft and lift the right side of the car with a jack, and then pull out the steering mechanism of the car through the window in the wheel well.
Operating principle and design of the steering rack
The steering column in the VAZ 2109 car has a simple design, including:
- a gear rack with two threaded holes for fastening the internal rod ends;
- drive gear with a splined shaft for connection to the steering clutch;
- support half rings creating smooth sliding;
- a stop mechanism that regulates the required design clearance of the gear pair;
- a crankcase into which the parts are assembled and fixedly attached to the car body;
- sealing elements and protection against dust and dirt.
VAZ 2109 steering rack diagram
The feasibility of installing EUR and power steering
Does it make sense to install an electric or hydraulic booster on your car? The only, but most important thing that such an installation can provide is to provide more comfortable driving. But you need to take into account that installing such a system is a rather complicated task that not everyone can cope with. At the same time, its cost is quite high, and if you cannot install the unit yourself, you will also have to pay a substantial amount for installation
Therefore, you need to decide whether it is profitable for you to install an amplifier from an economic point of view (video author - Gennady Martynyuk)
At the same time, its cost is quite high, and if you cannot install the unit yourself, you will also have to pay a substantial amount for installation. Therefore, you need to decide whether it is profitable for you to install an amplifier from an economic point of view (the author of the video is Gennady Martynyuk).
Tools and procedure
The steering rack must be tightened using the following tools:
- 10mm socket wrench or ratchet head;
- wrench head 13 with extension and wrench;
- a universal key that can tighten all structures with the necessary force.
To get to this element of the car mechanism, you need to remove the battery and remove its fastening elements. The sequence for tightening the steering rack is as follows:
- dismantling the battery. The power wires are removed from the vehicle's power source, after which the bolts or screws securing the device are unscrewed and the battery is removed from the installation site;
- Removing the battery mounting structures. The platform or brackets on which the battery was previously held are also unscrewed and removed;
- removing the plug on the steering rack nut. By touch it is not difficult to find the desired nut, which may be covered with a rubber plug. After removing the plug, you should start tightening the nut.
The steering mechanism in the VAZ-2110 model is tightened counterclockwise in the following sequence:
the nut is tightened counterclockwise until it stops, after which it is loosened a couple of notches - 24 degrees, which ensures minimal play (0.12 mm) between the nut and the rack; the play is checked - there should be no jamming or knocking between the rack and the nut; after this, the crankcase thread is cored or crushed (please note that the nut should not be damaged), and the fixation point is marked with paint to indicate in what position the nut should be in relation to the crankcase.
Correct adjustment of the steering column will help get rid of extraneous knocks, and the steering wheel should return to its original state on its own after each turn.
It is worth paying attention that excessive tightening of the steering rack nut can lead to the steering wheel biting in its extreme positions and the need to apply some effort to continue to fully control the car.
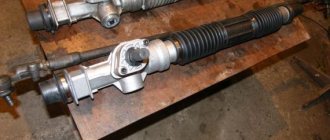
Disassembly procedure, video
When the play has been eliminated, but the knocking has not disappeared, you will have to overhaul the unit. You can disassemble the rack yourself without much difficulty, you just need to follow the sequence of all actions. As a result, you should get the following number of individual elements:
First of all, the rail itself is dismantled and fixed in a vice. After this, the fastening clamps of the protective caps, boot, support located on the right side and the spacer ring are dismantled:
Next, all other parts are removed sequentially and the bearing is pressed out. For this event you will need a special key:
The parts are thoroughly cleaned of accumulated dirt, then it is recommended to wash them with kerosene. After finishing cleaning, each element should be carefully inspected for any damage. All worn out and damaged parts must be replaced. Particular attention is paid to bearings - they are replaced with new ones if there is the slightest doubt about their performance. Remember that tightening the rack does not cause any difficulties, but not every driver can disassemble or replace the rack. If you do not have special skills on how to remove the rack, there is no free time or opportunity for this, there is a high probability of damaging the VAZ 2109 steering rack mount - contact an auto repair service. But at the same time, be prepared for the fact that you will have to pay for the services provided, and in each case - different amounts. But if you decide to do all the work yourself, we recommend preparing the following tools:
a special 24 mm internal octagon with an 18.5 mm hole in the middle;
- 17 mm octagonal key;
- release for ball joint;
- bearing puller;
- needle bearing removal wrench (if available);
- needle nose pliers to remove the retaining rings from the bearing;
- bench vice;
- lubricant
All this will greatly facilitate your work on repairing the steering rack.
Replacing the steering column of a VAZ 2107
Replacing a steering column is a rather difficult task, but it can be done independently if you have some experience in car repair. You will need the following tools:
- Wrenches 17 (socket and open-end).
- Socket heads for 17 and 30.
- Handle with ratchet.
- Mount.
- Hammer.
- Collar.
The column is removed in the following order:
- Disconnect the battery.
- Remove the steering wheel.
- Remove the steering shaft housing.
- Remove the wire block from the ignition switch.
- Remove the ignition switch.
- Remove the steering column switches.
- Remove the steering shaft clamped in the column.
- Using a 30mm socket and a powerful wrench, unscrew the steering column mounting nut. The tightening force here is significant, so the knob must be a fairly long lever. If you can’t unscrew it, you can lengthen the knob by putting a piece of pipe on it.
- Unscrew the 3 bolts securing the column to the body. The procedure is not easy - the distance between the parts and the body is too small, the bolts are difficult to keep from turning. A handle with a ratchet will come in handy here, which will speed up the process.
- Remove the column from the shaft. To do this, you need to knock the column off the tie rod splines using a pry bar. This must be done in jerks, resting your feet on the body.
- Unscrew and remove the shaft seal installed at the bottom of the column.
After dismantling the old column, it is necessary to clean the seat from dirt. Before installing a new column, you should check the condition of its hinge joints and needle bearings. If everything is in order, you can begin installation, which is done in the reverse order of removal.
When installing a new VAZ 2107 steering column, you must pay special attention to ensure that all fastening bolts and nuts are well tightened. Considering how important this unit is for driving a car, play, and even more so, slippage of the steering column splines can lead to tragic consequences
When installing the steering wheel, pay attention to the position of its spokes. After completing the installation of parts and connecting the wire block to the ignition switch, you can connect the battery
Column replacement completed
After completing the installation of parts and connecting the wire block to the ignition switch, you can connect the battery. Column replacement is complete.
Removing the steering rack from the car
If you have some repair skills, if there are instructions, it is quite possible to repair the rack yourself. To do this, you will need, in addition to a new repair kit and a standard set of motorist tools, some additional devices and tools:
- special internal octagon 24 mm. with a hole in the middle with a diameter of 18.5 mm;
- octagon 17 mm;
- ball joint puller;
- preferably a ball bearing puller;
- preferably a wrench for removing the needle bearing;
- needle nose pliers for removing the bearing retaining ring;
- preferably a bench vice;
- grease "Fiol-1", most suitable in cold weather, as it has higher fluidity, or "Litol-24" and the like.
Those devices that it is desirable to have will greatly facilitate disassembly; you can do without them, although this will complicate the work. So:
- It is advisable to pre-clean the rack and tie rods with tips using high-pressure water jets.
- A VAZ 2109 car, the rack of which is planned to be repaired, must be placed on a site with dimensions that provide free access to the front wheels and the engine compartment.
- Apply the handbrake and additionally support the rear wheels, set the front wheels straight. It is enough to jack up the front wheels until they sag, place reliable supports for safety, unscrew the fastening nuts and remove the right wheel.
- To provide access through the engine compartment, you need to remove the air filter and disconnect the battery.
Attention: To fold the parts and fasteners to be removed, you need to prepare a clean box.
- The first step inside the cabin between the pedals is to unscrew the locking bolt by two turns, tightening the steering coupling on the splined shank of the gear shaft.
Attention: If the clutch does not open, you need to loosen the splines by gently tapping with a hammer. By the way, all stages must first be studied from the photo, this will ensure the correct sequence and speed up the repair.
Then the tie rod ends are removed.
- To do this, use pliers to straighten the bent end of the cotter pins of the tips, pull out the cotter pins (they can be reused), using a 19 mm spanner. unscrew the nuts and use a puller to squeeze the ball joints out of the swing arms of the suspension struts.
- The protective casing is removed through the engine compartment, which is secured with three nuts with washers and engravers. Head 13 mm. unscrew two self-locking nuts holding the bracket securing the steering rack housing to the car body, and remove the bracket.
Attention: It is advisable to replace the nuts with new ones during assembly.
- The same operation is performed from the outside on the right wheel side to remove the second fastening bracket. Now you can remove the drive gear shaft from the steering coupling splines and pull the steering rack with the rods outward.
Work technology
Now let's get to work.
ATTENTION: Wait until the engine has completely cooled down; under no circumstances begin repair work when the engine has not cooled down.
- First of all, remove the heat protection, which is held on by three nuts.
- To unscrew the tie rods, you will have to arm yourself with a combat arsenal - a hammer, pliers and a screwdriver.
- Now, taking the key 22, we turn the bolts and pull the rods out of the rack.
- Next, you will need another key, size 13, with which we remove the clamps securing the rail to the entire structure.
- To dismantle, you will need the smallest key of 10. They need to unscrew the absorber.
- Usually a clogged boot is difficult to remove, so you can help yourself with key 13. Unscrew the rack a little and remove the boot.
- The steering mechanism faces such a serious test of strength every day as road dust. Therefore, when you dismantle the rack, clean it thoroughly and treat it with lubricant so that when installing a new boot you do not tear it.
IMPORTANT! Replacing the steering rack boot of a VAZ 2109 is a simple job, but the most important step is the final stage - installation of a new part. The main thing here is not to twist or deform the boot.
Now that the part is ready for installation, take the bolts and screw them into place, but under no circumstances turn the steering wheel at this moment, since otherwise the operation of the entire system will be disrupted. The bolts are tightened with a 22 key. Next, installation is carried out in reverse dismantling is in order. The steering rack repair is completed. Good journey and fair wind!
Have you ever heard knocking noises from the steering wheel when driving on gravel or broken roads? If so, then the steering rack was most likely the cause. It gets loose quite quickly and on all front-wheel drive cars, including VAZ 2109-2108, it sometimes has to be tightened. If the tightening does not help, then repair or replacement can be done. In this article I will talk about the second option, that is, the complete replacement of this mechanism.
Adjustment methods
The control rack can be adjusted in 2 ways.
Adjustment method
Peculiarities
If the rack is removed and adjusted, in most cases we are talking about repair, in other words, replacing the unit with a new one. It is recommended to carry out similar settings only in almost all situations
Without dismantling the unit
This adjustment method is vital if you need to tighten the rack a little, remove free play, and get rid of knocking. It is possible to do without dismantling work, in other words, set up the mechanism specifically on the car
Do-it-yourself Audi 80 steering rack repair.
Lada 2109 › Logbook › Experience in replacing the steering rack of a VAZ 2109
It all started with a knock on the rack. I think I’ll pull it up and everything will pass, but that’s not the case. There was nowhere else to tighten it, and the boot was torn (when the devil knows). The decision was made to buy a new rack.
The choice fell on Pilenga SR-P-1141. Since I did not find adequate reviews on slats. How many people have so many opinions? Well, they praise the SS-20, but the green creature did not give me peace and I could not strangle it)))
The rack was purchased for
2400 without traction. But as always, we live in Russia and I’m a fool and didn’t pay attention. They sold me the SR-P-1141 rail, and gave me the SR-P-1142 - which is for the 10th family. I only noticed it when I took mine off. Thanks to Loond for promptly coming to my garage and we went and exchanged the rack for the right one (inserting the nth to the sellers).
Since this was my first experience, I read a lot of information on replacement. I consulted some repairmen I knew - the whole mess of replacement came down to breaking off the rack mounting pins.
Having figured that the option of breaking the studs did not suit me very much, since I had already broken the stud (i.e. bolt) of the stabilizer bar fastening that weekend, it was decided to start preparing the studs for unscrewing on Wednesday.
I purchased a new can of WD-40 and every day (Wednesday, Thursday, Friday) after work I sprayed it on the nuts and studs of the rack mounting.
The hour has come. I'm in the garage, the hood is open, the left wheel is removed, the key for 10 and 13 is in my hands. First of all, we unscrew the 3 nuts securing the thermal protection (or xs as it is correctly called) two from the top and one from the bottom, the nuts on 10 - go wild.
How I did it (I forgot about them and didn’t treat them with a wedge, like the studs for fastening the rack), spray WD-40, wait 10-15 minutes. Next, with a little effort we try to unscrew the nut (slowly), it gave way, we turn it further, no, we wait and spray some more. Next, if the nut comes into tension, we begin to tighten it and unscrew it - the rust falls apart, the nut goes easier and do not forget to spray WD-40 or whatever you have (by the way, acetic acid or brake fluid is not bad - but wait longer and the smell is not pleasant in case with the Criminal Code).
Unscrewed the nuts. We remove the protection. Now we need to remove the bolts securing the steering rods to the rack (since I did not change the ends and the rods, I did not remove them). Disrupting them is not an easy task. You need a 22 mm wrench and a screwdriver since the bolts are locked with a bent plate. We bend the plate. We tear off the bolts. I had to hang from the key.
Unscrew the rack fastening nuts. They went well for me. From time to time he splashed the vedeshka and twisted it in front of the back. Cleaned the studs with a wire brush.
Next stage. We climb into the cabin to the pedals. There the steering shaft is connected to the rack. We unscrew the bolt to 13. I didn’t take a photo, but I’ll show you from Murzilka.
That's it, the rail is almost removed. You won't be able to rip it off the slots with your hands. I suffered for about 2 hours. But in the end the idea came to move the slots slightly apart at the place where they are fastened with a bolt. There you will understand exactly where. Here you need to drive (naturally, as parallel to the shaft as possible) a sharp chisel. Then the rail will be removed with one movement of the assembly. And it will be easier to dress.
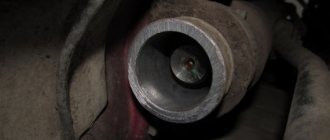
We pull out the rack on the driver's side through the hole behind the wheel. I removed the wheel. I removed the rack. And what I saw.
You can drive the rack back into the shaft with a hammer... By knocking on the place where the nut was at 13. Well, you will understand.
I hope I helped those who were planning to change the rake but were afraid
Slowly and carefully, everything changes well (if you tighten the nuts, don’t pull too hard, you might break it). Experience is priceless
Time wasted - a day. Drank 1.5 liters of beer
Experience is priceless. Time wasted - a day. Drank 1.5 liters of beer.
Now I’ll step back a little from the topic of replacing the rack and talk about the experience of replacing the anti-roll bar.
Anyone who has read and knows that by unscrewing or tightening the stub mounting nuts, you can break off the studs. But in fact, there are not studs, but bolts with their heads welded to the spar. So here's what you need to do if the pin breaks off.
1. Don’t panic and don’t listen to those who say to get drilled from inside.2. We find in the garage/buy/steal (just kidding)/ask a neighbor for a M8x1.5 tap and a 6.9+-0.1 mm drill. I had it at 6.8mm.3. Use a drill to drill out the remaining studs (bolts). We drill naturally through (the bolt). 4. Take a tap and cut the thread5. Take a bolt M8x1.5 and a locknut6. We tighten it and get the thickness of the spar and the bolt blade to be enough to hold the stub well.
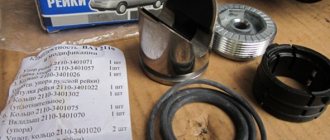
Repair
The first thing you will need to carry out your own repairs is a repair kit. They are available at almost any auto parts store. However, we strongly recommend that you buy only high-quality kits so that the result of your DIY repair lasts as long as possible.
What you need for work
The proposed kits are incomplete and complete. You will definitely need the following kit components:
- Needle bearing;
- A pair of rubber seals for the bushing;
- Support sleeve made of plastic;
- Set of gaskets;
- Spring;
- Retaining rings;
- Support bearing;
- Drive gear;
- Boot cover;
- Rail;
- Set of ties for the boot.
Repair kit Now that the kit is ready, the tools are available, and there is enough free time, you can get to work.
- First, remove the boot, end caps and stops. As you disassemble elements, even the smallest and insignificant at first glance, be sure to evaluate their current condition. If necessary, all worn-out elements will be replaced with new ones taken from the repair kit.
- Using an octagon, unscrew the screw plugs, which will allow you to remove the springs, retaining rings, and thrust bushings.
- Remove the bearing and check if it has any play. The repair kit includes a new bearing, so if the old component is in satisfactory condition, it is better to replace it immediately. It’s not for nothing that you took on such a complex process to get everything done 50%.
- Remove and inspect the drive gear. Next, you can completely remove the rail itself.
- Be sure to replace the support shaft bushing, not forgetting about the rubber bands. They are also included in the kit.
- Take your time to remove the rubber bands from the sleeve. First, insert the element into the crankcase, after which you can cut off the elastic with scissors or a sharp knife.
- The most difficult step is replacing the needle bearing. To remove it, you will need a special key. But you can do without it. In this case, arm yourself with a 1.5 mm drill bit and a drill. Using a drill, make a hole in such a way as to loosen the end of the bearing. Use a punch to knock out the old bearing from the crankcase.
- Before installing the new needle bearing, be sure to thoroughly clean the steering rack housing of accumulated debris and steel shavings from drilling.
- The hole made cannot be left. To eliminate it, you can mix metal filings with superglue. This mixture will harden quickly and give an excellent result.
- Lubricate literally everything that can be lubricated in the steering rack assembly. Experts advise using Litol 24 or other lubricants of similar quality. It wouldn't hurt to lubricate the CV joints.
- Reassemble the unit by following the reverse sequence of dismantling.
If you don’t have a key to remove the needle, repairing the steering rack yourself allows you to significantly save on replacement, plus gain a lot of experience in performing far from the simplest work related to your VAZ 2109. But you can do it easier, without taking any risks, by contacting a trusted car service center.
Checking status
Having completed the repair, you should not think that now the steering rack will serve tens of thousands of kilometers and will no longer cause you trouble. Like many other components, the condition of the rack must be periodically monitored.
What to look for
Your actions
Mounting nuts and bolts
These fasteners are subject to vibration after repair as they are used. Therefore, it is recommended to check and tighten them every 250-300 kilometers.
You can check it a little less often, approximately every 500-1000 kilometers, depending on the operating conditions of your car. Due to different quality, some anthers can last quite a long time, while others will require replacement after 10 thousand kilometers. The choice is yours which parts to use
The rack itself should be constantly monitored
Listen to the behavior of the steering mechanism, pay attention to the above signs of malfunction. As part of a scheduled technical inspection, be sure to include a check of the steering racks in the list of activities.
The repair cannot be called complicated, but it takes a lot of time
Plus, it is extremely important to perform all operations as carefully and efficiently as possible. Otherwise, the result will not last long and you will soon have to interfere with the design of the VAZ 2109 steering unit again
Steering mechanism repair
It will be easy to repair the steering mechanism yourself if you follow the recommendations of our material:
- We clamp the mechanism in a vice and clean it with a metal brush, then treat it with Whitespirit and a rag
- As soon as the case shines like new, unscrew the mustache bolts
- We recommend checking the condition of the silent blocks first.
- If play, rubber cracks or other defects are detected, we replace them
- We bend the plate that locks the bolts using a hammer and chisel, unscrew the bolts and remove the mustache
- We tighten the plugs from both ends of the rail
- Then remove the shaft rubber bands and the cover. The cover can be thrown away immediately, the remaining elements must be thoroughly washed and dried, but not in the sun
- Remove the bearing lock washer and pry it off with a screwdriver
- We unscrew the nut with a special wrench prepared in advance, and under it we find a bearing
- We tighten our splined shaft in a vice. It is advisable to place soft pads on the jaws of the vice so as not to damage the shaft
- Gently tap the housing with a hammer until the bearing comes out
- The shaft, gears and other parts will easily follow.
- We thoroughly wash all removed elements with White Spirit using a brush.
- Finding a bearing of this exact type will be very problematic, since it is non-standard, so you should carefully wash it and save it
- If you still need to remove it, use a special puller
- We recommend not touching it unless absolutely necessary, since it functions quite well for a long time
- Shake the rack out of the housing and wash it with White Spirit. Then dry it and lubricate it
- Through the hole located in the housing, carefully remove the plastic insert and unscrew the clamping nut
- Often this action is very difficult, know that the repair kit contains a new one if you are afraid of damaging this
- Replace the seal rings, don’t forget to shake out the stop first
- We carefully examine the mustache, the tips should not play, the fingers should move with some effort, the protective covers should not contain cracks or other defects
- If you notice that any part (or several) has defects or incorrect operation, be sure to rinse the part and dry it
- If this does not help, we replace the part, but try to preserve as much as possible
- lever length
- To protect against the effects of corrosion, at this stage we recommend treating the threads with Movil
- Next we'll work on the hinges.
- We install new hinges if there is anything you don’t like about their operation or seems suspicious
- We insert a new plastic bushing into the body, its protrusions must certainly be directed into the holes. Cutting off the elastic bands
- Insert the rack from the gear side
- The approximate distance from the rack body to the end should be about 28 millimeters
- The rail itself should not stick out
- The bearing must be pressed all the way with the gear together.
- We clamp the shaft together with the housing in a vice
- Then you won't have to put in a lot of physical effort.
- Orient the rack along the gear
- Insert the stop, then the nut and spring
- Install a new rubber ring on the shaft side and screw on another nut
- We put on the cover and counter washer, align the marks
- Then we put on the rubber ring along with the cover and tighten the plastic clamps tightly
- Installing the mustache. We tighten them with great effort, bend the locking plate
- Attach rubber plugs
- Carefully drag the assembled unit into the engine compartment
- We put the rail in place, put on the clamps, tighten the nuts and don’t forget about the washers
- Further installation is easier to perform with a partner (assistant).
- We align the end of the steering shaft from the interior so that it coincides with the gear shaft
- Be sure to pay attention to the flat on the shaft, into which the coupling bolt must go (otherwise you will not insert it)
- Fit it, gently tap the coupling with a hammer, push it in deeper
- The sound of the signal in our case can serve as a criterion for correct installation
- Until the signal sounds, we continue to work with a hammer
- The signal has started working - we can assume that the steering unit is ready for use
- Insert the coupling bolt into the ears and clamp tightly
- We insert the fingers of the mustache into the levers and tighten the nuts, do not forget to tighten them
- We take self-locking nuts and tighten the slats on the clamps, treat the clamp studs with Movil
- We fasten the wheels and remove the car from the jack and stands
Functionality check
From time to time it is necessary to inspect the steering. Where is the best place to start? Be sure to study the condition of the rods, their tightness, and do not forget about the protective cover. Have you noticed cracks or other damage that makes the device leaky? Change it.
You should check whether the steering wheel spoke is in a horizontal plane when the car wheels are in a straight position. If even a slight deviation is observed, it is necessary to identify the cause of the malfunction and eliminate it before it develops into a dangerous problem.
To make sure that the car's steering is working properly, you need to turn the steering wheel all the way clockwise and counterclockwise. In this case, there should be no sounds or jamming. The steering wheel must be firmly and reliably fixed; gaps in the hinges and other parts are unacceptable. Check whether the bolts and nuts of the fastenings are fully tightened.
If something goes wrong when checking the controls, knocking or other problems appear, remove the suspension control rods and check the condition of the steering mechanism again. This will make sure that knocking and malfunctions are caused by malfunctions of the steering wheel, and not by other reasons, of which there may be many.
Steering wheel adjustment
It is also important to make adjustments. We advise you to use the following rules for proper rack setup:
- When checking the operation of the mechanism, eliminate vertical play in the rods; it should correspond to 15 degrees.
- Steering should be soft and light. Jamming occurs due to improper installation of the steering rack.
- Do not forget to make the next adjustment after 700 kilometers to avoid any serious problems with the steering.
Ball joints are a fragile, fragile part, and they often fail. But there is a very effective way to extend its service life - you sometimes need to pierce the anthers with a syringe and inject one cube of lubricant used for the transmission there. The puncture is small, so there will be no deformation of the part; the hole will immediately be covered with layers of rubber.
The steering rack causes a lot of trouble for owners of front-wheel drive VAZs; often increased play in it is the source of constant knocking and poor vehicle handling. Typical malfunctions of the steering rack without power steering on VAZ cars (2108, 2109, 21099, 2110, 2111, 2112,2113,2114,2115, Kalina, Priora) are:
- knocking noise when driving (mainly on the right side);
- increased play in the steering wheel (as a result, the car wobbles at speed, the inability to set wheel alignment, the car pulls to the side);
- “biting” of the steering shaft (difficulty with control, the likelihood of the steering wheel jamming while driving);
- wear of the internal parts of the rack and so on;
There are several options for fixing the problem with the steering rack:
- adjustment;
- Repair kit replacement;
- replacement of the entire assembly;
The adjustment allows you to eliminate the backlash and restore the rack's functionality for a while. If the internal shafts are heavily worn, the adjustment cannot remove the play (“stiff steering wheel”), and it is necessary to change the belt kit. The entire steering rack is usually replaced when the body is deformed or damaged.
Advantages and disadvantages of DIY assembly
At first glance, there is nothing complicated in such work:
You can save money by purchasing only a repair kit and lubricant, the cost of which is quite reasonable. And at the service you will have to pay for the services of the master. And if the contractor is not entirely honest, then the parts may not be completely new, which will quickly necessitate a second repair. But there are also disadvantages that can affect the operation of the machine immediately or after a short operating period. To avoid mistakes in operation, you should carefully watch the video on how to properly repair the steering rack.
If you notice signs of a faulty steering rack, this does not always mean that a complete replacement of this unit is necessary. In some cases, repairs are sufficient. Stores sell special kits for this. Let's figure out in what cases it is necessary to repair the VAZ-2109 steering rack.
Steering rack bulkhead
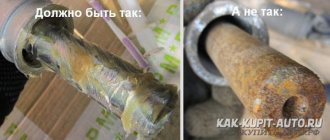
1. Using side cutters or any other suitable tool, cut off the plastic clamps on the sides of the protective casing.
After this, the casing can be easily removed. We inspect it for damage. The presence of tears or cracks is unacceptable, since water and dust enter the rack and pinion mechanism through them.
2. The side protective caps are also secured with plastic clamps. After cutting the clamp, the caps can be easily pulled off. They are visually inspected for damage.
3. It would not be superfluous to check the steering rack for wear in the gear-river pair. To do this, hold the rail with your hand at the place where the rods are attached and try to rotate the mechanism shaft left and right. The presence of play may indicate wear or incorrect adjustment in this unit.
4. For further work you will need a specialized key for VAZ cars. It is usually sold as a dual-use device: on one side there is an octagon for adjusting the rack or unscrewing the adjusting screw, and on the other side for tensioning the timing roller.
If this key is not available, then you can use any suitable octagon.
If the steering rack has not been adjusted or disassembled, it is quite difficult to turn the adjusting screw for the first time. In the factory conditions, after adjustment, this screw is cored.
5. After unscrewing, remove the sealing and retaining rings, the spring and the stop. The stop is one of two points of support for the rack itself in the body. Therefore, the performance of the entire mechanism directly depends on its condition.
The working surface must be smooth, without burrs or other damage. The sealing ring should also not be damaged.
6. To further disassemble the steering rack, it is necessary to remove the steering gear boot. It fits tightly on the body; there are no special fastenings. We also inspect it for cracks or any other damage.
7. Remove the lock washer. Unscrew the bearing nut. To do this you will need a special octagonal key.
- Then remove the O-ring and washer.
- Next, you need to remove the steering shaft. It is not set very tightly, so a little effort is enough.
- The condition of the ball bearing is checked.
- If the bearing is worn, it must be replaced. It fits tightly onto the shaft.
- The old one can be knocked off using a tool or by carefully hitting the outer ring with a hammer.
- Press the new one through a tubular adapter in a vice or on a press.
- It is not recommended to hammer a new bearing, as this will negatively affect its service life.
8. Remove the support needle bearing. To do this, use a screwdriver or an awl to carefully lift it and pull it out of its seat. If it also shows signs of wear, place a new bearing in the groove.
9. Take out the rail itself. After disassembling the steering mechanism and removing the stop, it easily comes out of the housing. Here it needs to be cleaned of any remaining old grease and carefully inspected.
The teeth should not have chips or other damage. There should be no burrs or areas where metal-to-metal friction occurred on the rack shaft itself. If such defects are present, the steering rack needs to be replaced.
There are options for grinding the shaft, but not all car repair shops undertake this. And the economic feasibility of this procedure is questionable.
10. The bushing is dismantled. To remove it, you must first move it from its seat. Using a flat-head screwdriver, hook it onto the edge from one of the edges of the case and apply light pressure until it detaches from the mounting groove.
After this, the bushing can be carefully crumpled in the body and pulled out through the hole for attaching the rods.
The bushing is one of the weakest points in the steering rack design. Plastic material wears out more intensively than metal, and backlashes appear.
11. Replacing the steering rack bushing begins with installing rings on the new bushing. After this, the sleeve is pushed through the side hole into the body until it rests against the locking lip.
Next, use a screwdriver to carefully twist the bushing through the hole for attaching the rods until it is installed in its working position. Most often, the steering rack knocks precisely because of a broken bushing. 12
After disassembly, all elements are washed in solvent or any other liquid composition for washing oily parts
12. After disassembly, all elements are washed in a solvent or any other liquid composition to wash oily parts.
When using a repair kit, it is better to replace all elements rather than individual parts. Assembly is carried out in reverse order.
Let's look at the rack diagram and repair options
There are three repair methods:
- Complete replacement of the rack (if you don’t have much time to tinker and you’re happy with the price, or the mechanism is not suitable for repair)
- Replacing parts from the repair kit (here you will have to tinker, remove the mechanism, disassemble and reassemble)
- An alternative to repair and the fastest way is to tighten the nut on the steering rack using a special wrench
This method gives a positive effect (just not always and not for long), but can have bad consequences. For example, if you tighten the nut too much, then the force required to rotate the steering wheel will increase, which makes it more difficult to control the car. More serious consequences are the steering wheel jamming while the car is moving; losing control, especially at speed, is extremely dangerous for you and others
Necessary materials and tools
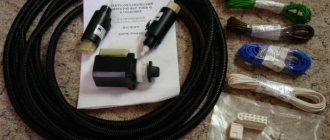
Replacing the steering rack of a VAZ 21093 - 2199 requires the necessary materials:
- Aerosol "Movil"
- Clean rags
- Plastic clamps 200 mm long and 4 mm wide (three pieces)
- Penetrating lubricant WD-40 (“liquid wrench”) to unscrew rusted and soured connections
- Liter of white - spirit
- FEOL type bearing grease or something similar
The following spare parts will also be required for repairs:
- Silent blocks (see Replacing silent blocks on a VAZ: we do it ourselves)
- Reiki cover
- Tips
- Special kit (repair kit) for repair
Replacing the steering rack on a VAZ 21093 - 2109 will require the following tools:
- Tip puller
- Hammer
- Socket heads
- A special key for the rack (it fits onto the pressure nut and has an internal octagon)
- Ratchet wrench extension
- A special wrench for unscrewing the bearing nut (octagonal rod at “24” with a recess)
- Metal brush
- Narrow tassel
Advice: Before starting the procedure for replacing the steering rack on a VAZ 2109, you need to process in advance (a day before) all connections with a “liquid wrench” (tip threads, four nuts securing the rack, a stop tightening nut). Then, after one and a half to two hours, repeat the treatment of all places and after a day you can begin the procedure.
Sequence of replacement and repair
To quickly and easily replace the rail, follow the procedure as stated in the instructions:
- We roll the car into a pit (inspection ditch)
- We put chocks under the rear wheels, tighten the handbrake (parking brake), and lock the steering wheel.
- Disconnect the power; to do this, remove both terminals from the battery.
- We put the car on a jack and remove the front wheels (it is advisable to put the car on supports (props in the form of wooden blocks).
- Unscrew the nuts of the tips and remove the fingers from the levers
- In this case, you will definitely need a finger puller - apply it, tighten the screw until it stops and hit the lever with a hammer, hold the puller screw with a wrench
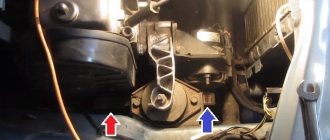
- Now that both rods are free, unscrew the clamp nuts (in the photo below the nut is indicated by an arrow)
- Inside the cabin, near the floor, unscrew the bolt on the steering shaft
- Then pull the bar towards you with a rocking motion
- The gear shank often does not immediately detach from the shaft, you will have to tinker
- Having disconnected the rack, pull out the unit through the right hole on the wheel side
Signs of breakdown
By studying the signs of malfunctions in the design of the steering rack, you will be able to promptly identify the breakdown and take appropriate action to eliminate it.
The symptoms below may indicate not only a damaged rack, but also problems with the steering column, ball joints or linkages. Therefore, be careful.
Symptom of malfunction
Peculiarities
Increases free play of the steering wheel
This indicates that the gear sector has worn out due to dirt and dust getting into it. Or the gap between the rack stops and the rack itself has increased. Therefore, the engagement of the rack with the gear decreases. Plus, such a sign may indicate wear on the silent blocks of the rods or weak fastening of the supports in the steering knuckle
Noisy or knocking noises near the steering unit
Most likely, a gap has formed between the rack and the stop, or the plastic bushings have worn out. A knock is also a sign of wear on the traction silent blocks, ball joints, or loosening of the gear shaft to the column shaft.
Steering wheel turns hard
Here we can talk about possible damage to the steering rack bushing and a violation of the integrity of the gear shaft bearing. But you shouldn’t rule out the possibility of damage to the ball joint or strut bearings.
Having determined the presence of signs of malfunctions, it is important to understand what exactly caused them to appear. Node diagram
Node diagram
Symptoms of a problem
Using the steering rack, the driver's commands are transmitted to the swing arms, which control the wheels using the front rods. Repairs should be carried out if you notice the following signs:
- grinding noise in the steering wheel area;
- steering play;
- lubricant leakage through the seal;
- The steering wheel locks periodically.
Such problems lead to the fact that driving becomes dangerous. First, you will need to carry out diagnostics, and after detecting a malfunction, repair the damaged unit. The symptoms listed may be signs of other problems with the steering mechanism, but most often the fault lies in the rack.
How to extend the life of a steering rack
There are a few simple rules that will help extend the life of the steering rack of any car.
Firstly, you need to give up reckless driving through pits, the habit of sharply accelerating and braking at the last moment, since such maneuvers have a detrimental effect on the steering rack. The key to a healthy rack is a smooth driving style.
Secondly, you need to learn how to park correctly. When using a curb as a motion limiter, each blow to the wheel is transmitted to the steering, which gradually becomes unusable.
Thirdly, you should periodically carry out maintenance of the entire mechanism, monitor the reliability of the fastenings and the serviceability of the protective covers. Timely replacement of damaged parts and boots will help extend the service life of the steering rack.
Fourthly, when using a hydraulic steering rack, you need to promptly change the hydraulic fluid in the power steering system, and also not leave the wheels in the inverted position during the winter months, so as not to accelerate the wear of the rack.
Screw puller
This is a more complex device. To make it you will have to use a welding machine. This device itself works by tightening a nut in a cylinder cut off on one side. Thus, the finger is squeezed out of the socket with minimal effort. You can do something like this:
- We find a suitable cylinder; it should be made of metal 2-4 millimeters thick. On one side, you need to cut a strip along the entire length of the cylinder, its thickness should be no more than 3 centimeters;
- Next, a circle of suitable diameter is cut out of a good iron plate. A notch is cut in it. It should coincide with the empty strip of the cylinder. After which, the workpiece is welded to one of the ends of the cylinder;
- We take a fairly thick plate of iron. Preferably at least 5 millimeters. And also cut out a circle from it. A hole (10) is drilled in its middle. It will need to be threaded. We weld the resulting part to the free end of the cylinder;
- All you have to do is screw a suitable bolt into the hole, and the device is ready for use.