To increase safety (so that the driver does not start driving with the door open and for the alarm to work), cars are equipped with open door sensors (popularly “limit switches” or “limit switches”). Their malfunction causes the interior lighting to work incorrectly and prevents the car from being armed. Let's figure out how to check and, if necessary, replace door switches.
Wiring check
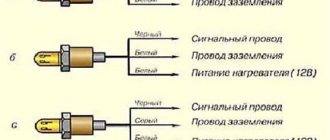
Instructions for cars of the B0 assembly line (XRAY, Largus, Nissan Almera, Renault Duster, Sandero). Remove the limit switch and set the multimeter to voltmeter mode. We measure the voltage at the contacts of the block with the wires:
- If there is no voltage, the circuit of the interior lamp lamp or the lamp itself is faulty.
- if the voltage is significantly less than 12 V, the wire connecting the sensor to ground is probably damaged.
We set the multimeter to ohmmeter mode, connect one probe to ground (body), and the other to the terminal of the block with the black wire. The resistance should be close to zero. If the resistance is high and tends to infinity, the connection between the wire and the body is probably damaged by corrosion or the wire is damaged (treat the connection with a product to protect electrical contacts). If the fault cannot be resolved in this way, it is necessary to remove the interior trim from the pillar, find and fix the fault.
VAZ-2112 harness diagrams
Instrument panel harness diagram
1, 2, 3, 4 – instrument panel harness pads to the front harness; 5 — block of the instrument panel harness to the side door harness; 6, 7, 8 — instrument panel harness pads to the rear harness; 9 – rear window heating switch; 10 – light signaling switch; 11 – windshield wiper switch; 12 – block of the instrument panel harness to the radio; 13 – mounting block; 14 — instrument cluster; 15 – heater control controller; 16 – heater motor switch; 17 — block of the instrument panel harness to the ignition system harness; 18, 19 — blocks of the instrument panel harness to the air supply box harness; 20 — ignition switch; 21 – fog lamp relay; 22 – sound signal relay; 23 — power window relay; 24 — starter relay; 25 – seat heating relay; 26 – external lighting switch; 27 – fog lamp switch; 28 – cigarette lighter; 29 – lampshade lighting of the glove box; 30 – glove box lighting switch; 31 – switch for rear fog lights; 32 – right steering column switch; 33 – socket for connecting a portable lamp; 34 — instrument lighting switch; 35 – brake signal switch; 36 – sound signal switch; 37 – alarm switch; 38 – air distribution drive gearmotor; 39 – VAZ-2112 illuminator; 40 — instrument panel harness block to the front harness; 41 – trunk lock drive switch; 42 – rear fog light relay.
Wiring check
Instructions for cars of the B0 assembly line (XRAY, Largus, Nissan Almera, Renault Duster, Sandero). Remove the limit switch and set the multimeter to voltmeter mode. We measure the voltage at the contacts of the block with the wires:
- If there is no voltage, the circuit of the interior lamp lamp or the lamp itself is faulty.
- if the voltage is significantly less than 12 V, the wire connecting the sensor to ground is probably damaged.
We set the multimeter to ohmmeter mode, connect one probe to ground (body), and the other to the terminal of the block with the black wire. The resistance should be close to zero. If the resistance is high and tends to infinity, the connection between the wire and the body is probably damaged by corrosion or the wire is damaged (treat the connection with a product to protect electrical contacts). If the fault cannot be resolved in this way, it is necessary to remove the interior trim from the pillar, find and fix the fault.
How to install an alarm?
Connecting door switches to the alarm system is not a very complicated procedure. When the door opens, the limit switch closes the black and white wire to ground, and its presence on this wire is a signal that the door is opening. Most alarm systems have such an input and are designated as a “negative door trigger.”
But if your chisel is equipped with an APS-4 immobilizer and an injection engine, then the above procedure will not be enough. In addition, you will need to arm the car after the “polite illumination” of the interior lamp or alarm is extinguished, and enable the “delay arming” function (if available). All the methods described are quite acceptable for use.
Checking the door switch
When the rod is recessed, the contacts are open. First of all, we check the serviceability of the sensors by opening all the car doors one by one.
Check with a multimeter. We connect a multimeter to the limit switch terminals in ohmmeter mode and check the closure of the sensor contacts (the contacts must be closed, the resistance is close to zero). We press the sensor rod and check the measurements (the contacts must be open - the resistance tends to infinity).
Let us remind you that in some cases (for example, in the cold season) limit switches may work intermittently. For Lada Vesta, Grant and Kalina 2 you can use this solution, and for Priora this.
Replacement
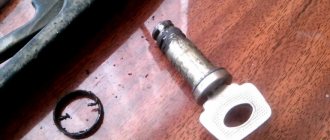
To remove the limit switches, open the doors, then:
- remove the protective cover from the sensor by simply pulling it towards you.
- pry off the limit switch with a screwdriver
- remove the limit switches by snapping off the three latches
- disconnect the block with wires.
On some Lada models (for example, Lada Priora or Niva 4x4), the limit switches are attached to the body with a screw.
On the Lada XRAY the limit switch is located in the door lock and changes along with the lock.
Installation is carried out in reverse order.
If the central locking system does not work
When the central locking opens but does not close the doors, or there are other problems, and the car is equipped with an alarm, the check begins with testing it. If the central locking does not work from its remote control, but works fine from its own or from a button, the reason is the alarm. If this is not the reason, you will have to tinker. A complete failure of the central locking system is characterized by barely audible clicks from the drives; the buttons for manually opening the doors will remain motionless.
In this case, the first thing you need to do is check the fuse leading to the central locking. You should first clarify the central locking circuit, since there may be several fuses. Very often it is at this stage that the repair ends. If one of them fails, you should know that this indicates a short circuit in its circuit, and the check must be carried out taking this into account.
If the fuses are normal, but the back door does not close from the central locking, or simply there are difficulties when operating from the button, you should check the wires suitable to it for integrity and the presence of oxide on the terminals, and the button itself for “sticking”. At the same time, it’s worth checking the activator located in the driver’s door - if it does not receive power or control signals, all other activators also turn out to be inoperative.
Often this is also evidenced by the situation when the driver's door does not close from the central locking or from the key fob. A problem with the power supply often causes the central locking to not lock with the key. In this case, the wires are checked for the presence of electrical impulses, and the quality of contact/integrity of the cables is checked, and lastly, the door switches.
Car alarm connection points for Lada Priora 2011
Ignition switch: + 12V – brown Starter – red IGN – blue/black
Tidy: Tacho signal - brown/red Handbrake - brown/blue (For more details, see Diagram 1)
Connector X3 (See Fig. 1) BCM: Driver's door switch - blue/black Right front door switch - brown Rear door switches - gray/red Trunk switch - yellow/red Opening the trunk (low-current input, possible without a relay, additional channel directly to alarm) – blue/red
Connector X1 (See Figure 1) BCM: Turns – blue, blue/black
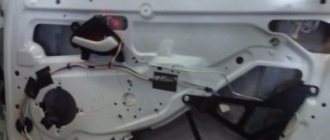
Ts.Z. - brown; The wire is located inside the driver's door, in the harness from the button block. (See Diagram 3 for details)
Hood end cap – white/black; Connector X2-17 (If an engine temperature sensor is used, then according to scheme 2)
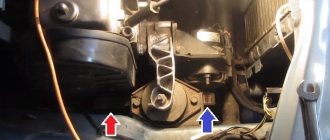
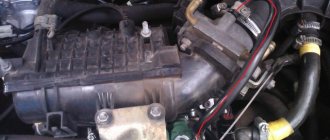
The block is located behind the panel, near the gas pedal. To remove the block, remove the left and right panels, unscrew the two 10mm nuts, left and right, securing the block.
Connection to central locking
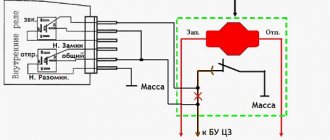
When connecting the central locking (see diagram 3), if you connect only to the brown wire in the driver's door, then all doors will close and only the driver's door will open. To open the remaining doors, you need to use a wire in the alarm for two-step opening of the central locking system, and connect according to the diagram below.
Types of faults
There are a lot of situations and cases when central locks on cars do not work. But it is important to understand exactly what happened and how the malfunction manifests itself. Mostly malfunctions manifest themselves in the form of a refusal to respond to certain commands. Sometimes the system opens completely. Mostly motorists are faced with the following situations:
- the castle behaves unstable;
- partial failure is observed;
- The central locking system does not respond to commands from the key fob;
- the system does not respond to commands from the key.
Each of the presented situations requires separate consideration.
Unstable work
There are cases when the central locks on cars have not stopped working, but their behavior and functioning can be described as unstable. That is, they can work normally when commands are given, but at some point give out unexpected surprises. Basically, instability at work manifests itself as follows:
- When the driver presses the key fob button, incorrect operation of the control unit or module is observed. The block either reacts to commands or completely ignores them and does not execute them. One time everything functions perfectly, no problems arise, but the next time there are failures. When sending commands to the central locking from the remote control, they may or may not be executed;
- When trying to open the door locks, at first the system opens them normally, but after a while it spontaneously locks them again. Although the driver did not give such a command. Locks can behave similarly when receiving a closing command. The doors lock and then unblock themselves;
- When the driver presses the button to open the doors, the control device closes them. And when you try to close the door, the opposite situation occurs, that is, the doors open;
- After pressing the open or close button, only part of the car doors carries out the command. One or more doors do not respond to signals, or perform actions opposite to the command.
Video “Eliminating squeaks”
You can learn how to solve one of the problems associated with the clutch in a car from the video from the author Konstantin Biyanov.
- Features of the phase, detonation and fuel level sensor on VAZ cars
- How to join the number of lucky ones who have cruise control, or how to install an “assistant” on the Lada Vesta and other VAZ models?
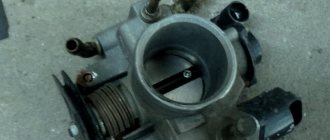
- Do-it-yourself repair of the throttle sensor on VAZ cars
Good evening everyone, nothing interesting happened to the car, and then bam, today it means I’m not touching anyone’s food, I didn’t pay attention to how often I pressed the brake, but suddenly the car begins to slow down to such an extent that it seems that it stalls while driving and then but after 1.5 seconds it starts, I couldn’t believe my eyes, at first I thought the gear was knocked out, when I press the gas at 40 km/h it just doesn’t go, so + besides, there are no revolutions at all! In a panic, I went and refueled (it was 5L at that time), I thought it was petrol, I refueled, I gave it a ***, I accelerated, like normal, I parked the car near the house, I started it an hour later, an error pops up, fortunately I have a friend Lyo with a cable and a program in next door, I rush to him. We do the diagnostics, and here’s the most interesting part:
Having read on the Internet that either the sensor is faulty ****, or the stoppers may burn out and because of this it is tripping, but the stoppers are all burning, the previous ones are intact. Someone also wrote that the sensor may be poorly adjusted, and it works too often when the brake is pressed. They cleared the error, now I’m driving and looking, so far everything is fine, so far there is no desire to change the sensor.
AvtoVAZ recalls 3,994 Lada Granta cars due to problems with brakes
Earlier it was reported that AvtoVAZ suspended sales of almost 7 thousand Lada Granta cars. Now, a recall campaign has started based on this discrepancy. In order to guarantee the consumer properties of Lada Granta cars, dealership centers will carry out work to replace the check valve of the vacuum brake booster (VUT). This is stated in order No. 48-19 dated September 26, 2019. For this purpose, the company's engineers developed a method for replacing this VUT check valve. A source close to the plant reported this to the Lada.Online website.
The document states that if you have a car from the list (you can download it below), it is necessary to carry out work on the territory of the dealership to replace the check valve of the vacuum booster. When carrying out work, follow the methodology. To carry out the above work, AvtoVAZ will notify car owners before October 26 about the need to visit the dealership.
Why does the central locking system not work?
Quite often a situation arises when the central lock cannot be opened with a key or key fob.
As a rule, the problem here is solely due to a faulty relay or due to damaged wiring. If the key normally opens the central locking system, but the key fob does not, then most likely the battery in the latter is simply dead or its button needs to be cleaned. Experienced specialists note that in their practice, signal receiver or transmitter failures have occurred extremely rarely. You can check it simply - just use a spare remote control or insert a new power supply into the existing one.
The inability to open with the key is due to incorrect operation of the activator. This device is located directly in the driver's door, and it is responsible for distributing the signal through the locking mechanism. First of all, in this case, check:
- wiring;
- circuit breakers;
- terminals.
To inspect the activator, you will need to remove the trim from the previously mentioned door.
Car alarm connection points for Lada Priora
Block to the right of the brake pedal: hood switch (-) – white/black in the middle connector ignition (+) – orange in the middle connector trunk opening (-) – blue/red in the small connector door switch (-) – white/black in the small connector connector trunk limit switch (-) – yellow/red in a small connector
original siren – gray/black on the fuse block
To control the central locking , cut the brown wire in the driver's door and connect it according to the diagram: