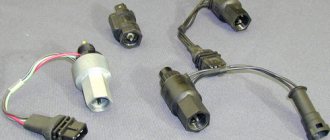
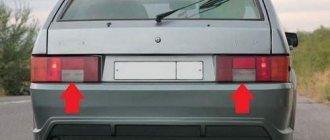
On all modern cars, including VAZ models, if you shift the gearshift lever to reverse gear, the corresponding indicator lights up in the lights. If the reverse sensor of a VAZ 2109 or another model is faulty, the light will work intermittently or will not function at all. What could be causing this problem? How to check the device and replace it? More on this below.
Why doesn't the light come on?
Before changing the sensor, you need to figure out whether it really is the problem. The reverse gear may not light up due to the following problems:
- The light bulbs have become unusable. They need to be tested with a multimeter;
- Wiring is damaged. In this case, you will need a multimeter to check all the wires. It is possible that the insulation is damaged, causing a short circuit (short circuit);
- No regulator contact. This happens due to a breakdown at the point of contact between the sensor and the socket. It can be checked visually;
- There is a problem with the fuse. The 2109 reverse sensor may not function due to a blown fuse. On older cars, you need to check element F16 in the block, in others - fuse number 5;
- Sensor malfunction. If, after correcting the problems described above, the lights still do not light up, then the sensor is not functioning.
Causes of failure
Before you start replacing the reverse sensor (RDS), we recommend checking the condition of the rear lights and determining whether the signal may not be working for other reasons.
| Possible reason | Your actions |
| Burnt out light bulbs | A common and fairly banal cause of problems, which, nevertheless, many ignore. Take out the light bulb, arm yourself with a multimeter and check if they have burned out. Replace if necessary |
| Wiring is damaged | The problem is no less common, but looking for the source of the problems in such a situation is a little more difficult. You will also need a multimeter, which you need to test the wiring and check the resistance readings |
| Poor regulator contact | It happens that during operation the contact of the sensor with the socket is broken. Lack of contact means that the device will not work normally. So check its condition |
| Wiring insulation is broken | If the insulation on the wires near the sensor is broken, this can lead to a short circuit. The result is quite obvious, so check the condition of the wiring and replace it if necessary |
| Fuse burned out | Depending on the type of fuse box, check the condition of the corresponding element in the mounting block. On old-style blocks this is fuse F16, and on new-style fuse blocks you should look at fuse 5. If they are melted, they will need to be replaced. But it is also important to determine the reason why the fuse blew |
| Sensor failure | A failure of the reverse control itself may be indicated by a situation where the lights do not light up at all or, on the contrary, light up without interruption. In the second case, the option of burnt out light bulbs is excluded by itself. |
Replacing a reverse sensor is not a difficult or financially expensive job. Today, the DZH can be purchased at any auto parts store, and its cost is about 100 rubles.
How to check the sensor
To check, you need to get close to the element. The following actions must be taken:
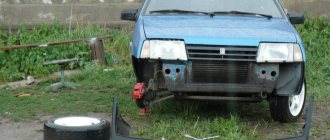
- Raise the car with a jack or on a lift;
- Remove the engine protection;
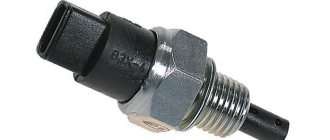
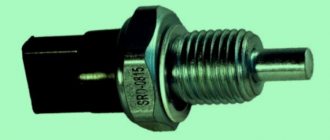
- Get to the sensor, which is located on the side of the gearbox housing;
- Put in reverse gear;
- Check the continuity between terminals 1–3 and 2–4, make sure that it is also present at the “neutral”;
- Shift into other gears and check for continuity, there shouldn't be any.
If there is always continuity, the reverse sensor of the VAZ 2109 is faulty and needs to be replaced.
Examination
It is easy to check the serviceability of the reverse lamps. You need to disconnect the wires suitable for the device, then connect them together (for example, with a piece of wire). If the headlights come on, then the sensor is faulty and needs to be replaced.
Frequent breakdowns are associated with deterioration in the quality of sensor manufacturing. Over time, its tightness is broken, and oil gets inside. Many inexperienced car enthusiasts associate this with different fuel supply systems - carburetor or injector. But this has nothing to do with this malfunction. You just need to monitor the condition of the sensor from time to time.
Replacement of reverse sensor VAZ 2109
Replacing the reverse sensor on a VAZ 2109 is a simple process. Experienced car owners can do everything without difficulty.
The following actions must be taken:
- Place the car on a pit or a lift; in extreme cases, use a jack;
- Remove the (–) terminal from the battery for safety (it is labeled);
- Drain the transmission oil for convenience, otherwise it will leak after removing the product. You will need to unscrew the drain cap, first replacing the container;
- Remove the engine protection;
- Find the sensor, which is located on the side of the gearbox housing, disconnect the terminal from it;
- Unscrew the clamping bolt to “22”. It is located on the crankcase;
- Take a new sensor, lubricate its seal with oil and install it by tightening it by hand and then with the head;
- Connect the wire block;
- Fill with transmission oil. If it has not been changed for a long time, it is better to fill it with a new one;
- Check the lubricant level;
- Install engine protection, remove the car from the jack;
- Connect the terminal to the battery;
- Turn the ignition key, set the lever to the reverse position to turn on the light, check operation.
After all this work, the reverse light on the VAZ 2109 will be in good working order. It is advisable to check the functionality on the go, making sure that it is in full working order.
XX sensor replacement guide
Before proceeding with the replacement, it is worth carrying out diagnostics using a special device - a multimeter. To do this, you need to enter the voltage measurement value in the device and diagnose the car’s network for broken nodes and other faults. In this case, the probes are placed on the battery terminals and show a voltage of 12V.
With the ignition turned off, you need to disconnect the wires from the DXX. In this case, the multimeter probe is connected to the main body of the machine. Next, you need to turn on the ignition, and using the second probe, check for the presence of voltage in the terminals on the connector. If it is below 12V or absent, it means there is an open circuit.
To dismantle the device, you need to take a Phillips screwdriver and remove the two fixing screws.
Replacing the DXX using a Phillips screwdriver
Having unscrewed the left screw, carefully pull the regulator towards you and unscrew the second screw. After this, you need to clean the air channel from dirt and dust, and also blow out the installation area for the regulator.
After this, assemble the part in reverse order. In this case, it is best to calibrate the device itself and lubricate the O-ring with engine oil before installation. The distance between the device and the needle tip should be 23 mm.
Replacing a stop repeater with your own hands
If repairing the repeater is not practical, it should be replaced.
The replacement process consists of the following steps:
- Using a wrench, unscrew the fastenings of the rear part of the stop and remove it.
- Then we connect the positive wire of the lighting fixture to the terminal where the brake light frog is located. To do this, you need to run the wire into the luggage compartment, unscrew the trim on the right side, and connect it to the desired terminal. The disadvantage may be a bolt in the luggage compartment.
- Heat shrink should be applied to the wiring. To prevent the wires from dangling, they need to be secured with insulating tape.
- The final step is to check the device for functionality.
Photo gallery
If a repeater with incandescent lamps is installed on the car, then when connecting a device with LEDs according to the above diagram, the lamp control will not work correctly due to different loads. In this case, you should insert the positive wire into the light bulb control unit and connect it to terminal 54H.
As a brake light, a strip with LEDs can be glued to the upper part along the entire length of the rear window. It needs to be connected to a standard device, and it will work in the same way. It is important to maintain polarity. To make the tape less conspicuous, it can be painted black. Attach the tape using double-sided tape. We check for functionality.
What kind of lamps are there?
Now a few words about the lamps used in the rear light of the VAZ 2109. The A12-5 (T5W) bulb with a power of 5 W is responsible for the side lights.
T5W bulb, responsible for the side light of the VAZ 2109
All steel lamps - direction indicator, fog light, reverse indicator and brake light - are of type A12-21-3 (P21W). Their power is 21 W.
What kind of lighting do you prefer?
Built-in Chandelier
Instructions for replacing light bulbs
It's time to learn how to change lamps yourself so as not to waste extra money and your time on trips to a car service center. Open the trunk lid and find the rear part of the lights. Disconnect the power supply.
Removing the power supply from the rear light of a VAZ 2109
Press the side latch that secures the light fixture. The latch is located on the side of the light device, which is closer to the central axis of the car.
The back of the lamp is secured using side latches
We take out the back part of the flashlight along with the circuit board and bulbs.
Removing the rear part of the right lamp VAZ 2109
Removed module with lamps
We find the burnt-out light bulb, guided by the photo in the section “Pinout of connectors and design of lamps”, turn it counterclockwise, and remove it. Fix the new lamp by turning it clockwise. We install the module in place, connect the power supply.
Important! On some modifications of the VAZ, the trunk has padding or a protective cover covering the circuit board. We partially dismantle the first one, bend it over, and remove the cover. It is fastened with two thumbscrews located diagonally (VAZ 2109) or using a rotary latch (VAZ 21099 sedan).
Cover covering the rear part of the lamp VAZ 2109 (left) and VAZ 21099
Causes
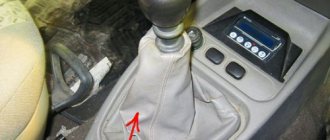
The reasons why reverse gear engagement is poor or difficult may be as follows:
- loosening of the fastening clamp of the rocker, due to which the length of the rod is not enough to fully engage the gear;
- jamming of the reverse speed lock;
- spring breakage and debris getting into the guide grooves of the gear selection mechanism;
- spontaneous loosening of the selection mechanism mounting bolts;
- the clamp bolt is cut off;
- wear of the clutch disc and release bearing;
- incorrect adjustment of the clutch and clutch pedal;
- low oil level in the box or the need to replace it.
Symptoms of a problem
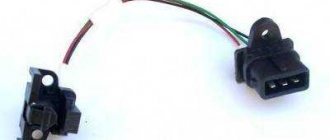
Under no circumstances should you ignore signs of failure of the idle speed sensor on your injection or carburetor VAZ 2109. This will make driving uncomfortable at first, but can soon cause a serious accident.
There are several main symptoms that may indicate problems with ICC:
- The revolutions spontaneously begin to increase and decrease;
- When turning on a cold power unit, the speed does not increase;
- When using additional electrically dependent devices, such as headlights or a heater, the speed immediately begins to drop at idle;
- When shifting gears or idling, the engine may stall.
This is not a complete list of possible symptoms, but they are all indirect. Therefore, to make sure that the problem lies precisely in the IAC, and not in other engine components, it is necessary to check the current state of the sensor.
The principle of operation of the brake light
The brake lights are located at the rear of the car. Red lanterns. They light up automatically if the driver brakes. When the driver takes his foot off the brake pedal, they are also automatically turned off. The presence of stops is mandatory for vehicles.
The lights should be located symmetrically and burn brighter than the side lights. Brake lights are installed on the sides, on the rear window, in the center above the line of the side stops.
Primary and secondary brake lights can be a single bulb, a neon tube, or a set of LED bulbs. The car enthusiast is additionally equipped with a brake light repeater. The rear brake light can also serve as a fog light. You can install a formula 1 brake light (the author of the video is Mikhail Ermolaev).