03/04/2022 5 110 Sensors
Author: Ivan Baranov
Modern cars use many different types of controllers and sensors. Such devices can be control and executive. If for some reason the controller fails, it can cause inconvenience in terms of driving. What is a reverse sensor and what functions does it perform? The answers to these and other questions are presented below.
[Hide]
What is a reverse sensor
Any car has a reverse gear in the gearbox, or, more simply, reverse gear. You can’t do without this function; reverse direction of movement is required when making difficult turns in a limited space, leaving and entering a parking lot (garage), and when crossing off-road conditions. Since the natural position of the driver is directed towards the direction of travel, visibility when reversing is limited. There may be people, vehicles, or stationary obstacles around a vehicle moving backwards. It is necessary to ensure their safety, as well as help the driver navigate difficult driving conditions.
And what about the reverse gear sensor?
Among the safety measures and driver assistance when engaging reverse gear, the following technical means can be listed:
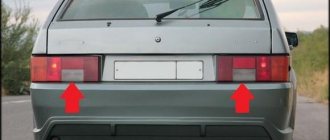
- Reversing lights. They not only illuminate the vehicle's path when reversing. For pedestrians and other road users, the inclusion of white lights on the rear of the car is a signal. Drivers located on the trajectory will be prepared for non-standard movement of the car in front.
- On large vehicles (buses, trucks, special equipment), turning on the reverse is accompanied by a sound signal.
- Activation of parking sensors.
- Turn on the rear view camera, which is the best means of monitoring traffic in blind spots.
How to activate these funds? Activating them manually is dangerous and unreliable; safety devices must be activated automatically. This is why you need a reverse sensor.
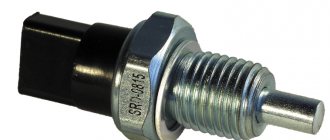
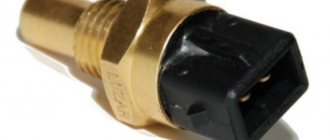
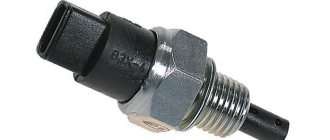
From a technical point of view, this is a switch (more precisely, a switch) activated mechanically.
Such limit switches are used not only in cars. When a certain object is moved into the action area of the push rod, the switch contacts close.
And then it’s a matter of technology. You can activate relays to turn on high-power devices, or supply power directly to them. For example, on the reversing lights. Actually, according to their purpose, these sensors are divided into universal (for connecting a number of systems via a relay) or working exclusively in the rear lighting circuit.
Purpose
Obviously, the car's reverse mode is designed to accelerate the car in the opposite direction without resorting to a 180-degree turn. This allows you to park more comfortably, maneuver faster and, finally, save time for yourself and other drivers.
A reverse signal is needed to warn surrounding drivers of an upcoming maneuver, similar to the way turn signals or brake lights do, embedded in the taillights.
Thus, when reverse gear is activated, a white lamp lights up. All drivers and pedestrians behind are instantly informed that the driver plans to reverse and make decisions about their further maneuvers.
The reverse alarm is also intended for maneuvering in the dark and in fog. The lamp, which has a fairly powerful light beam, allows the driver to better see what is happening behind the car and avoid annoying accidents and incidents when maneuvering. In any case, it is worth paying attention to the condition and operation of the lights. This will eliminate most problems and protect the car from accidental damage.
Location of the switch in the car
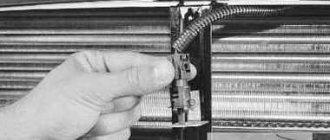
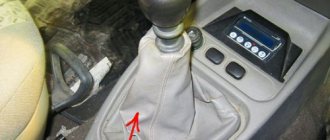
Where is the reverse sensor located? In principle, it can be placed next to any object that occupies a certain position when reverse gear is engaged. Is the gearshift lever suitable for this? In principle, yes, but moving the handle may not engage reverse gear. And vice versa: reverse gear may be engaged, but for some reason the handle will not take the desired position. It is most reliable to place the sensor itself in the switching mechanism. It is usually located in the gearbox housing.
The sensor rod is moved by the rocker, which is responsible for the position of the reverse drive gear.
Information! Sensors of this type are located only in manual transmissions. In cars with automatic transmission, the signal to turn on the reverse safety systems is provided by another device.
You should know that the mechanical part of the sensor and the threaded connection are actually a plug in the sealed gearbox housing. It contains transmission oil, which can spill out if the seal is broken.
Operating principle
The reverse sensor is exactly that device that is designed to activate and turn off maneuver indicators in the form of lamps or LEDs. Its task is to respond instantly when reverse gear is engaged and just as quickly to disengage when moving forward. Moreover, this operating scheme does not depend on the type of transmission, be it manual, automatic or CVT.
Where is the reverse sensor located? Obviously, if the lamp should turn on when the gear shift lever is moved to a certain position, then the sensor itself must be located in the area of the transmission.
Thus, this device consists of an electrical circuit that connects the battery to the lamp.
Obviously, between the battery and the lamp there must be some kind of system that is capable of responding to movements of the gear lever and being activated only when the lever is in reverse or reverse.
This function is performed by a limit switch, which is located along the direction of movement of the automatic transmission selector or on the manual transmission rocker, next to the reverse position point. What is a limit switch? At its core, this is a button that anyone often has to see in real life. Only, unlike most household appliances, this button is activated not directly with a finger, but with the help of a lever that presses it while in a certain position.
When the gearbox is switched to reverse mode, a limit switch powered by the battery is activated. The switch completes the circuit, voltage is applied to the lamp, and it lights up. When you turn off the transmission, in the same way, the button is released and the lamp stops lighting.
Types of sensors
By drive type:
- Rod or rod: a movable element in the form of a pin with a large range of movement.
Such an element does not require high mechanical precision, but takes up a lot of space in the gearbox. In addition, it is necessary to ensure tightness: for example, a seal around the rod. - Ball-type: a pressure mechanism in the form of a spring-loaded steel ball.
Small stroke (2–5 mm), high precision required. But the sensor takes up little space and is sealed in design.
By connector type:
- opening pin or knife type contacts;
- closed standard connector with casing for protection against oxidation;
- bayonet swivel connector;
- screw terminals for fastening wires without a connector.
The way the wires are connected is fundamentally unimportant. All types of connections, except open ones, are quite reliable and sealed.
Possible faults
Repairing the reverse sensor is perhaps exactly what no one is immune from. It happens that a unit needs to be replaced only because it simply does not work. How to act in such a situation? First of all, it is important to understand why the sensor is faulty or not working correctly.
Today it is customary to identify the following possible unit malfunctions:
- oxidation of contacts occurred at some point in the electronic circuit;
- the sensor has become “loose” or has failed;
- there was a “breakdown” in the electrical circuit of the identifier;
- contact between the sensor and the mounting block is broken;
- its fuse is blown;
- The rear headlight bulbs ("stopari") have burned out.
The symptoms of a malfunction of the reverse sensor are probably clear to everyone - the corresponding headlights are inoperative or function extremely incorrectly. It is simply unacceptable to operate a car in this condition, so the first thing you should think about when a problem with a unit arises is where the reverse sensor is located and how to repair it correctly. We'll talk about this in more detail below.
Sensor failure
The faulty element is identified immediately: the reversing lights and other related devices stop turning on. This problem can also occur due to a broken wiring. How to check the sensor for serviceability?
- Remove the connector, connect the multimeter in dial mode, and engage reverse gear.
- The next step is to unscrew the sensor, connect the device, and press the rod (ball) manually.
Important! When dismantling the sensor, it is necessary to prepare a screw plug to quickly block the hole. Otherwise, oil may leak from the gearbox housing.
- If the sensor itself is operational, you need to check the mechanisms inside the gearbox.
Repairing the reverse sensor is not practical. The case is sealed; after opening it and putting the contact group in order, it will be impossible to restore the structure to its factory condition. The unit is inexpensive, especially on domestically produced cars. Therefore, replacement will not be too expensive.
Important! There is no point in experimenting with selecting sensors from other car models. If the mechanical part is larger than standard, the gearbox may be damaged.
Replacement requires no special tools: just a wrench.
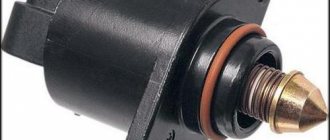
The procedure for replacing the IAC on a VAZ 2114 engine
Before replacing the idle speed control of the VAZ 2114, you need to prepare the sensor, the necessary tools and materials:
- As a replacement device, you can buy an IAC marked 2112-1148300-04 “KZTA” or “omega” 2112-114830. When choosing, be sure to check the exit of the needle rod to a distance of no more than 23 mm;
- for work you need a Phillips-head screwdriver, as well as a key “13”;
- Be sure to have rags, WD-40 and carburetor cleaner ready.
Before replacing the device, you must:
- Place the car on a level surface and put the handbrake on.
- Raise the hood and lock it in the open position.
- Disconnect the battery; when replacing the IAC, this is not a requirement, but a mandatory condition.
- Remove the cover, which is the protective casing of the engine.
- After loosening the clamp, disconnect the rubber tube from the air filter pipe, otherwise it will interfere with the disconnection of the pipe itself.
- Unscrew the clamp securing the VF pipe, disconnect and move the pipe corrugation to the side.
- Loosen the fastening screw and pull out the cable running from the gas pedal to the throttle valve.
- Using a rag, clean the surface of the throttle body and around it.
- Lubricate the remote control mounting nuts and IAC mounting screws with WD-40 to make them unscrew better .
- Unscrew the two nuts to “13” and remove the entire throttle assembly.
- Disconnect the IAC connector by removing it from the sensor terminals.
- If there is dirt in the places where the IAC is attached and adjacent to the remote control housing, it must be removed by thoroughly wiping everything with a prepared rag.
- Using a Phillips screwdriver, unscrew the two screws that secure the IAC to the remote control.
- Remove the valve from the mounting socket.
- It is advisable to wash the throttle assembly with carburetor cleaner.
- Install the regulator prepared for replacement on the throttle assembly in the same position in which the device was just removed.
The rubber gasket, which should be sold together with the sensor, must be pre-lubricated with engine oil.
- Tighten the two screws and make sure that the IAC is tightly attached to the remote control housing.
- Place the throttle assembly in place and make sure the mounting nuts are tightly tightened.
- Connect the connector to the valve terminals.
- Attach the cable to the throttle valve and connect the VF pipe and the rubber tube, tightening the clamps.
- Install the protective cover on the engine.
- After installation, the IAC must be calibrated. To do this, connect the battery terminals and turn on the ignition for ten seconds. The ECU will calibrate itself. After this, the IAC is ready for operation.
We recommend: Wiring diagram for an Alpha moped: features of domestic operation