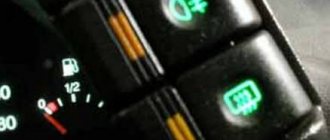
On all cars of the Tenth Family, the power lines for the lights contain many elements. There are lamp health relays, switches and fuses. Therefore, if the brake lights on a VAZ-2112 do not light up, you need to check the entire chain. But the reason may look simple: sometimes the lamps do not turn on because the socket does not contact ground. Circuits are easy to analyze, but finding the cause of a breakdown is difficult. Let's look into the details.
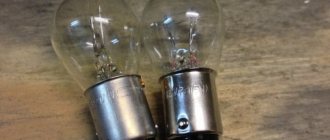
If one of the lamps does not light, it is simply replaced. See the example in the video - you need a P21 W
Why do the brake lights on the VAZ-2112 not light up or work, what should I do?
On all cars of the Tenth Family, the power lines for the lights contain many elements. There are lamp health relays, switches and fuses. Therefore, if the brake lights on a VAZ-2112 do not light up, you need to check the entire chain. But the reason may look simple: sometimes the lamps do not turn on because the socket does not contact ground. Circuits are easy to analyze, but finding the cause of a breakdown is difficult. Let's look into the details.
If one of the lamps does not light, it is simply replaced. See the example in the video - you need a P21 W
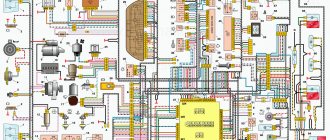
Standard version of the brake light operating diagram
Power is supplied to fuse F17 from the battery, then the current goes to limit switch contact 11, and then, if the limit switch is closed, a circuit is formed with the filament of lamps 7. But note: part of the circuit is relay K1, more precisely, its contacts 5 and 4.
If the brake lights do not light up, on the VAZ-2112, as on all Tens, check one fuse. It is called F17 and is located in the mounting block to the left of the driver.
It is important to know: voltage is always present at one of the fuse terminals. Check it out!
A few words about the “serviceability relay”
The lamp health relay is called K1, and it is the largest in the mounting block. If you remove this relay, then when you press the pedal you can dial the voltage at terminal 5 (but not 4). Look at the diagram again, and it will become clear what we are talking about.
The largest relay in the block
All relay contacts are numbered. Check the voltage at the block terminals:
- 6 – “mass” potential;
- 2 – voltage “+12”, but only after turning on the ignition;
- 5 – “+12” by pressing the pedal;
- 4 – the terminal rings like a ground tap.
If the potential “0” is not generated at terminal “4,” it means that the lamp filaments are burnt out or there is a break in the wiring. Now consider something else: the ground potential has been detected, but the lamps do not light. This is where suspicions of a short circuit arise.
We turn on the brake lights forcibly
Relay K1 is successfully replaced with a pad with jumpers. In Fig. 1 just shows its diagram. If there is no such platform, you can temporarily close contacts 4-5. First, check everything mentioned above.
Have an observer watch what happens to the lamps. Press the pedal with one touch and release it. If the lamps do not turn on, check that the fuse is working properly. It's burned out, which means you're looking for a short circuit.
How to and how not to check the “0 Volt” potential
Let’s agree right away that we only work with a voltmeter. Voltage “+12” is caused by connecting one probe to ground. The presence of potential “zero” is checked differently: any of the probes is connected to a terminal with positive voltage, and then the second probe is connected to the wire being tested.
Consider the error: one probe is connected to ground, the second to the terminal being tested, and vol. Here they conclude that there is a “mass” potential, but this is wrong! If the contact with ground is broken, the device will also show “0”. That is, the number “0” does not contain information.
How to and how not to check potential
Let’s agree right away that we only work with a voltmeter. Voltage “+12” is caused by connecting one probe to ground. The presence of potential “zero” is checked differently: any of the probes is connected to a terminal with positive voltage, and then the second probe is connected to the wire being tested.
Consider the error: one probe is connected to ground, the second to the terminal being tested, and vol. Here they conclude that there is a “mass” potential, but this is wrong! If the contact with ground is broken, the device will also show “0”. That is, the number “0” does not contain information.
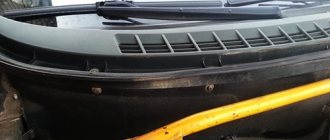
Wiring test for non-working brake lights (ground test)
Let's look at the basic diagram: the brake lights and the reversing lamps have a common ground pin. If contact with this pin is broken, the reverse lamps will not turn on. Well, brake lights too.
Connector for connecting “internal” lights
On the left side there is a connector through which the wiring goes to the fifth door. The connector has black and red wires. Check the voltages on them. Most often the ground on the black wire does not ring. But maybe the connector itself needs to be cleaned.
Usually, if the ground breaks, another pin is used - the one that is connected to the glass heating coil.
If the “plus” does not come to the red wire, we check the “frog”. It's simple here:
- Disconnect the connector with two wires from the limit switch;
- Using 17mm wrenches, loosen the two nuts: holding the lower nut, rotate the upper one;
By the way, one of the connector terminals receives a voltage of “12 Volts”. Check it!
If all the steps do not lead to results, there is only one thing left: contact a qualified electrician. We wish you success.
Source
Table of circuits protected by fuses on the VAZ 2110
| Fuse number | Current strength, A | Circuits protected by a fuse |
| F1 | 5 | License plate lamps. Instrument lighting lamps. Side light indicator lamp. Trunk light. Left side marker lamps |
| F2 | 7,5 | Left headlight (low beam) |
| F3 | 10 | Left headlight (high beam) |
| F4 | 10 | Right fog lamp |
| F5 | 30 | Door window motors |
| F6 | 15 | portable lamp |
| F7 | 20 | Engine cooling fan electric motor. Sound signal |
| F8 | 20 | Rear window heating element. Relay (contacts) for turning on the heated rear window |
| F9 | 20 | Recirculation valve. Windshield and headlight cleaners and washers. Relay (coil) for turning on the rear window heating |
| F10 | 20 | Spare |
| F11 | 5 | Starboard side marker lamps |
| F12 | 7,5 | Right headlight (low beam) |
| F13 | 10 | Right headlight (high beam). Indicator lamp for turning on the high beam. |
| F14 | 10 | Left fog lamp |
| F15 | 20 | Electrically heated seats. Trunk lock lock |
| F16 | 10 | Relay-breaker for direction indicators and hazard warning lights (in hazard warning mode). Hazard warning lamp |
| F17 | 7,5 | Interior lighting lamp. Individual backlight lamp. Ignition switch illumination lamp. Brake light bulbs. Clock (or trip computer) |
| F18 | 25 | Glove box lighting lamp. Heater controller. Cigarette lighter |
| F19 | 10 | Locking door locks. Relay for monitoring the health of brake light lamps and side lights. Direction indicators with warning lamps. Reversing lamps. Generator excitation winding. On-board control system display unit. Instrument cluster. Clock (or trip computer) |
| F20 | 7,5 | Rear fog lamps |
DOMOSTROYPlumbing and construction
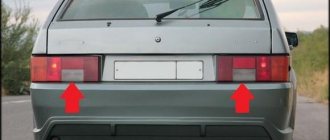
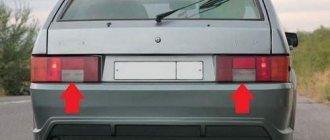
Both reverse lights are off
- Where should the brake lights be on a VAZ 2112? – 2 answers
- Will the new style tail lights fit the 2112 2005? – 2 answers
- Stop lights 2112 do not light up - 1 answer
There may be few reasons. The lamps are burnt out, the fuse is blown, the sensor is faulty or the wire to it is torn off.
Can you tell me in simple terms, with the gear off and the circuit breaker closed, should it light up, or only with the gear on?
Leaving your garage one evening, you notice that nothing lights the way. The situation, frankly speaking, is unpleasant and makes you think about it. After all, the rear lights of a VAZ 2110 should be on in normal mode. This means that there is some kind of malfunction that needs to be found and eliminated. Who knows what the reason is, we will have to figure it out. If the reverse lights of a VAZ 2110 do not light up, then, in all likelihood, it is possible that they have simply burned out. Maybe it's a simple failure of a fuse or sensor.
How to install xenon lamps in reverse
First, I redesigned the lamp sockets so that the polarity was correct. I cut the cable, 2 strips 2-3 millimeters wide, soldered the wires
Then I removed the socket for the reverse lamp, it is easy, it is secured with latches (picture 2).
I cut it out of stainless steel, fit the size inside the lantern, drilled holes for the lamp, and secured everything with screws (pictures 3 and 4). Ignition modules can be placed anywhere.
Xenon in the rear dimensions (connection): I did not connect the modules from the power supply of the reversing light wires, I used them to power the relay, I took the “+” for the modules from the relay from the windshield wiper motor.
I am pleased with the result, and my wife is even more pleased; at her request, I did this alteration. If desired, it is possible to simply redo everything back.
If your reverse lights do not light up properly, then replace your standard incandescent bulbs with halogen or LED bulbs. If you want it to be very bright, then install xenon headlights. An alternative to everything is a rear view camera or parking sensors.
Many owners of "ten" cars complain about the lack of light when reversing. Meanwhile, moving “into the dark” is unsafe and inconvenient. What can be done?
Reasons why the reverse lamps do not light up
It is not difficult to see that when the reverse light on a VAZ2110 does not light up, the reasons can be of a very different nature. But be that as it may, everything needs to be corrected, and for this the cause must be eliminated.
To do this you need to do the following:
- It is necessary to determine the condition of fuse No. 19. It is designed for a power of 7.5 A. Its location is the rear light board of the VAZ 2110 mounting block under the dashboard.
- Next you need to make sure that the light bulbs are working properly. If it turns out that there are no problems with them, you need to check the reverse sensor.
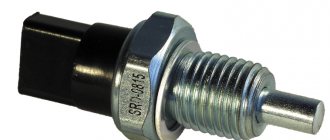
In the latter case, the question of its location may arise. When viewing the car from the front, it is on the right side. If we consider it in projection in the direction of travel, then it will be located in the gearbox, in its lower left part.
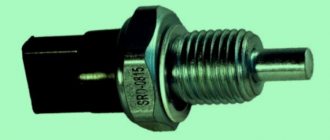
Car enthusiasts gave this sensor its name, calling it a frog. It is nothing more than a regular switch. The gearbox has a hole where this sensor is placed. Its working surface looks inside the box. From the outside, in the normal position, the contacts are open. When reverse gear is engaged, a special shield presses on the working surface of the sensor, which leads to the closure of the contacts. This provides power to the reversing lights. The sensor differs from a conventional switch in its special design. The device is sealed and resistant to significant mechanical loads.
Where is the reverse sensor located on the VAZ 2110?
One of the main reasons for failure of reverse lamps is the sensor responsible for turning them on. People often call it “frog”. It is located on the left side of the gearbox when looking at the car. If you have a viewing hole, drive your VAZ into it, and you will easily find it.
Design and principle of operation
What is this sensor for the VAZ 2110? In fact, this is a regular switch that is screwed into a special hole in the gearbox. In this case, the working surface of the switch appears in the box itself, and normally open contacts are located outside. When you engage reverse gear, a specially designed rod presses on the working part of the sensor, and it is triggered - the contacts close.
The contacts, in turn, supply power to the reversing lamps. The only difference between this sensor and a conventional switch is its special design. It is sealed and can withstand fairly high mechanical loads and temperatures. It is attached to the gearbox using a thread and screwed in with a wrench.
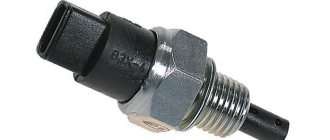
Checking the functionality of the sensor (frog)
When you manage to find it, you need to check its performance status:
- The wires connected to it must be disconnected.
- A tester is connected to their ends. The device is switched to “resistance” mode and the measurement is carried out.
- Then reverse gear is engaged.
- The ignition is switched to the on state.
- The instrument readings are taken.
The device may show 0 Ohm. This means that there are no problems with it. If there are other indicators, it needs to be replaced. This must be done not only when the VAZ 2110 does not have reverse gear on, but also when the lights are on and reverse gear is not engaged.
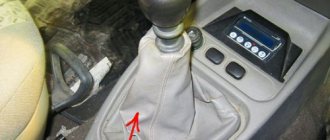
The feet of the VAZ 2112 do not light up
- Disconnect the terminal from the meter;
- Connect a multimeter to the connectors and turn it on in resistance measurement mode;
- Put the gearbox in reverse mode;
- Start the engine;
- Look at what the device produces;
- If the device shows a resistance of 0 Ohm, plus a beep sounds, then everything is fine, the sensor is working;
- It's bad if the meter shows infinity. This indicates that the sensor has served its purpose and needs urgent replacement.
Algorithm of actions when replacing a sensor
Changing it is not particularly difficult, but you need to do the following:
- To replace the car, you need to put it in a pit or drive it onto an overpass.
- If there is engine protection, it must be removed.
- You should first prepare some kind of container for the oil, since the moment the sensor is unscrewed, a certain part of the oil will leak out.
- Then you need to unscrew the wires that are connected to the sensor.
- The old sensor must be removed and a new device installed in its place.
- The oil that leaked out during the sensor replacement process must be added to the box.
- Next, the wires are connected. They must first be wiped dry to remove any oil that has got on them.
- Then you should start the car and check for light from the bulbs when reverse is engaged.
Such measures are one of the options for eliminating the problem in which the reverse lights of the VAZ 2110 do not light up.
We connect halogens as reversing lights
Because 55W lamps have a 10A fuse installed, and in this case, through fuse F19 (in addition to other equipment), we connect 2 60W lamps. To remove the load from fuse F19, you can also install a relay from the reverse light switch.
Contact 2 from the switch is connected to contact 85 of the relay, and contact 86 goes to ground. We connect the wire that was disconnected from contact 2 of the switch to contact 87 of the relay. We supply +12V power to pin 30 of the relay: you can take it from the battery, but it’s better to connect to Ш2-16 (plus is supplied after turning on the ignition in the car). The relay is placed on the mounting module.
Other causes of rear light malfunctions
But it may also happen that the reverse light on the VAZ 2110 does not light up, and the sensor is not the reason for this. Then it might be a nutritional issue. It also needs to be checked. When turned on, no power is supplied, which means you should look for a break in the wiring. Check the area where the fuse is connected to the sensor and the section where the sensor is connected to the lamp.
When reverse gear is engaged on a VAZ 2110, the white light bulbs should light up at the same time.
Their purpose is to perform the following functions:
- parking is much more convenient with lit lights;
- burning lights give pedestrians an indication that the car is about to reverse;
- Reversing lights are used to prevent emergency situations.
If a problem arises in which the reverse lights do not turn on, you can try to fix the problem yourself, or contact a car service center.
The problem can be resolved on your own, since the reasons for this, as a rule, are the following situations:
- The light bulb just burned out. In this case, it must be replaced. But before replacing, it is recommended to check the integrity of the wiring in order to eliminate the possibility of a situation in which a short circuit occurs.
- The reason may also be that there is no voltage on the flashlight board.
- The fuse that is installed to protect against short circuit has blown. It just needs to be changed. The fuse doesn't just blow. This means that this is due to some problem in the circuit. To do this, you need to “ring” each section and determine the location of the problem.
- Contacts may burn. Because of this, the light bulb will stop lighting. In this case, the burnt contacts should be cleaned.
- It is possible that the electrical cable is damaged. A malfunction can be detected by visual inspection or instrumentally using a multimeter.
- If the car is operated for a long time in conditions of high humidity, this can lead to oxidation of the contacts. As a result, the reversing lights will no longer work normally.
- The reason may lie in the incorrect operation of the gearbox mechanism. It is this mechanism that should lead to the inclusion of the rear lights.
- The malfunction may be caused by a broken reverse sensor. It is not at all necessary to take your car for professional diagnostics. You can check its performance yourself. To do this, the sensor must be removed and the ends of the wires connected to each other. If the light starts to light up, then the problem is in the sensor.
Modification of the rear lights of the VAZ 2110
Often, to fix the problem, it is necessary to modify the rear lights of the VAZ 2110. To do this, you first need to dismantle the old reverse lights. If the lamp simply burns out, then replacing it will not be a problem.
It won't be difficult to replace a blown fuse. But replacing a failed sensor is much more difficult. The algorithm of actions has already been announced within the framework of this article. But to replace it, you will need to drive the car into a pit or overpass. Without this, fixing the problem will be problematic.
Having read this review, the reader now has an idea of what could cause the reverse lights to turn off. If practical skills allow, this problem can be solved independently. Anyone who is not very familiar with the structure of the car and does not have practical repair skills is recommended to contact a service center, where qualified specialists will help solve the problem.
On all cars of the Tenth Family, the power lines for the lights contain many elements. There are lamp health relays, switches and fuses. Therefore, if the brake lights on a VAZ-2112 do not light up, you need to check the entire chain. But the reason may look simple: sometimes the lamps do not turn on because the socket does not contact ground. Circuits are easy to analyze, but finding the cause of a breakdown is difficult. Let's look into the details.
If one of the lamps does not light, it is simply replaced. See the example in the video - you need a P21 W
Installation of fog lights
Car owners can independently equip their car with fog lights. To make installation easier, you can watch videos from forums where craftsmen share their experience of such work.
Wiring VAZ 2112 for fog lights (Luxury package)
Conclusions: in fact, replacing old wiring in the rear of a car is much easier than in the engine compartment or inside the cabin. And the diagrams proposed in the article will help you figure it out faster and avoid mistakes.
Let's also understand the wiring diagram of the VAZ 2107.
Standard version of the brake light operating diagram
Power is supplied to fuse F17 from the battery, then the current goes to limit switch contact 11, and then, if the limit switch is closed, a circuit is formed with the filament of lamps 7. But note: part of the circuit is relay K1, more precisely, its contacts 5 and 4.
If the brake lights do not light up, on the VAZ-2112, as on all Tens, check one fuse. It is called F17 and is located in the mounting block to the left of the driver.
It is important to know: voltage is always present at one of the fuse terminals. Check it out!
A few words about the “serviceability relay”
The lamp health relay is called K1, and it is the largest in the mounting block. If you remove this relay, then when you press the pedal you can dial the voltage at terminal 5 (but not 4). Look at the diagram again, and it will become clear what we are talking about.
The largest relay in the block
All relay contacts are numbered. Check the voltage at the block terminals:
- 6 – “mass” potential;
- 2 – voltage “+12”, but only after turning on the ignition;
- 5 – “+12” by pressing the pedal;
- 4 – the terminal rings like a ground tap.
If the potential “0” is not generated at terminal “4,” it means that the lamp filaments are burnt out or there is a break in the wiring. Now consider something else: the ground potential has been detected, but the lamps do not light. This is where suspicions of a short circuit arise.
A few words about the “serviceability relay”
The lamp health relay is called K1, and it is the largest in the mounting block. If you remove this relay, then when you press the pedal you can dial the voltage at terminal 5 (but not 4). Look at the diagram again, and it will become clear what we are talking about.
The largest relay in the block. All relay contacts are numbered. Check the voltage at the block terminals:
- – “mass” potential;
- – voltage “+12”, but only after turning on the ignition;
- – “+12” by pressing the pedal;
- – the terminal rings like a ground tap.
If the potential “0” is not generated at terminal “4,” it means that the lamp filaments are burnt out or there is a break in the wiring. Now consider something else: the ground potential has been detected, but the lamps do not light. This is where suspicions of a short circuit arise.
We turn on the brake lights forcibly
Relay K1 is successfully replaced with a pad with jumpers. In Fig. 1 just shows its diagram. If there is no such platform, you can temporarily close contacts 4-5. First, check everything mentioned above.
Have an observer watch what happens to the lamps. Press the pedal with one touch and release it. If the lamps do not turn on, check that the fuse is working properly. It's burned out, which means you're looking for a short circuit.
How to and how not to check the “0 Volt” potential
Let’s agree right away that we only work with a voltmeter. Voltage “+12” is caused by connecting one probe to ground. The presence of potential “zero” is checked differently: any of the probes is connected to a terminal with positive voltage, and then the second probe is connected to the wire being tested.
Consider the error: one probe is connected to ground, the second to the terminal being tested, and vol. Here they conclude that there is a “mass” potential, but this is wrong! If the contact with ground is broken, the device will also show “0”. That is, the number “0” does not contain information.