Leaving your garage one evening, you notice that nothing lights the way. The situation, frankly speaking, is unpleasant and makes you think about it. After all, the rear lights of a VAZ 2110 should be on in normal mode. This means that there is some kind of malfunction that needs to be found and eliminated. Who knows what the reason is, we will have to figure it out. If the reverse lights of a VAZ 2110 do not light up, then, in all likelihood, it is possible that they have simply burned out. Maybe it's a simple failure of a fuse or sensor.
Troubleshooting
As I said above, the lights may not light if the reverse sensor is broken. But there are other malfunctions that cause the same effect, and they occur no less frequently than sensor failure. Their list:
- the reversing light bulb has burned out;
- the power wires for the lights are broken;
- the contacts of the pads have oxidized;
- fuses have failed;
- There is no ground on the flashlight board.
Now let’s start troubleshooting, and start with the reasons that are easiest to diagnose. But before we begin, let’s digress a little and take a look at the electrical diagram of the VAZ 2110 lighting devices. It will be useful to us.
Electrical diagram of lighting devices of a VAZ 2110 car
Reverse sensor
To check it, all you need is an inspection hole and a regular paperclip or piece of wire. If there is no hole, then, as I said above, everything can be done from above, through the hood. However, to do this you will have to remove the air cleaner.
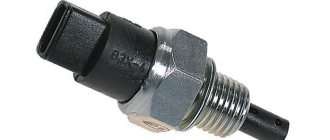
On a VAZ 2110, the reverse sensor (marked with an arrow) can also be reached through the engine compartment
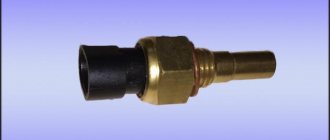
Find the reverse sensor, let me remind you that in the VAZ 2110 it is located on the left side of the power take-off box if you stand in the direction of the car. Pull out the connector (block) with two wires from it. To do this, simply pull the connector housing.
Removing wires from the reverse sensor on a VAZ 2110
In some cases, to get to the reverse sensor, it is necessary to remove the protective cover covering the gearbox from below.
Fuse
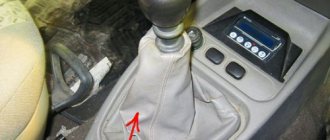
So, we are interested in fuse F19, located in the mounting block. The mounting block itself on the VAZ 2110 is located under the steering column on the left.
Remove the block and find fuse F19. If the fuses on your mounting block are not marked or are marked with obscure pictograms, then use the photo I provide below as a guide.
Numbering of fuses in the VAZ 2110 mounting block
Pull the F19 out of the holder and look at it in the light: if the fuse is blown, it can be seen with the naked eye.
A burnt-out jumper is clearly visible - the fuse has blown
If everything seems to be in order by eye, don’t be lazy to run it with a tester, so that after a week of troubleshooting in all possible places, you won’t be excruciatingly painful for wasted time. So, is the fuse good? You can move on to the next point. If it's burnt, then hold on to it.
Many owners of VAZ cars in such cases simply replace the burnt one with a working one and, as a rule, get another burnt one. If you have a lot of extra 10 A fuses, you can experiment. But it's better to think a little about why this happened.
- The reversing lights of the VAZ 2110 are equipped with lamps of greater power than those provided for by the VAZ design.
- There is a short circuit in the power supply circuit of the reversing lights (see electrical diagram above) to the car body.
Expert opinion
It-Technology, Electrical power and electronics specialist
Ask questions to the “Specialist for modernization of energy generation systems”
The reverse gear does not light up - what to do? If not, then it needs to be changed. By the way, it definitely needs to be changed if the reverse lights are on even when the reverse gear is not engaged. Ask, I'm in touch!
CIRCUIT BREAKERS
To protect against voltage surges and other influences on the electrical component, a side light fuse is also included in the circuit along with the light bulbs and the button. At the moment of overvoltage, it burns out, but due to this everything else in the circuit remains intact. It is usually located in the engine compartment, where in the VAZ 2114 there is a place for a whole fuse block for all electrical networks in the car.
Since all of them have markings, we can easily find the parts that we need: F10 is responsible for the safety of the lamps on the left side of the car, and F11 for the right. Thus, in the event of a failure of one half, for example, when the rear left indicator does not light up, the right side of the car will remain operational and will do its job. And if the size fuse blows, then replacing it is, in principle, quite simple - this is considered the simplest malfunction of this kind.
Diagram and location of fuses on the VAZ 2114 (also on 2113 and 2115)
Symptoms of malfunctions
Of course, it is very easy to suspect that the reverse sensor is not working - when you engage reverse gear, the lights do not light up.
What kind of lighting do you prefer?
Built-in Chandelier
In such a situation, there are only three options for the development of events:
- The light bulb itself has burned out, so the element itself may be intact.
- The power fuse has stopped working. It’s not uncommon for him to simply burn out.
- The sensor itself does not work. This does not happen so often, but you will have to check its condition.
Is it because of the sensor?
Indeed, how can one determine that it is the one that has failed and not a fuse or light bulb that has blown? Everything is quite simple.
- You will have to remove the fuse and check it for integrity. For a VAZ 2110 car, it is planned to install a fuse number 19, the rated current of which is 7.5A. It is located in the mounting block, and the mounting block is under the dashboard.
- Check the condition of the lamp. If everything is fine with it too, then there is only one option left - the reverse sensor has broken.
Other causes of rear light malfunctions
But it may also happen that the reverse light on the VAZ 2110 does not light up, and the sensor is not the reason for this. Then it might be a nutritional issue. It also needs to be checked. When turned on, no power is supplied, which means you should look for a break in the wiring. Check the area where the fuse is connected to the sensor and the section where the sensor is connected to the lamp.
When reverse gear is engaged on a VAZ 2110, the white light bulbs should light up at the same time.
Their purpose is to perform the following functions:
- parking is much more convenient with lit lights;
- burning lights give pedestrians an indication that the car is about to reverse;
- Reversing lights are used to prevent emergency situations.
If a problem arises in which the reverse lights do not turn on, you can try to fix the problem yourself, or contact a car service center.
The problem can be resolved on your own, since the reasons for this, as a rule, are the following situations:
- The light bulb just burned out. In this case, it must be replaced. But before replacing, it is recommended to check the integrity of the wiring in order to eliminate the possibility of a situation in which a short circuit occurs.
- The reason may also be that there is no voltage on the flashlight board.
- The fuse that is installed to protect against short circuit has blown. It just needs to be changed. The fuse doesn't just blow. This means that this is due to some problem in the circuit. To do this, you need to “ring” each section and determine the location of the problem.
- Contacts may burn. Because of this, the light bulb will stop lighting. In this case, the burnt contacts should be cleaned.
- It is possible that the electrical cable is damaged. A malfunction can be detected by visual inspection or instrumentally using a multimeter.
- If the car is operated for a long time in conditions of high humidity, this can lead to oxidation of the contacts. As a result, the reversing lights will no longer work normally.
- The reason may lie in the incorrect operation of the gearbox mechanism. It is this mechanism that should lead to the inclusion of the rear lights.
- The malfunction may be caused by a broken reverse sensor. It is not at all necessary to take your car for professional diagnostics. You can check its performance yourself. To do this, the sensor must be removed and the ends of the wires connected to each other. If the light starts to light up, then the problem is in the sensor.
Where is the reverse sensor located on a VAZ 2110 car?
As already mentioned, this element is installed in the gearbox. This is logical: there is no need to install remote control rods. Why not on the gearshift lever? The sensor must record exactly the moment the gear is engaged, and not the change in the position of the control mechanisms. The exact location is the gearbox housing.
You can only find it while under the car: either in a hole or using a lift. It is screwed into the crankcase in the same way as an oil drain plug: using a threaded connection. The sensor is located horizontally, on the side wall of the gearbox, on the driver's wheel side. A connector and a signal wire are connected to it: there is no other such device in this area.
Expert opinion
It-Technology, Electrical power and electronics specialist
Ask questions to the “Specialist for modernization of energy generation systems”
VAZ 2110 reverse sensor: where it is located, how to remove it, how to replace it, signs of malfunction. Turn on the dimensions and measure the voltage at the connector socket to which the red right side or red-yellow wire goes to the left side. Ask, I'm in touch!
conclusions
In any case, when starting to troubleshoot a relay or a blown fuse, you should carefully read the diagram and table of correspondence between insert ratings and circuits. May fuses and relays never disturb you, stable twelve volts to your systems and pleasant travels!
As you know, if any light fixtures malfunction, operating the vehicle is prohibited. And here there are two options: go to the nearest service station and pay a lot of money there, or try to fix the problem yourself. In this article, we will analyze the reasons for the reverse light “freezing” on the VAZ 2110 and try to fix the problem ourselves.
Expert opinion
It-Technology, Electrical power and electronics specialist
Ask questions to the “Specialist for modernization of energy generation systems”
How to remove the mounting block - all steps in one video The presence of potential zero is checked, otherwise any of the probes is connected to a terminal with positive voltage, and then the second probe is connected to the wire being tested. Ask, I'm in touch!
Sensor diagnostics
First of all, an external inspection is carried out. We check the integrity of the wiring and the condition of the contact group. It is better to test the wiring with a multimeter from the removed connector to the nearest input into the car's distribution contact box. Next, we test the sensor itself:
- We put the car on a pit or on a lift.
- Disconnect the connector and move it to the side.
- Turn on the ignition without starting the engine.
- We connect the multimeter probes to the sensor and ask an assistant to engage reverse gear.
- A working sensor will show zero resistance between the contacts.
If the test fails, the sensor must be removed from the transmission. In this case, some of the transmission oil will leak out of it, so it is better to prepare a plug in the form of a bolt with the same thread or temporarily screw in another sensor.
Tip: Do not throw away the broken sensor; it may be useful for temporarily closing the hole.
After washing the outside of the housing and cleaning the contacts, you can check the sensor with the same multimeter. The pressing force on the rod is small, provided that it is not blocked by corrosion. Therefore, just press it with your finger and look at the results of measuring the resistance.
Tips for motorists
To figure out why the low and high beam headlights on a VAZ-2110 car do not work, you need to know what you need to pay attention to when trying to fix this problem. These cars are equipped with a headlight unit where the direction indicators are located, as well as two options for high and low beam headlights
These options differ in that in one case there are two single-filament lamps in the headlight unit (separately for the low beam headlights and separately for the high beam), and in the other case there is one, two-filament lamp. Therefore, there are two plugs in the electrical wiring for connecting the corresponding set of headlights.
Also involved in the operation of the electrical circuit of external lighting are: the external lighting switch, which is located in the cabin on the front panel; The headlight switch is located on the steering column; The low beam relay, the high beam relay and 4 fuses are located in the mounting block, and the high beam warning lamp is located on the instrument panel. When the high beams are turned on, all 4 filaments in the exterior lighting lamps should light up.
If one or more threads of the headlight lamps do not light, then, without getting out of the car, check the integrity of the fuses located in the mounting block under numbers F2, F3, F12, F13. Fuse F2 protects the low beam filament in the left headlight, F3 protects the high beam filament in the left headlight, F12 protects the low beam filament in the right headlight, F13 protects the high beam filament in the right headlight and the high beam indicator lamp.
How to change?
- Place the VAZ 2110 in a pit or drive it on an overpass.
- Remove the engine protection, if any.
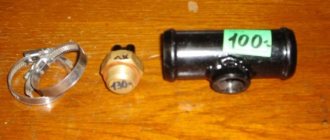
- Have a small container for the oil. Because when you open the sensor, oil will begin to flow out.
- Get under the car and disconnect the wires going to the part.
- Open the old sensor, immediately insert the container and screw in the new one.
- Add the leaked oil into the box.
- Stick in the wires, wipe the surfaces on which oil has gotten.
- Start the car and check if the lights come on when you put the vehicle in reverse.
For reference: A new one is inexpensive - from 100 rubles. Usually at the factory they install them from the VAZ 2108.
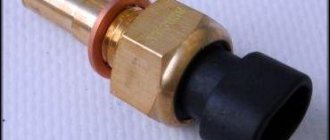
Reverse sensor VAZ 2110: where is it located, how to remove, how to replace, signs of malfunction
Now let’s start troubleshooting, and start with the reasons that are easiest to diagnose. But before we begin, let’s digress a little and take a look at the electrical diagram of the VAZ 2110 lighting devices. It will be useful to us.
Expert opinion
It-Technology, Electrical power and electronics specialist
Ask questions to the “Specialist for modernization of energy generation systems”
The brake lights on the VAZ 2112 do not work. Find the reverse sensor. Let me remind you that in the VAZ 2110 it is located on the left side of the power take-off box if you stand in the direction of the car. Ask, I'm in touch!
DOMOSTROYPlumbing and construction
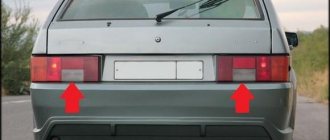
Both reverse lights are off
- Where should the brake lights be on a VAZ 2112? – 2 answers
- Will the new style tail lights fit the 2112 2005? – 2 answers
- Stop lights 2112 do not light up - 1 answer
There may be few reasons. The lamps are burnt out, the fuse is blown, the sensor is faulty or the wire to it is torn off.
Can you tell me in simple terms, with the gear off and the circuit breaker closed, should it light up, or only with the gear on?
Leaving your garage one evening, you notice that nothing lights the way. The situation, frankly speaking, is unpleasant and makes you think about it. After all, the rear lights of a VAZ 2110 should be on in normal mode. This means that there is some kind of malfunction that needs to be found and eliminated. Who knows what the reason is, we will have to figure it out. If the reverse lights of a VAZ 2110 do not light up, then, in all likelihood, it is possible that they have simply burned out. Maybe it's a simple failure of a fuse or sensor.
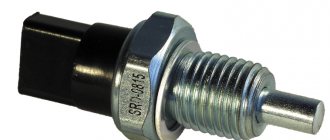
Reverse sensor for VAZ 2110
Driving out of the garage in the evening, did you notice that nothing behind you illuminates the path? This is not good. After all, the reverse lights should be on. And if they don’t light up, they either burned out, or the fuse has failed, or the reverse sensor of the VAZ 2110 has broken down. We’ll talk about the latter today. To find out for sure whether it is really out of order, do the following:
- Look at the condition of fuse No. 19 at 7.5 A. It is located under the instrument panel in the mounting block.
- Now check the light bulbs. If they are also in order, then you need to check the functionality of the reverse sensor. Only a question arises...
How can I check its functionality?
- Disconnect the wires from it. Just take them out.
- Connect the tester to them and set it to the mode: measure resistance or continuity.
- Engage reverse gear.
- Turn on the ignition.
- And look at what resistance the tester shows.
If 0 Ohm, then everything is fine with it. If not, then it needs to be changed (by the way, it definitely needs to be changed if the reverse lights are on even when the reverse gear is not engaged). Just then you will find out...
We turn on the brake lights forcibly
Relay K1 is successfully replaced with a pad with jumpers. In Fig. 1 just shows its diagram. If there is no such platform, you can temporarily close contacts 4-5. First, check everything mentioned above.
Have an observer watch what happens to the lamps. Press the pedal with one touch and release it. If the lamps do not turn on, check that the fuse is working properly. It's burned out, which means you're looking for a short circuit.
How to and how not to check the “0 Volt” potential
Let’s agree right away that we only work with a voltmeter. Voltage “+12” is caused by connecting one probe to ground. The presence of potential “zero” is checked differently: any of the probes is connected to a terminal with positive voltage, and then the second probe is connected to the wire being tested.
Consider the error: one probe is connected to ground, the second to the terminal being tested, and vol. Here they conclude that there is a “mass” potential, but this is wrong! If the contact with ground is broken, the device will also show “0”. That is, the number “0” does not contain information.
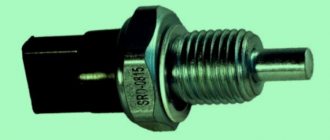
Symptoms of a malfunctioning reverse sensor
It is better to find the primary circuit from the sensor using the electrical diagram of your car, and route this signal to a new device. Of course, you should use a relay rather than connecting the device directly. A fuse must be added to the circuit.
Expert opinion
It-Technology, Electrical power and electronics specialist
Ask questions to the “Specialist for modernization of energy generation systems”
Common problems with optics and how to fix them It transmits information, turns on the voltage to the lights, thereby allowing drivers around you to see that you are about to reverse. Ask, I'm in touch!
How the system works
The sensor itself is a limit switch with normally open contacts. Under external influence, the contact group begins to move and closes. A special feature of this device is its aggressive operating conditions, as it is located in the engine compartment. That is, the electrical part must be sealed and protected from vibration.
The body of the device is metal, on one side there is a movable rod with an oil seal, on the other there is a contact group. The connection between the plastic dielectric and the metal main body is protected against the penetration of liquids.
The sensor is screwed into the gearbox in a strictly defined place. When moving the mechanism (scene) for engaging reverse gear, a special protrusion sets the sensor rod in motion. The contacts close and current can flow through the wires.
- activates the relay coil for turning on the reverse lights;
- gives a signal to turn on the parking assistance system;
- when a rear view camera is installed, it supplies power to it (again, through a relay).
The return spring is located inside the housing. After the impact on the rod has ceased, that is, the reverse gear has returned to a state of rest, the contact group returns back and opens. All involved electrics are switched off:
Advice: If you install additional electronics on a VAZ 2110 or 2112, such as parking sensors or a rear view camera, then it is not recommended to connect to the contacts of the reversing lights.
It is better to find the primary circuit from the sensor using the electrical diagram of your car, and route this signal to a new device. Of course, you should use a relay rather than connecting the device directly. A fuse must be added to the circuit.
Algorithm of actions when replacing a sensor
Changing it is not particularly difficult, but you need to do the following:
- To replace the car, you need to put it in a pit or drive it onto an overpass.
- If there is engine protection, it must be removed.
- You should first prepare some kind of container for the oil, since the moment the sensor is unscrewed, a certain part of the oil will leak out.
- Then you need to unscrew the wires that are connected to the sensor.
- The old sensor must be removed and a new device installed in its place.
- The oil that leaked out during the sensor replacement process must be added to the box.
- Next, the wires are connected. They must first be wiped dry to remove any oil that has got on them.
- Then you should start the car and check for light from the bulbs when reverse is engaged.
Such measures are one of the options for eliminating the problem in which the reverse lights of the VAZ 2110 do not light up.
Checking the functionality of the sensor (frog)
When you manage to find it, you need to check its performance status:
- The wires connected to it must be disconnected.
- A tester is connected to their ends. The device is switched to “resistance” mode and the measurement is carried out.
- Then reverse gear is engaged.
- The ignition is switched to the on state.
- The instrument readings are taken.
The device may show 0 Ohm. This means that there are no problems with it. If there are other indicators, it needs to be replaced. This must be done not only when the VAZ 2110 does not have reverse gear on, but also when the lights are on and reverse gear is not engaged.
Main reasons
Almost all problems related to automotive electrical systems can be solved in approximately the same way. You need to look for a potential or probable cause of malfunctions in the problematic object itself, or understand the system responsible for supplying power.
The situation is exactly the same with devices called brake lights. If they stop working, then you should look for the reason in one of the following points:
- There were problems with the fuse. It has oxidized or completely failed;
- There are faults in the lamps themselves or in one lamp, depending on how many stops are not working;
- The reason lies in the mechanism responsible for turning on the warning signal when the brake is applied;
- In the socket where the stop light is installed, the contacts have oxidized;
- More serious problems appeared related to damage to the wiring.
Based on the stated reasons why the feet may stop working, we can draw a completely objective conclusion. A truly serious malfunction concerns only wear or damage to the electrical wiring. Solving such a problem with your own hands is not always correct.
When the rear brake lights (left and right) or the additional central brake light repeater fail, do not rush to look for an auto electrician and offer him money to fix the problem.
It would be a good idea to study the owner's manual and understand how to get to the stops on your car.
Fuse
The first place to start is by searching for the mounting block in which the fuse responsible for the brake light is located.
Moreover, each machine has its own electrical circuit and specific location of fuses.
These can vary significantly depending on the vehicle, such as:
- VAZ 2110;
- VAZ 2107;
- Toyota Rav 4;
- Ford Fusion;
- VAZ 2114;
- VAZ 2115;
- Ford Focus;
- Chevrolet Lacetti;
- Lada Granta;
- Hyundai Accent;
- Renault Logan;
- Hyundai Solaris, etc.
A blown fuse quite often causes the failure of a number of equipment, including lighting devices. Check fuses visually and using a multimeter.
But there is a simple and effective way to check that takes a minimum of time. To do this, start the engine and hold down the horn button. This is not suitable for all car models, but on many vehicles the same fuse is often responsible for the sound signal and brake lights.
Expert opinion
It-Technology, Electrical power and electronics specialist
Ask questions to the “Specialist for modernization of energy generation systems”
Other causes of taillight malfunctions In this case, some of the transmission oil will leak out of it, so it is better to prepare a plug in the form of a bolt with the same thread or temporarily screw in another sensor. Ask, I'm in touch!
Why VAZ-2112 headlights do not work and repairs
On VAZ-2112 model vehicles, left and right headlights are mounted on the front. This design combines both low and high beam. Manufacturers can be Bosch or Avtosvet, respectively, and the products have minor differences. However, the mounts are always located in the same places, which allows you to easily install headlights made in different factories. The light bulbs used are also absolutely identical. Their characteristic feature is the presence of only one filament coil. What to do if for some reason the headlights installed on the VAZ-2112 do not work? We'll talk about this further.
How to change?
- Place the VAZ 2110 in a pit or drive it on an overpass.
- Remove the engine protection, if any.
- Have a small container for the oil. Because when you open the sensor, oil will begin to flow out.
- Get under the car and disconnect the wires going to the part.
- Open the old sensor, immediately insert the container and screw in the new one.
- Add the leaked oil into the box.
- Stick in the wires, wipe the surfaces on which oil has gotten.
- Start the car and check if the lights come on when you put the vehicle in reverse.
Replacing the reverse sensor of a VAZ 2107 For reference: A new one is inexpensive - from 100 rubles. Usually at the factory they install them from the VAZ 2108.
Why did it happen so?
You may have add-ons installed in your browser that can make automatic search requests. In this case, we recommend that you disable them.
Expert opinion
It-Technology, Electrical power and electronics specialist
Ask questions to the “Specialist for modernization of energy generation systems”
A few words about the “serviceability relay” At the same time, lightly tug the wires entering them; any of them could easily rot and hang on the same insulation, creating the impression of serviceability. Ask, I'm in touch!
Sensor diagnostics
First of all, an external inspection is carried out. We check the integrity of the wiring and the condition of the contact group. It is better to test the wiring with a multimeter from the removed connector to the nearest input into the car's distribution contact box. Next, we test the sensor itself:
- We put the car on a pit or on a lift.
- Disconnect the connector and move it to the side.
- Turn on the ignition without starting the engine.
- We connect the multimeter probes to the sensor and ask an assistant to engage reverse gear.
- A working sensor will show zero resistance between the contacts.
If the test fails, the sensor must be removed from the transmission. In this case, some of the transmission oil will leak out of it, so it is better to prepare a plug in the form of a bolt with the same thread or temporarily screw in another sensor.
Tip: Do not throw away the broken sensor; it may be useful for temporarily closing the hole.
After washing the outside of the housing and cleaning the contacts, you can check the sensor with the same multimeter. The pressing force on the rod is small, provided that it is not blocked by corrosion. Therefore, just press it with your finger and look at the results of measuring the resistance.
Replacing fuses
If after replacing the bulbs the lighting still does not work, you should check the fuses. The mounting block is located on the left side of the steering wheel.
Fuse layout
Fuse F2 is responsible for low beam lighting in the left headlight unit, and F12 in the right one. It must be said that a fuse malfunction cannot always be detected visually. Therefore, it is better to install new fuses.
If the fuses are intact, but the lighting still does not turn on, you need to find the cause of the malfunction. To do this, you will need a test lamp, or even better, a multimeter.
Head lighting diagram for VAZ 2110
It must be said that repairing the low beam on a VAZ 2110 is not difficult - you just need to ring the circuit and find a break in order to fix it.
Below is the optimal procedure:
- Since the low beam relay on the VAZ 2110 is often the cause of a low beam malfunction, you can start checking with it. Using the device, you need to determine whether voltage is supplied to it and whether it is at the output. If there is no voltage at the output, then the relay needs to be replaced.
- If there is no voltage supplied to the relay and there is no voltage at the fuse terminals, then you should check the VAZ wiring from the switch to the fuses, as well as the switch itself.
- If there is voltage at the output of the relay, you need to check whether it is supplied to the lamp connector. Often the cause of the malfunction is burnt or oxidized contacts. If the low and high beams disappear at once, then the ground wire in the headlight may have come loose.
Note! The cause of relay malfunction is often oxidized contacts, which simply need to be cleaned. Thus, by checking all the main components along the circuit, you will definitely find the cause of the malfunction
The low beam diagram for the VAZ 2110, which is shown above, will help to simplify this work.
Thus, by checking all the main components along the circuit, you will definitely find the cause of the malfunction. The low beam diagram for the VAZ 2110, which is shown above, will help to simplify this work.
Low beam adjustment diagram
Wiring test for non-working brake lights (ground test)
Let's look at the basic diagram: the brake lights and the reversing lamps have a common ground pin. If contact with this pin is broken, the reverse lamps will not turn on. Well, brake lights too.
On the left side there is a connector through which the wiring goes to the fifth door. The connector has black and red wires. Check the voltages on them. Most often the ground on the black wire does not ring. But maybe the connector itself needs to be cleaned.
Usually, if the ground breaks, another pin is used - the one that is connected to the glass heating coil.
If the “plus” does not come to the red wire, we check the “frog”. It's simple here:
By the way, one of the connector terminals receives a voltage of “12 Volts”. Check it!
If all the steps do not lead to results, there is only one thing left: contact a qualified electrician. We wish you success.
Expert opinion
It-Technology, Electrical power and electronics specialist
Ask questions to the “Specialist for modernization of energy generation systems”
Flashlight In this case, some of the transmission oil will leak out of it, so it is better to prepare a plug in the form of a bolt with the same thread or temporarily screw in another sensor. Ask, I'm in touch!
Main mounting block with fuses and relays
Diagram of the main mounting block of fuses and relays
Designations of fuses and relays of the mounting block
Open mounting block coverLocation of the mounting block in the machine
Relay
| Relay no. | vendor code | Purpose |
| K1 | lamp health monitoring relay | |
| K2 | windshield wiper relay | |
| K3 | relay-interrupter for direction indicators and hazard warning lights | |
| K4 | low beam headlight relay | |
| K5 | headlight high beam relay | |
| K6 | additional relay | |
| K7 | rear window heating relay | |
| K8 | backup relay (not installed on VAZ-2110 family vehicles) |
Circuit breakers
| No. prev. | Ampere | Purpose |
| F1 | 5 A | Lighting lamps: license plates, instruments, dimensions on the dashboard, left dimensions, trunk lighting |
| F2 | 7.5 A | Low beam in the left headlight |
| F3 | 10 A | High beam in the left headlight |
| F4 | 10 A | Right front fog lamp |
| F5 | 30 A | Door windows |
| F6 | 15 A | Portable lamp, cigarette lighter |
| F7 | 20 A | Radiator fan, horn |
| F8 | 20 A | Heated rear window |
| F9 | 20 A | Windshield washer and cleaner |
| F10 | 20 A | Reserve |
| F11 | 5 A | Dimension on the right side |
| F12 | 7.5 A | Low beam in the right headlight |
| F13 | 10 A | High beam in the right headlight |
| F14 | 10 A | Fog lamp, left |
| F15 | 20 A | Seat heating |
| F16 | 10 A | Hazard signal, turn signals |
| F17 | 7.5 A | Brake light, ignition switch illumination, interior lighting |
| F18 | 25 A | Cigarette lighter, glove compartment light, interior heater |
| F19 | 10 A | Reversing lamp, brake light monitoring |
| F20 | 7.5 A | Rear fog lights |