Why do we need a speed sensor on the VAZ-2109? Let's figure it out. This device is responsible for the correct display of data on our speedometer and tachometer. He does this by transmitting electronic impulses to the electrical control unit. But due to long-term operation and significant load on the speed sensor itself of the VAZ-2109 car (more than 6 thousand pulses are transmitted to the control unit per 1 km), an error occurs during data transfer. Then car owners have questions: how to check the speed sensor? How to change it correctly?
How to find out if our device is faulty
We may not always notice problems right away. This can turn into a huge problem - from a fine for speeding to road accidents and accidents.
Let's look at the main symptoms of a malfunction:
- It seems to you that the speedometer does not display the speed of your car correctly.
- Faulty idle.
- Lately you have been experiencing increased gas mileage.
- You can hear from the sound of the engine that it is not working at full power.
If we consider the complaints of car owners, then most often problems arise precisely with stopping the engine when the car is coasting, or during gear changes when the clutch is depressed.
Design and principle of operation
It should be noted that the frequency of these pulses directly depends on the speed of rotation of the drive wheels. Thus, for every kilometer traveled by the car, approximately 6004 pulses are sent to its control unit. The vehicle speed and tachometer readings are calculated by the electronic control unit by analyzing the time intervals between received pulses.
Attention! As a consequence of the above, it is necessary to understand that installing wheels with a diameter different from the nominal size directly affects the speedometer readings.
In addition to its informational role, the speed sensor affects the operating modes of the engine itself, since depending on the speed of the vehicle, the control unit changes modes:
- Idle speed, which is slightly increased on a moving vehicle;
- Fuel cut-off when closing the throttle valve;
- Smooth switching to idle, which depends not only on the speed of the car, but also on the engine speed.
What should be done in such cases
In the first case, we do not necessarily need to change the speed sensor itself. First, we have to familiarize ourselves with the connection diagram of the device and all the electrical wiring. First, let's check the contacts. They need to be cleaned and it is advisable to insulate them somehow - liquid rubber or oil-water-resistant electrical tape are quite suitable. If you don’t have this on hand, you need to at least lubricate them with Litol or some other product that you have in your garage.
Secondly, if the cause has not yet been eliminated after cleaning and sealing the contacts, we carefully review all the wiring, since even minor damage to them will lead to this type of malfunction. Most often, the rupture occurs near the contacts or near the exhaust manifold.
If the integrity of the entire chain does not give you any doubt, let’s move on to the second, more common reason for the speed to not work on the VAZ-2109 – worn out cable on the speedometer. If you look closely at a worn speedometer cable and a new one, you will undoubtedly see the difference. Wear manifests itself in unevenness on the cable, burrs, and micro-tears visible to the human eye. Due to these irregularities, the device fails quite quickly.
If your speedometer cable is brand new and the contacts are intact, you can check the speedometer sensor by removing it and connecting a special device - a multimeter. Since, as we found out, the sensor transmits pulses, the following values should be displayed on the multimeter: 0.5-10 W. If no fluctuations are detected on the multimeter, you should replace your old speed sensor with a new one.
Troubleshooting
- First you need to unscrew the flexible shaft from the car's gearbox. This is done with ordinary pliers. Unscrew the nut on the cable, and also unscrew the shaft from the VAZ 21099 gearbox. Next, twist the shaft, it is better to do this with a drill, holding the cable in the chuck while turning on the drill, since this method is much more convenient. If the arrow deviates, the speedometer is working properly.
- If the speedometer works, carefully inspect the drive shaft. They may lose their factory cross-section, causing the shaft to slip and the VAZ 21099 speedometer needle to twitch. If the shaft tip is in good condition, replace the shaft itself.
- If your car has an electronic speedometer, then inspect the wiring. Quite often it frays. And the wires located near the exhaust manifold are exposed to temperature, as a result of which the insulation melts and a short circuit occurs.
- Worn speedometer cable. Over time, it can acquire burrs, crack and even break.
These options are also possible: worn speedometer gears, change in the shape of the speed arrow.
The speed sensor could also be faulty. There are three main ways to check the device:
First way to check
- remove the sensor;
- Using a multimeter, find the contact that creates the pulses;
- attach a tube to the axis of the speed sensor and rotate it;
- during rotation, check the change in voltage supplied to the speed sensor;
- the speed of rotation of the tube must be proportional to the frequency of pulses and the voltage supplied to the speed sensor.
Second way to check
- using a jack, lift one wheel in the car arch;
- connect the multimeter to the speed sensor, as stated in the first method;
- spin the hanging wheel of the car;
- If during rotation of the wheel the pulses become more frequent and the voltage increases, then the sensor is working.
Third way to check
- take a control lamp or a regular light bulb rated for 12 volts (you can take a lamp from a VAZ 21099 located in the turn signal);
- remove the impulse wire and connect it to the light bulb;
- hang one front wheel in the arch using a jack, as in the second method;
- rotate the car wheel;
- if a minus appears on the control lamp or if a regular 12-volt lamp starts blinking, then the sensor is in working condition.
If, as a result of the check, the speed sensor is in good condition, then check the speed sensor drive. To do this, you need to hang the front wheel in the arch and find the speed sensor drive. Spin the car wheel and check the rotation stability of the drive.
Changing the speed sensor for VAZ-2109
In order to make a replacement, we will need the following: a new speed sensor (the old one cannot be repaired), as well as keys for “10” and “12”. First we need to disconnect the battery, then the speed sensor.
When dismantling a faulty device, you need to be very careful and carefully remove it from the stem to avoid breaking it. That's it, now we can install a new sensor - we'll do all the steps in reverse order. Carefully place the new sensor on the rod, connect it and at the very end, when all contacts are sealed (it is advisable to do this), connect the battery.
But that is not all. In order for our new sensor to display true results, immediately after its installation it is necessary to reset the electronic on-board computer data. Otherwise, do not expect correct data even if a new sensor is installed. Good luck with your installation, dismantling and long-term operation of your car!
How to remove the speedometer drive with your own hands - instructions
VAZ 2110
- We support the anti-rollback shoes of the rear wheel, then we need to jack up the front of the car, and then install it on supports.
- On a model with a cable-driven speedometer, remove the fastening pin and disconnect the cable from the gear drive.
- Unscrew the fastening bolt and remove it together with the heat shield.
- Remove the drive with the gear from the crankcase and remove it from the seal ring.
- The gear can be removed from the gearbox housing; be sure to check the condition of the gear; if defects are detected, it must be replaced.
- If there are signs of wear or damage to the gear, the condition of the gear should be checked.
- To remove the gear, release it from the transmission. Then you need to unscrew the mounting bolt and remove the drive gear housing. Then you should remove the drive gear and remove all the adjusting washers.
VAZ 2107
- Using a “13” wrench, you need to unscrew the bolt of the clamp securing the exhaust pipe of the muffler.
- Take a 10mm wrench and unscrew the drive fastening nut.
- Using a 13mm wrench, unscrew the two nuts securing the cross member.
- Then you need to lower the rear of the transmission.
- The pipe section must be moved to the right and then the speedometer drive must be removed from the crankcase hole.
VAZ 2114
- We unscrew the DS counterclockwise.
- After removing the DS, check the VAZ 2114 speed sensor drive.
- Using a “10” wrench, unscrew the nut and pull it out.
- After removing the drive, you need to check the condition of the ring and, if necessary, replace it.
https://youtube.com/watch?v=rJC6eudWRLA
Similar
| Digital portable anemometer ap1m irsha. 402131. 001 Tu is intended...Purpose: digital portable anemometer AP1M Irsha. 402131. 001 Tu is designed to measure the average speed of directed air… | Instructions for use en. 401 ReConnecting en4, en6, ez6 sensors to on-board monitoring controllers of the “Autograph-gsm” series 84 |
| Instructions for use en. 401 ReConnecting en4, en6, ez6 sensors to on-board monitoring controllers of the “Autograph-gsm” series 84 | 1. Requirements for technical means of controlRequirements for the subject of purchase: for the right to enter into an agreement for the supply, installation, calibration and activation of Mercury ta-001 tachographs... |
| The program must periodically poll the internal memory of the electronic...The general diagram of the system is shown in Fig. 1 and should consist of temperature sensors (1), pressure sensors (2), sensor power supply... | Application of a Doppler meter to determine the speed of moving railway unitsOts of radar Doppler speed meters. The possibility and scope of their application in railway transport is considered.... |
| 5. Operation of the filtration deviceCheck that the diffuser holders (26) and manifold (13) are in perfect condition, as well as the air duct connection to... | Technical description and operating instructions for the speed control device UX-1MU. The speed control device UX-1M, hereinafter referred to as UX, is designed to control the speed of transport equipment of mills, elevators... |
| Manual for installation, operation and calibration of aviation electronic... Monitoring and setting the minimum speed value is carried out by the minimum speed indicator ims-1M (hereinafter referred to as the “indicator”) during... | Algorithm for checking access speed... |
| Terminology in the technical literature Automatic transmission is driven by the output shaft and creates pressure proportional to the speed of the vehicle; in fact, Governor is a hydraulic... | The operating manual contains technical data, description...Measurement of parameters, regulation and configuration of a single-limit sensor |
| Product Name Vector control algorithm combines fine speed calculation and self-emission function of motor parameters. This achieves... | Instructions for complex setup and testing of the Mercury-115 cash register. The instructions apply to the Mercury-115 cash register with software - 115UZ107 for the following version of the cash register. |
| “Monitoring the opening speed of the Top 100 websites in Russia” This informational...Creation of a system for constant monitoring of the opening speed of popular web pages and prompt identification of resources (hereinafter referred to as the System),... | Operating manual for usd mercury 250 Part Software manual During the setup and operation of usd mercury 250, the following types of software are used |
Speed sensor device, malfunctions, check, repair
Manual, instructions for use Instructions, instructions for use
Replacement
Even if you have experience in car repairs, you have never had to change a speed sensor, we recommend watching a training video about this, or looking at the operating manual for your VAZ 2114.
Stock up on the necessary set of tools and materials:
- Keys for 21, 14, 10 millimeters;
- Dry rags for cleaning the gearbox housing;
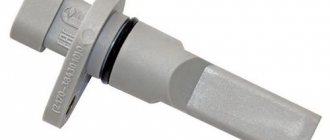
- New DS.
As for the new speed sensor, you can easily find it by catalog number - 2111-3843010. Its estimated cost today is around 300 rubles.
Let's start work.
- The device can be replaced through the engine compartment. But this option causes certain inconveniences due to the corrugated tube from the air filter and adsorber, which interfere with comfortable access to the desired object. You can remove them, but then unscrewing the sensor will still be problematic.
- To avoid unnecessary dismantling work and make the task easier for yourself, drive into the pit and get to the DS from below.
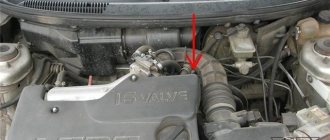
- The required device is located directly on the gearbox housing above the universal joint. Look in the area of the dipstick to check the amount of oil in the gearbox. This is where you will find DS.
- Once you enter the pit, wait a while for the engine housing to cool down. Open the hood to speed up the cooling process. Do not close when starting work. This will provide additional lighting.
- Disconnect the negative terminal from the battery of your VAZ 2114.
- Find the sensor you are looking for and use a dry rag to remove all dirt accumulated on the gearbox housing. It is not necessary to clean the entire box, just clear the area where the DS is located.
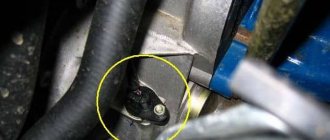
- Disconnect the contacts by removing the wiring block. To do this, simply press the spring-type lock.
- The DS should be unscrewed carefully, moving counterclockwise.
- It is not always possible to remove the sensor manually, since adhered dirt promotes sticking. Use a 21 mm wrench to remove the DS from its seat.
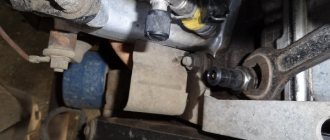
- After dismantling the DS, check the condition of the drive. We have already discussed exactly how to do this.
- If the rod is broken, you will have to remove the actuator completely.
- Using a 10 mm wrench, unscrew the fastening nut and remove it along with the washer.
- Using a 14 mm spanner, slightly loosen the drive in its socket, which will then allow you to carefully remove it from its seat.
- Be sure to make sure that the rod does not end up in the box. Otherwise, you will have to dismantle the gearbox and disassemble it. And this is a difficult task.
- Check the condition of the O-ring. Experts advise changing it regardless of the level of wear.
- Replace the rod, return the actuator to its place and reassemble in reverse order.
- The new sensor is carefully screwed into the socket, already clockwise.
- Return the terminals with wires, connect the contacts and check the operation of the device.
The DS should be screwed in as carefully as possible, since the sensor body is made of plastic. It is very easy to damage it.
Replacing a device such as a DS is not difficult. Follow the sequence of operations, act carefully and use high-quality replacement parts. Plus, don’t forget to first make sure that it is the DS that is causing the trouble. Otherwise, the work may be done in vain.
Loading …
Analyzer breakdowns
Like absolutely any device, this sensor can fail over time. There are many reasons for this - the gradual depletion of the device’s lifespan (over time, any device becomes unusable, no matter how high-quality it is), from manufacturing defects, from short circuits, contamination, and so on.
Regardless of the cause of the speed sensor malfunction, it is important to be able to recognize the symptoms in time in order to promptly replace the faulty part with a new one or try to repair it.
There are nuances, the presence of which may hint at the failure of one of the other sensors located in the vehicle system. For example, an increase in fuel consumption may be associated with the failure of the speed sensor, DTOZH and several other analyzers with which the vehicle is equipped. And there are those that directly indicate a malfunction of the DS.
How to understand that the speed detector may be malfunctioning:
- flashing warning light on the dashboard;
- specific error code on the on-board computer screen;
- excessive consumption of fuel;
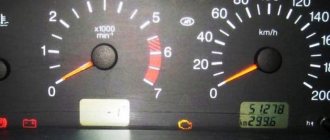
- incorrect speedometer readings or complete inoperability;
- difficulty starting the engine;
- unstable operation at idle until a complete stop;
- weak engine power.
After this, you can begin diagnosing the device itself, starting with assessing its external integrity - mechanical damage, corrosion, contamination. If the analyzer looks normal externally, you can check it using testers.
There are two ways to check the DS, which are suitable for detectors operating on the Hall principle (described above).
The first method involves dismantling the device and connecting it to a voltmeter. First of all, it is necessary to determine which terminal is responsible for what - and, according to the data obtained, connect the sensor to the tester.
The pulse terminal is connected to the input contact of the voltmeter, and the second is grounded to a metal part of the motor. Give rotation to the motor and check the voltage and frequency readings. As the rotation speed increases, this data will also increase.
If problems occur when installing a new panel
A “twitching” needle during ignition indicates that power is coming to the speedometer. Possible problems could be:
- incorrect connection of wires;
- there are breaks in the wiring - check the integrity of each wire separately;
- There are problems in the device itself - burnt out tracks or the speedometer drive.
By the way, the mere fact of replacing the sensor does not yet indicate its performance. VAZ sensors often turn out to be “dead” immediately after purchase. Ideally, ask your friends for a similar sensor that is known to work.
Speed sensor VAZ 2109
The speedometer operating system is quite simple. The speedometer sensor produces a signal. Further along the wiring it is duplicated and simultaneously goes to the ECU and the dashboard. Next, along the tracks on the dashboard board it gets to the speedometer mechanism - the arrow rotates to the desired angle.
The malfunction may be in any of these elements
Always pay special attention to the chips (contacts oxidize, measure with a tester, spray with a wedge, bend if necessary)
Just like any other old car, there are problems with the wires - they burn out, break under the insulation (check with a continuity tester). You can use a multimeter or a universal probe that “can” find plus, minus and absence of a signal. A 12V screwdriver, which detects only power, is an inferior assistant.
If the panel worked before
The check is essentially the same, but you can exclude an error in connecting the wires from the list of possible faults when switching to a new chip.
If you have a VDO device, on our website you can see how to do its self-diagnosis. If not, purchase a “lace” or have it diagnosed at a car service center. Sources of errors can also show which way to dig.
There is a feeling that in your case the problem lies in the speedometer mechanism itself or the tracks on the panel. Disassemble the panel yourself - call the roads, check the mechanism (continuity, check the integrity of the gears in the speedometer drive or other problems - the unit is quite complex, there are many sources of malfunctions) - or take it to a good electrician.
Also on amateur radio forums you can find diagrams of simulators of the speedometer sensor. Assembling this circuit will be useful for checking the operation of the speedometer. Without it, the dashboard will have to be constantly placed on the car and removed back.
Signs of breakdown
The car itself can tell you that the DS is out of order. To do this, you just need to pay attention to the characteristic signs of such a breakdown:
- The speedometer does not work at all or provides incorrect information about the current speed;
- Idling behavior is unstable;
- Gasoline consumption is increasing;
- The motor does not produce full power.
The practice of VAZ 2109 owners shows that the most obvious sign of a breakdown of the engine is the engine stopping at idle while coasting, or the engine stopping when the clutch is pressed to change speed.
If the engine breaks down, the “Check Engine” light on the dashboard should light up. If the car is equipped with an on-board computer, then the error code corresponding to the malfunction is 24.
Verification methods
The first thing you need to do is make sure that a voltage of 12 V is supplied to the DS contacts. Since the operation of the DS is based on the Hall effect, the test is performed by torsion. The voltage varies within 0.5-10V.
Today, there are three main ways to check the performance of a speed sensor. The first two involve the use of a multimeter. Which one to choose, decide for yourself. We will talk in detail about all three methods of checking DS.
Verification method
Your actions
- Remove the sensor;
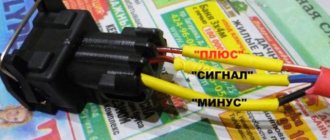
- Use a multimeter to check which contact performs which functions. You need to find a pulse contact;
- Connect the positive probe of the multimeter to the pulse contact, and the negative probe to the engine or car body. It will be a mass;
- Place a piece of tube on the DS axis and start rotating it at low speed;
- At the same time, check how the voltage changes;
- As the speed increases, the pulse frequency and voltage should increase
- Here you don't have to dismantle the device;
- Use a jack to lift one of the front wheels of the car; Connect the multimeter to the sensor wires, as in the first method;
- Rotate the wheel with your hands and monitor the multimeter readings;
- If pulses appear at the same time, the DS is working normally. If not, it has failed and needs to be replaced.
- This test method does not require the use of a multimeter;
- Instead, use a control lamp or a regular 12-volt light bulb;
- Disconnect the impulse wire from the DC;
- Turn on the ignition and use the test lamp to find the plus and minus;
- Raise one of the front wheels using a jack;
- Connect the test light to the signal wire and rotate the wheel;
- If the minus light on the control lamp lights up, this indicates the normal condition of the sensor;
- If you don't have a control, take any 12V light bulb. On the VAZ 2109 you will find this in the turn signal. Connect the signal contact and the plus of the battery with a wire. The functionality of the sensor is indicated by the lamp starting to blink.
If checking the DS shows that everything is fine with it, be sure to check the functionality of the sensor drive. It is necessary to hang up the front wheel and find the DS drive by touch. Now start rotating the wheel with your foot and check with your hand whether there is rotation in the drive and how stable it is. The help of a partner will not hurt you here.
Reasons for failure of the main vehicle systems
Many car malfunctions, initially perceived as mechanical, arise due to damage to the electrical wiring.
Some of the most common problems are described below:
- The starter turns the shaft, but the engine does not start. One of the reasons for engine inoperability may be a failure of the ignition system wiring harness or a blown fuse or relay. Faulty elements must be found and replaced with new ones. On machines with distributed injection, parts of the wiring of the engine control unit or fuel pump may be damaged. On a carburetor car, the faulty area can be found with a tester by calling each wire. On the injection VAZ 2109, it is possible to carry out diagnostics, which will show a unit with a damaged or broken circuit.
- When you turn the key, the starter does not work, the indicator lamps light up at normal intensity. The reasons may be a break or oxidation of the wires going to the starter, or the ignition switch.
- When you turn the key, the starter does not work and all the lights go out. A typical sign of a discharged battery or poor contact of the power wires with the battery terminals.
- After starting the engine, the charging indicator lamp does not go out. Most likely, the wiring has broken, the contacts on the generator have oxidized, or the drive belt is broken.
- Unusually bright headlights or pulsating light indicate damage to the voltage regulator on the generator. On injection machines, such a breakdown can cause the Check Engine lamp to turn on.
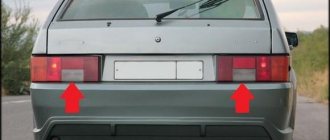
- A non-lit front or rear light indicates a failure of the lamps, fuse or wiring harness going to this unit.
- When you turn on the turn signal, all the lamps in the rear light begin to blink. A standard problem with all first-generation front-wheel drive VAZs, the cause of which is oxidation and short-circuiting of the circuit board tracks inside the lamp.