One fine day I got into the car, drove back and turned off the rear, but it didn’t turn off electronically. After checking the connections, it turned out that the shutdown frog grunted. For some time I simply turned it off and drove like that, because there was simply no time to replace it. A couple of days later I went and bought a frog just like this for the VAZ 21194 model
The replacement process itself is very simple. We take a key for 22, WD40 (well, some may not need it, but I personally couldn’t do without it) and unscrew the sensor counterclockwise. True, before all this manipulation it is necessary to remove the left front wheel, unscrew the metal protective casing with a 8mm head and bend it down towards you.
Oh yes, and have your thumb or plug ready, because when you unscrew the sensor from the box, oil will flow. And if you don’t want to drain and fill it back, but you will need to keep the hole from it plugged the whole time you change the sensor. Even if you lose 20 grams of oil, this is not critical. All the best. I hope it helps someone.
Reasons for reverse gear not engaging
- Before disassembling, you need to check the gear shift lever, since the cause of problems with reverse gear may be hidden in it. In addition, the cause is often in the rocker and cardan.
- The splines are worn out or the clamp is loose (an inspection hole is needed to correct it).
- Broken release bearing. However, in this case, when the gears were engaged, a characteristic crunch would be heard, and this would require effort.
- There are problems with the reverse gear locking mechanism. To confirm or refute this assumption, you need to remove the gear shift knob, as well as the dashboard between the seats, then carefully inspect everything.
In the example discussed in this article, the cause of the malfunction was precisely the faulty wiring of the gear lock solenoids (broken or torn).
How does the system work in Kalina?
The gear selection lever of the Lada Kalina transmission is equipped with a special ring. If you do not lift it, it is impossible to activate reverse gear. The lifting of the element is accompanied by the application of a certain electrical impulse to the coil. As a result, the core is drawn into the coil, which allows the transmission to be engaged. The same pulse generates a signal to activate the reverse movement indicator.
In the reverse process, the core is installed in its original place. Here, a pulse is also generated inside the coil, which enters the control system for the stern lighting devices. As a result, the lamps responsible for reverse gear turn off. Structurally, the reverse switch we are considering is located on the bottom of the transmission housing. Wires go to it. It is these components that become the reason for damage, since this arrangement creates a risk of touching uneven road surfaces. Breaks of patch cables are quite common here, as evidenced by many reviews.
Also check out
- Using a paper clip, we close the contacts of the connector from which the wires are lowered under the floor of the car. Try to engage reverse gear. If this works, the switch is broken.
- Disconnect the connector from the solenoid and install 2 pins into it. Use a tester to change the voltage. The device readings should be 12 Volts. It is worth charging it with a light bulb (5 Watt or 12 Watt). If it does not light up, then there is an open circuit, and the voltage arises due to resistance formed due to copper oxide. Very often, breaks and fractures occur on the harness in the place where the clamp is located on the pallet.
- Remove the clamp by pressing its fastenings at the bottom.
- Disconnect the connector from the stop switch and remove the harness. Remove the electrical tape from the corrugation, after which you can remove the wires. In the event of a break or breakage, characteristic signs will be noticeable.
- Use wire cutters to disconnect the wires and connect them of similar cross-section and diameter. The twist should be soldered and insulated (you can use heat shrink). If necessary, put on a new corrugation. This is done so that moisture does not penetrate inside, otherwise it is possible that all the troubles will happen again. The harness should be secured with a plastic clamp.
- Connect the connectors and check the operation of the solenoid. Failure of this element is quite rare. To check it you need to connect a tester. The resistance should be 2.2 Ohm. If the cause of the malfunction lies there, you will need to drain the oil from the box. One option is to quickly block the hole with something and install a new solenoid. In this case, it is important to apply sealant to the threads so that oil does not ooze down the threads during operation.
How to restore functionality?
Reverse faults can occur throughout the power and control circuit. If such a situation occurs, then you should not rush to replace the sensor. It would be more advisable to check all links of the designated chain.
It is recommended to start checking with the ring present on the lever. Some craftsmen turn off the sensor and blocking and “ride” further. However, this is not a correct measure, since it jeopardizes security. It’s no secret that the movements of the lever when engaging both reverse and first gear are carried out almost identically, that is, “toward and forward.” The only difference is that the first speed is activated without a ring, and the rear speed is activated with it. That is, this element acts as a “safety guarantor” against accidental engagement of reverse gear.
Lifting the cover on the lever, you can find several wires that are fed from the ring to the connectors. This special solution is implemented to prevent wires from breaking while manipulating the transmission lever. It is also recommended that these cables be thoroughly checked.
The most common situation associated with a reverse gear malfunction is a break in the wires that go directly to the sensor. In addition to the risk of hitting road irregularities, there is also the influence of the external atmosphere. This implies the negative impact of not only moisture, but also various particles of debris, as a result of which the wiring and reverse sensor become unusable over time.
Finding these wires will not be difficult. They are the only cables that are connected to the transmission unit, or more precisely to the sensor located on the LADA Kalina crankcase. In addition to visual inspection, inspection is reduced to testing using a device. If, after calling the wiring, we find its integrity, then the likely cause of the system failure and failure is the designated sensor.
How to remove air from the stove on Kalina
Lada Kalina Cross station wagon
Radiator Lada Kalina
Diagnostics
Checking the controller can be done in several ways; we recommend that you familiarize yourself with each of them in more detail. For the first two methods you will need a voltmeter.
- First, the sensor must be removed. Find its installation location, disconnect the connected connector, unscrew the fixing nut and remove the device from the mounting location.
- Then take a voltmeter and figure out the pinout of the connector. The connector has three contacts, the first of which is usually a positive contact, the second is an output signal, and the third is a negative contact. One of the tester probes should be connected to contact number 2, and the second probe should be grounded - connected to the engine body or car body.
- Afterwards, you need to rotate the controller to determine whether there are pulses in the operating cycle and measure the output voltage. To do this, you need to install a piece of pipe on the sensor axis and rotate the device at a speed of approximately 3-5 km/h. The voltage and frequency in the tester depend on the rotation speed of the controller (the author of the video is Artem Kulzhanov).
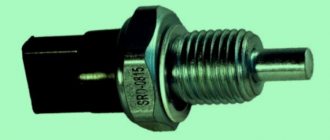
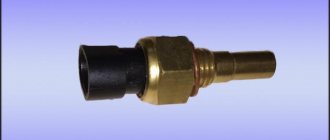
Replacing the sensor
Replacing the sensor is easy, but requires some skill and knowledge.
You can see the sensor by looking under the car from the front, after turning the steering wheel to the left. But the replacement is done on an overpass or from a pit:
- First of all, you need to disconnect the wires.
- Then unscrew the reverse switch from the box and immediately screw in a new one. If you hesitate, a lot of oil will leak out of the box. Therefore, everything must be done quickly. When unscrewing, do not stand directly under the box, the oil will simply flow out. It is recommended to let the machine cool down a bit before replacing the sensor. Then the oil pressure will not be so strong (and its fluidity will decrease slightly). But most importantly, keep the new sensor on hand.
- They pulled out the old one and immediately installed a new one. Then oil loss will be minimal.
If you do not have enough experience, simply place a clean container under the crankcase to catch the spilled oil. Then it can be refilled.
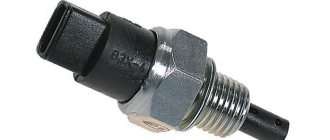
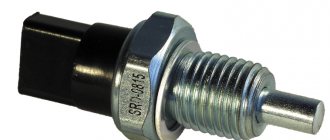
Place of the switch in the light switching circuit
On cars with manual transmission, voltage to the lamps when reversing is supplied through a limit switch (the so-called frog), which is screwed directly into the gearbox housing. When reverse gear is engaged, the switch button is pressed inside the gearbox. The contacts inside the “frog” bridge, and current begins to flow to the lamps.
On the circuit diagram for turning on the reversing lights, we can see that on the VAZ 1118 Kalina, the current from the battery through the ignition switch (No. 2) is supplied to fuse F1. Passing through the fuse that protects the switching circuit, “+” goes to the limit switch (No. 10). The contacts are in a normally open state and close only when reverse gear is engaged. Thus, current begins to flow to the light bulbs. The second contact of the lamps is connected to the “–” battery through the common ground contact of the lamps.
On cars with automatic transmission, the role of the limit switch lies with the selector position sensor. Information about changing the location of the gearshift knob is transmitted to the engine ECU, the light control unit.
How to check the "frog"
- Remove the headlight switch chip.
- Turn on the ignition.
- Using a small piece of wire, connect the contacts of the reverse gear sensor connector to each other.
If the reverse lights are on, then the problem is in the “frog”. Some drivers disassemble the switches, clean the contacts, after which the device continues to work properly. It is up to you to judge the appropriateness of such measures. But keep in mind that on many cars (including VAZ models) the limit switch is located below the oil level in the gearbox. We recommend simply replacing the power sensor. To minimize oil loss, jack up the car on the side where the end switch is installed.
Related Issues
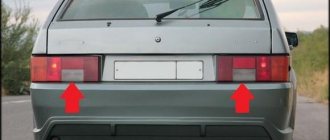
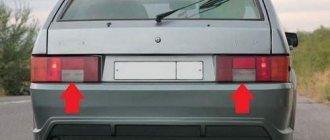
In some cases, the reverse still turns on, but there is no lamp. It is important to look at the overall plan here. If we are talking about one of the lamps, then most likely the problem is there. Although this is rare. If both lamps do not turn on, then you need to “ring” the circuit from the sensor to the lamps.
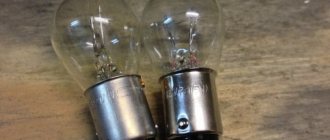
If only one of them does not light, then most likely the reverse lamp needs to be replaced.
This is done from the trunk. Remove the casing and unscrew the lamp socket (counterclockwise). Then you need to remove the lamp itself from the socket. Press and turn counterclockwise. Done, install the new lamp in reverse order.
tweet
back Characteristics of the on-board computer on the Lada Kalina and its replacement
Next How to fix the idle speed sensor on Kalina?
Tag sensor, reverse sensor, replacement