Box vaz 2110
One of the most obvious problems that require an immediate solution is replacing the gearbox in a VAZ 2110. And naturally, in the process you have to deal with such a component as mounting the VAZ 2110 gearbox. On the VAZ 2110, the gearbox mount has some features that make removing it from the car very problematic. To perform this work, you must have an assistant who will help in this difficult task. In addition to dismantling and disassembling the gearbox, it is also necessary to reassemble it. The assembly process is no less problematic.
Also check out
Wash the headlights.
Pay special attention to the lenses. Inspect the headlights for defects in the glass and headlight reflectors. If there are chips or cracks, replace the glass. There should be no damage to the reflector
If present, it will need to be replaced. To increase the luminous flux, it makes sense to install halogen lamps or install xenon lamps.
In order for you to be able to adjust the headlights, you need to meet all the conditions: the car must be complete (full tank, good tire pressure, spare tire). The driver's seat should be under a load approximately equal to the driver's weight (you can ask an assistant or put a sandbag).
Gearbox adjustment
It is not always necessary to remove it to get the box working properly. Although, if replacement of gearbox bearings or other repair measures is planned, simple adjustment is not enough.
The “ten” is characterized by situations in which the gears are poorly switched, they are simply knocked out. To correct such situations, the design includes a mechanism for adjusting the gear selection drive.
Adjustment is required in several situations:
- Recently, the input shaft bearings were replaced on a VAZ 2110 or another type of repair with the mandatory removal of the gearbox;
- There is a constant overshoot of one of the speeds;
- The gears are switched slowly, poorly, or are knocked out directly while driving.
If you are faced with one of these situations, then adjustment will not be avoided. Although this is better than dismantling and completely repairing the gearbox. The operation is performed as follows:
- At the bottom of the car, find the nut and bolt that tighten the gearbox linkage clamp. You don't need to remove it completely, just loosen it a little.
- The grooves of the rod are moved apart a little using a regular screwdriver, and also widen the gap in the clamp. This will make it easier for the rod to move to the speed selection rod. The rod must be set to neutral.
- Remove the cover from the gearshift knob.
- According to the template, position the lever - a template is installed in the window of the bracket lining to lock the reverse gear. Next, the lever axis stop is inserted into the existing template groove. It must be pressed in the transverse direction, but do not apply much force.
- Now the axial play of the rod is adjusted in the rear direction, plus the axial play is adjusted by turning to the left.
- The clamp is put in place, leaving a space of a few millimeters to the end of the rod. Now the clamp is properly tightened with the bolt.
Adjusting the gear shift lever and drive
All that remains is to adjust the gear shift lever and clutch release drive. To do this, you also need to know a few simple rules. To check the gear shift lever:
- The transmission control rod has a clamp nut. It is necessary to unscrew the bolt quite a bit.
Note: Access to the nut is from underneath the vehicle.
- It is necessary to have access to the free movement of the gear selection rod. After some operations to increase the connector, it is necessary to put the rod in the neutral position.
- The subsequent operation takes place inside the car. The gearbox cover is removed from the lever. It is enough to move it down.
- In the opened space, you need to find the reverse locking bracket.
- The lever must be fixed in the position where the groove of the lever axis stop is pressed against the template.
Note: it is necessary to carry out the shift smoothly and carefully, since the bracket itself can be deformed.
- From the bottom of the car, the rod play is placed in the “backward” position. The angular play must be placed counterclockwise.
- The nut of the clamp block under the car is tightened. The clamp needs to be moved forward a little. A space of 2-3 millimeters is provided.
The clutch pedal is adjusted in the following way:
- The car is installed on a flat surface. The minus terminal must be disconnected from the battery.
- A ruler is placed on the floor near the pedal. The measurement is taken from the floor to the rubber pad. If the indicator exceeds 160 millimeters, the pedal should be adjusted.
- When the hood is open, there is a metal clutch cable that should already be disconnected. Adjustment occurs by turning the nut. By tightening the nut, the gap decreases. Unscrewing the nut increases the pedal travel.
- Press the clutch pedal several times. If the results change, it is necessary to adjust the nut again.
- The rubber limiting sleeve moves into the fork to the limit.
It is worth noting that a lot of video materials exist on this topic. Detailed information about the methods of fastening the gearbox, its installation and removal can be obtained from the detailed photos. When working with your own hands, you need to often use the rules and advice given in the instructions. Today, as you know, the price of repair services in car services is not cheap. Therefore, learning to work independently on your car will be a pressing matter.
How to remove box 2110
print The client says that the transmissions have stopped connecting...
Well, let's drive the car into the pit. I’m going to look at the rest of the joints, leaks, etc. at the same time.
Cracked coolant hose
Leaking crankcase gasket in the flywheel area
The drive rubs against the plastic protection
How to remove the gearbox on a VAZ 2110
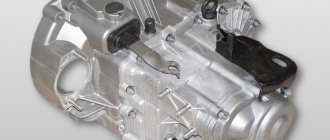
Car repair is a rather complex and time-consuming operation, and it is usually entrusted to car service professionals. Certain machine components do not generally require dismantling and repair by the driver in a garage. However, repair services are becoming more expensive, and vehicles break down more and more every year. Owners of products from the domestic automobile industry are not yet deprived of the opportunity to troubleshoot problems in their “iron horse” on their own. Transmission breakdown is one of the common problems that cause headaches for the owner of VAZ cars. Today we will talk about how to remove the box on a VAZ 2110, diagnose it and carry out feasible repairs.
Removal and installation of gearbox VAZ 2110, 2111, 2112
Removing and installing the gearbox, replacing the VAZ clutch.
We disassemble the VAZ 2110 gearbox with our own hands
0:107
Recommendation Remove the gearbox with an assistant.
0:210
EXECUTION ORDER
0:249
Remove the battery, drain the gearbox oil and remove the starter
0:404 1:909
Disconnect the block with wires from the speed sensor by squeezing the spring clips.
1:1052 2:1557
How to remove the gearshift mechanism
Remove bolt 1 securing the ignition module bracket to the gearbox and two bolts of the upper gearbox mounting to the engine. Bolt 2 (front of the car) is short, bolt 3 is long.
2:1923 3:2428
At the bottom of the car, disconnect the block with wires from the reverse light switch.
3:158 4:663
Remove the two bolts securing the torque rod bracket to the gearbox.
4:807 5:1312
Loosen the bolt of the gear shift rod clamp and disconnect the rod from the gear selector rod hinge by sliding it back.
5:1566 6:2071
Remove the wheel drives. Tie the plug inserted in place of one of the drives with a rope or wire so that it does not fall out when removing the box. The right drive does not need to be completely removed. It is enough to disconnect it from the gearbox and, moving it to the side, hang it from the body.
Replacing the release bearing on a VAZ 2110 with your own hands: video instructions
6:514 7:1019
To make it easier to remove the box, unscrew the two mounting bolts and disconnect the left ball joint from the steering knuckle
7:1234 8:1739
Unscrew the nut of the lower right mounting of gearbox 1 to the engine (engine side)
Please note that on models with a fuel injection system, a support bracket 2 for the intake pipe is installed under this nut, which must be removed from the stud
8:2216 9:504
If necessary, loosen the top nut securing this bracket.
9:651 10:1156
Unscrew the three fastening bolts and remove the lower cover 1 of the clutch housing 2.
10:1298 11:1803
Remove the bolt from the lower left mounting of the gearbox to the engine. Suspend the engine using a hoist or board.
11:2016 12:504
From the bottom of the car, unscrew the nut securing the left power unit support.
12:645 13:1150
Unscrew the two nuts securing the rear power unit mount to the body.
13:1284 14:1789
Unscrew the two bolts securing the rear support of the power unit to the gearbox, holding the nuts from turning with a second wrench, and remove the support.
14:2061 15:504
By inserting a screwdriver between the clutch housing and the cylinder block, slide the gearbox off the guide bushings. Be sure to hold it while doing this.
15:785 16:1290
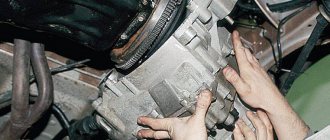
Move the gearbox as far back as possible, passing the rear cover of the box over the front suspension brace (the input shaft should disengage from the clutch). If the input shaft cannot be disengaged from the clutch, push the engine to the side. Lower the front end of the box and remove it from under the car. Install the gearbox in the reverse order of removal. After installation, fill in oil, adjust the clutch release drive and gear shift lever.
16:2127
https://www.drive2.ru/l/288230376153000970/
16:46 next article:
Adjusting the gear shift lever and drive
All that remains is to adjust the gear shift lever and clutch release drive. To do this, you also need to know a few simple rules. To check the gear shift lever:
- The transmission control rod has a clamp nut. It is necessary to unscrew the bolt quite a bit.
Note: Access to the nut is from underneath the vehicle.
- It is necessary to have access to the free movement of the gear selection rod. After some operations to increase the connector, it is necessary to put the rod in the neutral position.
- The subsequent operation takes place inside the car. The gearbox cover is removed from the lever. It is enough to move it down.
- In the opened space, you need to find the reverse locking bracket.
- The lever must be fixed in the position where the groove of the lever axis stop is pressed against the template.
Note: it is necessary to carry out the shift smoothly and carefully, since the bracket itself can be deformed.
- From the bottom of the car, the rod play is placed in the “backward” position. The angular play must be placed counterclockwise.
- The nut of the clamp block under the car is tightened. The clamp needs to be moved forward a little. A space of 2-3 millimeters is provided.
The clutch pedal is adjusted in the following way:
- The car is installed on a flat surface. The minus terminal must be disconnected from the battery.
- A ruler is placed on the floor near the pedal. The measurement is taken from the floor to the rubber pad. If the indicator exceeds 160 millimeters, the pedal should be adjusted.
- When the hood is open, there is a metal clutch cable that should already be disconnected. Adjustment occurs by turning the nut. By tightening the nut, the gap decreases. Unscrewing the nut increases the pedal travel.
- Press the clutch pedal several times. If the results change, it is necessary to adjust the nut again.
- The rubber limiting sleeve moves into the fork to the limit.
It is worth noting that a lot of video materials exist on this topic. Detailed information about the methods of fastening the gearbox, its installation and removal can be obtained from the detailed photos. When working with your own hands, you need to often use the rules and advice given in the instructions. Today, as you know, the price of repair services in car services is not cheap. Therefore, learning to work independently on your car will be a pressing matter.
Pro tips, driver actions after gearbox repair
First of all, the starter and battery are removed. Then you should drain the oil from the device. Next we perform the following steps:
First you have to disconnect the clutch cable. This should not cause any difficulties, because here it is enough to loosen the two nuts and then remove the cable; unscrew the fastening nuts, and then remove the cable from the box bracket; we compress the spring clips, after which we disconnect the wires from the speed sensor; Next, you should unscrew a couple of bolts, thanks to which the box is attached to the power unit; we are engaged in unscrewing the fastenings of the VAZ 2110 gearbox, which connects the box to the ignition; then the jet rod is removed (we unscrew the fastening bolts, loosen the clamp, and then pull the rod back); dismantle the left wheel drive (the right one can be left in place); then the bolts that are located on the steering knuckle, as well as in the lower right part of the box, are unscrewed. The bracket nut, clutch housing bolts and the left lower mounting bolt are also unscrewed; at this stage you can already get the power unit
It is important to secure it well so that it does not interfere with work and is not damaged; We dismantle the extreme fastenings; then we proceed to unscrew the two nuts of the rear engine mount; We begin to shift the gearbox from the guide bushings. Here it is worth holding it a little so that the unit does not fall; When we move the box as far as possible to the left, it will be possible to completely remove the device from the vehicle.
Gearbox device
There are situations when removing the gearbox is not at all necessary; adjusting it is enough. The VAZ 2110 very often has problems with gear shifting, they get knocked out. To eliminate this problem, it is not at all necessary to remove the box; it is enough to adjust the gear selection drive mechanism. It is enough to make do with adjustment in the following cases:
- not so long ago, the input shaft bearing was replaced or any other repair was carried out where the gearbox was removed.
- Only one speed comes out.
- When the car is moving, the speed shifts poorly or completely jumps out.
To adjust the gearbox you need:
- Loosen the nut and bolt, which is located under the machine, tightening the clamp securing the box rod.
- Using a screwdriver, move the clamp and grooves of the rod apart. Set the rod to the neutral position.
- Remove the cover from the gearbox.
- In order to block reverse gear, you need to place a lever in the window of the bracket lining.
- Adjust the axial play in the rear direction and by turning to the left.
- Place the clamp in place and tighten it with a bolt.
Gearbox 2110, how to remove it correctly, step by step instructions
- It is necessary to disconnect the gearbox and the clutch cable release forks from the bracket, for which we pull out the clutch cable forks from the lever in the engine compartment. Next, you need to loosen the nut securing the cable sheath to the gearbox. We hold the shell and pull out the cable tip from the bracket.
- Now disconnect the wire connector from the reverse sensor and speed sensor.
- After this, you need to disconnect the jet rod, which is attached to the buffer using two nuts. When the nuts are unscrewed, it is necessary to remove the bracket and dismantle the rod.
- Next, disconnect the gear shift drive rod from the hinge.
- Then unscrew the fastening bolts on the clutch housing cover and remove the cover.
- The wheel drives can now be removed. To avoid problems during installation, you should install a wooden plug. We move it to the side or remove the right drive.
- Next, loosen the ball joint mounting bolts.
- Remove the lower crankcase cover.
- Unscrew the lower bolt securing the gearbox to the engine.
- Then we hang the power unit using the prepared support. We dismantle the left motor mount by unscrewing the fastening nut.
- After unscrewing the gearbox mounting bolts and nuts that secure the rear engine mount to the body, remove the rear mount.
- We insert a screwdriver between the clutch housing and the cylinder block, and slide the box off the guide bushings.
- We move the gearbox as far back as possible, rocking it, and then dismantle it.
Installing an automatic transmission instead of a manual transmission on a VAZ 2110
Since KB VAZ does not have its own automatic transmission model, the German ZF continuously variable variator is used as an automatic transmission. The principle of operation of such a unit is based on the operation of a V-belt type transmission with the difference that both pulleys are of a split type. When converging or diverging, the segments change the depth of the stream, and the drive belt rotates at different radii. By changing the radii of rotation, the gear ratio also changes.
There is nothing complicated about installing this foreign equipment. All that was required was the manufacture of a special insert between the engine and the clutch housing, and the VAZ 2110 engine mount, which is attached to a manual gearbox, was also transferred. In the cabin, the gearshift lever was replaced with an automatic transmission selector.
With this modification of the transmission, the choice has become smaller; in addition to parking, neutral, reverse and the actual forward movement of the car, the braking mode of the power plant has been preserved, which distinguishes the CVT from other automatic transmissions and operates quite effectively.
In this position of the automatic transmission selector, the variator selects an extremely high gear ratio, operating in the “low” gear mode and continues to hold it when the accelerator is released. To prevent blocking of wheel travel, stage switching is done softly and smoothly, with some delay. When passing dynamic tests and during operation, the unit showed a sufficient degree of reliability.
VAZ 2110 — Removing the gearbox
What the public loves about our cars is their simplicity of design, availability of spare parts and ease of repair. As a rule, all basic work is carried out with a standard set of tools, except in rare cases when some kind of puller is desirable. But, as a rule, they can do without it.
The need for dismantling work
This holy simplicity helps to save on the services of masters, and quite a lot. Moreover, given the age category of owners of the VAZ 2110 and others like it, such repair work instills diligence, a love of technology and develops hand motor skills. But seriously, in any garage, any person who is even remotely familiar with threaded connections will be able to dismantle and restore any unit.
The need to dismantle the VAZ 2110 gearbox arises not only when there is a problem in the gearbox itself, but also when for some reason you need to get to the clutch - change the disc, repair the basket, change the release bearing. Despite the fact that the car is inexpensive, the owners have very few complaints about it, which is why they choose the VAZ 2110 among the entire model range. Removing the gearbox is no exception. The work is carried out in several stages, and takes about an hour and a half.
Preparatory work
Before we start removing the VAZ 2110 gearbox, let's prepare for work on the material part. To withdraw you will need:
- set of open-end wrenches;
- set of spanners
- heads and knobs with cardan;
- without a hammer - nowhere;
- a skein of strong braid (although you can do without it);
- jack.
In order to avoid going under the car and getting up from the inspection hole a hundred times, we will try to organize the work according to this principle.
Work on removing the gearbox from the engine compartment
- We place the car on a flat platform with an inspection hole. If it is possible to use a lift, great, it will make the work much easier. We open and fix the hood in the open position, after which the first step is to remove the terminals from the battery, starter relay and speed sensor.
- Disconnect the mass from the clutch housing and disconnect its drive cable. Now you can unscrew the two uppermost bolts securing the clutch housing to the cylinder block and the upper starter mounting nut.
- Now we need to think about keeping the engine in the same position when we disconnect it from the mounting points. For this, the factory has provided a mounting eye, which should be on the manifold stud. We hang the motor with braid either on a beam in the garage, or on a traverse, or on a board laid across the car, resting it on the drainage grooves. We get down under the car.
Work carried out under the car
- remove the engine splash guard and the protective cover of the clutch housing;
- drain the transmission oil from the gearbox, having previously unscrewed the plug;
- we find the reverse switch and disconnect the terminals from it; loosen the clamp securing the linkage, remove it from the selector;
- find and disconnect the jet thrust;
- we disconnect the internal CV joints, make sure that the unfixed side gear does not fall into the gearbox;
- use a hammer to knock out both hinges;
- move it to the sides of the drive to the maximum possible distance;
- if it is not possible to dismantle the CV joints on the car, then you will have to remove them along with the box and then knock them out in a vice, if there is such a need;
- unscrew the rear engine mount, the engine is already hanging;
- unscrew the left engine mount;
- unscrew the remaining starter mounting nut;
- dismantle the starter;
- We put a spacer under the gearbox so that you can remove the load from the mating plane, slightly loosen the braid on which the motor is attached;
- unscrew the last bolt securing the box to the crankcase, move it back and remove it together with the clutch housing.
The box has been dismantled. When carrying out work, you must take into account that in no case should you rest the gearbox on the input shaft in order to avoid its deformation, and when removing it, you must carefully remove the shaft from the clutch, there is a danger of damaging the petals of the basket.
Installation of the box is carried out in the reverse order, the only thing that can be strongly recommended is to be sure to change the retaining rings on the inner CV joints. Happy work!
Engine dismantling
To carry out repairs and modifications, in some cases you will also have to remove the engine. What can we say about the need or desire to change the power unit to a new one. There is no way to avoid this event.
To remove the engine you will need:
- Pit or overpass;
- Assistant;
- A set of all kinds of tools;
- The lifting mechanism is a winch or hoist.
When choosing a lifting device, pay attention to its load capacity. In the case of removing the engine from a VAZ 2110, this figure should be at least 200 kilograms
How to remove the engine on a VAZ
Having prepared everything you need, you can begin dismantling the engine.
- Remove the hood. Be sure to use a marker to make notes on the location of the four washers. This will make putting the hood back together much easier.
- Relieve pressure in the fuel system. To do this, turn on the starter for 15 seconds with the wiring from the fuel pump turned off. Or simply remove the fuel pump fuse.
- Remove the battery.
- Remove the plastic cover from the motor.
- Move the air filter housing aside.
- Disconnect the throttle cable from the engine.
- Disconnect the wiring harness from the throttle position sensor.
- Disconnect the wiring harness from the idle speed control.
- Disconnect the brake booster hose from the intake receiver.
- Disconnect the wiring harness from the ignition module.
- Disconnect the block from the camshaft and crankshaft position sensor.
- Next, be sure to disconnect the wiring from the canister purge valve. Disconnect the wiring block and the injector block from each other.
- On a 1.5-liter engine, the wiring block from the oil level sensor located in the oil pan is disconnected. The wiring from the coolant temperature sensor is also disconnected.
- Disconnect the temperature sensor wiring and the knock sensor wiring. The latter are located on the intake module.
- The ground wires and the tip of the negative terminal wire of the battery are removed from the engine.
- Remove the block with wires from the emergency oil pressure sensor.
- Now the fuel lines are disconnected from the power unit.
- Don't forget to remove the generator.
- Drain the coolant from the system.
- Remove engine oil from the system.
- Drain all oil that is in the gearbox.
- Disconnect the coolant hoses coming from the thermostat.
- On 1.5-liter engines (injectors), remove the exhaust pipe, and on a 1.6-liter injection engine, remove the catalytic manifold.
- Completely remove the gearbox.
- Remove the front wheel hub bearing along with the bolts, nuts and washers.
- One bolt securing the gearbox should be screwed into the upper threaded hole of the BC on the left together with a wide washer.
- A cable from the lifting mechanism you choose is tied to the bolt.
- The second lift cable is connected to the engine through a mounting eye. It is located on the cylinder head.
- Carefully lift the engine and secure it in a suspended position.
- Remove the upper and lower engine mounts.
- The right mount will be the last mount for your motor. Unscrew the top nut and lift the engine using the mechanism, completely removing it from the engine compartment.
- Remove it carefully so that the engine does not touch or damage anything along the way. Don’t forget, the engine on a VAZ 2110 weighs about 120 kilograms, and some versions weigh more than 130 kilograms.
Make sure the winch can handle a lot of weight in advance by performing a test lift of a heavy object. Otherwise, the lift may fail at the most inopportune moment.
When installing a repaired or new motor, proceed in the reverse order of dismantling. Pour new oil into the engine, gearbox, and don’t forget about the coolant.
When changing the engine to a new one, you should understand that now engines from the “ten” cost from 60 to 100 thousand rubles.
Source
Diagnostics
Before starting work, you should carry out diagnostics, this will allow you to determine exactly what the reason is and whether it is necessary to remove the box from the car. This will avoid unnecessary and unnecessary actions.
All these are signs of a broken box.
. Here you will definitely have to repair the unit or replace it with a new one. It is better to fix the problem in a timely manner. A faulty gearbox causes increased loads on the motor, which will lead to accelerated wear. Also, at one moment you can stop on the road with a completely failed gearbox.
In addition to malfunctions, the box may need to be removed to repair other components of the car. There are actually quite a lot of cases when this is required:
- Replacing the clutch. This may involve either replacing the entire basket or installing a replacement disk;
- If for any reason the box needs to be replaced;
- Removing the gearbox oil seal;
- Elimination of leaks through the rear crankshaft oil seal;
- Installing a new release bearing;
- Removing the bushing;
- Removing the flywheel;
- To carry out other repair operations.
As you can see, there are many reasons to dismantle the box. Therefore, you should know exactly how this work is done. In general, this operation is not difficult, but it requires care. Still, the gearbox weighs about 30 kg.
, that is, removal requires physical effort.
Disassembling the gearbox
In the situations described above, a simple gearbox adjustment will be sufficient. This is much better than repairing the VAZ 2110 gearbox, disassembling and assembling the gearbox.
Procedure for disassembling the gearbox:
- Remove the oil indicator from the gearbox. Unscrew the bolts that hold the clutch cable.
- Unscrew the bolts that hold the back cover. The lid is hermetically sealed, so when removing it, you can use a hammer.
- To prevent the shafts from turning while disassembling the gearbox, turn on the third or fourth speed. Then unscrew the bolt that secures the fifth gear.
- Remove the fifth gear and fork together.
- Afterwards, remove the gear from the secondary shaft and the fork. Then remove the plate that protects the bearings.
Dismantling the VAZ 2110 gearbox housing
Having started repairing the VAZ 2110 gearbox, after all the steps described above, it is necessary to disassemble the crankcase and the operating mechanism. Let's get started:
- We unscrew the spring plugs that hold the gear rods. Once the plugs are unscrewed, the end balls will fall out of the holes. We do the same with the plug that holds the reverse gear. If the balls have not fallen out of the holes, you can get them out using a magnetic screwdriver.
- Next, we unscrew the bolts that secure the gearbox housing to the clutch housing. After the bolts are unscrewed, you can use a screwdriver to disconnect the crankcases.
- Next step. Unscrew the rod from the first and second gear fork.
- We do the same with gears third, fourth and fifth, respectively. To remove the rod, it must be removed together with the gear shift parts.
- You need to remove the axle from the reverse gear and, of course, the gear.
- Next, take out the differential and two shafts with gears. Unscrew the three bolts that secure the gear mechanism and remove it from the crankcase.
- Unscrew the rear lever bolt and remove the rod.
- If necessary, remove the bearings of the primary and secondary shafts with a separator.
Communities › VAZ: Repair and Modification › Blog › Removing the gearbox from a VAZ2110
Repair. I’ll try to describe the process of removing the gearbox, maybe someone doesn’t know.
Remove the protection, drain the oil from the gearbox
Comments 61
there is some kind of gear inside falling because of this
Is your gearbox assembled using gaskets or sealant?
...we unscrew the eggs xD
no, my friend and I removed a box without a hole, just lift the face higher and disassemble the suspension on the left (strut and lever)
No matter how you look at it, you need a hole. As soon as I buy a garage and build an overpass at the dacha, I can divorce my wife
Why pull the drive?
To make it easier to remove and more convenient to install the gearbox, I have a narrow pit with inconvenient drives.
in general everything is so. I was alone with him. I removed the drive completely for convenience. I didn't unscrew the support. I removed the saber from the short side. This makes it easier to put the box in place. Don’t forget, if you take both drives out of the box, you need a plug in front of the second one! Also remove the starter. The less weight, the better IMHO. and +100 for a post with good photos!
and that there is a lot of unnecessary things)) I don’t even bother to take pictures of what I’m doing)) few people will remove the box themselves)) they usually go to the service center)) without a hole, I jacked up the face high and took pictures of everything)))
It’s kind of strange, why the extra body movements?! Why remove the lever, but leave the right drive in the box? I was filming for the first time, alone, without experience, with all the breaks for beer) it took about an hour, it took longer to put it in place... it was very inconvenient to do it alone
And now how we sorted it out, we need a photo))
You still need to learn Russian...
Described well, but everything is not as simple as it seems)
With the help of a thread, you can concoct a fairly high-quality manual, relying not only on your own experience, but on the experience of a large circle of people. Well done for deciding to do this.
Everything is correct, but instead of unscrewing the gear selector rod from the cardan, it is easier to unscrew the cardan from the gearbox rod. Then there is no need to regulate gear shifting. And this saves a lot of time.
I didn't know, now I will know.
You lift up the boot and there is a bolt for a 10 key. I unscrew it and that’s it.
Everything is correct, but instead of unscrewing the gear selector rod from the cardan, it is easier to unscrew the cardan from the gearbox rod. Then there is no need to regulate gear shifting. And this saves a lot of time.
That’s right))) and you can also not pull the drives out of the hub, but simply unscrew the 4 bolts on both sides of the balls and pull the drive out of the box
It is possible, but it is better to remove it to make it easier to remove the box.
I don’t see the point) I’m the only one doing all this and I also put one box, it takes me 2 and a half hours to remove, sort through, put the box)) and so everyone does it as it’s convenient for him
Come on? 2.5 hours, one, remove, sort out and install? I do not believe )
No one is forcing you to believe)) and I didn’t remove so many things to remove the box) but I put one on, it’s more convenient for me))
Come on? 2.5 hours, one, remove, sort out and install? I do not believe )
Take 15 minutes to disassemble the box)))))
along with the entire 08 output shaft up to first gear?
The procedure for removing the gearbox on a VAZ 2110
To begin with, you should definitely decide whether you really want to remove the VAZ 2110 gearbox without the help of an experienced specialist. These works are quite complex, so we cannot do without the proper knowledge, skills and equipment.
If you still decide to get down to business on your own, then you should call a friend for help - for some actions one pair of hands will not be enough, and the work will be more fun. The tools we need are, first of all, wrenches and screwdrivers.
In addition, it is worth reading the instructions on how to change the box on a VAZ 2110. Don’t be too lazy to do this, because the process itself is quite complicated, so you can damage the device during dismantling work.
First, we drive the car into the pit. If you want to know how to remove a box on a VAZ 2110 without a pit, then everything happens exactly the same, but the work will be more difficult. After all, having straightened up to your full height, all movements are easier and more convenient. Next, install supports for the wheels. After making sure that the car is immobilized, we begin removing the VAZ 2110 gearbox.
How to remove and install a manual transmission
The procedure for removing the gearbox must be carried out by driving the car onto an overpass or into a garage with an inspection hole. The wider and more spacious the pit, the easier it will be to do the work. Provide good lighting for the underside of the car, because all work will take place in semi-darkness.
The gearbox in the “ten” weighs about 30 kg, provided that the oil is drained. The weight does not seem very large, but keep in mind that you will need to hold the gearbox and unscrew the nuts. There are two options: work with an assistant or build a device into which you can rest the box when removing it and then grab it with both hands to remove it.
List of tools required for dismantling:
- Set of wrenches;
- Set of socket heads with extension;
- Flat and figured screwdrivers;
- Pliers;
- Mount;
- Jack;
- Clean dry cloth for wiping.
Further work is carried out in the following order:
- Remove the plastic engine protection by unscrewing the bolts with a socket wrench. We also remove the shield covering the engine compartment.
- Drain the oil from the box. Any container is suitable for this, for example, a plastic 5-liter bottle with a cut off neck. We unscrew the plug, wait until everything drains, then wipe the plug and drain neck and tighten the hole.
- We de-energize the car by removing the terminal from the battery
- Remove the air filter along with the throttle valve. We also remove the air flow sensor and crankcase ventilation hoses.
- We remove the starter. To do this, you need to remove all the rubber caps from the large bolt with the plus from the battery and the small bolt of the solenoid relay, disconnect all the terminals, and then unscrew the bolts securing the starter to the engine housing.
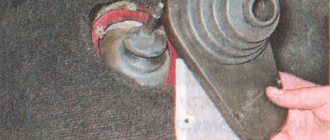
- We remove the clutch cable by releasing it from the fork and loosening the outer nut.
- We disconnect the wiring from the box - this is the speed indicator sensor and the reverse gear lights.
- You can remove the reaction thrust by unscrewing the two nuts holding the bracket to the buffer.
- Disconnect the gear shift rod from the joint
- Next, you need to unscrew the bolts on the clutch housing cover and move the cover to the side.
- The next step is to remove the right and left front wheel drives. You can insert a plug into the hole of one of the drives so as not to mix them up during assembly. We remove the left drive completely, move the right one to the side so that it does not interfere. The bolts that secure the ball joint must be loosened.
- Then we remove the lower crankcase cover and unscrew the lower bolt that secures the gearbox to the engine.
- After this, the engine must be lifted to free the box for removal. You can throw a cable with a hook over the ceiling beam. A handy option is to use a strong board as a support.
- The next step is to remove the rear power unit mount. First you need to unscrew the bolt holding the engine to the left side support, then unscrew the bolts securing the rear support to the body and gearbox. Hold the bolt heads with a second wrench, otherwise they will turn. After this, you can remove the support itself.
- The box must be removed from the guides while holding it in weight. To obtain a good breaking force, you can insert a flathead screwdriver between the cylinder block and the clutch housing. The input shaft gears should disengage. If this does not happen, slightly shake the engine by pressing it with a stop board.
- Be careful! The heavy body of the box should not rest on anything. Moving it back as far as possible, tilt the assembly with its front edge forward and pull it out from under the car.
After removing the box, it should be disassembled to carry out a visual inspection of the shafts and gears. If necessary, replace worn parts with new ones
When assembling the box, pay special attention to sealing the crankcase and replacing the seals
Reinstallation of the box is carried out in the reverse order. If this is your first time carrying out a similar procedure, take photographs of each step, the location of parts and fasteners. This will help restore the sequence of actions.
Video: dismantling the gearbox on Lada 2110
HOW TO REMOVE THE GEARBOX OF A VAZ 2110 2111 2112
After repairing the gearbox, you need to run in the new gears for some time, especially if you changed them block by block, in groups. During the break-in period, refrain from aggressive driving style. When switching to a higher speed, pause for one or two seconds, and when downshifting, on the contrary, engage a new one immediately. Always monitor the oil level - if it drops, take the time to crawl under the car and inspect for leaks at the junction of the cover and crankcase. Handle your vehicle carefully and the service life of the gearbox will increase.
selection of differential bearing adjusting ring
Differential bearings must be mounted with a preload of 0.25 mm (for control 0.15-0.35 mm). The tension is ensured by selecting the thickness of the adjusting ring 13 (see Fig. 3-7), installed in the gearbox housing socket under the outer ring of the differential bearing.
Note.
Select the thickness of the adjusting ring when replacing one of the following parts: differential box, differential bearing and clutch or gearbox housings.
Determine the thickness of the adjusting ring using tool 67.7824.9517 in the following sequence: press the outer ring of the tapered roller bearing 3 together with the adjusting ring 4 (Fig. 3-24) into the gearbox housing;
Note.
The installation ring 4 has a constant thickness of 1.25 mm.
Press the outer race of the other differential bearing into the clutch housing. At the same time, be careful not to mix up the outer rings of the differential bearings; install the differential into the gearbox housing and, covering it with the clutch housing, tighten at least three nuts, equidistant from each other, securing the gearbox housing to the clutch housing (tightening torque 24.5 Nm (2.5 kgcm)). Then turn the differential to self-install the bearings 2-3 turns; install support mandrel 2 on the differential box and secure indicator 1 with extension using a universal holder. Install the indicator leg on the support mandrel with a preload of 1 mm, and in this position fix the indicator and set its arrow to zero; move the differential from below and watch the indicator;
WARNING
When measuring the axial movement of the differential, do not rotate it so as not to distort the measurement results.
Using the formula S = A + B + C, calculate the thickness of the adjusting ring of the differential bearings, where: S is the thickness of the adjusting ring; A is the amount of axial movement of the differential; B - the amount of preload of the differential bearings; C is the thickness of the installation ring (constant value). Example.
The indicator reading when moving the differential is 1.00 mm. The preload of the differential bearings is 0.25 mm, the thickness of the mounting ring is 1.25 mm. S = 1.00+ 0.25+ 1.25 = 2.50 mm. After determining the thickness of the adjusting ring, disconnect the clutch housing and gearbox, remove the differential, press out the outer bearing ring from the gearbox housing using a puller 67.7801.9526 and install the selected adjusting ring instead of the adjusting ring 4. Press in the outer ring of the differential bearing using the mandrel 67.7853.9575 and install the differential into the gearbox housing and, covering it with the clutch housing, tighten the nuts securing the gearbox to the clutch housing. Check the moment of resistance to rotation of the differential with a dynamometer 02.7812.9501. To do this, pass the tip of the dynamometer through the hole in the differential box (for the wheel drive shaft) until it wraps around the pinion axis. Turn the dynamometer handle several turns clockwise and use the scale to determine the moment of resistance to turning. It should be: for new bearings 147-343 Ncm (15-35 kgf.cm), for run-in bearings at least 30 Ncm (3 kgf.cm).
Rice. 3-24. Scheme for selecting the thickness of the differential bearing adjusting ring: 1 - indicator; 2 - support mandrel; 3 — differential bearing; 4 — installation ring; 5 - mandrel
Something bad happened and a VAZ 2110 gearbox needed to be repaired. Unit repair is required when:
- It is difficult to switch gears off and on.
- automatic switching off of gears.
- noise occurs when shifting gears.
- transmission oil leak.
The reasons for the breakdown may be different, perhaps the oil was not changed in a timely manner or the mechanism has simply exhausted its resource.
How is a VAZ 2110 gearbox repaired? Do-it-yourself VAZ 2110 gearbox repair, video.
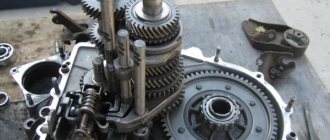
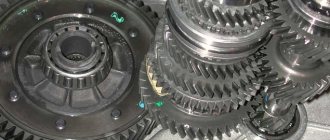
VAZ 2110 gearbox device
The Volzhsky Automobile Plant's 10th series vehicles are equipped with a five-speed manual gearbox. It is two-shaft, has five gears for forward movement and one reverse gear for reverse. The main gear, differential and the gearbox itself are combined in one housing. When connecting the crankcase to the cover, it is possible to seal it with a gasket or sealant that is resistant to gasoline and oil.
The two-shaft system is represented by a primary and secondary shaft. The first is a block of driving gears, the second contains driven gears that provide forward movement. The two groups of gears are in constant mesh. The secondary shaft parts can be removed for replacement or repair.
The secondary shaft is made empty inside to lighten the weight of the structure. At the locations of the gears there are circular grooves that ensure the supply of lubricant to the surface of the shaft during operation. The rotation of the fifth gear gear is carried out through the bushing. The shaft splines are used to install synchronizer hubs. The shafts themselves are installed in the box body on bearings - a pair of roller bearings on one side and a pair of ball bearings on the other.
The differential uses two satellites. The pretension of the bearings in it can be adjusted by changing a special ring from thick to more or less thin. This ring can be found under the outer differential bearing cover. The speed sensor is connected to a plastic gear located on the gearbox housing, which, in turn, is driven by the drive gear on the differential housing.
VAZ 2110 gearbox design: 1- clutch release bearing; 2 — guide sleeve of the clutch release bearing; 3 - main gear drive gear; 4 — roller bearing of the secondary shaft; 5 - oil sump; 6 — satellite axis; 7 — speedometer drive gear; 8 — axle gear; 9 — differential box; 10 — satellite; 11 — clutch housing; 12 — driven gear of the main gear; 13 — adjusting ring; 14 — tapered roller bearing of the differential; 15 — axle shaft seal; 16 — driven gear of the 1st gear of the secondary shaft; 17 — synchronizer for 1st and 2nd gears; 18 — driven gear of the second gear of the secondary shaft; 19 — driven gear of the third gear of the secondary shaft; 20 — synchronizer for 3rd and 4th gears; 21 — driven gear of the fourth gear of the secondary shaft; 22 — ball bearing of the secondary shaft; 23 — driven gear V of the secondary shaft transmission; 24 — 5th gear synchronizer; 25 - secondary shaft; 26 — rear cover of the gearbox housing; 27 — drive gear of the 5th gear; 28 — ball bearing of the input shaft; 29 — input shaft; 30 — gearbox housing; 31 — roller bearing of the input shaft; 32 — input shaft oil seal; 33 - breather
When driving on a bumpy road, the engine experiences vibrations, which, if the rubber dampers are worn out or sagging, can lead to displacement of the gearbox shafts. This can result in unpredictable transmission disengagement when the gears on the two shafts become disengaged. To compensate for such vibrations, a reaction rod is provided in the connection between the gearshift handle support and the gearbox housing. It is equipped with a rubber gasket to dampen vibration from the engine, which causes the gearshift lever to shake.
You can find out how much oil is in the gearbox by checking the dipstick. According to factory standards, the gearbox holds 3.5 liters. If the oil level drops, it is necessary to add it, otherwise accelerated wear of the gears can lead to breakdown. Technical regulations require routine oil changes every 90 thousand kilometers.
Gearbox disassembly and repair
ATTENTION !
If during the repair of the gearbox at least one of the following parts was replaced: clutch or gearbox housings, differential housing or differential bearings, then it is necessary to select a differential bearing adjusting ring.
| 4. Unscrew the remaining four nuts securing the rear cover. | ||
| 5. Use a screwdriver to hook the boss on the cover and remove the back cover. | 6. Unscrew the bolt securing the 5th gear fork (a spring washer is installed under the bolt head). | 2. Secure the gearbox shafts from turning. To do this, engage 5th gear by moving the synchronizer clutch down along with the fork so that the coupling splines engage with the gear, then engage 3rd or 4th gear by moving the gear selection rod. |
| 2. Unlock and unscrew the nut securing the input shaft. To do this, you need to apply a lot of force, since the nut is tightened with a large torque. | 9. Having previously unlocked it, unscrew the nut securing the secondary shaft. To do this, you need to apply force, since the nut is tightened with a large torque. | 10. Using screwdrivers, lift the 5th gear driven gear (thereby pressing the synchronizer hub from the shaft), remove it together with the synchronizer and fork from the secondary shaft. At the same time, make sure that the synchronizer clutch does not come off the hub: the spring-loaded synchronizer retaining balls may fall apart. |
| 11. Remove the thrust plate from the synchronizer. Then remove the fork from the groove of the synchronizer clutch. | 12. Remove the 5th gear from the synchronizer with blocking ring 1. Mark blocking ring 1 relative to clutch 2 and remove it. During operation, the teeth of the ring are worn in to the teeth of the coupling, so during assembly the ring must be installed in the same position. If you do not intend to disassemble the synchronizer, tie it with wire or rope to prevent it from falling apart. | 13. Remove the bushing from the secondary shaft. |
| 14. Remove the 5th gear drive gear from the input shaft. Pay attention to how it is installed. | 15. Using an impact screwdriver, remove the four screws (there are spring washers underneath) securing the bearing plate and remove bearing plate 1. Then remove thrust washer 2 from the secondary shaft. | 16. Remove the retaining rings from the bearings of both shafts while lifting the shafts by hand. |
| 17. Unscrew the three clamp plugs and carefully remove the clamp balls with springs. | 18. After unscrewing the reverse lock plug, remove the O-ring, and then remove the lock spring. | 19. Tilt the box and remove the locking ball. |
| 20. Unscrew the twelve nuts and bolt securing the gearbox housings. Pay attention to which nuts holder 1 and eye 2 are installed under. Spring washers are installed under the nuts and bolt. Remove the process plug | 21. By inserting a screwdriver into the grooves (three special grooves along the perimeter of the crankcases), separate the gearbox housing from the clutch housing. | 22. Lift the gearbox housing slightly, turn it counterclockwise so that boss 1 of the housing comes out from under the gear, and remove the gearbox housing from the clutch housing. |
| 2Unscrew the bolts securing the 1st–2nd and 3rd–4th gear shift forks. | 24. Slightly lift the 1st–2nd gear shift rod so that it comes out of support 3, and turn it counterclockwise so that its head 1 disengages from the locking bracket 2. Remove the rod fork 4 from the groove of the synchronizer clutch and remove the rod with a fork. It is not recommended to remove the forks from the rods unless necessary, so as not to mix them up during assembly. | 25. By turning the 3rd–4th gear shift rod, disengage its head from the gear selection lever. Then lift the rod slightly so that it comes out of the support, and, moving the rod fork out of the groove of the synchronizer clutch, remove the rod with the fork. |
| 26. By turning the 5th gear shift rod, disengage its head from the locking bracket. Remove the rod by moving it out of the support. | 27. Remove the reverse idler gear shaft. | 28. Slide the reverse idler gear all the way into the gear selection mechanism, turn it 30–40° and remove the idler gear from under the shaft gears. |
| 29. Using a slight rocking motion, remove the input and output shafts at the same time. | 30. Remove the differential from the clutch housing. | 31. Unscrew the three bolts securing the gear selection mechanism (spring washers are installed under the heads of the bolts). Remove the gear selector mechanism. |
| 32. Remove the magnet from the clutch housing. | 3After unscrewing the fastening nut, remove the housing with the speedometer drive gear. Replace a torn or loose housing O-ring. | 34. Unscrew the reverse light switch from the gearbox housing. There is a metal O-ring installed underneath it. |
| 35. There is a special puller for pressing out the front bearing of the secondary shaft. If it is missing, press out the bearing using a screwdriver. | 36. Remove the oil pan located under the bearing. | 37. There is also a special puller for pressing out the front input shaft bearing. If it is missing, bend the device into the shape of a hook made of stiff wire. Insert the tool into one of the two grooves in the crankcase and place the hook under the bearing. Then, using a screwdriver (placing a wooden block), press the bearing out of the crankcase, applying force to the opposite end of the screwdriver with hammer blows and alternately moving the hook in the grooves. |
| 38. Press the new front shaft bearings all the way into the clutch housing using a suitable mandrel. | ||
| 39. Using a screwdriver, use a screwdriver to hook the edge of the protective boot on the gear selector rod and slide it off the rod support sleeve. | 40. Remove the gear selector lever mounting bolt. Slide the rod and remove the gear selector lever. Then remove the gear selector rod from the clutch housing. | 41. If it is necessary to replace the rod hinge, slide the protective cover off it and unscrew the hinge mounting bolt. The bolt is fixed with special glue TB-1324. Before tightening the bolt, clean it of old glue and apply new one. Replace the torn or lost elasticity protective cover of the rod hinge. |
| 42. To replace the clutch housing, remove the bearing and clutch release fork from it (see here), press out the seals. | ||
| 4 Inspect the clutch and gearbox housings, as well as the rear cover. There should be no cracks or chips on them. There should be no nicks, scratches, dents, etc. on the mating surfaces. Remove minor damage with sandpaper. In case of severe damage, replace the defective parts. | ||
| 44. Check the bearing seats in the clutch housing and in the gearbox housing. These surfaces must show no signs of wear or damage. Otherwise, replace the crankcases. | ||
| 45. Check the condition of the roller bearings. If the raceways, cage or rollers are damaged and if play is detected in the bearing, replace it by installing it on the shaft (the radial play in the bearing should not exceed 0.07 mm). | ||
| 46. Check the condition of the gear shift rods. Replace bent rods, with burrs, burrs or worn out holes for clamps. Replace the forks if they are bent or their tabs are worn. | ||
| 47. Check the axle seals. The seals must not be warped or have tears. The working edge must be smooth, without holes, dents or rubber sagging. The oil seal spring must not be broken or stretched. Replace defective seals. | ||
| 48. Also check and, if necessary, replace the input shaft seal and the selector rod seal. | ||
| 49. Clean the magnet from particles of wear parts. If the magnet is cracked or its magnetic properties are weakened, replace the magnet. | ||
| 50. Thoroughly clean the mating surfaces of the clutch and gearbox housings and the rear cover from old sealant. Reassemble the gearbox in the reverse order of disassembly, taking into account the following. | ||
| 51. Before installing the shafts, engage the teeth of their gears and, in this position, install them in the clutch housing. | ||
| 52. Pay attention to how the forks are installed on the gear shift rods: 1 – rod with the 1st and 2nd gear shift fork, 2 – rod with the 3rd and 4th gear shift fork. | ||
| 5 Liberally lubricate all rubbing parts with transmission oil. | ||
| 54. Don't forget to reinstall the magnet. | ||
| 55. Before installing the gearbox housing on the clutch housing and the rear cover on the gearbox housing, sealant is applied to their mating surfaces along the entire perimeter. | ||
Difficulty engaging second gear, video
The owner of the ten may encounter the same problems as when turning on the first speed. In any case, malfunctions are due to the following reasons:
- abrasion of gear teeth. At the first stages, the speed turns on poorly, but over time it will start to crash. Therefore, surgical intervention is required;
- there is insufficient adhesion of the gear to the gear shift clutch;
- the speed is switched off when hitting uneven road surfaces. In this case, the problem is the clutch.
Sometimes, to eliminate the knockout of the second gear, it is enough to replace the clamp. If replacement does not achieve the desired result, then a major overhaul is required.
Adjustment in this case will not solve the problem. Carrying out repair work yourself is quite difficult. Unlike adjusting and replacing oil seals, major repairs require professional skills.
Nuances, video
It should be noted that the gearbox is a fairly stable component of the vehicle. Compared to other units, breakdowns occur much less frequently here. At the same time, you need to remember that for the normal functioning of the box, you should change the oil in a timely manner, and use products from trusted brands. In terms of their performance, the gearboxes are almost identical. If we are talking about front-wheel drive cars, which include the VAZ-2110, then you can use oil poured into the power unit. If we are talking about rear-wheel drive VAZs, then special oil is provided for them. Sometimes car owners notice an oil leak. This is caused by weak fastening of the box and crankcase. The problem is solved with the help of seals, as well as careful tightening of the bolts.
If problems arise with the box, first of all it is necessary to adjust the drive and replace parts that have failed as a result of physical wear.
If the car owner has the skills and experience, then repairing the gearbox of a VAZ-2110 car can be done with his own hands. In other cases, it is better to visit a trusted auto repair shop and eliminate the deficiencies after professional diagnostics.
Where can I buy
You can buy a new replacement part at special retail outlets or HERE.
The cost of the checkpoint varies, starting from 50,000 tenge
Repair work in the “tens” gearbox
Unscheduled repairs of the VAZ 2110 gearbox are carried out if faults are detected in the unit itself. Typical signs that require transmission repair are the following:
- spontaneous switching off of gears;
- leakage of aggregate oil (wear of the gear selector rod, input shaft seals);
- knocking in the gearbox cavity (bearing wear);
- presence of extraneous noise in the gearbox;
- for other defects that interfere with the normal operation of the transmission.
After determining the nature of the defect, we repair the VAZ 2110 gearbox in the area where the defect was detected. For this purpose, disassembly of the box is required, which is best entrusted to a specialist - a mechanic for repairing automobile units. The point is that the kinematic diagram of the gearbox is quite complex, and you need to have the necessary skills to carry out repair work on such a part.
In addition, repairs require special keys, which are not available in a typical car enthusiast’s kit. After the repair work, the VAZ 2110 box is assembled by the same master who was involved in restoring the operating functions of this vehicle unit. This is a more responsible process, because after it the unit is installed on the car for further operation.
In some cases, when this transmission unit cannot be repaired due to objective reasons, in a VAZ 2110 car, replacing the gearbox is a necessary and sufficient condition for further operation of the vehicle. True, there are cases when the “ten” is equipped with an automatic transmission instead of “mechanics”.