Every motorist knows that the fuel level sensor on the injection VAZ 2110 plays its irreplaceable role on the dashboard. How else will you determine how much fuel you have left in the tank?!
When it comes to driving around the city, you don’t have to pay much attention to this, since there is always some gas station nearby. Traveling outside the city, where gas stations occur every few tens or even hundreds of kilometers, is a very risky activity in the case when the measuring element does not work.
Typical faults
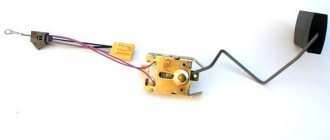
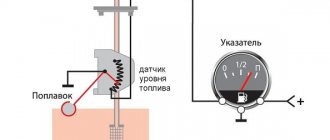
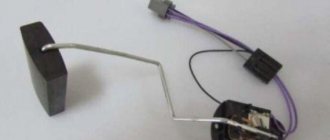
In the VAZ 2110 car, the fuel sensor is based on a rheostat with a resistor, which is made of nichrome particles. The moving element of the rheostat is lowered into the fuel and moves using a lever and a float.
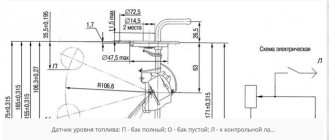
The second part of the lever is, in fact, an additional contact. If you place it in a certain position, the circuit regulating the process of replenishing with spare fuel will be closed. In the domestic “ten”, the volume of reserve fuel is about 4-6.5 liters.
Alas, despite the importance of a fuel level meter, its quality is far from perfect, which is why car owners often have to deal with sensor malfunctions.
It is important to note that not all breakdowns necessarily require replacement. Sometimes you can get by with a simple tweak that will allow you to return the previous functionality to the pointer.
Typical breakdowns
There are several typical malfunctions that even a beginner can cope with.
- The fuel level indicator suddenly changes its values. Most likely, the contact track has worn out due to the slider. If the wear is not severe, it is enough to simply bend the fasteners of the slider so that it is slightly above the problem area. But when wear is severe, the contact track changes completely.
- The indicator arrow is at a level that is not true. For example, it shows an empty tank even though you just filled up. This will require some adjustment. Disconnect the sensor from the gasoline tank and adjust the indicator. It is enough to move the arrow from the value at which it is stuck to zero. Most often, this measure helps.
- The arrow barely moves and cannot reach the desired position. In such a situation, the tongue bends slightly, which allows you to increase the range of the pointer arrow. It is possible that the contacts on the pointers have broken or come loose. To do this, look under the dashboard and check the condition of the wiring.
- It is possible that the fasteners securing the wires have become loose. They need to be tightened up. If the instrument panel is in good condition, examine the entire wiring path. A short circuit often occurs, causing the measuring device to stop working.
If all the measures taken have not yielded any result, the sensor continues to show complete inoperability, you will have to replace it.
Other fuel level sensor options
As an alternative, various non-contact sensors, such as MAAPS or an inactive magnetic position sensor, are used to measure the amount of fuel in the vehicle tank. The MAAPS sensing element does not come into contact with the fuel.
It has the following operating principle. Such a sensor determines the amount of fuel remaining in the tank using a float connected to a permanent magnet via a lever. The magnet moves along a sector on which a large number of plates of various lengths are deposited with rays. Electrical signals are formed in the plates under the influence of a magnetic field (different in each plate), depending on what signal the sensor gives, the remaining fuel is determined.
Choosing something new
Purchasing a fuel sensor for a VAZ 2110 is not at all a problem if you have already removed the old element from your car.
It is not recommended to just go out and buy the first one you come across, even if it is high-quality, since it may simply not be suitable.
There are two ways to solve this issue.
- Remove the old element, take it to an auto parts store and purchase a similar one.
- Take a look at your car's owner's manual to find out which sensor with which characteristics is used for your car. Buy a similar one.
It is important to note that the VAZ 2110 is equipped with various measuring devices from the factory, the resistance values of which are not identical. Therefore, it is important to replace the old element with exactly the same one in order to avoid possible problems.
Description of the fuel level sensor operation
The operating principle of any FLS boils down to the fact that a specific signal corresponds to a certain level of fuel in the tank. But this is not enough for correct operation.
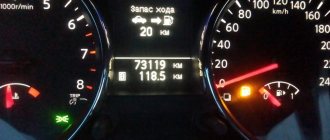
The fact is that modern cars use tanks of complex shape, adapted to the shape of the body. It follows from this that the remaining fuel does not depend linearly on its level. There is also a design feature of all sensors: the fuel level must drop to a certain value before the FLS detects its change. As a result, measurement error occurs. It is especially pronounced in domestic cars, such as the VAZ-2109 or VAZ-2110. As a result, it happens that after refueling, the car has driven 50 km, and the indicator still shows the maximum amount of fuel in the tank.
To combat measurement errors, engineers have found an effective remedy. All sensors according to the type of transmitted signal are divided into:
The analog signal is a change in voltage across the potentiometer. The error can be reduced by converting such a signal to a digital one. For this purpose, the FLS is equipped with a microprocessor that not only converts the signal, but also corrects the error.
Replacement
You don't have to be a professional auto mechanic to replace a fuel sensor. It is enough to study the operating manual and understand the nuances of disassembling and assembling the unit.
Alas, this cannot be done without related work. In order to get to the sensor, you will first have to remove the fuel pump.
Before starting work, drain the fuel so that as little fuel remains in the tank as possible. Tools you will find useful:
- Spanners;
- Screwdrivers;
- Hammer, etc.
So, let's start removing the fuel pump:
- Remove the floor covering you have in the trunk;
- Remove the fastenings of the rectangular cover, which is made in black;
- Disconnect the negative terminal from the battery;
- Make marks on the gas pipeline tubes so that you can later figure out which one is intended for supply and which one is intended for return;
- The fitting is unscrewed with a 17mm wrench, after which the supply pipe is removed;
- The outlet pipe is removed in a similar way;
- Use a 7 mm socket wrench to unscrew the nuts securing the pressure rim;
- A hammer may be required here, since the hardware is often firmly attached. Place a flathead screwdriver on the ridged part of the nut and give the handle a light hammer blow;
- With the rim free, lift the assembly and remove the float from the fuel tank;
- Now you can remove the pump and, accordingly, the sensor.
Dismantling the sensor
This work is performed in the following sequence.
- Using a curved screwdriver, remove the two screws that hold the sensor to the pump.
- The fixing elements are unbent with a screwdriver and the guides are released from the pump body;
- The sensor is held on by bolts and nuts, so be sure to hold the back of the stud while unscrewing the fasteners;
- Carefully remove the pointer, after which you can replace it with new ones;
- Before reassembling, carefully examine the condition of all components and elements;
- It is important to pay attention to the wear of seals, pipes, and bushings. If the wear is severe, be sure to replace them with new ones. They are cheap, so you will not experience serious financial losses;
- When reassembling the bushings, treat them with the almighty WD40. And regardless of whether they are old or new.
The procedure really seems simple and easy to do with your own hands. This is partially true because you are dealing with gasoline, a highly flammable substance. Therefore, when replacing the fuel sensor yourself, be sure to follow all safety rules. Plus, you should definitely have a fire extinguisher on hand. It is strictly forbidden to start work without it. Any violation of safety rules entails rather dire consequences.
Where is the FLS (motor injector) located?
Since the fuel level is determined by the sensor using a conventional float mechanism, the potentiometer is placed directly in the “tens” gas tank. To save space, the FLS (fuel level sensor) is installed together with the pump. Therefore, for maintenance, repair or replacement of the first one, the second one will also need to be removed from the seat. You can find the body of the VAZ 2110 fuel pump under the passenger sofa - it is hidden there behind a black technical hatch.
Video tutorial on checking the fuel sensor in a car tank
Malfunctions in vehicle operation with a faulty FLS
- Let's say you see that your fuel level is changing rapidly. The reason for this phenomenon may be the contact path worn out under the influence of the slider.
- If there is slight wear, you can try to get out of this situation in this way: bend the runner mount a little more than the problem area. If the track wear is enormous, you will need to change the VAZ 2110 fuel level sensor.
- There is another difficulty that often arises: the device deceives - its indicator indicator shows the level of remaining fuel with a significant error. The device probably just needs to be configured.
- In this case, it is disassembled and the pointer is moved manually from the left extreme position “1” to the right position “0”, monitoring the accuracy of the readings. If the pointer does not reach the extreme positions, tighten the adjusting tab - this will increase the stroke of the arrow.
- There is also a similar picture: you have half a tank of fuel, but the device indicates that there is nothing there. In this case, it is necessary to check all contacts of the meter. First, those that are on the device panel - it is probably necessary to tighten the nuts that secure the wires.
- Everything is fine with the wires on the panel - check if the lever is jammed in transition positions. To establish the general functionality of the fuel gauge, it is necessary to check the connections of the ground wires and the handbrake handle.
Important! You have done the prevention, but there is no effect - this means that the VAZ 2110 fuel level sensor needs to be replaced.
Before purchasing a new device, check its labeling. For this purpose, there is a proper annotation in the machine’s operating manual. There are approximately 10 types of meters, differing in resistance levels. This coefficient is personal for any device.
Frequent malfunctions of the fuel sensor on the VAZ 2110
In principle, a fuel level sensor can present drivers with many unpleasant surprises, which are very confusing on the road:
- The fuel level readings start to fluctuate. In such a modification, the device can show anything - either the highest or the lowest fuel level. Understanding such a situation becomes absolutely unrealistic. The root cause of this phenomenon may be damage to roads on the board of the control body. Sooner or later they may wear out due to the continuous impact of the runner. If a similar symptom is found in your car, you can try to bend the slider, that is, move it to a significant area of the board. However, this can only help when the roads are not yet very worn out. Otherwise, the sensor needs to be replaced.
- The fuel level sensor constantly shows incorrect information. There may be a number of reasons for this phenomenon: ✔ If the level readings are constantly increased or decreased, in this case you can adjust the fuel gauge. ✔ The fuel level cursor indicates the fullness of the tank. In fact, you clearly know that the tank is only partially filled.
Problems
- Let's say you notice that gasoline levels are changing dramatically. The reason for this phenomenon may be the contact track worn out under the influence of the slider.
- If there is slight wear, you can try to get out of this situation like this: bend the runner mount just above the problem area. If the wear on the track is very large, you will have to replace the VAZ 2110 fuel level sensor.
- There is another problem that arises no less often: the device is lying - the arrow of its indicator indicates the level of remaining fuel with a large error. The sensor may just need to be adjusted.
On the instrument cluster, the fuel indicator is on the right
- In this case, it is dismantled and the indicator is manually moved from the left extreme position “1” to the right position “0”, checking the correctness of the readings. If the arrow does not reach the extreme positions, bend the adjusting tongue - this will increase the stroke of the arrow.
- There is also the following situation: you have half a tank of gasoline, but the device shows that it is empty. In this case, you need to check all sensor contacts. First of all, those that are on the instrument panel - you may need to tighten the nuts that secure the wires.
- The wires on the panel are fine - check if the lever is stuck in intermediate positions. To determine the overall performance of the fuel gauge, you need to check the connections of the ground wires and the handbrake handle.
You have carried out preventive maintenance, but the result is zero - which means you need to replace the VAZ 2110 fuel level sensor. Before purchasing a new device, find out its markings. To do this, there are corresponding instructions in the car's operating manual. There are about a dozen types of sensors, differing in resistance levels. This indicator is individual for each device.
Features of measuring fuel pressure on a VAZ-2110
I would like to immediately note that this parameter can be measured in several ways. One of the most popular is to purchase a special kit, which includes a special adapter for connection, a pressure gauge (it is with this that the measurement is made), as well as a drain. You will have to allocate about 1,500 rubles to purchase such devices. You can do it differently - go to a service station, where specialists will carry out the necessary measurements for 300-500 rubles.
But there is a more sophisticated method that does not require additional costs - measuring fuel pressure using a regular pressure gauge, which is used to check tire pressure. In this case, for measurements it is better to use pressure gauges with a minimum limit (about 6-7 atmospheres). In this case, the error will be minimal.
But how to check? The sequence of actions will be as follows:
- Prepare a pressure gauge with a limit of 6-7 atmospheres and wind the foam directly under the pipe.
- Prepare an oxygen tube with a diameter of 9 mm and put it on top.
- Secure the fasteners on both sides with clamps.
- Cover the generator with something to prevent fire.
- Reduce fuel system pressure to a minimum. It's easy to do. Remove the fuse that powers the fuel pump (in the “ten” it is located under the trim near the control unit, on the far left side), start the engine and wait until it stalls.
- Twist off the plastic cap installed on the fuel rail.
- Look inside the cap - there will be a standard hole and nipple. Take the cap from the car wheel and unscrew it. Be prepared for a slight surge of fuel (this is caused by residual pressure).
- Now put the second edge of the hose onto the ramp outlet and then secure it with a clamp.
- Remove the “protection” from the generator and start the engine (don’t forget to put the fuse back in place).
Methods for restoring performance
A faulty sensor does not always need to be replaced. Restoring the fuel level indication system must be done in the following sequence.
- Check the electrical equipment of the car in the dashboard area, check the voltage of the on-board network, along the power supply circuits of the dashboard.
- Process the sensor contacts.
- Dismantle the device, check the condition of the slider, and tighten the contacts if necessary.
- Check the condition of the float, its fastening, and draft.
- Calibrate the device by moving the float sequentially to its extreme positions.
- If the working areas of the sensor become dirty, wipe them with a soft cloth.
Heater valve VAZ 2110
Replacing the stove tap on a VAZ 2110
There is a possibility that most users of VAZ 2110 cars will not be able to find this tap in their car. It was installed on earlier and recently released modifications of the car, and therefore, if the model was purchased not so long ago, then this mechanism may not be in this place. Although, some craftsmen manage to install a similar mechanism on their car. The heating system is one of those that most often breaks down. This part of the car allows you to drive the vehicle in different weather conditions with increased comfort.
VAZ 2110 stove faucet
Adjustment of this stove tap. carried out remotely. In versions of VAZ 2101 - 2110 cars, this mechanism is one of the most frequently broken. After each trip, it is necessary to constantly monitor its valves. This is necessary to eliminate leaks. As soon as leaks are discovered, the equipment must be replaced immediately.
Note. It was this fact that forced the manufacturers of the VAZ 2110 to abandon the crane. But after modernizing the crane, they began to install it again.
Replacing the faucet
VAZ 2110 heater tap
To carry out work to replace this equipment, you must have a special tool on hand. You will need:
After each tool is ready, you must immediately begin replacing it. For this purpose, you must use the following methods:
- The engine must be drained of coolant.
- The heater has two hoses. They are secured with clamps. Liquid swells from one and flows into the other. These clamps need to be slightly loosened, but not completely unscrewed.
VAZ heater taps
They must be disconnected from their mounting points.
Note: if the valve is replaced due to insufficient sealing, then, most likely, all the coolant has already managed to drain into the car interior before the repair is carried out. This problem can be detected if there is a puddle of the same liquid under the passenger seat rug. Also, if there is no coolant in the system, a constantly cold air stream will flow from the stove.
An undoubted companion to a fluid leak is the presence of a specific odor in the cabin.
- The two bolts are unscrewed with a key marked “7”.
- The rubber insulation is removed.
Faucet for stove VAZ 2110
Note: the bolts must be unscrewed carefully, since the fastener itself is plastic and the slightest failure in the thread can lead to major complications.
- The body is removed from the box.
- The duct has a bracket nut that needs to be removed. A wrench with the number “10” is used.
Electric stove faucet
- ”
- Using a screwdriver, you need to disconnect the clamps on the heater body.
- The right air duct is disconnected first.
Article: 24.3827, additional articles: 2108-3827010.01/20, 2108-3827010
Order code: 000637
- You may need
- show more
Fuel level indicator sensor with reserve fuel level indicator
- Rated voltage -12 V
- Lever radius - 114 mm
- Rheostat impedance - 330 Ohm
- Used
on VAZ-2108 - VAZ-2115 cars
- Passenger cars / VAZ / VAZ-21092 drawings
» href=»/catalog/vaz-3/legkovye_avtomobili-30/vaz_2109-9/pribory-205/#part10022087″>Gasoline indicator sensorInstruments and sensors / Instruments - » href=»/catalog/vaz-3/legkovye_avtomobili-30/vaz_2109-9/bak_toplivnyiy-87/#part32272″>Gasoline level indicator sensorPower system / Fuel tank
- » href=»/catalog/vaz-3/legkovye_avtomobili-30/vaz_2110-10/bak_toplivnyiy-113/#part40585″>Gasoline level indicator sensor Power system / Fuel tank
- » href=»/catalog/vaz-3/legkovye_avtomobili-30/vaz_2112-12/bak_toplivnyiy-113/#part49201″>Gasoline level indicator sensor Power system / Fuel tank
- » href=»/catalog/vaz-3/legkovye_avtomobili-30/vaz_2110__2111__2112-415/bak_toplivnyiy-123/#part1302938″>SensorPower system / Fuel tank
- » href=»/catalog/vaz-3/legkovye_avtomobili-30/vaz_2113-648/bak_toplivnyiy-15/#part1669334″>Gasoline level indicator sensor Power system / Fuel tank
- » href=»/catalog/vaz-3/legkovye_avtomobili-30/vaz_2108-18/bak_toplivnyiy-77/#part27927″>SensorPower system / Fuel tank
- » href=»/catalog/vaz-3/legkovye_avtomobili-30/vaz_21099-79/pribory-205/#part10022088″>Gasoline indicator sensorInstruments and sensors / Instruments
- » href=»/catalog/vaz-3/legkovye_avtomobili-30/vaz_2111-11/bak_toplivnyiy-113/#part44893″>Gasoline level indicator sensor Power system / Fuel tank
- » href=»/catalog/vaz-3/legkovye_avtomobili-30/vaz_2115-65/bak_toplivnyiy-78/#part53036″>SensorPower system / Fuel tank
- » href=»/catalog/vaz-3/legkovye_avtomobili-30/vaz_2114-647/bak_toplivnyiy-15/#part1669335″>Sensor Power system / Fuel tank
- There are no reviews for this product yet.
The series of articles “Crystal VAZs, or typical breakdowns of domestic cars” talks about typical problems and malfunctions of cars produced by the Volzhsky Automobile Plant. Today we will talk about the front-wheel drive Samara family, as well as its modern analogues.
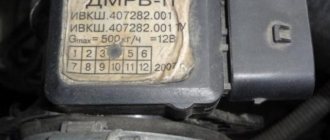
When you need to change the DFID sensor 2110: symptoms of sensor malfunction and check
During the operation of a vehicle, the mass air flow sensor 2110 can fail for various reasons, one of which is the long period of use of the device. When a sensor fails, it is usually not repaired; it is simply replaced with a new one. The following symptoms may indicate that the sensor is not working properly:
- “Check Engine” lights up on the car’s dashboard (you need to check the engine);
- fuel consumption increased, acceleration dynamics decreased;
- the car engine does not start;
- at idle, the car’s internal combustion engine operates jerkily (change in idle speed down or up).
