NIVA 21213, 21214. Design, maintenance, diagnostics, repair
Year of manufacture: 2005
Developer website: www.neotechsoft.ru
Publisher: Behind the Wheel
Interface language: Russian
Bit depth: 32 bit
Operating system: Windows 98, ME, 2000, XP, Vista, 7
Description: Multimedia manual for the design, maintenance, diagnostics and repair of NIVA 21213 21214 with 1.7 and 1.7i engines.
A full-color, illustrated guide to doing your own car repairs. The manual shows the design features of components and systems of VAZ-21213, -21214 vehicles, including the VAZ-21213 carburetor engine and the -21214 engine with a distributed fuel injection system. The main malfunctions, their causes and solutions are described in detail. The disassembly and repair process is illustrated and provided with detailed comments.
GTZ NIVA
Removing and installing the Niva brake master cylinder (instructions)
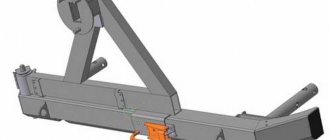
Remove the spare wheel support bracket for the VAZ 2131.
Using pliers, loosen the clamps securing the flexible hoses to the fittings of the master brake cylinder.
Carefully holding the fittings, remove the hoses. Drain the brake fluid from the reservoir into a substitute container. To replace the brake master cylinder fitting...
pry it off with a screwdriver...
and remove it from the brake master cylinder socket.
Use a screwdriver to pry up the rubber connecting sleeve...
and take it out. To remove a vehicle's brake master cylinder...
Using a special “10” wrench covering the five sides of the nut, unscrew the fittings of the four Niva 2121 brake pipes.
We remove the pipes from the brake cylinder Niva 2131.
Using a 17mm spanner, unscrew the two nuts securing the master brake cylinder to the vacuum booster...
and remove the main brake cylinder of the VAZ 2121. Install the main brake cylinder of the VAZ 2121 in the reverse order. We bleed the hydraulic drive system.
Repair of GTZ NIVA
Problem: the Main Brake Cylinder on the NIVA leaked directly into the Vacuum Booster.
I took out the main brake assembly with vacuum from a Peugeot 405 from old bins, and also bought two cylinder connectors for the front calipers and two front brake hoses from Shevik.
cylinder connector VAZ-2123
front brake hose VAZ-2123
GTZ and VUT from Peugeot 405 (front view)
GTZ and VUT from Peugeot 405 (rear view)
I started disassembling the old system. As it turned out, the old owner was wise here too. I threw out absolutely everything old, leaving only the pedal and the front cylinders, and began to assemble everything in a new way: 1. Put the cylinder connectors on the front calipers;
installed cylinder connector on brake cylinder
installed cylinder connector on brake cylinder
2. At first I took the hoses to the turners - they cut threads on the outside at the ends where the tube is screwed in, turned out two thin nuts and two thin washers - to attach one end of the hose to the body;
here we modify the brake hoses
3. Installed the hoses, connecting them at one end with the cylinder connectors, and securing the other end with the modified end to the body in the normal place; 4.Laid new copper pipes from the tee to the hoses. Then it came to the Chief with the vacuum cleaner. Having estimated approximately where it would stand, I began to split hairs: 1. Making an adapter bracket, because the vacuum itself is much larger than Nivovsky, we had to carry it some distance
plate for vacuum booster
plate to body
We weld the plates together with an angle of 25x25mm and a length of 120mm at 4 corners; 2. Manufacturing of an intermediate drive rod from the pedal to the vacuum itself with the possibility of adjusting its length;
transitional drive rod from pedal to amplifier with adjustable length
3. Because The main brake reservoir in Peugeot is not installed as it should be, we had to make adapters to connect the hoses from the fluid reservoir and lengthen the hoses themselves. Once all of this was done, the adapter bracket was painted and dried, and assembly began. Everything fell into place, as I had planned. All that remained was to run the pipelines from the main cylinder to the tees. It was then that I decided to check the vacuum cylinder that had been lying in the garage for about ten years - I plugged the outlet holes of the cylinder and tried to bleed it. To my surprise, everything turned out to be more than 100% working. Next, I ran the pipelines to the tees, only on the tee that placed one plug on the rear brakes. After all, now the brakes are like those of a normal car - rear/front.
plug on tee for rear brakes
We started bleeding the system - not an easy task, because there were still two bleeding fittings left on the front cylinders. But we still succeeded. I took it for a test drive and was more than pleased. The brakes are 100% clearer. Even when skidding, the car goes smoothly - without skidding, all wheels brake as they should, and not each on its own. The result exceeded my expectations. And under the hood it all looks like this.
everything is in place and looks like this
Video on GTZ repair - replacing cuffs
Replacing brake discs and pads NIVA
Replacing Niva brake discs and pads (step-by-step instructions) Video on replacing brake pads
The Niva with fuel injection has today almost completely replaced the carburetor models of the family. With the transition to a new injection system, the manufacturer tried to minimize the inconvenience for the car owner and not radically change the location of the mounting blocks, as well as their filling with protective elements. Traditionally, there are two of them in the cabin. Another one, in the back, is responsible for controlling the engine.
Fuse box VAZ 21214 Niva with description
In the interior of the VAZ 21214 Niva with fuel injection there are two fuse blocks. One of them is located in the traditional place - to the left of the driver's hand and the dashboard. But the second one is located below, near the central tunnel, on the passenger side. In the updated models, it was in this block that the fuses responsible for various types of headlights were placed.
Both blocks are connected to each other. The total number of fuses in the upper one is ten, while at the bottom there are six, including reserve ones.
Current (amps)
Heater fan, rear window defroster, rear wiper and washer system, windshield washer pump
Steering column switch, windshield wipers, hazard warning lights, breaker relay (in turn signal mode), reverse light, instrument cluster (coolant temperature gauge, fuel level gauge, tachometer, indicator lamps: turn signals, differential lock, parking brake, emergency condition of the working brake system, insufficient oil pressure, fuel reserve, battery charge)
Left high beam, high beam warning lamp
Right high beam
Left low beam
Right low beam
Side light lamps in the left front and left rear lights, license plate lights, side light indicator lamp
Side light lamps in the right front and right rear lamps, backlight lamps for the instrument cluster, cigarette lighter, switches, heating and ventilation control unit
Hazard switch, breaker relay (in hazard mode), heated tailgate glass relay contacts
Sound signal, interior lamps, brake lamps in the rear lights
Fog light relay contacts in rear lights
Installing new calipers
Nissan BlueBird U12 calipers are best suited here. It is worth noting that the weight of the foreign car is almost identical to the Niva, which is an additional advantage for choosing this device. Among the best brake pads, it is worth noting Lucas.
Before starting work, you need to prepare a drawing for the adapter plates. Everything is made from 16mm steel plate. We remove the drum shield, where we install the finished plate. Afterwards, all that remains is to install the axle shaft in a suitable position, and then secure the structure. Bolts from the bearing cap can be used as fasteners.
To protect the device from dirt. We make a new shield. First, we prepare a cardboard blank, after which we cut out a shield from a metal sheet 1 mm thick along its contour.
It is important to make the holes correctly, according to our template
Using four bolts, we attach the shield to the adapter plate. Then the caliper bracket is attached there. If the latter begins to interfere with the movement of the brake disc, use a small backing. Next, the pads themselves are inserted into the bracket. If you do everything correctly, you will not have any difficulties with this.
The next step is to install the brake pipes. Here you need to take rubber hoses - you won’t be able to plug metal models into the caliper.
Since as a result of installation the parking brake cable will be located at the bottom, we will end up with two free brackets. To them we attach a rubber hose that comes from the caliper, as well as a metal tube that comes from the central tee
It is important that the brake hose is small, so a model from Kopeyka will do. We select the iron tube by size
The penny bolt is too big, so you'll have to look for an adapter. Bolts must be tightened exclusively using disposable copper washers.
The brake pipe is connected to an iron hose in the place where the handbrake cable used to be
We lay the tube in any convenient way, it is only important to secure it not at one, but at several points at once. In places where the tubes come into contact with the clamps, it is necessary to use additional protection (we simply wrap the elements in rubber or wrap them with special rubber tape)
Summarizing
The need to understand the wiring diagram may arise if there are malfunctions in the operation of the system and they need to be eliminated. Of course, complex malfunctions associated with the operation of the generator unit and other devices that are not simple in terms of design will be problematic to solve in a garage without certain knowledge. However, even simple knowledge of the electrical circuit and the ability to decipher the symbols can greatly help the car enthusiast during repairs. In addition, the need to understand wiring may also arise if you decide to upgrade your speakers or install a more advanced audio system.
Signs of loss of tire pressure
In order for the driver to be able to correct the problem of a flat tire in a timely manner during a trip, he must understand that a loss of pressure is not always characterized by driving on the rim. Such situations occur only when hitting a large sharp obstacle, when simple pumping cannot solve the problem. Thus, you can find out about a loss of pressure by the following obvious signs:
Tire inflation
- First of all, on the road the driver feels that the car begins to deviate significantly from a straight trajectory, and this change in direction only increases with increasing speed. This symptom is mainly associated with a puncture or loss of pressure in the front wheel.
- If the problem occurs with the rear tire, the driver, as a rule, does not feel any inconvenience until he hears the beating of the rubber on the road surface. However, when the driver carefully controls and monitors any change in the behavior of his “iron horse,” then when moving in a straight direction he will feel a skew and a slight tilt in exactly the direction where the problem is identified.
- It should be noted that the higher the rubber profile, the more a flat tire is felt in the cabin. And on sports cars with a tire profile height of less than 40 mm, the problem can reach such a scale that the driver will already hear the grinding of the alloy wheel on the asphalt with a completely deflated tire.
Important! In order to avoid unexpectedly getting into an unpleasant situation on the road, a car owner should check the tire pressure at least once a week using a special portable compressor or at a tire service station. In addition, many gas stations from well-known oil companies often offer a free service for inflating wheels and checking tire pressure, the use of which should not be neglected.
Central wheel inflation system for VAZ 21214
Differences between VAZ 2121 and VAZ 21213 from VAZ 21214 for dummies
Differences between VAZ 2121 and VAZ 21213 from VAZ 21214 for dummies
#1 Post by dperovsky » 08 Jan 2022, 16:33
Niva 2121 and the updated Niva 21213, let's look at their differences.
In 1994, the design of the ZHIGULI-2121 Niva underwent certain changes. We will try to note the main changes in the design of the degenerated modification based not only on official data, but also on the comments of the owners.
Main innovations of the 213th Niva
Re: Differences between VAZ 2121 and VAZ 21213 and VAZ 21214 for dummies
#2 Post by dperovsky » 23 Jan 2022, 21:00
The difference between VAZ 21213 and VAZ 21214
The production of the fuel-injected Niva VAZ-21214 (LADA 4×4) began in the mid-1990s, a modification of model 21213 with a VAZ-21214 engine (1.7 l, 82.8 hp, 127.5 Nm) equipped with central fuel injection. Since 2002, this model has been equipped with a VAZ-21214-10 (Euro-0) engine with distributed fuel injection, upgraded in 2006 to Euro-2 standards (21214-20), in 2008 to Euro-3 (21214- 30) and, finally, in 2011, to Euro-5 (for export) and Euro-4 (for domestic consumption) standards. Power steering was also installed on a small part of the model.
The only difference is the engine.
In 2009, production began of a restyled version of the injection version of the Lada 4x4 3-door, which was called Lada 4x4M or VAZ-21214m. (popularly called emki). A lot of good things appeared there, and since then, every year some innovations have appeared.
First of all, the designers paid attention to the long-term operating experience of the SUV and took a number of measures to eliminate “childhood” diseases and replace domestically produced components with imported ones. Also, most of the components and parts were unified with the components of the NIVA-Chevrolet car.
The power unit was left virtually unchanged - it is still the same 1.7-liter engine with distributed fuel injection, meeting the Euro-4 toxicity standard.
A new clutch from Valeo has been installed - the same one that is installed on NIVA-Chevrolet.
The most significant changes affected the suspension - it was optimized and almost completely unified with the well-proven NIVA-Chevrolet suspension: The rear shock absorber mounts were moved.
The rear and front shock absorbers 21214m also became different.
- New front suspension steering knuckles;
- The front suspension has lower control arms with modern silent blocks;
- Front wheel alignment angles have been changed;
- Front axle of increased diameter;
- Reinforced brackets;
- New ball joints with an increased swing angle, forged body and liner made of polymer materials;
- Modern gas-oil shock absorbers with increased travel and service life;
- Optimized layout of the lower rods and arms in the rear suspension.
Comfort
Installation of power steering and air conditioning.
In terms of all the indicators, Emka has become better, but there was a fly in the ointment. The “flat” floor has disappeared).
How does the "sorcerer" work?
The principle of operation or operation of any brake system pressure regulator is quite simple. The driver sharply presses the pedal, after which the nose of the car is pressed towards the road surface, and the rear part is slightly raised.
Since the regulator works accurately, it does not allow simultaneous blocking of the braking of the rear and front pairs. Rear brake pressure is applied later, which significantly reduces the risk of skidding.
The operating principle takes into account that there is an increase between the bottom and the rear axle. As a result of this work, the piston responsible for regulating the pressure is released. The flow of fluid in the lines stops, but the wheels continue to rotate.
Although it is generally accepted that the pressure reducing valve is “capricious” during operation and can be gotten rid of, professionals do not recommend dismantling this unit without reason. Such actions can provoke an uncontrolled skid on the road. The car will lose control during braking, which will increase the risk of a dangerous situation.
Fluid for refilling the hydraulic steering system
Material grade
Manufacturer
Regulatory document
Pentiosin Werke AG, Germany
List of products containing precious metals in LADA 4x4 cars
Fuel tank (carburetor gas tank) VAZ 21213-110101030.
By clicking on the button you will receive all the information on delivery and payment of the method convenient for you to receive the goods. Our employees will calculate for you the most profitable method of delivering the goods you have chosen.
Pickup for everyone who is convenient in Moscow to independently pick up and pay for the goods you have chosen.
Delivery by mail or EMS Post. It is preferable for buyers who live in areas where there are no branches of transport companies nearby. Some goods can be sent by mail (restrictions on weight and dimensions). We will advise you on a more convenient delivery method.
We deliver by courier only in Moscow and the Moscow region. The buyer provides the address and telephone number of the place of delivery of the goods, full name. person responsible for receiving the goods, his phone number. When transferring the goods to the Buyer (Representative), the quality, quantity, and completeness of the transferred goods are checked.
Delivery by transport companies is the most convenient and profitable and often the only way to receive the spare parts you ordered. We work with any Transport companies convenient for you. Which are located in Moscow.
Excerpt from “Warranty Conditions for Auto Parts”
1.1. The warranty period (except for electrical parts) for original spare parts is 6 (six) months or 30 (thirty) thousand km. mileage, and 3 (three) months or 5 (five) thousand km. mileage if the purchased Product belongs to the “non-original” category (whichever occurs earlier), unless otherwise determined by the Manufacturer or Seller of this spare part. You can familiarize yourself with the full terms of the warranty by following the link: Warranty terms for Auto Parts
Chevrolet Niva “My all-terrain vehicle” › Logbook › Replacing the sorcerer... and so on little things...
What was replaced on the engine!
Previously, I bought a sorcerer (VAZ 2123 brake pressure regulator with AvtoVAZ21233512008 bracket) for 1,390 rubles, as well as hoses from a truck - while driving I read that they fit a raised field, but the service department said that they did not fit, so I DO NOT ADVISE buying them - DZTA 33023506025
01/16/2019 came to replace the sorcerer and two brake pipes, plus asked to see why oil was leaking from under the cap and from under the crankshaft seal, and also antifreeze was leaking through the hoses. The service website stated “5% discount on all work” - that’s 1,167 rubles . But you won’t get 5%, and one and a half will do, that is, 312 rubles.
This is such an enticement, but oh well, although I still don’t understand why such a scam, plus they changed one low beam lamp without approval, but why? “-We change everything if they are burnt out so that we can issue a working car”... - True, I bought these lamps at home for use, but oh well, do what’s most convenient for you, the customer is always wrong, fortunately, at least not like the title of the movie that came to mind “the customer is always dead.” Oil was still leaking from under the cap, but I didn’t contact it, it was clogged because... It’s not leaking much, the hoses have been tightened - it seems like antifreeze has stopped leaking through them. The whole thing turned out to be a bit expensive in total. The lamp burned out within a few days...a week or two later - a questionable lamp replacement, I don’t know where it was taken from. And the old second one - mine - everything is on fire! Well, in general, I’m not particularly happy, because of what was said above, but everything else is fine, but what about everything else? Well... the engine works (although it worked before), the brakes work (and worked previously, but the sorcerer was all rusty), antifreeze does not leak at the connection of the hoses, nothing of mine is missing, as in another service about which I wrote earlier - I’ll remind you there, we managed to pour 2 liters of oil into the rear gearbox, and even though there is a lock there (www.drive2.ru/l/531187812347674725/) + in this service, almost all the spare parts were put in a box and given to me at my request, and everything was official - with act of completed work.
It was necessary to change the engine plugs - wherever I asked - no one wanted to do it, including this service, they didn’t want to, so antifreeze kept leaking through the plugs... but they changed the light bulb!
Source
What do the numbers in the Niva index mean?
To understand the features of the wiring and electrical equipment of a Niva 2131 car or another model with an injector or carburetor, let’s look at the index designations:
- VAZ 21213 - this is how a Niva with a carburetor is designated. In this case, the engine volume is 1.7 liters.
- VAZ 21214 is the same carburetor with the same engine size. Only in this case the car is characterized by a distributed fuel injection system.
- VAZ 21213 is also a carburetor, only Niva with such digital designations can have a 1.8-liter engine.
- VAZ 21073. This Niva can be equipped with either a Solex carburetor or an injector. The ignition system in these cars is contactless.
- As for the Niva 21215 models, this index designates export versions of vehicles equipped with a diesel engine from the manufacturer Citroen.
Officially, Niva vehicles equipped with diesel engines have never been sold in the Russian Federation and the countries of the former USSR. The cost of such a vehicle, of course, was higher. Those fans of domestic SUVs who were willing to pay such a price could only purchase a car abroad.
Below is a diagram of the VAZ 2121. If you are interested in the electrical diagram of another model, for example, 2131, then it will have certain differences from this modification. For example, in the case of a carburetor, the electrical circuit for charging the battery and ignition system is not protected, unlike injectors.
Generator wiring diagram 2121
Alternative solution
At the same time, it is still possible to install normal HTDs on the Niva with your own hands. To do this, you need to select suitable calipers that have a handbrake drive. You shouldn’t look among domestic models - we don’t have a suitable analogue. The optimal solution here would be imported options, and, above all, calipers from the Nissan brand. This type of parking brake is based on the principle of a separate-functioning system. For example, on Japanese Toyota cars, the drum actually plays the role of a parking brake, while the main braking occurs with the help of discs.
How to check and replace the vacuum booster on a Niva Chevrolet
Checking the vacuum booster
1. Press the brake pedal all the way several times with the engine not running and, holding the pedal pressed, start the engine.
In this case, due to the pressure difference in the cavities of the amplifier, the brake pedal should move forward.
If this does not happen, check the tightness of the vacuum booster hose connections and, if necessary, eliminate air leaks.
If this does not give a positive result, then the amplifier is faulty and must be replaced.
2. To check the tightness of the vacuum booster, you need to open the hood and start the engine for 1 minute. Approximately 30 seconds after the engine has been turned off, press the brake pedal 2 times, and you should hear a characteristic hiss of air entering the amplifier. Otherwise, replace the amplifier.
3. Blow out the hose with the check valve at both ends.
Air should only flow from the check valve side.
Otherwise, replace the check valve.
The design of the vacuum brake booster is shown in Fig. 1.
The vacuum amplifier is quite complex; repairing it requires some skills and special equipment, so if the amplifier fails, replace it as an assembly.
Removal and installation
You will need: keys “10”, “13”, “17”.
1. Disconnect the wire ends from the brake fluid level sensor.
2. Remove the bolt of the power steering reservoir mounting bracket
3. Remove the tank from the bracket and move it to the side.
4. Unscrew the two nuts securing the master cylinder to the vacuum booster.
5. Without bending or twisting the brake pipes, carefully move the master cylinder to the side.
Adjusting the governor drive
If the vehicle's rear suspension has been replaced or work related to the replacement of suspension components has been performed, then you need to check the adjustment of the governor drive.
To adjust, you need to hang the rear axle of the car.
Using a 10mm wrench, unscrew the nut of the bolt securing the tip of the elastic regulator lever to the rear axle bracket rod. Use the second key to hold the bolt from turning.
We take out the bolt and disconnect the elastic lever of the regulator drive from the rear axle bracket rod.
Loosen the locknut with a 10mm wrench, holding the bolt from turning.
Raising or lowering the end of the elastic lever, we install it at a distance of 200±5 mm from the floor of the body.
We measure the distance with a ruler, the end of which rests on the floor of the body.
To fix the lever at the required distance, insert a wooden block of the required length between it and the rear axle beam.
Holding the elastic lever in this position, use a 10mm wrench to turn the adjusting bolt until it touches the piston lever 1 so as to ensure contact between the regulator drive lever 2, into which the adjusting bolt is screwed, and the spring 3.
After this, tighten the locknut of the adjusting bolt.
We connect the elastic lever of the regulator drive with the rod on the rear axle beam.
When the adjuster is properly adjusted, the front brakes should lock slightly before the rear wheels.
Sorcerer, aka brake force regulator. One might say, a brilliant invention of domestic designers.
To be honest, I find it difficult to name the brand of an imported car whose brake system would use a “sorcerer”.
In the realities of the domestic car structure, all brands came off the assembly line with this problem - Vases, Nivas, Muscovites, etc., have a miracle of engineering under the bottom of the body, aka a sorcerer.
Plus half a meter: development history and design features of the VAZ-2131
It would seem that everyone enjoys the good old three-door Niva, which has survived on the assembly line to this day. Cross-country ability, accessibility, low cost - these advantages of the “shorty” have carried it through more than four decades, in spite of environmental standards and EuroNCAP tests. However, many motorists back in Soviet times were forced to abandon the three-door car because of its, to put it mildly, not the most outstanding practicality. A short wheelbase, only one side door on each side, a frankly small trunk - the Niva was not an alternative to the Zhiguli, forcing the potential buyer to make a choice in an “either-or” format. After all, when choosing cross-country ability, it was necessary to obviously sacrifice the cargo-passenger qualities of the car. And that is why, over time, the traditional “twenty-first” was supplemented by a long-wheelbase five-door version, which many owners affectionately call the “crocodile”. Today we will recall the history of the development and design features of this model.
Start
In the nineties, VAZ was working on the “last hope” for a single-volume vehicle - that is, an all-wheel drive minivan based on the Niva, and this modification was not planned and, like many other things, appeared by accident. Rather, it was a research project, the purpose of which was to obtain an answer to the question of whether it was possible to make something completely new for the plant on the basis of a regular Niva - for example, a minivan. At the same time, the safety margin of a regular Niva was unknown. More precisely, after a number of victories and achievements of the VAZ-2121, it was clear that this is a successful and strong car, but will it withstand the one and a half times the load associated with turning into a seven-seater car with a monocoque body?
To answer the question posed, from a pair of serial three-door bodies, two frames of future five-doors, extended by 500 mm, were welded, and only half was taken from each of the “sources” (front and rear, respectively). Each of the prototypes received a very pretentious name - Consul and President. These running models differed in that the Consul had narrow rear doors that made it possible to load sandbags into the body to simulate the load, while the President did not have them.
In the photo: a prototype codenamed “Consul”, distinguished by the presence of a pair of narrow doors-leafs
The tests were successful, which surprised the factory workers themselves. After all, unexpected positive conclusions regarding the safety margin of the ordinary Niva allowed the Togliatti people to begin developing the VAZ-2120, known as Nadezhda.
At this time, pilot industrial production (EPP) was just launched at VAZ, but the “twentieth” model was still frankly crude - that is, it was at the stage of “plasticine” and modifications, being not even ready for small-scale production.
Twenty nine and other numbers
That is why VAZ came up with the idea of not only making a single-volume all-wheel drive with an original layout on a modernized chassis, but also launching production (albeit in small batches) of an elongated Niva, which could become a real dream for a summer resident. After all, an additional half meter in the base could make this car spacious and practical, and the very fact of the simultaneous existence of a “shorty” and a long-wheelbase version was a common occurrence for most SUVs, including such grandees as the Mitsubishi Pajero, Nissan Patrol, Land Rover Defender and even “His Majesty” Gelendvagen."
Five doors and a German license plate – why not a “cube”?
Thus, the search project gradually turned into a small-scale car under the index 2129. It differed from the familiar five-door “crocodile” by the absence of a pair of rear doors - that is, by lengthening the base and moving the rear seat, the designers retained the previous “low-door” body. Subsequently, modification 2130, distinguished by an enlarged gas tank, was added to the commercial copies of the “twenty-nine”.
Created in OPP: very interesting modifications were developed in the pilot industrial production of VAZ
To be fair, we note that it was not very convenient for rear passengers to get in and out (the front doors remained “short”), but in terms of interior space, this car was comparable to ordinary Zhigulis and even slightly superior to them, which is for an SUV with permanent all-wheel drive was a good achievement – especially compared to the “shorty” one.
“Twenty-Ninth” bore the unofficial name “Cedar” and was produced in small series at AvtoVAZ OPP in 1992-1994, and on its basis several copies of a commercial version called “Utility” were made.
The shortcomings of the three-door version gave rise to the development of a five-door version under the symbol 2131, where the standard front doors were supplemented by rear ones with a vertical window and a small window in the new sidewall. Another difference between the five-door and the regular Niva is the step on the roof that hid the welds.
Here the roof insert is particularly visible. Body torsional rigidity – 7400 Nm/deg. The “three-door” has 8900 Nm/deg, which is even more than the VAZ-2108!
Three quarters at the back: the five-door version seemed too long to many, although it was only that way compared to the “shorty” one
"Thirty-first" from Tolyatti
Unlike the “thirty-first” Volga from Gorky, the Tolyatti car received a long wheelbase compared to the original Niva, but retained the utilitarian essence of the VAZ-2121.
The base of the “crocodile” increased by half a meter, but otherwise this car remained true to itself
The production of the long Niva in OPP began back in 1995, and by 2009, over 100,000 copies of the “five-door” were produced. Having retained the supporting structure, the body received a number of original parts, but as before, to make a long-wheelbase car, the “short one” was simply sawn in half, after which additional body elements were welded into the central part. This seems surprising, but such a “semi-handicraft” method in the conditions of pilot industrial production was quite normal.
Their service is both dangerous and difficult: the long Niva was also a collector
Lengthening the body by 500 mm led to a change in the wheelbase from 2200 mm to 2700 mm, and the overall length of the car increased to 4220 mm - that is, the Niva still remained in the so-called C-class, but became “long” by SUV standards.
In order for the “sawed” and elongated car to be strong enough, a number of additional elements were still introduced into the design - for example, side member reinforcements in the area of the front suspension braces and floor linings at the mounting points of the gearbox and transfer case.
Since the steering wheel on the elongated car became heavier, a hydraulic booster appeared in the steering, which later began to be equipped with the regular “short” Niva. The previous engine, even if it had received “one hundred grams for courage” compared to the original, could no longer “carry” a car that had become heavier to 1350 kg, the total weight of which with cargo and passengers was already 1850 kg. That is why the OPP mastered the production of the 1.8-liter VAZ-2130 engine, which developed 84 hp. and 132 Nm of torque.
“Injector” has been the only option for the power supply system for 15 years
This version received the index 21312, and due to its dark green color and long body with a relatively squat silhouette, the car received the nickname “crocodile” or “croc”.
Most long Nivas were painted dark green or white
As a “heavy fuel alternative,” modification 21315 was developed, under the hood of which a 1.8-liter Barnaul vortex-chamber turbodiesel 3431 was supposed to appear, but this engine never became serial.
Chevrolet Niva “My all-terrain vehicle” › Logbook › Replacing the sorcerer... and so on little things...
What was replaced on the engine!
Previously, I bought a sorcerer (VAZ 2123 brake pressure regulator with AvtoVAZ21233512008 bracket) for 1,390 rubles, as well as hoses from a truck - while driving I read that they fit a raised field, but the service department said that they did not fit, so I DO NOT ADVISE buying them - DZTA 33023506025
01/16/2019 came to replace the sorcerer and two brake pipes, plus asked to see why oil was leaking from under the cap and from under the crankshaft seal, and also antifreeze was leaking through the hoses. The service website stated “5% discount on all work” - that’s 1,167 rubles . But you won’t get 5%, and one and a half will do, that is, 312 rubles.
This is such an enticement, but oh well, although I still don’t understand why such a scam, plus they changed one low beam lamp without approval, but why? “-We change everything if they are burnt out so that we can issue a working car”... - True, I bought these lamps at home for use, but oh well, do what’s most convenient for you, the customer is always wrong, fortunately, at least not like the title of the movie that came to mind “the customer is always dead.” Oil was still leaking from under the cap, but I didn’t contact it, it was clogged because... It’s not leaking much, the hoses have been tightened - it seems like antifreeze has stopped leaking through them. The whole thing turned out to be a bit expensive in total. The lamp burned out within a few days...a week or two later - a questionable lamp replacement, I don’t know where it was taken from. And the old second one - mine - everything is on fire! Well, in general, I’m not particularly happy, because of what was said above, but everything else is fine, but what about everything else? Well... the engine works (although it worked before), the brakes work (and worked previously, but the sorcerer was all rusty), antifreeze does not leak at the connection of the hoses, nothing of mine is missing, as in another service about which I wrote earlier - I’ll remind you there, we managed to pour 2 liters of oil into the rear gearbox, and even though there is a lock there (www.drive2.ru/l/531187812347674725/) + in this service, almost all the spare parts were put in a box and given to me at my request, and everything was official - with act of completed work.
It was necessary to change the engine plugs - wherever I asked - no one wanted to do it, including this service, they didn’t want to, so antifreeze kept leaking through the plugs... but they changed the light bulb!
Source
Power unit
The engine installed on the modern model of the Niva 21213 (214) car was inherited from its Soviet progenitor - the VAZ 2121, and in terms of fluid volumes they are almost identical:
- Liquid cooling system. Filled with antifreeze in an amount of 10.7 liters with a freezing point not higher than -40 ° C. The capacity of the interior heating radiator is also included in this volume.
- Crankcase. Motor oils are poured here, the brand of which depends on the operating conditions. Capacity: 3.75 liters, including oil filter filling.
The viscosity of the oil poured into the Niva engine must correspond to the outdoor temperature at which the car is operated. Possible modes and suitable oil brands are shown in the table:
| Lower limit of ambient temperature, °C | -20 | -25 | -25 | -30 | -30 | -15 | -35 | -30 |
| Upper limit of ambient temperature, °C | +45 | +35 | +45 | +35 | +45 | +45 | +25 | 30 |
| SAE lubricant viscosity grade | 15W-40 | 10W-30 | 10W-40 | 5W-30 | 5W-40 | 20W-40 | 0W-30 | 0W-40 |
When flushing the power unit during the process of replacing liquid lubricant, the same amount of flushing oil (3.75 l) is used, taking into account the size of the filter. Replacement is carried out after 8-12 thousand kilometers, depending on the quality of the oil. Flushing is usually performed after 3 engine lubricant changes. During operation, it is important to monitor the oil level in the engine crankcase using a special dipstick. If the level drops below the Min mark, it is urgent to add lubricant to the engine of the same viscosity as was previously filled.
Antifreeze needs to be updated at least once every 3 years or according to the degree of wear of the fluid. It is not recommended to dilute antifreeze with distilled water, either in winter or summer. In winter, the diluted liquid may freeze, and during the summer heat it may boil ahead of time, which will lead to overheating of the engine.
GAZ 2705 | Pressure Regulator Adjustment | Gazelle
After the first 2500 km and during TO-2, and also if the rear wheels of an equipped vehicle lock up earlier than the front wheels or much later when braking on a dry hard surface, you should make sure that the regulator is adjusted correctly.
The regulator should be adjusted in the following order:
| Rice. 8.4. Pressure regulator: C = 28-32 mm (for buses), 13-17 mm (for vans); 1—press lever; 2 - pin; 3 — fixing bolt; 4 — axis of the pressure lever; 5 - nut; 6 - axis; 7 — body; 8 and 9 — regulator brackets; 10 - lock nut; 11 — adjusting bolt; 12 — load spring; 13 - spring; 14 — piston sleeve; 15 — control cone; 16 — pressure spring; 17 - ball; 18 — thrust bracket; 19 — return spring; 20 - bushing; 21 - piston; 22 — protective cover; 23 — bridge bracket; 24 - stand; 25 - spring washer |
— disconnect the lower end of the regulator strut 24 from bracket 23 (see Fig. 8.4) on the rear axle by unscrewing the axle nut 5 to do this; - unscrew locknut 10 a few turns and, rotating adjusting bolt 11, set distance C: for GAZ-2705 and GAZ-2705 “Combi” - 13-17 mm; for buses - 28-32 mm between axle 6 and hole in bracket 23;
— tighten the locknut, holding the adjusting bolt from turning;
— secure the lower end of the rack to the rear axle bracket.
It is necessary to check the correct adjustment of the pressure regulator by braking until the wheels lock on a horizontal section of the road with a hard, dry surface at a speed of 50–60 km/h. If the pressure regulator is in working order and correctly adjusted, during effective braking there should be some advance in the locking of the front wheels relative to the rear ones. If the rear wheels lock before the front wheels, then, after first unscrewing the lock nut 10, unscrew the adjusting bolt 11 by half a turn and lock it again. If the front wheels lock much earlier than the rear wheels, you should tighten the adjusting bolt half a turn.
After performing the above operations, check the adjustment of the regulator again by braking on the road.
It should be remembered that if the rear wheels are blocked ahead of time, the car may skid, and if the front brakes are blocked much earlier than the rear ones, then the car may lose control, especially when driving on a slippery road.
Connection diagram for starter car Niva 21214 injector
Starters 21070-3708010-01, 21214-3708010-01, 5722.3708 and their analogues from different manufacturers can be installed on a Niva 21214 car with a 21214 1.7 liter injection engine.
Here is a diagram of their connection (they are all connected in the same way) with a description of the operating procedure (turning on and off).
Connection diagram for a starter on a Niva 21214 injector car
Description of the starter connection diagram
— The voltage in the electrical circuit for turning on the starter is supplied to the positive terminal of the battery through terminal “30” of the generator.
— The starter is turned on by turning the key in the ignition switch to position II (starter). In this case, voltage is supplied to terminal “D” of the starter retractor (traction) relay. The relay armature is pulled into the interior of the pull-in relay (the pull-in winding of the relay is activated), and the bendix associated with it moves forward. Its gear meshes with the teeth of the flywheel. The contacts inside the relay close and electric current from the battery is supplied to the starter motor, turning it along with the gear and flywheel. The engine starts.
After the key in the ignition switch returns to position I, the holding winding of the relay is de-energized, and the armature inside it returns to its original position under the action of the spring. The contacts inside the relay are disconnected, the starter is de-energized and stops.
— Power is supplied to the coils of the retractor relay through the starter interlock relay mounted on the mounting stud of the master cylinder reservoir. Controls the operation of the ECU (control unit) relay. It turns on the locking relay when the key is turned in the ignition switch and allows you to start the car engine and turns it off when it detects that the engine is idling, protects the starter from turning on while the engine is running.
General device
Chevrolet Niva combines two subsystems. Each brake system has its own purpose, they are called:
- Working.
- Parking lot.
The purpose of the latter is extremely clear; this braking system ensures that the Chevrolet Niva jeep is held in one position when parked on an uneven surface for a long time. The brake system, called the service brake, is regularly used when the car is moving. With its help, the driver slows down at traffic lights and stops the car where he needs it. You can control its operation using the foot pedal, which is located to the left of the gas pedal and to the right of the clutch, if, of course, there is one.