Stages of replacing Chevrolet Niva coolant
When switching from antifreeze to antifreeze, it is necessary to flush the cooling system. This is done so that the new liquid does not lose its properties when mixed. Also, due to the different chemical composition, a precipitate or flakes may form. Therefore, the correct procedure between draining and filling should include a flushing step.
This model is quite popular, so many people know it under other names:
- Chevrolet Niva;
- Chevy Niva;
- Shniva;
- VAZ-21236.
We will consider the instructions for replacing the coolant using the example of a 1.7-liter gasoline engine. But there is one nuance: cars after the 2016 restyling have electronic control of the gas pedal.
Accordingly, there are no pipes for heating the throttle valve. Therefore, we will consider bleeding air on this modification. You can also familiarize yourself with the nuances of replacement on a regular Niva 4x4, the replacement on which we also described.
Coolant drain
To drain the antifreeze, you need to place the car on a flat surface, open the cap of the expansion tank and wait a little until the temperature drops below 60°C. For further convenience, remove the decorative plastic protection on top of the engine.
Further in the instructions we are recommended to turn the temperature regulator to maximum. But it is useless to do this. Since the temperature control in the Chevrolet Niva occurs by moving the air damper. And not by blocking the radiator as in old VAZs.
After the machine has cooled down a little, we begin the draining process itself:
- If you stand in front of the car, at the bottom right, there is a plastic valve on the radiator that closes the drain hole. We unscrew it to drain the antifreeze from the radiator (Fig. 1). When unscrewing, be careful not to lose the rubber O-ring.
In this way, we completely drained the old fluid, but in any case, a small part still remains in the system, distributed among the engine channels. Therefore, in order for the replacement to be high-quality, we proceed to flushing the system.
Flushing the cooling system
If the Chevrolet Niva cooling system is not clogged, but is simply undergoing a scheduled replacement, then we use ordinary distilled water for flushing. To do this, close the drain holes and pour distilled water into the expansion tank.
Then close the tank cap and start the engine. We warm it up until the thermostat opens to flush both circuits. Next, turn it off, wait for it to cool and drain the water. To achieve a good result, it is recommended to do this procedure 2-3 times.
If the car system is heavily contaminated, it is recommended to wash it with special chemical solutions. For these purposes, washes from well-known brands, such as LAVR or Hi Gear, are suitable. Recommendations, as well as instructions, are usually printed on the back of the container with the composition.
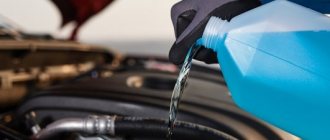
Filling without air pockets
To properly fill new antifreeze into a Chevrolet Niva, you need to perform a number of steps. After all, it depends on whether an air lock forms in the system or not. We will close the drain holes in stages, so for now we will leave them open:
- We begin to pour antifreeze into the expansion tank, as soon as it flows through the drain hole in the radiator, we put the wing plug in place.
- We continue the flood until it starts flowing from the hole in the block. After which we close it too. The drain bolt on the block must be clamped with a slight force, approximately 25-30 N•m, if you have a torque wrench.
- Now we need to bleed the air from the top of the radiator. To do this, we find a special plug, the location of which is shown in the photo (Fig. 3). We unscrew it a little, continue to pour antifreeze into the tank, as soon as it flows, screw the cap back into place.
The system is completely filled with new antifreeze, now all that remains is to start the engine, wait until it warms up completely, and check the level. Some people advise starting the car with the reservoir open and closing it after 5 minutes to get rid of air pockets as much as possible. But when replacing according to these instructions, they should not be there.
What oil should I use in the transmission?
You cannot mix different types of oils. Based on viscosity, it is better to choose a liquid with the following markings: 75W - 90; 80W - 85; 80W - 90. Manufacturers that have proven themselves well and produce brands that are suitable for an SUV are: Gazproneft, Lukoil, Shell, Castrol, TNK, ExxonMobil. Transmission oil must be of high quality; the proper operation of all mechanisms in the Chevrolet Niva depends on this.
To replace you will need: a 12mm hexagon, a 17mm wrench, a rag and a container for waste material. Next you need to unscrew the filler plug, and then the drain plug.
When the liquid has come out, clean the holes with a rag and fill the cleaning liquid to the top.
Replacement frequency, what antifreeze to fill
In the maintenance information for Niva Chevrolet, it is recommended to change antifreeze every 60,000 kilometers. But many car enthusiasts are not happy with the flooded antifreeze, which becomes unusable by 20 thousand. Dzerzhinsky antifreeze is usually filled from the factory, but there is also information about pouring red antifreeze.
When choosing coolant, it is better to use a concentrate rather than a finished product. Since it can be diluted in the required proportion, because after flushing there is still some distilled water left in the system.
A good choice would be Castrol Radicool SF concentrate; it is what dealers often recommend for use. If you choose ready-made antifreezes, then you should pay attention to the red AGA Z40. FELIX Carbox G12+ or Lukoil G12 Red with good reviews.
Fuel tank characteristics
The fuel tank of this model has almost sixty liters, or more precisely 58. On average, per hundred kilometers you have to spend 8-9 liters of AI-95, Premium-95 or AI-92 gasoline. Features of the fuel container:
- the tank is located directly under the rear seat;
- in the upper part there is a small hatch under which the fuel pump is installed;
- The sensor will help determine the level of fuel fluid and the amount of gasoline.
There are other Chevrolet Niva filling tanks , many of which are included in various systems.
This is interesting: What is the volume of oil in a T 40 engine
Leaks and problems
When replacing the coolant, you should inspect all pipes and connections for possible problems. After all, when the fluid is drained, it is easier to replace them than to tear them during operation. You need to pay special attention to the clamps; for some reason, many people use ordinary worm clamps. Over time, they squeeze the hoses, causing them to break.
In general, the Chevrolet Niva has several main problems related to the cooling system. It often happens that antifreeze leaves the expansion tank. The plastic on it constantly bursts, which causes leaks. In this case, replacement will be required.
Another problem is antifreeze under the driver's mat, which can cause a sweetish smell in the cabin and also fog up the windows. Most likely the culprit will be a leaking heater radiator. This problem is usually referred to as “a chef’s nightmare.”
There is also a situation where antifreeze is thrown out of the expansion tank. This may indicate a broken cylinder head gasket. This is checked as follows. With the car completely cooled down, remove the expansion tank cap, after which you need to start the engine and rev it up intensively. It is advisable to have a second person so that he can see whether the antifreeze in the tank will bubble at this time.
How to change the oil?
How to independently replace technological fluids in a Niva Chevrolet? To do this, you need to purchase high-quality oil, which is recommended by the manufacturer. All required volumes are indicated in the instructions for the car. For beginners, the replacement process will seem complicated, but in fact it is not.
The choice of oil for an all-wheel drive vehicle is a very important point; the service life, wear of parts and the operation of all transfer gear mechanisms depend on it. You need to buy liquids that are recommended by the manufacturer or proven, well-known brands. There are different types of oil for different seasons, they differ in viscosity and are adapted to work at a certain temperature.
If the car was purchased used, it is better to immediately check the level of all fluids and replace them.
Video
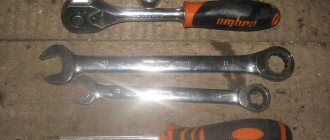
- Ratchet wrench
- Extension
- 8 mm head
- 10 mm head
- 13 mm head
- Narrow nose pliers
- Torque wrench
- Knife
- Funnel
Parts and consumables:
- Coolant 8 l (10 l with reserve)
- Technical capacity
- Radiator Cap O-ring (if required)
- Plastic bottle
- Rags
According to the Chevrolet Niva maintenance regulations, the coolant should be replaced after two years of operation or after 60 thousand kilometers, whichever comes first. In addition, if the coolant changes color to a reddish color, replace it immediately, as such a change indicates that inhibitory additives have developed and the liquid has become aggressive towards the parts of the cooling system.
Replace coolant only when the engine is cold.
1. Place the car on a ditch and open the hood.
2. Remove the oil sump guard and engine splash guard as described.
The crankcase protection and mudguard may not be removed, but in this case you will have to use some kind of device to collect the drained liquid, otherwise it will inevitably spill across the area under the car.
3. Relieve excess pressure in the cooling system by unscrewing the expansion tank cap.
4. Place a wide container with a volume of at least 8.5 liters under the drain hole made in the lower part of the left radiator tank. To reduce the intensity of liquid drainage at the initial moment, the cap of the expansion tank should be tightly screwed on.
5. Unscrew the radiator drain plug by hand and drain the coolant from the radiator into a substitute container.
Coolant is toxic and lethal to all living things, so be careful when working with it. To avoid polluting the environment, drain the radiator through a funnel (such as one made from a plastic soda bottle).
The drain plug is sealed with a rubber ring. Replace a ring that is torn, cracked or has lost elasticity.
6. Unscrew the cap of the expansion tank.
7. To drain the coolant from the engine cooling jacket, place a container under the drain hole located on the left side of the cylinder block next to the ignition module, and unscrew the drain plug using a 13 mm socket with an extension.
8. The connection between the plug and the cylinder block uses a conical thread that does not require additional sealing. Close the radiator and cylinder block drain plugs. Tighten the drain plug of the cylinder block to a torque of 25-30 N∙m.
9. Before filling the cooling system with liquid, remove the engine screen (if any), use narrow-nose pliers to loosen the clamp securing the coolant supply hose to the throttle assembly and remove the hose from the pipe.
10. Pour liquid into the engine cooling system through the expansion tank until liquid flows from the coolant supply hose to the throttle body. After this, install the hose in place and secure it with a clamp.
Use coolants recommended by the manufacturer.
11. Close the cap of the expansion tank.
Screw the expansion tank cap tightly. The expansion tank is under pressure when the engine is running, and therefore, if the plug is loosely tightened, coolant may leak from under it.
12. Start the engine. When the engine warms up, the radiator outlet (lower) hose should be cold for some time, and then quickly heat up, which will indicate the beginning of fluid circulation in a large circle. After waiting for the cooling fan to turn on, stop the engine.
When starting the engine, the expansion tank cap must be closed.
With the engine running, monitor the coolant temperature according to the gauge. If the arrow reaches the red zone and the fan does not turn on, turn on the heater and check what kind of air flows through it. If the heater supplies heated air, it means that the fan is most likely faulty, and if it is cold, it means that an air lock has formed in the engine cooling system. But there shouldn’t be a plug, since the cooling system was depressurized before adding liquid (see point 9).
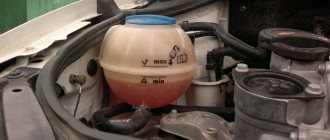
13. After the engine has cooled, check the coolant level in the tank and bring it to normal (it should be between the MIN and MAX marks).
Lubrication system
The Chevy Niva lubrication system itself is also combined. The oil pump supplies oil under pressure to the bearings, crankshaft, and drive helical gear. Some parts are lubricated by splashing. Characteristics of containers requiring lubrication:
- engine lubrication capacity is 3.75 l;
- It is better to use synthetic and semi-synthetic SUPER oil. Its viscosity class: from -25 to +30, +35 - 5W30, 5W40; from -15-+45 — 15W 40; from -10-+45 — 20W 40;
- Transmission oils from Lukoil TM-4 are made on a mineral (80W 85, 80W-90) and semi-synthetic base (75W-90) and are off-season, high-quality, as they use additives from the world's best manufacturers. They are needed for gearbox housings (1.6 l);
- the same oil is used for the transfer case (0.79 l);
- for the front (1.15 l) and rear (1.3 l) axles use 80W 90 and 85W 90;
- the power steering needs 1.7 liters of Pentosin Hydraulic Fluid CHF115;
- The hydraulic front shock absorber (0.15 l) and rear shock absorber (0.215) are filled with Slavol-AZh or GRZh-12 operating fluid.
How to choose coolant?
The selection of coolant should be approached responsibly.
Making a choice right away is not so easy. Today, stores offer a large selection of canisters and bottles of various colors and compositions. The question is brewing: what to fill - antifreeze or antifreeze? What does the manufacturer recommend?
Types and properties of coolants for cars
The best option for effectively lowering the temperature is antifreeze. This is a liquid that contains:
- distilled water;
- ethylene glycol or propylene glycol (less aggressive substance);
- additional additives.
Distilled water. Ethylene glycol based antifreeze.
Additives, in turn, are divided into the following subtypes:
- silicate;
- based on organic acids (carboxylate);
- hybrid antifreezes (based on the two described above).
Carboxylate coolants have good heat transfer and high cooling temperatures. They reliably fight fat deposits and have a longer service life. Silicate antifreezes perfectly prevent corrosion and reduce the temperature of aqueous solutions. They are considered universal.
Carboxylate coolant after 60,000 km
Depending on the additives used, a high-quality coolant must have a high boiling point and thermal conductivity. Also not to be exposed to freezing in the winter season, maintaining its performance. Do not form scale or foam.
Windshield and brake fluid reservoir
Another filling capacity of the Chevrolet Niva is two glass washer reservoirs, the capacity of which is five and two liters.
This model has two independent braking systems. The working one has a hydraulic drive, the parking one has a mechanical drive. The contours are separated from each other.
The hydraulic drive includes a special tank made for brake fluid. Recommended fluids for pouring into other containers and for lubricating joints:
- DOT-4 brake fluid is suitable for half-liter hydraulic brakes. The product has improved characteristics and has a boiling point of over 235 degrees. Well suited for regions with low ambient temperatures;
- SAEJ1703, FMSS116 are used for the entire hydraulic system and clutch release (0.15 l). The synthetic product provides good lubrication and reduces oxidation at high temperatures;
- tank lid hatch hinges, door and hood locks require VTV-1, FIOL-1 greases. Hinges of steering rods and cardan shafts - ShRB-4, Litin 2, Esma;
- The air conditioner also has two containers. One of them is for oil (0.22 l), the other is for refrigerant (0.650 kg).
Replacing antifreeze on a Niva Chevrolet
Replacing antifreeze on a Niva Chevrolet car must be carried out taking into account the strict frequency established by the manufacturer - once every 40,000 km, or (if the car owner rarely uses the car) every two years. At the same time, it is necessary to check the antifreeze level and replace it if it darkens or appears brown. Also, replacement of antifreeze may be necessary if the composition does not meet the required density or repair of the engine (cooling system elements) is required.
Which antifreeze is better, and how much to fill in a Chevrolet Niva?
To fill the cooling system you need 10 liters of high quality antifreeze (antifreeze). When choosing a suitable composition, you should focus on the recommendations of the manufacturer and the experience of servicing Niva Chevrolet vehicles. Let's look at the best options:
- Cars manufactured in 2002 are suitable for red antifreeze class G12. It is advisable to give preference to G-Energy or MOTUL Ultra.
- For cars manufactured from 2003 to 2009, the best choice is red antifreeze class G12+. Options - Lukoil Ultra, G-Energy, MOTUL Ultra, Havoline, Frostschutzmittel A.
- In Chevrolet Nivas produced since 2010, it is better to use red coolant G12++, namely products from the brands FEBI, Freecor QR, Frostschutzmittel A, VAG.
Replacement process
To replace antifreeze on a Niva Chevrolet, find an inspection hole. You can also work on an overpass or lift. It is important that the car stands strictly horizontally, with mandatory fixation, in order to avoid movement during the work process. If you can't find a perfectly level area, find an area where the front of the machine is slightly higher.
Before draining the antifreeze, perform a few more manipulations - wait until the engine cools down, remove the negative voltage from the battery, and also prepare the tool for work. You will need a ten-socket wrench, a funnel for filling coolant, pliers, a screwdriver, a new portion of antifreeze and a container for draining the coolant. Use a canister, bucket, basin or bottle as a drainage container.
Antifreeze Frostschutzmittel A from Febi
Let's start with how to drain antifreeze. Take a series of steps:
- Open and secure the hood.
- Unscrew the cap on the expansion tank. As noted above, wait until the engine cools down to avoid burning your hands. As a last resort, the coolant temperature should not exceed 90 degrees Celsius. Carefully unscrew the cap, take your time. Allow hot air to escape, which helps reduce pressure. After this, unscrew the cap completely.
- Unscrew the plug from the drain hole, and then wait until all the coolant comes out. Don't forget to place the container first to avoid getting antifreeze on the ground.
- As soon as the waste fluid leaves the system, screw the plug back into place.
To avoid air locks in the system, discard the tube from the fitting of the throttle assembly. To do this, take a screwdriver or pliers, and then, using the tool, loosen the fastener, and then move it back. Now remove the tube from the throttle body fitting.
Filling with new antifreeze
Above we looked at the first stage - how to drain antifreeze. The next step is to fill the system with new coolant. Remember that the composition must be prepared, because many antifreezes are sold as a concentrate and require dilution with distilled water, in a ratio of 1 to 1. Read the instructions carefully, because they may contain other information.
Next, do the following:
- Pour new antifreeze into the reservoir.
- Monitor the working fluid level. As soon as it comes out of the throttle assembly, return the hose to its place and install the clamp.
- Fill the cooling system. The antifreeze level should reach the MAX line.
- During the filling process, press the radiator tubes several times to prevent plugs from forming.
- After filling the cooling system, screw the cap on the expansion tank.
Replacement instructions
The procedure for replacing the coolant is not complicated, so even a novice car enthusiast can perform it.
How much to pour?
Antifreeze in a car, according to the manufacturer’s recommendations, should be changed after 40 thousand kilometers or after two years of operation. In this case, it is necessary to constantly monitor the condition of the coolant and check its level. If it has darkened or become cinnamon in color, then it needs to be changed. If the level is below the required level, add water or antifreeze. Replacement may be required if the coolant poured into the car does not meet the density.
The required volume of liquid to be filled is 10 liters. It is advisable to fill with coolant specified in the owner's manual.
Coolant
What will you need?
To carry out the replacement, you will need an inspection hole, a lift or an overpass. The machine must be installed horizontally and secured so that it cannot roll during work. The front of the machine should be installed higher than the rear. The procedure is carried out only on a cold engine. To carry it out you need to prepare the following tools and materials:
- spanner set to “10”;
- pliers;
- screwdriver;
- funnel;
- container for draining waste liquid;
- new antifreeze;
- clean rag.
A watering can can be made from a plastic bottle by cutting it in half. A canister or plastic water bottle is suitable as a container.
Stages
Having installed the car on the inspection hole, they begin to replace the coolant.
- First, open and secure the hood.
- The next step is to unscrew the cap on the expansion tank. It is advisable to perform the procedure on a cold machine.
Expansion tank Niva Chevrolet
If this is not possible, then the coolant temperature should be no higher than 90 degrees. To avoid getting burned by steam or hot liquid, place a rag on the engine and around the neck of the expansion tank. The lid should be unscrewed carefully. First you need to unscrew it a little so that hot air comes out and release the tank from pressure, and then unscrew it completely. - Now unscrew the plug on the drain hole and drain all the liquid. When the used antifreeze has drained, screw the plug back into place.
- To prevent the formation of air plugs in the cooling system, you need to disconnect the hose from the throttle body fitting. To do this, use a screwdriver or pliers to loosen the fastening on the clamp and move it back. Then disconnect the hose from the throttle assembly fitting.
- Before adding coolant, it should be prepared. There are ready-to-use liquids, mainly antifreeze. There are antifreezes that require dilution with distilled water; usually the proportion is 50/50, unless otherwise indicated in the instructions.
- Next, you can proceed to filling the cooling system.
Coolant is poured into the expansion tank. As soon as it begins to flow out of the throttle body nozzle, put the hose on the nozzle and tighten the hose clamp. Next, continue to fill the antifreeze solution to the maximum mark in the expansion tank.
- When pouring antifreeze solution, tighten the radiator hoses to prevent air pockets from forming.
- After the cooling system is filled, tighten the cap on the expansion tank.
- Next, you need to start the engine and wait for the electric fan to turn on. If this does not happen, you need to check what kind of air is coming from the heater. If it is warm, then the fan is faulty, if it is cold, the reason is the presence of air pockets formed in the system. To get rid of them, you need to open the cap on the radiator, start the engine, and after 5 minutes of operation, turn off the engine. Now close the radiator cap.
Removing the radiator cap - When the second cooling circle opens, the coolant level will drop significantly.
- You must wait until the engine cools down. Next, check the fluid level again. On a cold engine it should be between maximum and minimum, on a hot engine it should be at maximum. If necessary, add to the required volume.
The number of these elements in each vehicle may vary. In addition, it is important to have a clear understanding of the location, types, engine and transmission oil used, types of lubricants and fluids.
After all, they must be filled out taking into account the plant’s recommendations so that all systems can fully operate.
This is interesting: How to properly change the oil in a variator
Chevrolet Niva
If the engine is hot, you need to let it cool and then relieve excess pressure in the cooling system by unscrewing the expansion tank cap. If the engine is hot, you need to let it cool and then relieve excess pressure in the cooling system by unscrewing the expansion tank cap.
We place a wide container with a volume of at least 8.5 liters under the drain hole made in the lower part of the left radiator tank. To reduce the intensity of liquid drainage at the initial moment, the cap of the expansion tank should be tightly screwed on.
We unscrew the radiator drain plug by hand and drain the coolant from the radiator into a substitute container. We unscrew the radiator drain plug by hand and drain the coolant from the radiator into a substitute container.
The drain plug is sealed with a rubber ring. Replace a torn, cracked or lost elasticity ring.
Unscrew the expansion tank cap.
To drain the coolant from the engine cooling jacket, place a container under the drain hole located on the left side of the cylinder block next to the ignition module.
Using a 13mm socket with an extension, unscrew the drain plug of the cylinder block and drain the liquid from the engine. Using a 13mm socket with an extension, unscrew the drain plug of the cylinder block and drain the liquid from the engine.
The connection between the plug and the cylinder block uses a conical thread that does not require additional sealing. We tighten the drain plugs of the radiator and cylinder block. We tighten the drain plug of the cylinder block with a torque of 25–30 N∙m.
Before filling the cooling system with liquid, remove the engine screen and use pliers to loosen the clamp securing the coolant supply hose to the throttle assembly... Before filling the cooling system with liquid, remove the engine screen and use pliers to loosen the clamp securing the coolant supply hose to the throttle assembly... >Chevrolet Niva
...and remove the hose from the pipe. ...and remove the hose from the pipe.
We pour liquid into the engine cooling system through the expansion tank until liquid flows from the coolant supply hose to the throttle body. We pour liquid into the engine cooling system through the expansion tank until liquid flows from the coolant supply hose to the throttle body.
After this, install the hose in place and secure it with a clamp. We wrap the cap of the expansion tank. Let's start the engine. When the engine warms up, the radiator outlet (lower) hose should be cold for some time, and then quickly heat up, which will indicate the beginning of fluid circulation in a large circle. After waiting for the cooling system fan to turn on, stop the engine.
After the engine has cooled, check the coolant level in the tank and bring it to normal (it should be between the MIN and MAX marks). After the engine has cooled, check the coolant level in the tank and bring it to normal (it should be between the MIN and MAX marks).
According to the maintenance regulations for a Chevrolet Niva, the coolant should be replaced every 60 thousand kilometers.
Chevrolet > Niva
How much antifreeze is in the cooling system, volume table
According to information about car maintenance, antifreeze should be changed after the car has driven 60 thousand km. Antifreeze becomes unusable after a run of 20 thousand km .
Important. It is better to give the choice of coolant in favor of concentrate. The main advantage is that it can be diluted in the required proportion, since after flushing, distilled water remains in the system.
An excellent choice is the product Castrol Radicool SF . If you give preference to a ready-made product, it is recommended to choose AGA Z4, G12 Re or FELIX Carbox G12+.
Table (Niva Chevrolet) antifreeze volume:
- Castrol Radicool SF
- AGA Z40
- FELIX Carbox G12+
- Lukoil G12 Red
Fluid for refilling the hydraulic steering system
Table 12
List of products containing precious metals in LADA 4x4 cars
| Product number | product name | Location of precious metals | Weight in grams | ||
| gold | silver | palladium | |||
| 2115-3801010 | Instrument cluster | In semiconductors | 0,000263 | 0,016414 | |
| 2105-3747010-03 | Turn signal and hazard warning light switch | 0,0180561 | 0,0208012 | 0,103 | |
| 2105-3709310/-01 | Three lever switch | Coating | 0,1664 | ||
| 2101-3704010-11 | Ignition switch | In contacts | 0,14078 | ||
| 2105-3710010-03/-04 | Hazard switch | In contacts | 0,107 | ||
| 21213-3709607 | Heated rear window switch | In contacts | 0,11517 | ||
| 2113-3709609-10 | Rear fog lamp switch | In contacts | 0,115169 | ||
| 2104-3709612 | Rear window wiper and washer switch | In contacts | 0,403093 | ||
| 2107-3709608-01 | Heater switch | In contacts | 0,265997 | ||
| 21045-3709280 | Fuel heating switch | In contacts | 0,170288 | ||
| 2108-3720010-10/-11/-12 | Brake light switch | In contacts | 0,1681 | ||
| Generator voltage regulator | In semiconductors | 0,0534 | |||
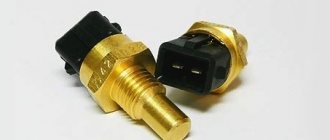
| 2106-3828110 | Water temperature indicator sensor | In contacts | 0,0161637 | ||
| 2105-3747010-02/03 | Relay-breaker for direction indicators and hazard warning lights | Gold in semiconductors, silver in contacts | 0,00021 | 0,0731 | |
| 2105-3747210-12 | High beam relay | In contacts | 0,055 | ||
| 2105-37470-1010-12 | Low beam relay | In contacts | 0,055 | ||
| 2105-3747210-02 | Headlight wiper relay | In contacts | 0,137 | ||
| 2114-3747610 | Rear fog light relay | Gold in semiconductors, silver in contacts | 0,000998 | 0,034935 | |
Flushing fluids for the engine lubrication system
Table 10
Liquid brand Manufacturer Regulatory document AUTO WASHING OIL Lukoil-Nizhegorodnefteorgsintez, Kstovo, LLC Lukoil-Permnefteorgsintez, Perm STO 00044434-0122 WASHING OIL Novo-Ufa Oil Refinery OJSC, Ufa TU 0253-019-05766528 R OSNEFT EXPRESS OAO « Angarsk Petrochemical Company, Angarsk TU 0253-392-05742746 MP SYNTHETIC MP CLASSIC OJSC Omsk Oil Refinery, Omsk STO 84035624-005Note. Flushing fluids are used during maintenance in accordance with the service book when replacing the working engine oil with fresh one.
Carrying out an oil change
Let's look in detail at how to change the oil in axles. The main steps of the procedure are identical to changing the lubricant in the transfer case. First, the fluid in the gearboxes warms up. To do this you need to drive about five kilometers. Then the car is driven onto a viewing hole, overpass or lift. The waste is poured into prepared containers. Its condition is assessed for the presence of dirt and metal particles. New lubricant is added. Possible leaks are checked. You also need to clean the breathers of both bridges. The filler holes are inspection holes for checking the lubricant level. The liquid should be level with these holes.
Power unit
The engine installed on the modern model of the Niva 21213 (214) car was inherited from its Soviet progenitor - the VAZ 2121, and in terms of fluid volumes they are almost identical:
- Liquid cooling system. Filled with antifreeze in an amount of 10.7 liters with a freezing point not higher than -40 ° C. The capacity of the interior heating radiator is also included in this volume.
- Crankcase. Motor oils are poured here, the brand of which depends on the operating conditions. Capacity: 3.75 liters, including oil filter filling.
The viscosity of the oil poured into the Niva engine must correspond to the outdoor temperature at which the car is operated. Possible modes and suitable oil brands are shown in the table:
When flushing the power unit during the process of replacing liquid lubricant, the same amount of flushing oil (3.75 l) is used, taking into account the size of the filter. Replacement is carried out after 8-12 thousand kilometers, depending on the quality of the oil. Flushing is usually performed after 3 engine lubricant changes. During operation, it is important to monitor the oil level in the engine crankcase using a special dipstick. If the level drops below the Min mark, it is urgent to add lubricant to the engine of the same viscosity as was previously filled.
Antifreeze needs to be updated at least once every 3 years or according to the degree of wear of the fluid. It is not recommended to dilute antifreeze with distilled water, either in winter or summer. In winter, the diluted liquid may freeze, and during the summer heat it may boil ahead of time, which will lead to overheating of the engine.