You can reupholster your car seats not only in a specialized salon, but also with your own hands. In this way, you can update worn out seats, as well as give the interior a unique and original style. What do you need to reupholster the seats yourself? You don't have to have any sewing education! All you need is your desire, patience and a sewing machine. The work is not very difficult, but quite painstaking. Therefore, if you are ready, I suggest you get started!
01. MATERIALS. What do we need and how much? Our interior will be combined from two colors – black and beige. You can, of course, choose any other colors you like. For the central parts of the seats, I chose beige perforated eco leather (2.5 m). For the back parts of the back and pockets - beige without perforation (1.5 m). And for all other parts - black leather (3.5 m). Choose special automotive material. It is designed to withstand large temperature changes and is resistant to fading. Ordinary furniture leather is not suitable, as it is designed for comfortable conditions in apartments. You will also need thin foam rubber - 0.5 cm thick. They will need to glue all the leather parts. I have already duplicated the black material. But for beige it took 3 sheets of foam rubber. You will need special furniture glue. It is usually pink in color. It can be purchased in specialized stores.
02. Sewing accessories. • Buy special needles for leather No. 90 or 100. • You will also need threads for sewing leather (regular ones will not work, they simply will not withstand the load). Look for threads labeled Extra Strong or for the shoe industry. You will need at least three coils of 200 meters each. • 3-5 meters of adhesive interlining - according to the amount of foam rubber and perforated material. • Machine oil.
03. Preparation of the material We glue all the foam rubber with non-woven material using an iron. This is necessary so that the foam rubber does not crumble during use. The interlining also makes it easier for the foam to slide under the foot while sewing.
04. Let's get to work Remove all the trim from the seats (the seats have long been removed from the car).
05. Marking Now, looking at the case, everything seems clear and understandable to us. But when we break it down into parts, we can easily get confused about which part comes from where. Therefore, we take a marker and number each element of the case. For convenience, I drew a diagram of each seat and back on separate sheets and also numbered the parts. This way, it will be impossible to get confused.
06. Knitting needles On the wrong side you can find these “pockets” with knitting needles. We will need these wires for new cases. Take them out and set them aside for now. Be sure to remember where these needles are sewn and mark it on your paper diagram.
07. Preparing patterns We rip out the covers. We cut off all seam allowances. This is what we ended up with – patterns for new cases.
08. Cutting We transfer each detail to the leather. In order not to confuse anything and not get the parts in a mirror arrangement, we apply them to the wrong side of the material, wrong side up. As shown in the photo.
09. Seam allowances Add 1 cm seam allowances on all sides (where required). Don't forget to number all the parts.
11. We receive a set of new parts for the covers. In this case, this is the back seat. But we do the backrest and both front seats in the same way.
12. Glue As mentioned earlier, parts made of zama leather must be glued with foam rubber. I only need to work with beige. I have a black leather jacket ready for sewing. Ideally, you need to glue it with a spray gun. But at home this is not always possible, so we apply the glue with a brush or rubber spatula. Practice on scraps of material, whatever suits you best. Please note that we glue the foam rubber to the skin with the side that is without interlining.
How to install covers yourself | Thread Posted by: Sushil
All car covers from leading companies that are represented on the Russian market have almost the same approach to the use of this accessory.
They are attached either using elastic bands with hooks or synthetic tapes. It doesn’t matter whether you bought expensive individual covers or more affordable universal ones, installation remains an important step in this matter. You can, of course, install seat covers without installation, but then the quality will be very poor and will not look very nice. So, to achieve the best result, we recommend completely removing the seats from the car. Tools for putting on covers: scissors, screwdriver, pliers, sharp knife. 1. take out the cover for the front seat, attach a hook to each elastic band and clamp them with pliers (hooks are included in the kit). We put the cover on the front seat and tuck the back part of the cover between the seat and the back. We hook all the hooks under the seat so that the elastic bands are taut. The seat is ready. 2. Now we put the cover on the back, usually it fits tightly, so when putting it on you need to squeeze the side supports of the seat so as not to tear the cover. We straighten it properly so that all the seams are even. And tie the laces together (pull only by the material). On the dressed backrest we look for holes for the headrests and carefully cut the holes (some models already have holes for the headrests, so there is no need to cut anything) and tuck the slot under the plastic bushing of the headrest. The seat and back are dressed. 3. We put on the headrest. The headrest fits tightly, so you can squeeze it, put on a cover, straighten it along the seams and fasten it together with laces. Everyone got dressed before. 4. Rear seats. We put on the cover and straightened it out, turn it over, pull the cord - the drawstring at both ends and tie them together; we also tie the rest of the ropes; the seat is ready. 5. We put the cover on the back of the rear seat and, just like on the seat, we pull the drawcord at both ends and tie it. We cut a hole for the retainer (crosswise) and other holes and tuck the material under the plastic. We make holes for the headrests and reclining buttons. We tighten the cord on the back of the backrest. We similarly put on the other backrest and headrests.
Tags:
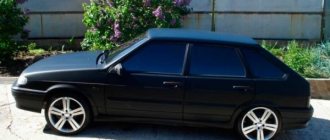
How to put seat covers on a VAZ 2114
Kinds
Let's start by discussing the types of covers. They can be classified by color and texture, but the most significant criterion is the material.
| Material type | Advantages | Flaws |
| Velours | With good quality, it creates a cozy, comfortable interior, lasts a long time, and does not require careful maintenance. | Heavy stains are difficult to remove and absorb odors |
| Textile | Cheap and varied in color and texture | Cheapness negatively affects quality and service life |
| Leather | Traditional solution, attractive appearance, easy maintenance | High cost, delicate, requires careful handling, gets very hot under the sun |
| Eco leather | Modern, high-tech material that breathes, does not fade, does not crack, can be cleaned and washed, and is not afraid of frost. | Limited range of colors, quite high cost |
| Leatherette | It has almost all the advantages of genuine leather, costs less, and is easier to care for. | May initially emit unpleasant odors |
| Animal fur | Soft, comfortable, unusual, create an original atmosphere in the salon | Bacteria and microbes may remain on them. You have to carefully and often care for the covers |
Eco leather in action
From all that has been said above, we can conclude that leather is an ideal option for those who are looking for a combination of quality, visual appeal and durability.
Why leather? Advantages and disadvantages
Let's discuss leather capes and their main characteristics in more detail. Today, many owners of the VAZ 2114 and others opt for this option. Why? Let's try to figure it out.
Let's start with the positive qualities. These include:
- Attractive and stylish appearance, emphasizing the solidity of the interior;
- Easy to clean, easy to wash covers;
- Impressive durability indicators subject to basic care rules;
- Adaptability to harsh climates, which is why the covers will not crack and harden in our frosts;
- Create a soft and comfortable place for the driver and passengers to sit;
- Pleasant to the touch, warm, not afraid of heat;
- The leather is not afraid of such contaminants as motor oil and animal hair, which turn fabric covers into unnecessary rags.
Leather capes
What are their disadvantages? There are only two that can be named, and they are quite controversial.
- The leather cover heats up in the sun, making it difficult to sit on the chairs with bare skin. The problem can be solved by simply covering the windshield with a reflector. All seats are heated, so this is a dubious drawback.
- High price. There is no arguing here, leather capes are really expensive. But the money spent is repaid by the longevity and reliability of operation of such covers. They last a long time and do not need to be replaced every year.
Despite the controversial disadvantages, leather cases have excellent advantages, which makes them the most attractive in the eyes of practical buyers.
Price issue
An important issue when choosing such products is their cost.
Not everyone is counting on long-term prospects, and cannot afford to spend a lot of money on the purchase of certain types of cases. But this position is not entirely correct if you are not going to sell your VAZ 2114 in the near future.
High-quality covers will provide you with comfort and coziness, and protect the seats themselves from wear. Therefore, we advise you to invest a normal amount, but buy some capes.
Prices directly depend on the material used to sew them, as well as on the specific manufacturer and region. Therefore, the price tags listed below may differ from those presented in your market.
- Leather - about 3.5 thousand rubles per set.
- Jacquard - approximately 3 thousand rubles per set.
- Velor and fur - approximately 4.8-5 thousand rubles.
- Genuine leather - from 5.5 thousand rubles and above per set.
- Fabric - you can find sets for 1.5-2 thousand rubles or more.
Eco-leather car covers! 89516199217…. | Topic author: Denis
Car covers are available in two versions: a) Individually for cars; VAZ 21099, 2113, 2114, 2115; VAZ 2110; VAZ 2111, 2112; Niva Chevrolet; Lada Kalina; Priora b) Universal kit No. 3, for foreign cars. The front covers are put on the headrest, that is, they are sewn together with the headrest. The backrest and seat are made with zippers to allow 60/40, 40/60, 50/50 divisions. The fastening is mainly a 10 mm belt sling, with half rings. The set of car covers includes covers for the entire interior of the car (front seats, rear seats, three headrests for the rear seat, an armrest……..
Back row
Depending on the tailoring and manufacturer, these products may differ from each other. But mostly the installation principle is the same everywhere.
Modification of the steering control of the VAZ 2110
The steering of the VAZ 2110 is not much improved
Tens simply cannot be kept silent about the steering, and many manufacturers take into account some punctures in the design of the steering rack, as well as the lack of power steering. Therefore, numerous sets and individual elements began to be sold that help eliminate these shortcomings. Electromechanical power steering is not an essential item, but if the driver spends quite a long time in the car, then fatigue is felt.
An amplifier will somehow solve this problem, and now there are complete kits ready for installation. It is not customary to talk about their quality, but everyone knows what they are getting into when buying an electric amplifier from an unknown manufacturer, painted with bright yellow paint and without identification marks. A steering rack damper can be considered a useful acquisition. Firstly, it reduces the recoil load on the rack itself, and secondly, it contributes to more precise handling on roads with poor surfaces. In some way, the steering damper relieves vibrations on the steering wheel, and this also affects handling.
The SS20 company took a more radical approach to the steering, which released several improved rack models for the 2110. Some physical, technical and design changes were applied in the modernized steering rack. In particular, this applies to the modified rack-shaft pair, in which the standard gear ratio is changed in such a way that only 3 full turns of the steering wheel are needed to completely turn the wheels from the far left to the far right position. This, of course, will affect the control accuracy, but the steering wheel stroke has become shorter by one turn.
How to remove the rear seats on a VAZ 2110, including removing the backrests from video
Car seats not only provide a comfortable ride, but are also responsible for the safety of the driver and passengers. When a breakdown occurs in the structure of the rear seats of a VAZ 2110 or the need to clean them, it is not necessary to spend money on a trip to a car service center to remove them. You can do this yourself.
When is it necessary to remove the rear seats?
Over the years of use of the car, all elements of the interior wear out. The seats are upholstered in fabric, so they need to be cleaned periodically to remove dust and dirt. It is best to do it after dismantling them, in this case the cleaning will be really high-quality and effective.
Rear seat removal may also be necessary for repairs in the following situations:
- after an accident;
- if the backrest lowering mechanism breaks down;
- if the armrests are faulty;
- for tightening fastening mechanisms.
Step-by-step instructions for dismantling
Before starting work, we prepare the necessary tools. To remove the seats we will need:
- flat and Phillips screwdrivers;
- key to 10;
- pliers;
- repair kit (depending on the situation).
The procedure is as follows:
- Unfasten the rear seat upholstery buttons on the trunk side.
- Pull back the loop and remove the latch near the headrest. To get to the latch, you need to pull the loop near the headrest
- We pull out the hooks on the back from the metal brackets that are on the body. Remove the hooks that hold the seats to the body
- The armrest mounting frame is fixed with three screws; we unscrew them for further dismantling.
- To remove the armrest itself, use a 10mm wrench and unscrew the nuts. Use a 10mm wrench to remove the armrest fastening nut.
- The mounting pad is secured with two latches; we press them out with a flat-head screwdriver. To remove the mounting pad, press the two latches
- Unscrew the fastening bolt and pull out the seat cushion lock. After unscrewing the mounting bolt, the lock can be easily removed
- Dismantling ends by unscrewing the last two nuts with a 10mm wrench, after which the base of the lock is removed.
PHOTO GALLERY: TUNED VAZ 2112 SALON
Interior tuning is done in contrasting red and black colors
This car has a new europanel installed in combination with a non-standard leather-wrapped steering wheel.
The red braid of the steering wheel and the red seats are clearly from another car.
The car owner is quite capable of making the interior of the VAZ 2121 a little more comfortable and reducing the noise level in it. But any improvement is good in moderation. Otherwise, the car may turn into a laughing stock.
REPLACING THE STEERING WHEEL
Here's what's required to replace the steering wheel on a VAZ 2112:
- large flat screwdriver;
- socket head 22;
- new steering wheel.
SEQUENCE OF OPERATION
The first step is to get rid of the decorative trim on the steering wheel. It is most convenient to pry it off with a thin knife.
- The horn switch is attached to three self-tapping screws. They should be unscrewed using a large screwdriver.
- There is a 22 nut under the panel. It is most convenient to unscrew it with a socket head on a long wrench.
It is convenient to unscrew the nut 22 using a socket head on a long wrench - The steering wheel can now be removed and replaced with a new one.
After unscrewing the central nut, the steering wheel can be easily removed
Tuning the interior of a VAZ 2112 - a selection of photos
A cool selection of photographs of the most diverse tuning of VAZ-2112 interiors - from the most striking options to very sophisticated ones. Perhaps some of these photos will inspire you to tune your VAZ 2112
Sources
- vazdriver.ru/tyuning_salona_vaz_2112_podborka_foto.html
- tuningkod.ru/tyuning-avtomobilej/tyuning-russkix-avto/tyuning-vaz/tyuning-salona-vaz-2112-metody-preobrazheniya.html
- ladaautos.ru/vaz-2112/kak-sdelat-tyuning-salona-vaz-2112-svoimi-rukami.html
- drive2.ru/l/544540281555387922/
- bumper.guru/klassicheskie-modeli-vaz/tyuning/tyuning-salona-vaz-2112.html
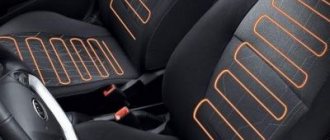
Eco-leather
Eco-leather is an excellent modern material from which excellent cases are created using the latest technologies. The material is breathable and does not contain polyvinyl chloride components, which ensures comfort for the driver and passengers and does not contribute to fogging of the back and legs when in contact with eco-leather. Due to special micropores, the products allow steam and moisture to pass through, but at the same time reliably retain water. The breathability indicators significantly exceed even the highest quality natural leather. The only drawback is the rather high price.
Eco leather
What to choose?
Today, motorists are offered a fairly extensive range of covers, and choosing among them is not so easy.
Factory finish
There are products specifically designed for specific models, and there are universal ones. The choice is always up to the client. Some people make them with their own hands, or order custom tailoring.
Each of the presented options has its own advantages and disadvantages, which we invite you to familiarize yourself with in more detail in our table.
| Options | Advantages | Flaws |
| Ready-made specialized ones for VAZ 2110 | The design matches the interior Easy to put on A wide range of Affordable | The quality of tailoring is not always at a high level The choice is large, but mostly monotonous |
| Ready-made universal | Are more diverse Allows you to put them on the seats without any problems Quality is usually good | May not fit seat sizes The choice specifically for the VAZ 2110 is small |
| To order | Possibility to get any image We use materials of the same quality that you can pay for Individual approach to the client Exactly fits the installed seats | The most expensive cover option |
| Self-tailoring | Freedom of creativity Possibility of using truly high-quality materials | Cases are complex in design Seamstress skills required |
Which option you ultimately choose is up to you to decide. Once you decide, you can proceed directly to tensioning them on the seats and back sofa of your car. All this will be discussed further in our material.
How to avoid falling for scammers?
Often, customers in online stores or on “one-page advertising sites” are sold low-quality cases with polyurethane film, no more than 0.6-0.8 mm thick. It cannot be used for sewing car covers, as it cannot withstand the load. As a result, after six months on such covers, the polyurethane layer moves away from the base. The thickness of the polyurethane film used for the production of eco-leather covers must be at least 1 mm.
Classification of eco-leather “Arigon” (Oregon, Arigon, etc.):
- 0.6-0.7 mm – economy segment (called TOWN and CITY by eco-leather suppliers)
- 0.8-0.9 mm – the most common (PEGASO)
- 1 mm is the thickest eco-leather in the segment of cases up to 15 thousand rubles. (LSTRONG)
We sew covers from eco-leather, 1.1 mm thick. This eco-leather is used by many studios in the process of reupholstering the interior. Some manufacturers, for greater persuasiveness, indicate that their cases are made of eco-leather, 1.2 or even 1.3 mm thick. However, this cannot be the case. They use a material that is 1.1 mm thick in the hope that you won't check it.
High-quality eco-leather covers for the VAZ 2110 should have smooth and clear seams. Protruding threads are unacceptable, because this can lead to unraveling of the seams and subsequently to detachment of the fabric base and deformation of the material.
By purchasing eco-leather covers for a VAZ 2110 on our website, you are guaranteed to receive an even and high-quality seam.
ABOUT REPLACING SEATS
The seats on the VAZ 2112 cannot be called comfortable. This is especially noticeable on long trips. So, at the first opportunity, drivers put seats from other cars on the “two-wheeler.” As a rule, Skoda Octavia acts as a “seat donor”.
Skoda Octavia is the most popular “seat donor” for the VAZ 2112
It is impossible to install the seats from this car on a VAZ 2112 in the garage, since serious adjustment of the fasteners and welding are required. There is only one option: use the services of specialists with the appropriate equipment.
Problems and their solutions
As the car is used, owners of the VAZ-2110 encounter various problems:
- Dirt – Over time, factory seat upholstery becomes dirty as a result of transporting a dog or children. The fabric becomes stained from spilled tea, juice or coffee, dust that has penetrated inside is eaten away, and so on.
- Passengers – with the regular transportation of people and various things, pollution also remains.
- Comfort and appearance - over time, any seat upholstery wears out, and this affects both ride comfort and the appearance of the seats.
For those who want to prevent damage to the standard upholstery, keep the interior clean and make the ride more comfortable, eco-leather covers will help. They do not absorb moisture, are durable and are easy to clean from dirt (to do this, you just need to wipe the surface of the covers with a damp cloth and they will sparkle clean again).
Front seats
Consistency, accuracy and attentiveness are all you need to successfully install covers on the front seats.
- It is not necessary to remove the front seats to install the covers. All work can be done directly in the salon.
- Remove the head restraints from the seats.
- Pull the cover over the top of the back of your chair.
- Usually there are three elastic bands on the central seams of the covers. They must be passed between the back and the seat so that each element of the product is exactly in its place.
- Now we fix the position of the covers using hooks that are placed under the chair itself.
- Carry out a similar operation with the lower part of the chair.
- The locking hooks are also inserted from the bottom so as not to interfere with the driver and passenger.
- All that remains is to pull the material onto the headrest. Depending on the tailoring, the product may have hooks or elastic bands. Try to hide them so that they are out of sight.
- They are often hidden under the holes of the pistons (through which the headrest is inserted into the chair).
- Carry out the same procedure with the front passenger seat.
Updated chairs