The fuel filter for the VAZ 2107 (injector) cleans the fuel from impurities that can harm the injection system. It should be replaced after at least 30 thousand km. car mileage, and taking into account the poor quality of fuel at gas stations in the country, much earlier.
Replacing the fuel filter on a VAZ 2107 with an injection engine
The injectors of injection engines are very sensitive to the presence of foreign impurities and contaminants in the fuel. These parts clog much more easily than jets on carburetor engines, and cleaning or replacing injectors is much more complex and costly than repairing a carburetor.
The fuel filter for the VAZ 2107 (injector) cleans the fuel from impurities that can harm the injection system. It should be replaced after at least 30 thousand km. car mileage, and taking into account the poor quality of fuel at gas stations in the country, much earlier.
Signs that replacement is needed
When the filter becomes clogged, it loses its capacity, so the fuel pump cannot provide sufficient pressure to the injectors, which is especially noticeable when the engine is running at high speeds. There are two main signs that the VAZ 2107 fuel filter needs to be replaced:
- Increased gasoline consumption.
- Reduced engine power.
- Install the new filter so that the arrow on the housing is turned towards the fuel rail.
- Tighten the fuel filter clamp.
- Replace the O-rings on the fuel line fittings.
- Tighten the fittings while holding the filter with a wrench.
- Install and tighten the battery terminals.
Replacing it is inexpensive and quite simple. You will need a minimum of tools, a new filter and half an hour of time.
Removing the fuel filter VAZ 2107
Before performing any work on the fuel supply system, which includes the filter, it is necessary to take care of fire safety - relieve fuel pressure and disconnect the battery to prevent spark formation and fire.
To relieve gasoline pressure in the fuel line, you must turn off the fuel pump fuse (F3) and start the engine and let it run for a while. The fuel pumped by the fuel pump will run out.
After this, you can turn off the ignition and unscrew the terminal from the battery.
Important: do not forget to return the fuse to its place!
When the pressure is relieved, the fuel pipe fitting is unscrewed using a pair of open-end wrenches: one should hold the filter so that it does not turn, and the other should turn the fitting nut.
Despite the release of fuel pressure, there is still some gasoline left in the filter, which can spill in the engine compartment. To protect against this, you can spread an old rag or rags under the filter.
When the fuel system pipes are disconnected, you need to unscrew the fuel filter mount and remove it.
Installing the fuel filter
After completing the work, you can turn on the ignition and start the engine.
With the engine running, you must ensure that there are no fuel leaks at the points where the fuel filter is connected to the main pipes.
At this point, work on replacing the VAZ 2107 filter can be considered completed.
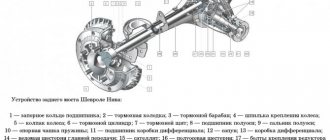
Fuel pump drive
The VAZ 2107 mechanical fuel pump is driven by a pusher and an eccentric. Among drivers, it is customary to call the pusher a rod, although the rod is another part of the fuel pump. The eccentric is located on the intermediate shaft, which operates from the gas distribution mechanism.
The fuel pump drive includes (see figure):
- 1 - pusher;
- 2 — heat-insulating spacer;
- 4 — adjusting gasket;
- 5 - sealing gasket;
- roller (cam).
Device and principle of operation
The operation of the mechanical fuel pump drive is not based on the fact that:
- the oil pump shaft is driven through a timing chain;
- the cam (or eccentric) begins to press cyclically on the pusher;
- The pusher transmits force to the lever and the fuel pump begins to pump fuel.
Drive faults
Problems with the mechanical fuel pump drive lead to interruptions in the operation of the fuel supply system. Actuator malfunctions are most often associated with deformation or excessive wear of the pushrod or cam.
Fuel pump rod bends
The fuel pump pusher is often made of metal that is not strong enough. There are often cases when, after 2–3 thousand kilometers, such a pusher bends and flattens the constant impact of the cam. The length of the pusher should be 82.5 mm. If your fuel pump tappet does not meet this size and is flattened on the cam side, it will need to be replaced.
Replacing the fuel filter on a VAZ 2107 injector
The fuel filter on every car plays a very important role, cleaning the fuel from various impurities, debris and small particles. Everyone knows the fact that no matter how first-class the fuel is, the presence of impurities in it cannot be ruled out.
It is possible to save a car engine only through the use of fuel filters. This applies not only to injection cars, but also to carburetor cars. As you know, the VAZ 2107, better known as the “seven”, was produced both in carburetor and injection form.
Let's look at the features of replacing the fuel filter on a VAZ 2107 injection and carburetor type.
When it's time to replace
The fuel filter is a replaceable element. Manufacturers of injection cars recommend replacing these devices every 30 thousand km. The filter on the VAZ 2107 must be replaced because the device becomes clogged, losing capacity. This negatively affects the fuel supply system to the injectors, as the pressure decreases.
Contaminated fuel causes malfunctions not only of the injector, but also of the fuel pump, which, due to its duty, has to transport gasoline to the engine compartment of the car. You can determine the need to change the gasoline purifier on a VAZ 2107 by the following criteria:
A decrease in the throughput of the product means that the injectors do not receive gasoline in the required quantity, which significantly affects the power of the vehicle engine.
Sequence of work when changing the filter on a VAZ 2107
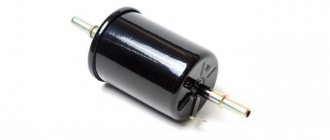
To begin with, it should be said that the fuel filter on a VAZ 2107 car is located directly in the engine compartment. To see it, you need to open the hood. The device looks like this, as shown in the photo above.
Replacing the device in question does not present any difficulties, but if the work is being performed for the first time, it is recommended to adhere to the following instructions:
As you can see, you don’t need to be a professional to change the fuel purifier on the “Seven”. It is important to follow the step-by-step instructions and also replace the device in a timely manner. It is better to change this device more often than to do it rarely and too late.
Replacing the filter on a carburetor "seven"
Carburetor VAZ 2107 cars also need to replace fuel filters. The replacement sequence on a carburetor VAZ-2107 is as follows:
On carburetor VAZ 2107 cars, the device in question is also located in the engine compartment. This device is held in place by rubber hoses, so additional fastening elements are usually absent.
In a carburetor engine there is no pressure in the fuel system, so there is no need to relieve the pressure before starting work. The cost of the device for carburetor cars is several times cheaper than for injection cars, but it is recommended to change them more often.
The advantage of a filter for carburetor cars is that the product has a transparent body. This allows you to determine the degree of contamination of the filter part visually.
In conclusion, it is worth emphasizing the importance of the device in question. The absence of a fuel filter would lead to frequent breakdowns in the injector and carburetor, as well as fuel pumps.
Fuel pump repair
To dismantle the electric fuel pump you will need:
- Phillips and flathead screwdrivers;
- 7mm tubular socket wrench.
Removing the electric fuel pump
Dismantling the electric fuel pump is performed in the following sequence:
- The negative terminal of the battery is disconnected.
If you need to replace or wash the coarse filter, you need to pry it off with a screwdriver and remove the old mesh. The new filter is installed by pressing tightly.
The fuel pump is installed in reverse order.
Video: how to replace an electric fuel pump at a service station
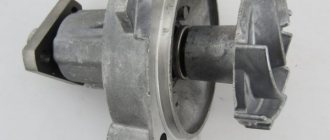
Removing the mechanical fuel pump
To remove the mechanical fuel pump, you need to prepare a Phillips screwdriver and a 13mm wrench, then:
- Loosen the clamps of the inlet and outlet hoses and remove the hoses from the fittings.
- Unscrew the two pump mounting nuts with a 13 mm wrench.
After this, you need to evaluate the condition of the pusher and, if necessary, replace it.
Disassembly
To disassemble a mechanical fuel pump you will need:
- keys for 10 and 8;
- Phillips screwdriver.
To disassemble a fuel pump of this type, you must:
- Unscrew the top mounting bolt.
After this, you need to evaluate the condition of the parts of the diaphragm and the mesh filter. If necessary, replace worn, deformed or damaged components.
Replacing valves
New valves are included in the fuel pump repair kit. To replace valves, you need a needle file and attachments for pressing out old valves. Replacement is carried out as follows:
- The cores are ground off with a needle file.
Installing a fuel pump
Reinstalling the mechanical fuel pump is performed in the reverse order of removal. The most important point during installation is the correct choice of gaskets. There will be two such gaskets:
- adjustable thickness 0.75 mm or 1.25 mm;
- sealing - 0.3 mm.
Between them there is a heat-insulating spacer. When installing a fuel pump, you must:
- Place the sealing gasket.
- Insert the pusher.
- Place a heat-insulating spacer on the studs.
- Install the adjusting shim.
Press all installed gaskets tightly. Turn the crankshaft by the pulley with a wrench so that the pusher protrudes from the edge of the gasket minimally. The protrusion of the pusher should not exceed 0.8–1.3 mm. If the minimum extension of the pusher differs from this value, you need to select a shim of a different thickness.
The electric fuel pump of the injection “seven” is responsible for providing the engine with fuel and maintaining the pressure in the power system at the required level. An electric fuel pump, as a rule, does not overheat, and therefore is more reliable in operation than a mechanical fuel pump. Proper operation and timely maintenance of the fuel pump can ensure its long-term trouble-free operation.
Cleaning the fuel pump is a fairly urgent procedure that must be carried out when the following symptoms appear:
- Difficulty starting the engine with the starter;
- reduction in vehicle acceleration dynamics;
- jerking when pressing the gas pedal sharply;
- floating speed and sluggish engine response;
- the engine stalls in transition modes after pressing the accelerator, etc.
In some cases, when you press the gas, the car practically does not accelerate, overcomes inclines with great difficulty, and does not overtake. There may be several reasons for such a malfunction, but often the problem is localized in the fuel pump area. Next, we will consider issues related to the electric fuel pump, which is installed in the gas tank of injection cars.
Read in this article
Replacing air, oil and fuel filters on VAZ 2101-2107
Filters in VAZ cars must be replaced periodically, depending on the mileage. The air filter should be changed every 10-15 thousand.
km, depending on the conditions in which the car is operated, the oil filter along with an oil change, which must be done every 10 thousand km, the fuel filter is changed every 30 thousand.
km or as it gets dirty - it has a transparent body and the level of contamination of the filter element is clearly visible.
Replacing filters on a VAZ
Replacing the air filter VAZ 2101-2107.
To replace the VAZ air filter, the first step is to unscrew the three bolts that hold the upper part of the air filter housing. Then we remove it and take out the old air filter.
We close the air intake hole with a regular rag or rag, and then thoroughly clean the casing of dust and dirt.
We install the new filter in place, removing the protective film or paper from it, close the casing and fasten it with bolts.
Replacing the oil filter VAZ 2101-2107.
The VAZ oil filter must be replaced at the same time as the oil change, at a time when the old oil has already been drained from the engine and new oil has not yet been added. Unscrewing it with bare hands is not always easy; this may require a special key or puller.
After the filter is removed, wipe the landing pipe with a dry, clean cloth. Before installing a new filter, you need to moisten the rubber o-ring with oil and pour a little inside (enough so that it does not leak out during installation). Then screw the filter onto the seat and tighten it by hand.
After replacing the filter, you need to start the car and let it run for 2-3 minutes to flush out the oil.
Replacing the fuel filter VAZ 2101-2107.
Before replacing the VAZ fuel filter, for safety reasons, it is necessary to remove the negative terminal from the battery. The filter is directional and is attached using clamps to the fuel line hoses.
Before removing the old filter, it is best to clamp the hoses with any available means so that any remaining gasoline does not leak out. After the hoses are clamped, you need to unscrew the clamps and remove the old fuel filter.
If the clamps are new, there is no point in changing them, but if they are already worn out, then replacement is required. We put the hoses on the new fuel filter and secure them with clamps.
It should be noted that when buying a car second-hand, it is necessary to change not only the oil, but also all the filters. In addition, any clogged filter has a bad effect on engine operation, reducing its service life and reducing key performance.
Video of replacing the air and fuel filter of a VAZ 2107
Oil type
We looked at what kind of oil to pour into a VAZ 2110 in winter based on such a parameter as viscosity.
But the type of lubricant should also be taken into account. There are three in total:
- Mineral;
- Synthetic;
- Semi-synthetic;
Mineral oil for winter VAZ-2109 is the worst option. Such a lubricant made by processing petroleum products is characterized by insufficiently good performance indicators, especially low-temperature viscosity. That is, its thickening threshold is much higher than that of other types of oil. But here it is worth noting that such oil for use as a lubricant is practically never found. But it is often used as a basis for flushing liquids.
Synthetic oil is one of the most optimal options for power plants of modern cars. It is obtained by synthesis, during which certain parameters of the lubricant are set, including viscosity. Therefore, when deciding which oil to pour into a VAZ-2114 in winter, preference should be given to synthetic oil.
It is these two criteria - viscosity and type that should be taken into account when determining which oil to fill in the VAZ-2115 or any other model for the winter.
Naturally, you should pay attention to the manufacturer. You should not buy lubricant from dubious places of sale or from little-known manufacturers. When choosing oil, it is better not to skimp.
When choosing oil, it is better not to skimp.
Replacing the fuel pump for a VAZ 2107 injector, installing an electric fuel pump and replacing the mesh
Cases when a VAZ 2107 injector fuel pump needs to be replaced are not that frequent, and its service life depends not only on the quality of the gas pump itself, but also on the condition of the gas tank. The reason I had to change it was because a small speck got into it because the filter came off.
Electric fuel pump device
The design of an injection fuel pump is simple and can be divided into two parts:
The most important thing is its structure itself. The electric fuel pump itself is hermetically sealed to protect against fuel ingress. The fuel enters the pump through the filter and the intake hole and is supplied to the power system through the outlet hole (sealed from the electric motor).
Here is a diagram you can find. I would like to note that it does not happen that the motor rotor rotates in liquid and even in gasoline. Firstly, a spark forms on the commutator when the engine is running. You understand that this will lead to a fire. Secondly, rotor rotation in liquid is so difficult that gaining speed and creating pressure is simply out of the question.
Therefore, gasoline passes through the engine through a special channel, and the design of the engine itself is hermetically sealed.
Where is the fuel pump on the VAZ 2107 injector?
On carburetor engines, the fuel pump is installed on the right side of the block and is visually accessible. On the injector, it is located in the gas tank and only the output tubes coming from it are visible, and replacement is somewhat more complicated.
Symptoms for replacement
Signs of a malfunction of the VAZ 2107 injector fuel pump appear both when starting the engine and during operation:
- “heavy”, long engine start;
- jerking when moving;
- uneven operation at idle;
- The fuel pump doesn't pump.
Diagnostics
The primary conclusion whether the fuel pump is working or not can be assessed by ear when the ignition is turned on. If you don’t hear a quiet buzzing noise from behind, then you need to check the voltage supply to the gas tank block and then draw a conclusion about its malfunction.
You can check the serviceability of the fuel pump using the MTL-2 pressure gauge; this is the most correct way. You can somewhat roughly estimate the pressure using air pressure gauges to check tire pressure. To do this, screw a rubber hose to the sensor and connect it to the fuel system.
You can do without instruments at all; to do this, unscrew the fuel hose from the filter, place a container and turn on the ignition. In one minute, about 1 liter should be poured into the container.
The pressure of the VAZ 2107 injector fuel pump when the ignition is on should be 4.0 atmospheres, and when the ignition is running 2.8-3.2. In reality, the pump pressure is different and was slightly less, but this may be an error in the pressure gauge.
The carburetor pump is checked by setting the camshaft position by cranking the engine so as to ensure free movement of the pump foot. The hose is unscrewed from the carburetor or filter and the presence of fuel supply is determined by pressing the foot.
How to replace a VAZ injector fuel pump
To replace the fuel pump on an injection vase you will need:
I recommend removing the gas tank mount for ease of repair work. To remove the fuel pump you need:
- disconnect the pressure relief pipes in the gas tank;
- Unscrew the main pipelines using 2 17mm wrenches;
- remove the gasket from the gas tank neck;
- unscrew the tank mount;
- move the tank to the side;
- remove the power and fuel level block;
- unscrew the fuel pump flange;
- remove the fuel pump filter;
- remove the tube from the pump after heating it;
- We take out the old pump and install a new one.
When installing the filter, do not hesitate to give it a good tap, otherwise it may fall off like mine. The fuel pump mesh on the VAZ injector is replaced if the old one is dirty or torn. Its replacement is carried out in the same way. Usually it is sold complete with a fuel pump; if not, you will have to buy it, the price is 25 rubles.
Reassemble in reverse order. We heat the hose again in boiling water; if the mounting location of the old electric fuel pump does not allow the part to be properly secured, then we cut it off.
Check the integrity of the gasket between the flange and the gas tank; if it is torn, there will be a smell of gasoline in the cabin.
Important. When choosing, pay attention to performance and maximum pressure. I had Bosch 0 580 454 456 and replaced it with a close analogue of FR 453-453 from WEBER.
Characteristics:
- OEM part number 21083-1139009-01;
- Installation of VAZ 2108 - 2115;
- Pressure - 580 kPa;
- Productivity - 60 l/min;
- Voltage - 13.5 V.
Consumption per 100 km at a speed of 120 is about 8 liters. Very pleased.
Replacing the fuel pump VAZ 2107 injector video:
Signs of a fuel pump malfunction
A faulty fuel pump can be determined by the following symptoms:
- When starting a cold or warm engine, you have to turn it with the starter for a long time. This may be due to the fact that the required pressure does not build up in the system for a long time;
- the car accelerates poorly, the engine has difficulty picking up speed, the response to pressing the gas pedal is delayed, the car moves jerkily;
- a car with a full tank of gasoline starts, but then can stall at any moment;
- extraneous sounds appeared from the fuel pump - hum, crackling or popping sounds;
- Gasoline consumption has increased sharply, etc.
The fuel pump does not pump
If, after turning the ignition key of the injection “seven”, you do not hear the usual sound of the fuel pump running, you need to check the electrical power circuit, as well as the mechanical part of this unit.
Checking the relay and fuse
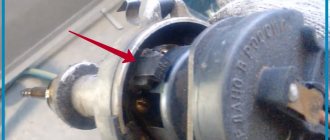
Troubleshooting begins with the relay and fuse box located in the cabin under the glove compartment. To make it more convenient to work, the block must be removed from the niche by pulling it towards you. The fuel pump fuse is located in the middle of the block (indicated by the number 4 in the figure), the fuel pump relay is located slightly to the right of the fuse (in the figure - 5).
From the connection diagram it can be seen that voltage is supplied to the fuel pump through the fuse and relay. Therefore, first of all, you need to check the integrity of the fuse: this can be done, for example, with a multimeter. If the fuse turns out to be blown, and after replacing it the car runs fine, then you have the easiest emergency of all. If the fuse is intact, then further actions are as follows:
- Turn on the ignition and check for voltage on the pink wire that goes to pin 30 of the relay. The test can be done with the same multimeter. If the device shows 12 V, proceed to the next step.
- We install a jumper between contacts 30 and 87 of the relay. If after this the fuel pump turns on, then most likely the cause of the malfunction was in the relay. To make sure of this, we check the voltage on the relay coil (see figure - REL1 coil contacts). If power comes to the coil, but the fuel pump does not turn on without a jumper, the relay needs to be changed.
If the fuel pump does not turn on, you need to look at the positive voltage not only at the relay, but also at the fuel pump plug. To do this, it is not necessary to turn the ignition on and off: simply place a jumper on the fuel pump relay between contacts 30 and 87, and the control checks the circuit to the fuel pump plug. By the way, the alarms block in the vast majority of cases the fuel pump circuit. It is in the gap of the positive (gray) wire that the contacts of the blocking relay are placed.
GIN
Checking the fuel pump motor
If everything is in order with the fuse, relay and wiring, and the fuel pump does not work or works intermittently, you need to check the pump motor. First of all, you should make sure that the electric motor terminals are not oxidized or clogged. After this, you need to connect the clamps of a multimeter or a regular 12 V light bulb to the terminals and turn on the ignition. If the light comes on or the multimeter shows the presence of voltage in the circuit, then there is a problem in the motor. A failed electric fuel pump motor is usually replaced with a new one.
Mechanical check
If the fuel pump receives a voltage of 12 V, the pump motor rotates properly, but fuel is still supplied unevenly to the injectors and interruptions in engine operation continue, you need to check the mechanical components of the unit. First of all, you should measure the pressure in the rail. This is done as follows:
- Remove the fuel pump fuse and start the engine. We wait until the engine stalls after the remaining fuel in the system runs out.
- We attach the pressure gauge to the ramp. The pressure gauge connection point is usually closed with a plug that must be removed. Under the plug there is a special fitting that must be unscrewed carefully, as there may be gasoline residues in the ramp.
- Securely attach the pressure gauge hose to the ramp. The pressure gauge itself is brought out through the edge of the hood onto the windshield.
Installing a gas tank on an injection VAZ 2107: detailed instructions
Many VAZ 2107 car owners have probably thought about changing the carburetor to an injector. And not in vain, because according to the Euro standards in force in Russia, an injector is many times more preferable.
The carburetor is quite complex, so a car enthusiast may experience difficulty setting it up. But the injector is simpler. The only thing that can happen to it is clogging of the channels.
To prevent this from happening, it is necessary to regularly flush the injectors.
VAZ 2107
The design of the injection engine of the VAZ 2107 car
This design ensures fuel storage, purification from impurities and supply, along with air purified through a filter, into the engine cylinders.
The system consists of several components:
- Gas tank;
- Gasoline pump;
- Fuel lines;
- Fuel rail with injectors;
- Fuel filter;
- Air filter;
- Air supply channels;
- Throttle valve;
- Fuel vapor recovery system.
VAZ 2107 injector
Gas tank and fuel pump
In a VAZ 2107 car, the gas tank is made of two steel parts, lined with lead on the inside, and is located on the right side of the trunk. Fuel is pumped out of the gas tank by a gas pump, which has a filter that does not allow large particles of contaminants to pass through. Next, gasoline enters the fuel filter through the fuel pipe.
Fuel filter and fuel rail
The fuel filter is built into the fuel line between the fuel pump and the rail and consists of a paper filter element and a protective metal housing in the shape of a cylinder.
In it, the fuel is finally purified and enters the fuel rail, which is a bar that supplies fuel to four injectors. The ramp is secured with two screws to the intake manifold, into which fuel is injected through the injectors.
There is also a valve installed on the ramp that keeps the fuel pressure within normal limits (280-320 kPa), which is necessary for the proper operation of the entire injection engine.
Air filter
The air filter is located in the engine compartment of the VAZ 2107 car. Like the fuel filter, the air filter is replaceable, made of paper. To make it possible to change the filter, its cover is removable. After cleaning, the air enters the throttle valve through the channel.
Throttle valve
The throttle valve regulates the amount of air entering the cylinders. It is attached to an axis in the housing, around which it rotates. The housing also contains a coolant channel connected to the cooling system, and fittings connecting the damper to the adsorber.
Evaporative emission system
Environmental requirements of Euro II provide for the presence of this system in the VAZ 2107 car. It consists of an adsorber, several valves and connecting hoses. The valves are located both in the engine compartment (purge valve), in the niche of the gas tank (safety and bypass), in the line of the system itself (gravity).
The adsorber consists of three pipes:
Injector installation
Let's take a closer look at how to install an injector on a VAZ 2107. First of all, you need to drain some of the coolant, after which the carburetor, intake and exhaust manifolds are removed.
An electric air blower is installed under the injector, so if a VAZ 2107 has a forced air blower, it also needs to be removed. The first thing to replace is the crankshaft pulley. To place the sensor on it, the new pulley must have special teeth.
Next, the front engine cover and sealing gaskets are replaced.
During installation, you will need a coolant temperature sensor. To install it, you need an underflow located on the tee of the block head. A threaded hole is prepared for the sensor, after which the ebb is installed back. The sensor itself will come in handy after installing new wiring.
Then the manifolds are installed with all the equipment attached to them, such as a fuel rail with injectors, a throttle valve and a receiver. The position sensor and idle air valve are bolted to the base of the manifold.
The fuel pump and ignition system elements are replaced with plugs, after which the fuel filter is installed in any convenient place.
The gas tank is secured with clamps, and the fuel outlet line is connected to it. If the gas tank is not replaced with a new one, but the same one is installed, it is necessary to wipe it from the inside with a solvent.
The electric fuel pump is installed approximately in the place where the gas tank is located, under the bottom of the car. A fuel line is also installed at the inlet to drain gasoline from the system into the gas tank.
You can stretch it in any way, but it is important that the line and the gas tank are tightly connected.
Next, the ramp is attached to the manifold, and new wiring is installed. To install the latter, you need to have a good knowledge of the electrical equipment of the VAZ 2107 car. An on-board computer, wiring harnesses and injection sensors must be installed. The last step is to install the elements of the ignition system, high-voltage wires and the remaining sensors.
Pros and cons of an injection engine
One of the advantages is that the injector has a much smaller number of disadvantages during operation, which is especially noticeable at low ambient temperatures. Another plus is higher efficiency, meeting European standards.
But there are also disadvantages:
- The injector requires higher quality gasoline than the carburetor;
- Regular washing of the injectors is mandatory, otherwise they will become so clogged that neither flushing nor cleaning will help them;
- New injectors are quite expensive given the current economic conditions.
- In the event of a breakdown, repairs will take longer, and besides, not every car enthusiast will be able to repair the engine themselves
If you are willing to cover possible costs, then an injector will be a more acceptable option compared to a carburetor.
Did you find this article useful?
How to clean the fuel pump yourself
Let's start with the fact that the mesh filter for the fuel pump is a coarse filter and is designed to capture large particles and deposits that are in the fuel and inevitably accumulate in the fuel tank. It turns out that the fuel pump has its own additional fuel filter mesh, which prevents debris from entering the fuel system from the tank parallel to the usual fuel filter. The process of cleaning or replacing the fuel pump mesh is almost similar to the general scheme for replacing the pump itself:
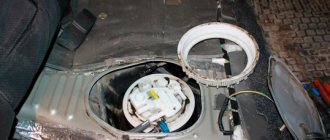
- The fuel pump is installed directly into the gas tank. You can get to the pump from the passenger compartment, as it is located under the rear seat. To gain access to the fuel pump, you need to remove the rear seat cushion or fold down half of the sofa (if possible).
- The fuel pump is usually located on the right and covered with a special plastic cover. The specified cover must be removed.
- Before removing the fuel pump itself, it is necessary to relieve the fuel pressure in the system. To do this, you will need to disconnect the power connector from the fuel pump, and then turn the engine with the starter.
- The next step is to remove the negative terminal from the battery, after which the tubes from the fuel pump are disconnected. These tubes are “supply” and “return”, they are secured with clamps that need to be pressed out.
- Next, you need to unscrew the special pressure ring-cover of the fuel pump. It is very difficult to unscrew this cover manually. There is a special fuel pump cover puller for removal. If there is no such puller, then you can try to carefully unscrew the ring using improvised means. We strongly recommend that you first study on specialized auto forums how to remove the fuel pump cap on a specific car model.
- After unscrewing the cap, you can remove the fuel pump. Before complete removal, the remaining gasoline should be drained from its body, and the sealing ring should be removed.
- Now you can begin disassembling the fuel pump housing. To clean, you will need to remove the bottom part. There is often dirt in the indicated lower part of the housing.
- After this, remove the fuel pump screen. To remove the mesh, just pry out the filter at the place of attachment to the pump body using a regular screwdriver. The fuel pump strainer usually becomes completely clogged, especially on cars with high mileage.
- Then the fuel pump mesh can be replaced with a new one or cleaned. It is better to wash the fuel pump mesh first with carburetor cleaner. Mechanical cleaning is done with a soft brush. Then the mesh should be dried and blown. The bottom of the pump housing and the cleaned mesh are finally washed again with gasoline.
- The final step is to reassemble the fuel pump and install the device in the gas tank. To facilitate installation, it is better to invite an assistant, as it may be necessary to ensure high-quality pressure of the pump to the tank. The fact is that many gasoline pumps have a special spring, the force of which must be overcome. At the same time, you need to make sure that the rubber seal is in place and at the same time screw in the pressure ring-cover of the fuel pump. When tightening the clamping ring with a puller or improvised means, do not exceed the tightening torque. If you tighten it too tightly, the fuel pump cap may burst; if you tighten it too weakly, the fuel pump will wobble due to poor fixation.
In order to determine the correct position of the fuel pump, there are special indicators. Such indicators are made in the form of arrows and are located on the fuel pump, the gas tank body and the pressure ring. The correct installation of the fuel pump can be considered when all the arrows are in the same line. We would like to add that if the gasket is installed incorrectly, gasoline may leak out if you fill the tank full.
Now all that remains is to connect the fuel supply and return pipes to the fuel pump, while simultaneously checking that the clamps are securely fastened. The completion is to connect the electrical power connector to the fuel pump, after which you can start the car for testing.