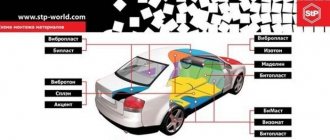
With the adoption of Euro-3 standards by domestic manufacturers, exhaust gas purification systems are installed on mass-produced vehicles.
The so-called catalytic fillers are equipped with two oxygen sensors on the Lada Grant, which are located at the top and bottom of the perimeter of the catalyst. Accordingly, the upper one is called the control one, the lower one is called the diagnostic one.
Low-octane fuel and low fuel quality are the main factors contributing to the premature failure of oxygen sensors (hereinafter referred to as oxygen sensors or lambda probes).
The process of self-replacement is simple, but requires care on the part of the repairman.
Receiving pipe with neutralizer
| № | vendor code | Name |
| 1 | 00001-0061008-11 | Nut M8 |
| 2 | 00001-0005196-01 | Washer 8 |
| 2 | 00002-0204136-01 | Washer 8 |
| 3 | 11183-1203008-00 | Reception pipe |
| 4 | 21114-1008080-00 | Pad |
| 5 | 00001-0035435-21 | Hairpin M8x25 |
| 6 | 00001-0035437-21 | Hairpin M8x35 |
| 7 | 21010-1008082-00 | Hairpin |
| 8 | 11183-1203040-00 | Front pipe bracket |
| 9 | 00001-0060432-21 | Bolt M8x16 |
| 10 | 00001-0005166-70 | Spring washer 8 |
| 11, 15 | 11180-3850010-00 | Oxygen sensor |
| 12 | 00001-0045696-80 | Bracket 12 |
| 13 | 11180-1203042-00 | Bracket clamp |
| 14 | 21100-1203021-12 | Flange gasket |
| 16 | 00001-0035168-30 | Hairpin M8x1.25x20 |
| 17 | 11190-1203075-00 | Nut locking plate |
| 18 | 21080-1203019-01 | Exhaust pipe mounting nut |
Where are the oxygen sensors on the Lada Grant?
Regardless of the engine modification, the number of valves, the standard location of the lambda probe is in the engine compartment.
Related link:
Test drive — LADA Granta Sport 2018
Since the design provides for the presence of two controllers, the first is installed on top, directly on the exhaust manifold body.
The lower one, also known as diagnostic, is mounted in the exhaust pipe of the exhaust system. To ensure access, we first dismantle the plastic protection.
DIY lambda sensor repair steps
To dismantle the lambda probe, you will need to first warm up its surface to a maximum of 60 degrees. Then carefully remove it and additionally take out the protective cap. After this, you can begin cleaning with orthophosphoric acid, which helps to easily deal with any (even the most persistent) flammable deposits.
Warming up the surface of the lambda probe
At the end of cleaning the sensor, it is necessary to soak the spare part. To do this, you can use products for flushing the engine cooling system or just clean water. At the end of the work, be sure to dry the sensor and install it in its proper place.
Tip: upon completion of work, before installation, do not forget to pre-lubricate the threads with a special sealant to ensure complete tightness of the product.
Sequence of actions to independently replace the oxygen sensor on the Lada Grant
- We place the car within the perimeter of the repair area, take basic safety measures, and fix the rear row of wheels to prevent any arbitrary rollback.
- We remove the battery terminals to prevent a short circuit in the circuit.
- If you have an 8-valve Lada Granta, then there is no decorative plate. In the 16-valve modification, we first snap off the plate, remove it, and then remove the receiver (key to “19”). It is located on the rear side of the engine compartment.
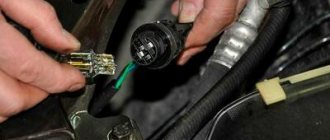
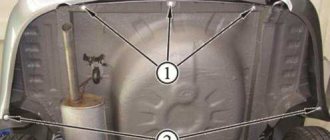
Location of the oxygen concentration control sensor
: 1 – junction of the sensor wiring harness block with the engine control system wiring harness block; 2 – plastic holder for the sensor wiring harness; 3 – control oxygen concentration sensor.
- We squeeze the block with the wires on the sides, snap off the plastic clip, and remove the holder from the hole in the steering mechanism screen.
We take out the holder
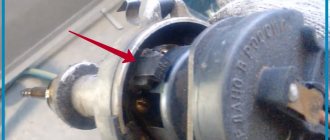
- Using a key set to “22”, unscrew the diagnostic DC from the hole in the catenary collector. Due to operation at high temperatures, DC often sticks to the metal base. We apply force and tear off the lambda probe.
Unscrew the diagnostic DC
- From under the bottom of the car in the area where the right drive is located, unscrew the second (diagnostic) oxygen sensor with a key set to “17”. We first install the machine on the inspection hole and hang it using a hydraulic lifting mechanism. Visually, the recreation center on the Lada Granta is located after the gas neutralizer.
Disconnecting the rear suspension support of the power unit of the Lada Granta 2190 car: 1 - nut (part 1118-1001257) fixing the engine support; 2 - rear support (part 2190-1001033) of the power unit suspension
Related link:
Replacing the timing belt Lada Granta 8/16 valves. Why does the belt break?
The diagnostic sensor has a block with wires located in the engine compartment. The pinout is closer to the steering rack and the metal partition with the interior.
- We press the latch and remove the block with wires.
Press the latch
- Using a key set to “22”, unscrew the DC from the hole in the catenary collector.
- We remove the lambda probe.
- We carry out troubleshooting of the seat, check the integrity of the wiring and threads, and assemble the structure in the reverse order.
We carry out troubleshooting
Note to the driver! Before screwing the DC, be sure to lubricate the thread with a thin layer of graphite lubricant. We tighten each DC using a torque wrench with a force of 40 Nm.
Description and device
Ladovsky lambda probe from BOSCH
For normal operation of the Lada Granta oxygen sensor, the device must have a temperature of at least 300 degrees. For this, an additional thermal component is used, which begins to work immediately after the power unit is started. On Kalina or any other VAZ, the oxygen sensor (OS) can be poisoned as a result of using leaded fuel.
Where is the CD located in a Lada Kalina or any other car? Its installation is carried out in the exhaust manifold, thanks to which the device can constantly monitor the level of oxygen in the exhaust gases during operation of the internal combustion engine. If necessary, the regulator located in the exhaust manifold can send an impulse to the control unit, as a result of which the fuel system begins regulating air and fuel. As you know, a combustible mixture is needed for the full operation of the power unit.
Since high thermal loads are placed on the CD during operation, it is usually made from heat-resistant materials. The surface of the device itself is covered with a special ceramic material, and platinum dusting is applied on top. Accordingly, this allows you to withstand maximum temperatures during engine operation, up to 350 degrees.
As for controlling the oxygen level for the formation of a combustible mixture, a heating component installed inside the structure is responsible for this. As stated above, it comes into operation after the engine starts. If there is a breakdown in the operation of this regulator, this will make it impossible to start the internal combustion engine. To find out exactly where the controller is located, you need to drive the car into an inspection hole and crawl under the bottom. In particular, pay attention to the top of the resonator - it is usually placed there.
Typical faults and solutions
| Malfunctions | Remedies |
| Unstable operation of the power unit at idle speed | Checking the integrity of electrical wiring. Replacing the lambda probe |
| Excessive fuel consumption | Replacing the DC with a new one |
| Reduced acceleration dynamics | —/— |
| After stopping the engine, a characteristic crackling sound is heard in the area where the catalytic filler is located. | Cleaning the catalyst, replacing it with a new one, preventing DC |
| Exceeding the operating temperature of the standard catalytic collector | Catalyst clogging, prevention, replacement with a new one |
| Indication of engine operation error “SNESK ENGINE” on the dashboard | —/— |
| Sensor error "P0140" | —/— |
Electronic lambda probe test
You can find out about the condition of the lambda probe by checking it on professional equipment. An electronic oscilloscope is used for this. Some experts determine the performance of the oxygen sensor using a multimeter, however, it can only state or deny the fact of its failure.
The device is checked during full engine operation, since at rest the sensor will not be able to fully convey a picture of its performance. In case of even a slight deviation from the norm, it is recommended to replace the lambda probe.
If the oxygen sensor is faulty, there are several options to solve the problem. One of them is to change the lambda probe sensor. You can do this yourself by purchasing a new part in a specialized store or car service center. Pay attention to the markings on the old probe. The new probe should have exactly the same one.
Replacement must be done with the engine cooled and the ignition off. To begin with, the wires are disconnected from the old device. Then the old probe is disconnected with a wrench and a new one is put in its place. You must work carefully, without breaking the thread.
If you are not sure that you can handle it, contact a specialist. Where can a lambda probe be replaced? In any car service for little money. Specialists will do the job efficiently. For the next 50,000–100,000 km, the original oxygen sensor will work perfectly.
Benefits of Installing a New Oxygen Sensor
- Saves fuel from 5 to 15%. A worn sensor affects fuel consumption, so installing a new one will return it to normal;
- Improves engine performance;
- Notifies with 100% certainty that the catalyst is failing;
- Reduces the release of harmful substances.
A significant disadvantage of this solution is the price. The cost of a new lambda probe reaches 25,000 rubles. If the car's catalyst is disabled or knocked out, replacing the lambda probe will not help. Software shutdown will help - chip tuning.
Causes of premature wear of oxygen sensors
- Systematic use of low-octane fuel with the addition of chemical impurities exceeding the limit standards.
- Use of silicone-based sealants in the process of prevention.
- Overheating (boiling) of lambda probes due to incorrectly set ignition angle, excessive enrichment of the combustible mixture, unstable voltage supply in the circuit.
- Repeated engine starts at short intervals. As a result, carbon deposits accumulate in the combustion chamber, since the fuel is not completely burned.
- Diagnostics of spark plugs, cylinder operation with unscrewed spark plugs;
- Contact of chemically aggressive compounds and petroleum products on the tip of the DC.
- Damage to the insulating layer, wiring windings, short to ground.
- Depressurization in the system.
What happens if you ignore signs of trouble?
Naturally, every driver is interested in what the malfunction of the lambda probe affects. Most often, when this part fails, you can observe the following consequences:
- The car moves unnaturally.
- Fuel consumption increases significantly.
- An unpleasant, pungent odor appears from the exhaust pipe.
In modern cars with electronic filling, if the lambda probe breaks down, the emergency lock is immediately activated. This allows you to protect the car from serious damage, even if the driver did not notice any signs of a malfunction. In addition, driving with a broken lambda probe is simply unsafe.
The car behaves too unpredictably. Because of this, an emergency situation on the road may arise, which will endanger not only the life of the driver, but also the lives of other people. That is why it is so important to notice signs of malfunction in time and send the car for service. Moreover, for greater safety it is better to call a tow truck.
In the worst case scenario, the sensor depressurizes. In this case, further movement may lead to engine damage. Restoration will require at least a major overhaul.
When depressurization occurs, exhaust gases enter the intake channel. When braking, the lambda probe begins to detect a huge number of oxygen molecules. As a result, the injection system completely fails.
The main symptom of such a malfunction is loss of power. This is best noticeable at high speeds. At the same time, a mechanical knocking noise under the hood is constantly heard. An unpleasant odor and jerking are also present.
Diagnostics and checking the serviceability of oxygen sensors on the Lada Grant
In a car service center, diagnostics are carried out using digital scanners, which allows you to read a large amount of data for interpretation. At home, mechanics practice using a multimeter.
So, the operation of the DC is based on the following principle: an input voltage of 0.45V is supplied from the electronic control unit (ECU) to the lambda probe. The specified voltage is sufficient for correct operation. If the sensor malfunctions, the input voltage will differ from the specified standard.
We activate the multimeter, set the required voltage, and check the readings at the output connector.
We also inspect the oxygen sensor heater, it is located in the center of the part. There should be no damage to its surface.
Sometimes owners, instead of the above lambda probes, install fake oxygen sensors. This is not prohibited on the territory of the Russian Federation, but when crossing the border with the EU, the driver will be fined for unauthorized interference with the operation of the exhaust system.
Note to the driver! Craftsmen do not always practice replacing the lambda probe with a new one. If the output voltage does not match, solder a resistor. It pulls the missing voltage to ground and equalizes the reference voltage.
When there is a large amount of oxygen in the exhaust system, the resistance indicator tends to be 0.1 V. When a lack of oxygen is detected, the arrow points to 0.8 V.
- Lean mixture: increase the fuel supply to check the correct operation of the sensor. We clamp the return drain hose. If the error repeats, it means that the DC is faulty and must be replaced with a new one.
- Enriched mixture: to check the DC, remove the vacuum hose; the voltage in the system decreases. The sensor is serviceable, otherwise replace it with a new one.
- We repeat the first and second procedures, if the error does not disappear, then the DC is faulty.
Oxygen sensor
The design and principle of operation of the lambda probe
The principle of operation of the lambda probe
The principle seems simple, but its implementation is not so easy. This sensor must compare the results with something in order to “understand” that a change in the percentage of oxygen has occurred. Therefore, he takes measurements in two places - atmospheric air and what remains after combustion of the mixture. This allows him to “feel” the difference when changing the air-fuel mixture ratio.
1 – solid electrolyte ZrO2; 2, 3 – external and internal electrodes; 4 – ground contact; 5 – “signal contact”; 6 – exhaust pipe
In this case, an electrical signal must be supplied to the electronic unit. To do this, the lambda probe needs to convert the measurement results into a pulse that will be sent to the ECU. To measure the concentration of oxygen in the atmosphere and in exhaust gases, two electrodes are used that react with it. That is, the operation of this sensor involves the principle of a galvanic cell, in which a change in the parameters of a chemical reaction entails a change in the voltage between the electrodes of the sensor. So, with an enriched mixture, when the percentage of oxygen is less, the voltage increases, and with a lean mixture it decreases.
The electrical impulse obtained as a result of the chemical reaction is supplied to the ECU, the parameters of which it compares with those recorded in its memory and, as a result, adjusts the operation of the power system.
Using chemical reactions to operate, the lambda probe is not complex in design. Its main element is a ceramic tip made of zirconium dioxide (less commonly, titanium dioxide) with a platinum coating, which acts as electrodes that react. One side of the tip is in contact with the atmosphere, and the other with exhaust gases.
List of online stores selling parts (Moscow, St. Petersburg, Kyiv regions)
| № | Name | Address |
| 1. | "Prom.ua" | https://prom.ua/Datchik-kisloroda.html |
| 2. | "Ukrparts" | https://ukrparts.com.ua/category/lyambda-zond/c-88/ |
| 3. | "Tiu.ru" | https://spb.tiu.ru/Datchik-kisloroda-lyambda-zond.html |
| 4. | "How much" | https://www.avtostore.spb.ru/katalog/product/view/133/123 |
| 5. | "Carvilleshop" | https://carvilleshop.ru/catalogue/datchiki_reguliyatori/datchiki-kisloroda/ |
| 6. | "PRO-Sport" | https://www.pro-sport.ru/catalog |
How to Troubleshoot or Reset Trouble Code P0036
Some suggested steps to troubleshoot and fix error code P0036:
- Clear error codes from the car's computer memory.
- Test drive the vehicle to see if the P0036 code appears again.
- Perform a visual inspection and, if necessary, repair or replace damaged electrical wires.
- Check the grounding and correct the problem if necessary.
- If there is a problem with the PCM, reprogram or replace the engine control module.
Review of manufacturers, cost of oxygen sensors
| Catalog Article/sensor number | Price, rub.) | Resource (Thousand km) |
| Catalog number of the control sensor 21074-3850010-00 | From 2600 | 70- 75 |
| Diagnostic sensor 2 21074-3850010-00 | From 2600 | 70 — 75 |
| Lambda probe NGK 95801 Code: 0000-749176 | From 2800 - 2900 | 70 — 85 |
| BOSCH 0 258 006537 | —/— | —/— |
| BOSCH 0 258 986 602 | —/— | —/— |
| BOSCH 0 280 218 116 | —/— | —/— |
| BREMI 30223 | —/— | —/— |
| ERA 570023 | —/— | —/— |
| FENOX SD10100O7 | From 3100 – 3300 | —/— |
| FENOX AM28116C3 | —/— | —/— |
| DENSO DOX-0150 | —/— | —/— |
| PIERBURG 7.22701.08.0 | —/— | —/— |
| DENSO DOX-0150 | —/— | —/— |
| STELLOX 20-00028-SX | —/— | —/— |
| STELLOX 20-00022-SX | —/— | —/— |
| STELLOX 20-00020-SX | —/— | —/— |
| PATRON HZ-30301006-0042 | —/— | —/— |
| ERA 570023 | —/— | —/— |
| NGK 5653 | —/— | —/— |
| NGK 1628 | —/— | —/— |
*prices are current as of November 6, 2018.
Symptoms of malfunction
The main driver symptom of P0036 is the MIL (Malfunction Indicator Light) illumination. It is also called Check engine or simply “check light”.
They can also appear as:
- The “Check engine” warning light on the control panel will light up (the code will be stored in the ECM memory as a malfunction).
- In some cases, the engine control module (ECM) may put the vehicle into limp mode.
- Sometimes there may be no symptoms despite a stored DTC.
When this code appears, the car can continue to move, but the problem must be corrected as soon as possible. To prevent potential problems such as sensor circuit failure and increased fuel consumption. If the problem is ignored for a long time, unstable operation of the engine is possible, as well as damage to other components.
Recommendations for the selection of parts and components
For domestic car brands, service station technicians advise purchasing Russian-made parts, since their cost is 10-15% cheaper compared to foreign analogues. At the same time, the workmanship is identical.
Before purchasing, always check the catalog numbers with the actual data specified in the operating instructions for the technical product.
Use the services of certified service stations for prevention, diagnosis and replacement of faulty equipment.
Reasons for reducing the service life of equipment
- Violation of vehicle operating conditions, failure to comply with scheduled technical inspection deadlines;
- Filling the car with low-quality fuel;
- Purchase and subsequent installation of non-original parts;
- Violation of installation technology;
- Defective parts during manufacturing;
- Damage due to an accident, collision, impact;
- Incorrect operation of the firmware of the electronic control unit.
Do-it-yourself diagnostics of the controller on the Lada Granta
To check the equipment we use a multimeter. Most motorists have the device in their garage. The sequence of actions is as follows:
- We place the car above the inspection hole;
- Remove the limit switches;
- Connect the multimeter terminals;
- We activate the device to the “Resistance measurement” position;
- We analyze the received data.
If the arrow tends to infinity, the lambda probe is working; if the arrow drops to zero, the part is damaged. Remember that the controller is non-separable and cannot be prevented.
Note to the driver. Service station mechanics strongly recommend purchasing parts with factory catalog numbers in order to prevent unstable operation of the power unit.
Reviews
| № | Positive |
| 1. | Vasily: I have been successfully using the car for two years now, there are no comments on the engine’s performance. I fill up with high-octane fuel, buy high-quality oils, and drive carefully and non-aggressively. |
| 2. | Gennady: for a year and a half of active driving there were no breakdowns. Minor defects were eliminated on my own. After all, the car is in the budget segment, you must always remember this and be prepared for minor defects. |
| 3. | Ivan: I’m pleased with the build quality and workmanship of the Lada Granta, there are no complaints. Over the course of a year and a half, I once made an unscheduled visit to a service station to diagnose the exhaust system. It turned out that the contact of the block was weak, as a result of which the error indicator on the dashboard came on. |
| 4. | Vladimir: I replaced the DC on my own at around 85,000 km, which is very good for a domestic car. The average service life is 70,000 km. The replacement process is not complicated, the work was completed within half an hour. My recommendations to motorists. |
| 5. | Ignat: I’m happy with the Lada Granta car, despite a number of negative reviews about the brand. Subject to careful treatment and timely maintenance of the technical equipment, the period of its trouble-free operation can be increased by 10 - 15%. |
| 6. | At 80,000 km I replaced both oxygen sensors, which turned out to be not difficult at all. More time was spent on preparatory work. At the same time, I carried out diagnostics of the chassis and suspension. Recommendations for motorists - look under the bottom of the car more often. |
| 7. | Vladlen: my positive review of the Lada Granta car. Build quality, manufacturing of parts at a decent level. The driver is required to provide systematic care, refilling with high-octane fuel and engine oil. |
| Negative | |
| 1. | Dmitry: already at 50,000 km I replaced the control oxygen sensor on the Lada Granta. Dissatisfied with the quality of workmanship. The operating instructions indicate that the average service life is 70 - 75 thousand km. |
| 2. | Ivan: in a year and a half of driving the car, I twice unscheduledly contacted the service station for repairs under warranty. |
| 3. | Victor: I do not recommend the Lada Grant for purchase. It’s better to spend a few tens of thousands and buy a Renault Logan. |
Related link:
Replacing the pump on the Lada Grant. Recommendations from the selection specialist
What and how can you check the lambda?
To check, you will need a digital voltmeter (preferably an analog voltmeter, since it has a much lower “sampling time” than a digital one) and an oscilloscope; if possible, the measurements will be more accurate. Before carrying out the test, it is advisable to warm up the car, since the lambda works properly at temperatures above 300C°.
First, look for the heating wire:
We start the engine, do not disconnect the lambda connector. We connect the negative probe of the voltmeter (regular store) to the body. Using a positive circuit probe, we “hit” each contact of the wire and observe the voltmeter readings. When the positive terminal of the heater is detected, the voltmeter should show a constant 12 V. Next, using the negative probe of the voltmeter, we try to find the negative wire of the heating element. We turn on the remaining contacts of the sensor connector. If a negative terminal is detected, the voltmeter will again show 12 V. The remaining wire is the signal wires.
Conclusion
The service life of a lambda probe directly depends on the quality of the fuel supplied to the car, as well as the frequency of engine starting.
If startup intervals are too short, the fuel does not have time to burn completely. As a result, an excessive amount of carbon deposits forms in the chambers, and the exhaust system of the car becomes clogged (coked up).
Compliance with the manufacturer's recommendations, refueling with high-quality fuel, and a moderate driving style are the main factors that guarantee the long service life of a technical device.
Sensor Features
This often happens: the CD informs the motorist about the presence of a lean mixture in the cylinders; this is one of its features. To solve the problem, first of all, you should increase the supply of gasoline; to do this, you can take a little fuel in a syringe and spray it into the intake manifold. If after this the device sees that the mixture has become richer, this means that the problem is not with it, but with a malfunction of the fuel supply system. It is quite possible that the cause of the problem is damage to the line or incorrect operation of the fuel pump.
On which cars is this problem most common?
The problem with code P0036 can occur on different machines, but there are always statistics on which brands this error occurs more often. Here is a list of some of them:
- Acura
- Audi (Audi a6)
- BMW (BMW X5, E90, 330i)
- Cadillac
- Chery (Chery Tiggo, Fora)
- Chevrolet (Chevrolet Avalanche, Aveo, Captiva, Cruz, Lacetti, Orlando, Silverado, Trailblazer, Epica)
- Citroen
- Daewoo (Daewoo Matiz)
- Datsun
- Dodge (Dodge Intrepid)
- Ford (Ford Mondeo, Fiesta, Focus, Fusion)
- Honda
- Hyundai (Hyundai Getz, Santa Fe, Solaris, Sonata, Tucson, Elantra, ix35)
- Kia (Kia Optima, Rio, Sid, Sportage, Cerato)
- Lifan
- Mercedes (Mercedes ml350)
- Mini (Mini Cooper)
- Opel (Opel Antara, Astra, Vectra, Zafira, Corsa)
- Peugeot
- Porsche
- Skoda (Skoda Yeti, Octavia, Fabia)
- Suzuki
- Toyota
- Volkswagen (Volkswagen Golf, Jetta, Passat)
- Volvo (Volvo xc90)
- VAZ 2104, 2105, 2107, 2111, 2112, 2114, 2115
- Lada Vesta, Granta, Kalina, Largus, Niva, Priora, X-Ray
- UAZ Bukhanka, Patriot, 39099
With fault code P0036, you can sometimes encounter other errors. The most common are: P0016, P0017, P0030, P0037, P0054, P0056, P0068, P0102, P0135, P0136, P0140, P0141, P0300, P0335, P0341, P0343, P0368, P0444, P0449, P045 5, P0463, P0500, P0505 , P2F00, P2101, P2431.
Source
Additional comments for troubleshooting P0036
Many high mileage vehicles (usually over 150,000 kilometers) have short-term problems with sensors, which usually occur when the engine is started or the transmission is subjected to prolonged stress. Often, if the Check Engine Light comes on but the vehicle continues to operate normally, the OBD-II system can be reset and the problem will be resolved. This is why it is important to check for an error code using a scanner and clear the code from the computer's memory before performing any repair work.