Pump VAZ 2107
On cars with a liquid cooling system, one of the main elements responsible for maintaining the operating temperature of the engine is the pump. Thanks to this unit, the circulation of coolant is ensured. If problems arise or if the water pump fails, the normal operation of the power unit is disrupted, which can lead to serious consequences and expensive repairs.
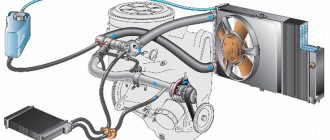
The pump circulates coolant through the engine cooling system
Purpose
The operation of the pump is aimed at continuous circulation of coolant (coolant) through the engine cooling jacket. The antifreeze is heated under the influence of the rubbing elements of the power unit, and the necessary pressure in the system is created by a water pump. The liquid is directly cooled in the main radiator, after which the coolant again enters the cooling jacket. If circulation is interrupted for at least 5 minutes, the motor will overheat. That is why it is so important to monitor the proper operation of the node in question.
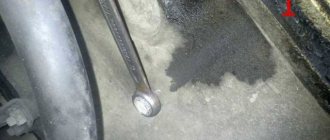
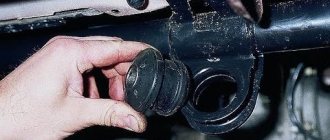
Fluid leaking from the drain hole or from under the seating surface
There are different signs of a malfunction of the VAZ-2109, 2107, 2114 and other car models. So, if the coolant was of poor quality, a leak may occur in the area of the drain hole. In this case, leakage occurs, the formation of drops after the vehicle is run in. This can be determined by examining the area of the drainage hole. It is worth noting that a small leak of liquid is normal for a new pump. This happens within the first 10 minutes. motor operation. This occurs due to the mechanical seal moving to the correct position.
If the new pump's break-in period is complete and fluid is still leaking from the drain hole, this is a sign that it is faulty. It is necessary to thoroughly flush the cooling system and install a new pump. Next you need to fill in the required amount of new antifreeze of acceptable quality.
If a leak is observed from under the seating surface, this also indicates a breakdown. In this case, a sign of a malfunction of the VAZ-2107, 2110, 2109 or other models is wetness, the appearance of drops, smudges on the body or around the specified area. The cause of such a breakdown is incorrect installation of the pump or incorrect use of sealant or seals.
If the pump is new, it needs to be removed and checked for correct installation.
It is especially important to pay attention to the tightening torques. If the pump is already old, it must be replaced
How to check the pump on a VAZ 2107
Since there is a need to check the pump, there are problems in the cooling system, namely, overheating of the engine or obvious signs of a pump malfunction. It could be:
- increased noise coming from the pump when the engine is running;
- obvious leaks on the shaft under the pulley;
- antifreeze leakage through the housing gasket;
- increased play on the pump shaft;
- lack of antifreeze circulation and, as a result, engine overheating.
The fluid circulation may simply be insufficient, that is, the pressure in the cooling system is not normal. This can only happen in one case. The VAZ 2107 injector pump is designed for high performance, and if you install a conventional pump from a carburetor engine, its performance may not be enough and the engine will overheat.
Actually, diagnosing the condition of the pump is not difficult. Obviously, the pump requires replacement if there are gaps and fluid leaks. However, it is possible to check the pump's performance by eye. To do this, with the engine warmed up to operating temperature, you need to briefly clamp the upper hose going to the radiator. If, after releasing the hose, a pressure surge is felt, there is nothing wrong with the impeller and the fluid is circulating normally.
Decreased performance
Whatever antifreeze is used in the cooling system, it is a chemical substance. Over time, erosion occurs in the pump housing or impeller, which can lead to a decrease in the flow of pumped liquid. As a result, the motor may overheat with all the ensuing consequences. Therefore, if the coolant temperature sensor on the instrument panel begins to exceed +90˚С (operating temperature), it is worth thinking about a possible replacement of the pump or, at least, a revision of this unit.
Video: how the pump on a VAZ makes noise
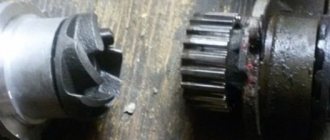
The pump impeller is inserted into a separate housing mounted on the cylinder block
Almost all pump problems are the result of bearing wear. With little wear and play of the shaft, the pump operates normally. As the gaps in the bearing separators increase, the oil seal begins to leak antifreeze, and unnatural noises are heard from the pump installation site when the engine is running - a hum or crackling sound. As a result, the shaft becomes distorted. The further scenario can develop in three ways.
- The bearing jams and the belt jumps off the pulleys. The engine continues to run, but the red battery discharge lamp lights up on the dashboard, and the coolant temperature rises sharply to the maximum.
- As a result of bearing jamming, the shaft breaks into two parts. As in the first case, when the engine is running, the battery discharge lamp lights up and the maximum coolant temperature is observed.
- Due to the skewed shaft, the rotating impeller breaks a hole in the wall of the pump housing, through which all the antifreeze comes out within a few seconds, and the engine instantly overheats. In this case, you will have to change not only the pump, but also the housing in which the impeller broke the wall.
Read, it may come in handy: Description of the fuel pump on the VAZ 2107
As a result of bearing wear and misalignment, the pump shaft may break.
Unlike front-wheel drive VAZ models, where the pump is hidden under the timing cover, in the “classic” it is in plain sight. Therefore, it is much easier to avoid unpleasant consequences. You only need to periodically check the pump as follows.
- Start the engine, open the hood and listen. If there are suspicious noises from the front of the engine, manually press the accelerator and increase the speed until the hum becomes clearly audible.
- Carefully inspect the front of the engine for coolant leaks.
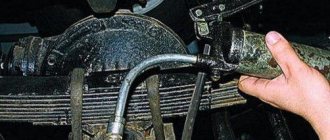
- If you find traces of leaking antifreeze, grab the pump pulley with your hand and shake it along the shaft axis in order to detect any play.
- If you feel a slight play when the belt is tensioned or you doubt the diagnostic result, unscrew the nut securing the generator to the adjusting bracket and loosen the belt. After this, pump the pump pulley again.
The nut keeps the belt taut
Due to the considerable age of these cars, the “native” plant no longer produces original spare parts for them. Commercially available parts rarely last more than 50 thousand kilometers. You should focus on this figure when servicing your car, which will help you detect a malfunction in time.
If you notice a slight play, you should not immediately start replacing the water pump. It will still “live” for 3-5 thousand kilometers. However, its condition will have to be constantly monitored and a new pump will have to be purchased in advance.
If there is any leakage of antifreeze, noticeable play in the shaft, and a cracking sound is heard during operation, the pump should be immediately replaced with a new one.
Signs of trouble
I would like to immediately note that in order to determine faults in the water pump, you will need to remove the unit and disassemble it. Only this method provides a real opportunity to see the resulting traces of corrosion, signs of cavitation and contamination.
Practice clearly shows that this happens on a wide variety of machines:
- VAZ 2107;
- Volkswagen Passat;
- FF2, that is, Ford Focus 2nd generation;
- Lada Granta;
- Kia Spectra;
- Chevrolet Aveo;
- Audi A5;
- Nissan Qashqai;
- Mitsubishi Outlander;
- Toyota Camry;
- Skoda Octavia, etc.
Moreover, the situation is approximately the same everywhere. That is, it is impossible to determine whether there are problems without disassembling and looking inside the cooling system water pump.
Therefore, the main emphasis is on indirect signs. With their help, the driver gets the opportunity to diagnose the problem in advance and prevent serious consequences.
The following indirect signs are distinguished:
- A thin whistle appears without interruption during engine operation. Moreover, it comes from the area of the camshaft pulley of the internal combustion engine. A whistle indicates that a higher bearing is failing;
- Coolant leaks. Traces of antifreeze can be seen directly on the power unit, or under the bottom of the car, that is, on the asphalt;
- Pump play. To check for its presence, simply grab the pump pulley with your hand and try to swing the device up and down.
Do not forget about the possible airing of the system, due to which the antifreeze does not fully perform its functions, the engine overheats and a number of resulting breakdowns occur. Here it would be correct to remind you about removing the air lock from the cooling system. Also, be sure to read the material about checking the cap of the expansion tank, which is directly related to the engine cooling system.
I won't talk about how the pump changes. Usually replacement is carried out according to the owner's manual from the car manufacturer. The point is to drain the cooling liquid, disconnect the pipes, first turn off the power to the car, and dismantle the problem unit.
The design and location of all pumps are different, therefore there is no universal instruction. You can find a video online, or simply take the car to a car service center.
Replacing the water pump
The work of installing a new pump on a classic VAZ model consists of several stages.
- Selecting and purchasing a new part.
- Preparing tools and work area.
- Dismantling the old pump and determining whether it can be repaired.
- Installing a new pump and checking its performance.
When choosing a new pump, you should focus on well-known brands
It makes sense to purchase a new pump in advance only if you are sure that the old one is faulty or its service life is coming to an end. If there is an auto shop near the work site, you can purchase a pump during disassembly.
Bearing type
There are several reasons for heating of the rolling elements of a bearing: micro-slippage of the rolling elements on the raceways, hysteresis of the rolling elements and race materials due to contact mechanical stresses, sliding between the cage and the rolling elements or side surface, movement and turbulence in the lubricant. The amount of heat generated by each of these sources depends on the bearing geometry, load, rotation speed, lubricant properties: type, viscosity and quantity. At low loads and high speeds, ball bearings heat up less than roller bearings. At low speeds and high loads, the opposite is true. Although a bearing is usually selected based on cost and durability considerations, in some cases temperature can also influence the choice.
Pump selection
The VAZ 2107 is equipped with pumps with the following catalog numbers:
- 21073–1307010 – standard;
- 2123–1307011–75 – pump with a reinforced design.
Pumps for “sevens” are produced by many companies. We recommend paying attention to:
- luzar;
- Fenox;
- Hepu.
The impellers on new pumps are made of plastic, cast iron, and steel. We recommend purchasing with a plastic or cast iron impeller.
Pumps are also sold with or without housings. If you have no mechanical damage to the body, you should not overpay; buy a separate pumping element.
How to modify and modernize the stove with your own hands?
You can improve the operation of the heating system on the “seven” in the following ways:
- redo side window ventilation;
- modernize the damper;
- modify the foot airflow system to increase its efficiency;
- improve the operation of the rear cabin heating system;
- modify the thermostat;
- improve the functioning of the steam exhaust line;
- install an additional water pump.
User Egor Panther spoke about options for upgrading the heating system in VAZ 2107 cars.
Improved side ventilation
The side ventilation system needs to be modified after purchasing an additional fan. The device is mounted in the left line, which will allow forced air flow to the deflector.
The tuning procedure looks like this:
- At the first stage, the deflector device is dismantled from the main line. To perform this task you need to use a screwdriver. The deflector in the cabin is pryed up and removed; it must be pulled forward. Similar actions are performed on the other side of the stove.
- Dismantling the device is carried out carefully so as not to leave any traces of damage on the center console.
- If the deflector is removed, it is necessary to remove the holding device from the dashboard. This element is mounted in the center console using special antennae. The essence of this modernization is that a classic computer fan is installed to force air flow into the heating system.
- To install the ventilation device, the element must first be fitted to the deflector body. After applying it to the plastic with a marker or pencil, you need to apply markings. Using a utility knife, a cut is made in the plastic on the deflector.
- If the dimensions are marked accurately, the ventilation device will be tightly installed in the housing. This is important, since such installation will prevent the part from loosening while driving.
- After completing the installation of the fan, you need to make sure that its blades rotate normally and nothing interferes with them. If problems arise, the device is adjusted. If necessary, the blades can be trimmed a little.
- To ensure efficient air flow and no backdraft, the entire structure must be sealed. Therefore, using sealant or the remains of plastic that appeared after cutting the deflector, the cracks are clogged.
- If all steps are completed, the ventilation device is installed in the main line area, and then mounted on the body of the deflector element.
- After completing all the installation steps, you need to work with the electrical component. It is recommended to connect the fan electrical circuit to the conductor where the current appears when the ignition is activated. This option is more convenient. It is possible to connect the device to the heating unit control cable.
Damper modernization
Modification of the VAZ 2107 stove, which consists of upgrading the lower damper of the system, is the easiest option to implement. If all actions are performed correctly, the device will not open or close randomly when the car drives over bumps. This will ensure efficient and equal airflow on both glasses.
Tools and materials for work:
- ratchet crank;
- head for ten;
- extension;
- mount;
- socket wrench for thirteen, seventeen;
- slotted screwdriver;
- rags;
- basin.
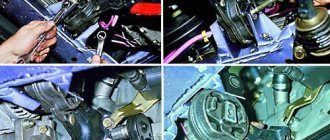
Replacement algorithm
Let's start.
- Open the drain hole and carefully drain the liquid. How much antifreeze comes out, that much will need to be added (if there was no leak before). If there was a leak, then it is advisable to completely empty the system of coolant and fill it with 9.8 liters according to the instructions.
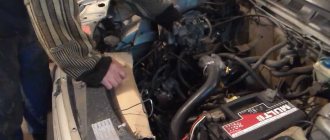
- Disconnect the battery. Disconnect the electric fan connector.
- Remove the fan protective cover.
Access to various elements of the cylinder block is now open.
- Loosen the generator belt tension nut (M17) and remove the belt.
- Unscrew the bracket fixed to the pump and move it to the side.
- Holding the pump pulley, unscrew the three mounting bolts.
- Then unscrew the four nuts securing the pump to the engine.
- Dismantle the pump and clean the seat with sandpaper.
- Install a new pump, first lubricating the seat with sealant.
Read, it may come in handy: Engine tuning of the seventh model: a complete guide with photos and videos
The rest of the assembly process is carried out in reverse order.
Replacing the impeller
If the impeller is damaged, for example, the blades are broken, then the part can be replaced. Damage usually occurs upon contact with the housing due to severe wear of the shaft or bearing. Regardless of the material of the impeller, the part is attached to the axle by pressing. To replace the plastic impeller you will need:
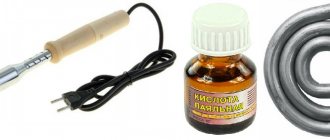
- Having secured the shaft on the reverse side in a yew, use an M18 tap with a pitch of 1.5 mm to cut the threads inside the impeller, having previously lubricated the tool with engine oil.
- Screw a special puller into the hole and tighten the outer bolt.
- By rotating the head of the inner bolt clockwise, press out the impeller and remove it from the shaft.
- The metal impeller has threads cut from the factory, so the part is simply pressed out with a puller.
To dismantle the impeller you will need a puller and taps m18*1.5 mm
When reinstalling, the part is pressed onto the shaft using a hammer and a suitable attachment, avoiding damage to the blades. You need to make sure that the lower part of the impeller rests against the ring on the oil seal, after which it needs to be seated 2-3 mm inward. This will ensure a tight fit of the rotating part to the ring.
What's the result?
As you can see, if you have certain skills, the process of replacing the clutch disc is not difficult. The most time-consuming operation is gaining access to the clutch itself, especially on front-wheel drive vehicles.
As for replacing the disc itself and how to correctly install the clutch disc, as well as the frequent question of which side to place the driven clutch disc, you need to take into account that the disc is placed towards the basket with the part where the damper springs protrude.
Manual transmission gears (speeds) do not engage after replacing the clutch: main reasons, settings and adjustments. Diagnosis of problems, useful tips.
How to replace the clutch on a DSG/S-Tronic robotic gearbox. Signs of the need for replacement, removal and installation of the DSG clutch, calibration and adaptation.
Features of pouring antifreeze (antifreeze)
After replacing the VAZ 2107 pump, all that remains is to tighten the alternator belt and fill in the coolant. The latter will need about 10 liters.
To add antifreeze without creating air locks in the cooling system, you should do the following:
- position the car so that the front is higher than the rear. Then the heating radiator will be lower than the other elements of the system.
- disconnect the thin hose of the cooling system going to the carburetor or throttle valve (depending on whether the carburetor or injection type of engine is installed on the car);
- open the plugs on the expansion tank and radiator;
- make sure that the drain plugs are installed and carefully tightened;
- pour antifreeze (antifreeze) into the radiator using a watering can;
- push the rubber hoses of the cooling system with your hands, expelling the air (the fluid level will drop);
- fill the radiator to the brim and close the cap;
- pour coolant into the expansion tank and close it;
- start the engine, warm it up to operating temperature;
- With the engine running, squeeze and release the cooling hoses several times to remove remaining air from the system;
- add fluid to the expansion tank to the recommended level.
- install the hose going to the throttle and tighten the clamp.
Electric fan
We are talking about the fan that is installed on the cooling radiator. It works quite rarely. It turns on only when the temperature at the radiator outlet is exceeded. A sensor is installed in this place, or, to be more precise, a thermal switch. It consists of a bimetal plate, which at a certain temperature is deformed, changing its geometry. In this case, the contacts connected to this plate mechanically are closed.
It is worth noting that the cooling system of the VAZ-2107, malfunctions of which can be eliminated fairly quickly, is still not very perfect. The sensor, according to the manufacturer, is capable of switching large currents and has an impressive service life. But it is better to have a degree of protection - switching on should be done using an electromagnetic relay, which is controlled by a sensor. This way you can increase the resource many times. In addition, it is necessary to have a button in the cabin connected parallel to the sensor. With its help, you can force the fan to turn on.