The classic “seven” has enormous potential in terms of creating conditions for installing good music. The acoustic shelf, located under the rear window in a VAZ 2107, is the best place to install large speakers. Finished parts of this kind are sold in auto parts and accessories stores and are quite expensive. They are usually molded from plastic, but in order to achieve high-quality sound, it is recommended to use a wooden podium.
A base made of this material eliminates parasitic vibrations and allows you to achieve maximum purity when playing musical compositions. Most VAZ 2107 cars, in which really high-quality audio players are installed, are equipped in special workshops or all operations are performed by hand.
Required materials and tools
The acoustic shelf for the VAZ 2107 is made with your own hands directly from composite materials on a wood base. To make a shelf with your own hands, you will need the following list of materials:
- plywood 16 mm and 12 mm thick;
- decorative materials for lining shelves. These can be: leatherette, dermantin or carpet;
- two-component epoxy resin;
- polyurethane foam;
- several self-tapping screws and bolts with nuts for fastening.
Of course, the new shelf will require appropriate speakers, usually oval or round. To carry out the work you will also need a screwdriver, a jigsaw, screwdrivers and a furniture stapler. In this case, not a collective farm version of the shelf will be produced, but a real acoustic system, which will have not only a beautiful design, but also decent sound parameters.
Construction of seat belt boxes and speaker podiums
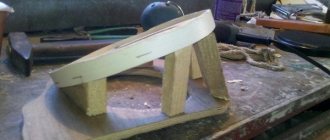
Using a jigsaw we make the bases for the podiums. In order for the structure to be rigid, it must be reinforced with 40x20 mm wooden blocks; using self-tapping screws and bars we connect the ovals together (as shown in the figure below). We cut out several holes in the shelf for air circulation between the trunk and the passenger compartment.
We fill the voids between the bars of the podiums with polyurethane foam. After the foam has dried, we simply cut it along the edges and sand it with sandpaper to smooth out the unevenness. We strengthen the structure with cardboard, which is impregnated with epoxy glue.
When making boxes for seat belts, it should be taken into account that the belts enter from the side. The boxes are made of timber, which adds rigidity to the structure. After installing the boxes, the rear shelf of the VAZ 2107 is no different from the factory one. To give it an aesthetic appearance, you need to cover it with carpet, the entire shelf is ready, you can install it.
Note: you can make a bass reflex for an acoustic shelf. To do this, make a hole in the middle of the shelf, so as not to spoil the view, it can be covered with a decorative lattice.
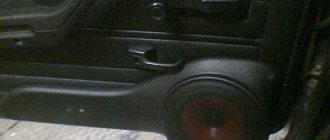
Hiding the speakers in the rear shelf of a VAZ 2101
Rear shelf repair and speaker installation
Good day! Yesterday I removed the original rear shelf along with the pancakes. The condition of the shelf is, frankly, not good. What did she not see: a tubular curtain, and a Chinese brake light... In short, everything was left with holes. In addition, I have long been toying with the idea of making a new shelf, but not a simple one, but so that the speakers under it would be hidden from prying eyes, and would not spoil the original look. Well, I’m finally ready to bring this topic to life. In general, I found 0.5 plywood in the garage. You will say that she is too thin for this matter. I agree. But the goal here is to hide the speakers, not the acoustic shelf. So, in my case, the normal option. I removed the original shelf, put it on plywood and made a pattern.
I took the plywood home because I didn’t have the necessary tools in the garage. This morning I started cutting it out. Here's what happened:
Then I went to the car market for the rest of the materials. I purchased a carpet with fine pile and a plastic mesh for the face 2107.
What is the mesh for? In order for the shelf to remain a shelf, and the carpet in the places of the speakers does not sag. I cut the mesh in half and screwed it to the shelf along with the “pancakes”. It turned out like this:
Tomorrow I will cover it all with carpet.
Covering the rear shelf with carpet
Covered the rear shelf with carpet. I decided not to use a stapler, the plywood was too thin. I planted it on Titan glue. Unreal thing! It sticks to everything in the world, even in the most unimaginable combinations. Verified.
The end result was a shelf like this. The top is perfectly flat, the mesh doesn’t bulge outwards - I’m happy. When I have time, I’ll get it together and install it.
Later she will have extra stops, a first aid kit and a Soviet police cap. In general, these are the plans for now.
Installing the rear shelf
I went out to the garage to install the rear shelf. She stood up perfectly, like her own. The surface is flat and the speakers are not visible. Just what the doctor ordered, basically.
https://www.drive2.ru/l/4899916394579332867/, https://www.drive2.ru/l/288230376152919009/, https://www.drive2.ru/l/288230376152935983/
Radio VAZ classic
Hiding the radio in the glove compartment of a VAZ 2101: preparation and purchase Hiding the radio in the glove compartment
Required materials and tools
The acoustic shelf for the VAZ 2107 is made with your own hands directly from composite materials on a wood base. To make a shelf with your own hands, you will need the following list of materials:
- plywood 16 mm and 12 mm thick;
- decorative materials for lining shelves. These can be: leatherette, dermantin or carpet;
- two-component epoxy resin;
- polyurethane foam;
- several self-tapping screws and bolts with nuts for fastening.
Of course, the new shelf will require appropriate speakers, usually oval or round. To carry out the work you will also need a screwdriver, a jigsaw, screwdrivers and a furniture stapler. In this case, not a collective farm version of the shelf will be produced, but a real acoustic system, which will have not only a beautiful design, but also decent sound parameters.
Option number 1: making a shelf
The VAZ 2107 acoustic shelf with podiums for installing oval speakers is made as follows:
- First, you should dismantle the standard shelf, eventually taking it as a template for making a new base.
- A sheet of 16 mm plywood or chipboard of appropriate size is taken, after which a template is placed on it. Markings are made according to the template using a simple pencil or pen.
- According to the drawn template, it is necessary to cut out a new base for the shelf, but it must be cut 4-8mm smaller than the factory sample, otherwise, due to its greater thickness, the product will not fit and will not fit into place. To do this, it is recommended to use an electric jigsaw, which will allow you to do everything quickly and efficiently.
- Using the same wood, you need to cut a base for the podium and for the speaker itself. This is not difficult to do, and you can use oval speakers as a template. From scraps of material we make supports with which we will fix these two ovals with the angle of inclination we need.
- We try on the resulting blanks for the shelf, mark and saw holes inside the podiums.
- Using sandpaper, you need to go over all the cuts and sand them down. The corners should be smooth and rounded.
- The podium must be secured using self-tapping screws of appropriate length. You will need to install a cardboard base on the inside of the product. This base will play the role of the inner surface of the podium.
- The recesses between the base and the podiums should be carefully blown out with foam. Once the foam has dried, which may take several hours, you will need to trim off the excess. After trimming, thoroughly clean the corners.
- The shelf on the VAZ 2107 is almost ready, all that remains is to cover it with decorative materials. Fantasy is already at work here. It can be designed in any form. Decorative elements are fastened using a furniture stapler.
Option No. 1: installing a shelf
The finished product is mounted in place of the standard shelf using bolt and nut connections. The corresponding holes should be drilled at the fastening points, and then the shelf should be secured.
After installing the shelf, you need to connect it. For connection, it is recommended to use special acoustic wiring with a cross-section of at least 1.5 mm. Thinner wires will not be able to reveal the full musical potential of the installed acoustics, especially when playing low-frequency components. As a result, we get the following product:
Making parts yourself
A quality shelf with podiums for installing speakers begins with preparing the base. We dismantle the standard part with our own hands and use it as a template. We lay it on top of a sheet of chipboard or plywood and trace it with a simple pencil. Using a jigsaw, we cut out the base and carefully process it along the contour of the sandpaper. We cut out the upper part of the podium from the same material and make supports for it from scraps of wood.
We attach the resulting structure to the base using self-tapping screws. A cardboard piece is installed on the inside of the podium, forming the inner surface of the podium. The resulting recesses are filled with construction foam and left alone until it dries completely. Now the base for the shelf is ready, the excess hardened foam is cut off and thoroughly cleaned.
The base for installing speakers under the rear window of the VAZ 2107 is ready; now it needs to be covered with decorative materials with your own hands. This operation is performed carefully with smoothing of the coating, which, in addition to the main method of fastening, is also fixed from the wrong side with a furniture stapler.
Installing a homemade acoustic shelf in a VAZ 2107
As you know, it is quite difficult to achieve good sound in the interior of the Seven. The fact is that in addition to the noise of a moving car, there are many obstacles that prevent the sound from fully reaching the listener. Typically, this problem is solved in two ways:
- Installation of speakers for the car radio, which are directly sent to the listener. Since passengers are in different parts of the cabin, or, in other words, in different corners of the car, the speakers should be directed to the center of the cabin so as not to deprive any of the vehicle passengers of sound. In this case, the sound from the speakers must be directed so that it passes all obstacles.
Rear acoustic shelf for VAZ 2107
- Installing speakers under the ceiling is a way to solve a problem called spot sound. In this case, you will have to make acoustic podiums, which is very difficult and will require the implementation of durable fasteners and all this will lead to a lack of bass.
- The second method involves reflected sound and is much easier to implement. The speakers are directed to the rear window, and the sound is thereby reflected. The sound becomes much more spacious, because the stereo effect is enhanced. In this case, you will need to make an acoustic shelf.
Note. As you know, there are ready-made store shelves, but they are made in such a way that the speakers placed on them are directed towards the ceiling. Thus, part of the sound is damped by the pile of the car’s ceiling, and if there are also obstacles, such as seat headrests, you can forget about high-quality sound altogether. Therefore, it is advisable to make a shelf with your own hands, especially since it is not at all difficult.
The first way to make an acoustic shelf with your own hands
Let us present to the reader a way to make a shelf in the cabin for coaxial speakers measuring 6x9:
- First you need to prepare everything, remove the excess from the back and the standard shelf, as well as the insulation.
- The standard shelf now needs to be marked on a piece of chipboard.
Homemade shelf for coaxial speakers
Note. The markings must be carried out in such a way that the future acoustic shelf is 50 mm shorter on each side than the factory one. Otherwise, it simply won't fit into place.
- We cut out the future shelf.
- We carry out fitting into the car and if all sizes are suitable, we move on to the next stage.
- We mark the markings for the speaker holes.
Note. We make the holes so that the speakers fit into them freely, without force. The holes should not be too large either. The edges of the holes must be made smooth to avoid any mechanical damage.
- Now we need to start making the second level shelf. This is done so that the speakers are tilted towards the rear window.
- Trace the template and cut it out.
- The second level must be glued to the first main shelf with good construction adhesive and secured with self-tapping screws. This is what should happen.
DIY rear acoustic shelf for VAZ 2107
- Let's try everything on again.
- Using some sharp object, such as a nail, we make notches on the frame of the car, where our homemade shelf is placed.
Note. Holes in the iron shelf must be cut with a grinder, preferably small in size. We make holes no smaller than in a homemade chipboard shelf.
- We clean the trunk of all kinds of unnecessary debris. The cleaner it is, the better the quality of the sound in the cabin.
- We make the third level of the shelf, just like the second.
- We put it on top and also fasten it with screws and glue.
- We make one more level and attach the fourth one.
- We trim everything, where there is excess, grind it and sand it completely.
Note. The shelf should be such that its front part, which faces the driver, is lower than the side of the trunk. This provides the desired design to allow the speakers to project sound directly into the rear window.
- We cover the shelf with carpet, preferably black.
- We screw on the speakers.
- We put the shelf in the car.
VAZ 2107 acoustic shelf
Note. There is no need to glue noise or vibration insulation under the homemade shelf, but pasting the trunk itself with vibroplast will not hurt.
The shelf is ready. If you install a high-quality car radio, good active speakers and connect everything with a high-quality speaker cable, the sound will be like in a symphony opera house.
Note. Music lovers and gourmets are advised to make, in addition, a large hole in the center of the homemade shelf, and place a decorative mesh on top. This ensures correct bass reflex. Such are the things.
The second way to make an acoustic shelf with your own hands
To begin with, I prepared the following set of tools:
- Chipboard.
- Polyurethane foam.
- Glue.
- Jigsaw.
- Drill.
- Cutter.
- Stapler.
- We remove the standard stock shelf.
- We put it on a sheet of chipboard and trace it.
- We cut out with a jigsaw according to the markings.
- We draw an oval frame on the chipboard that will cover the speaker.
Note. Ovals can be cut out using an oval-shaped metal object that will act as a layout.
- Two holes are cut on the shelf. In order for them to turn out to be a mirror reflection of each other, and this, as is known, gives an additional acoustic effect, you need to find the center on a homemade shelf and glue a sheet of paper. We outline and cut out the right hole, then turn the shelf to the other side and carry out the same operation with the left hole.
Note. This method differs from the first in that there is no need to cut out several levels of shelves. It is enough to cut plates from ordinary tin or beams, and then nail them to the shelf with small nails. Two homemade ovals and parallel bars form a real podium, as in the photo below.
Homemade podium for speakers
- Now we take the foam and fix the homemade podiums to the shelf. Pieces of thick cardboard are placed inside the podiums to prevent foam from penetrating inside.
- We wait until everything dries.
- We take a utility knife and cut out the excess parts of the frozen foam.
- We first cover the podiums with carpet.
- Then we take a layer of carpet and put it on the shelf. We grab one end with a stapler and spray it with water. After this, we quietly pull out the material and secure it with a stapler. Thus, there will be two layers of carpet on the podiums, but they will look beautiful and the speakers will fit perfectly in them.
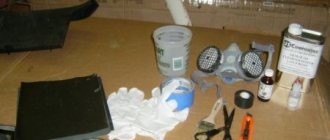
Materials and tools
A good shelf for speakers is now made from wood-based composite materials. To manufacture this part, it is recommended to use the following materials:
- Chipboard - 16mm or plywood 10-12mm thick for making the base.
- Carpet, leatherette or other decorative material for covering the shelf.
- Two-component epoxy resin.
- Thin fabric such as nylon, you can use old women's tights or stockings.
- Construction foam.
The work is done with your own hands using electric and manual tools, according to the list below:
- furniture stapler;
- electric jigsaw and a set of files;
- drill with continuously variable speed control or screwdriver;
- Phillips and flathead screwdrivers.
Making a high-quality rear shelf for a VAZ 2107 from the above materials with your own hands is only possible if you strictly adhere to the technology.
Product delivery options
Note! Below are the shipping methods available specifically for this product. Payment options may vary depending on the shipping method. Detailed information can be found on the “Delivery and Payment” page.
Parcel by Russian Post
Available payment methods:
- Cash on delivery (payment upon receipt)
- Using cards Sberbank, VTB, Post Bank, Tinkoff
- Yandex money
- QIWI
- ROBOKASSA
Shipping throughout Russia. Delivery time is from 5 to 12 days.
Parcel by Russian Post 1st class
Available payment methods:
- Cash on delivery (payment upon receipt)
- Using cards Sberbank, VTB, Post Bank, Tinkoff
- Yandex money
- QIWI
- ROBOKASSA
Shipping throughout Russia. Delivery time is from 2 to 5 days. More expensive than regular delivery by Russian Post, approximately 50%. Parcel weight up to 2.5 kg
Express Parcel EMS
Available payment methods:
- Cash on delivery (payment upon receipt)
- Using cards Sberbank, VTB, Post Bank, Tinkoff
- Yandex money
- QIWI
- ROBOKASSA
Shipping throughout Russia. Delivery time is from 3 to 7 days. More expensive than regular delivery by Russian Post, approximately 100%.
Transport companies
Available payment methods:
- Using cards Sberbank, VTB, Post Bank, Tinkoff
- Yandex money
- QIWI
- ROBOKASSA
Delivery is possible to any locality where there is a representative office of the transport company. Delivery time is from 2 to 10 days. Sending large parcels is approximately 50% more profitable than by Russian Post.
Pickup from our warehouse
Available payment methods:
- Cash upon receipt
- Credit, installments
- Using cards Sberbank, VTB, Post Bank, Tinkoff
- Yandex money
- QIWI
- ROBOKASSA
Pickup times must coincide with store opening hours.
Installing an acoustic shelf
The finished product can be secured to the car using bolts that attach the shelf to the metal of the body. The fastening is organized in such a way that the nuts are tightened from the trunk of the car. After installing the shelf, you can proceed to checking and adjusting the car's sound system.
It makes no sense to cover the area under a homemade shelf with vibration or noise insulation. To improve the sound, it is better to cover the surface of the trunk with vibroplast.
Tips for working with carpet
Carpet is an excellent material for decorative trim of the rear shelf of a VAZ 2107. When working with it, you need to take into account some unique features:
- Carpet pieces cannot be glued together.
- To give the carpet a certain shape, you need to wet it, stretch it, and then dry it with a hairdryer.
- The easiest way is to glue the carpet to the shelf with spray adhesive.
- In order for the carpet to adhere well, the glue must be applied in a thin layer.
There are other ways to independently manufacture a VAZ 2107 acoustic shelf. They differ in design, manufacturing technology and materials used. For example, you can make a multi-level shelf that consists of several layers of chipboard or plywood.
Rear shelf - podiums: video
Although the VAZ 2107 is an excellent car, it still requires some improvements. For example, in most cases acoustics are not installed in the “seven” from the factory. And living in the modern world, any driver can no longer imagine a car that would lack at least some music. The first level of car audio is the installation of two “pancakes” in the rear parcel shelf of the VAZ 2107, which is located under the rear window, which is the optimal place for installing large speakers. These speakers can be installed in a special plastic shelf, but you won’t be able to get high-quality sound.
In order for the sound to truly satisfy the driver's needs, it is necessary to prepare an acoustic podium made of wood. Making such a shelf out of wood for a VAZ is not difficult; even an ordinary driver without carpentry skills can handle it. Let’s find out in more detail how to make such a structure with your own hands. There are many options for manufacturing rear acoustic shelves on a VAZ 2107, but we will look at the two most common ones, which will allow you to choose the most appropriate method.
Option No. 1: installing a shelf
The finished product is mounted in place of the standard shelf using bolt and nut connections. The corresponding holes should be drilled at the fastening points, and then the shelf should be secured.
After installing the shelf, you need to connect it. For connection, it is recommended to use special acoustic wiring with a cross-section of at least 1.5 mm. Thinner wires will not be able to reveal the full musical potential of the installed acoustics, especially when playing low-frequency components. As a result, we get the following product:
Option No. 2: features of manufacturing an acoustic shelf
The rear acoustic shelf in the VAZ 2107 can be made with your own hands and using another option. The second method is simpler and involves repeating the first method, but without making podium stands for the speakers. The shelf is cut out using a standard stencil and adjusted to size. Then we mark it and cut out holes for the speakers, at the same time we think through and prepare places for attaching the shelf itself to the car body. We also saw holes for the speakers in the iron body panel. It is important that they coincide with the holes in the shelf. We recommend that you carefully glue the metal panel on which the entire structure will be attached with Shumka.
When everything is prepared, you can cover the new product with the material you like and fasten it in place. For even greater lovers of good sound, you can carefully foam the resulting gap between the shelf and the metal with foam. This will make the structure even more monolithic and improve the sound of low frequencies.
Read, it may come in handy: Installing a VAZ-2107 radio: how to connect correctly
The second option for making a shelf is more practical, since there is more free space for arranging some things. It’s up to you to decide which version of the shelf you choose for your car, just remember that you should approach the manufacture of the shelf responsibly, which will affect the final result of the sound of the music.
Along with the manufacture of the shelf, we also recommend making the door trims, installing podiums for the speakers and soundproofing the car; this will have a very positive effect on the sound quality of the music and driving pleasure.
How to make a podium yourself
Acoustics in the VAZ 2107 imply the presence of a podium and, as mentioned above, it should preferably be made independently. Let's find out how to make it? Ordinary plywood is the most suitable material for making a podium. The process begins with cutting out ovals or circles from plywood with a jigsaw. Shaping the podium can be done using:
- Foam, but as we learned, it will not provide adequate rigidity.
- Epoxy resin.
- Compoplast.
Preparatory work.
Before starting work, you need to remove the standard shelf of the VAZ 2107. This does not take much time, and the only tool you need is a screwdriver. After dismantling, the shelf serves as a template for making a new part. To do this, it is placed on a sheet of chipboard and, using a pencil, the contours of the future shelf and cutouts for seat belts are marked.
After this, you need to mark the holes for the speakers using templates. You can draw them yourself or draw them in a computer program and print them on a printer. It all depends on the skills and capabilities of the master.