Diagnostics - causes and symptoms of malfunction
The condition of a wheel bearing is assessed based on a number of factors. The main signs of a node malfunction include:
- noticeable wheel play;
- hum, rustle, crunch from a spinning wheel;
- the suspended axis rotates unevenly, there is wedging;
- excessive heating of the disk;
- increased noise when cornering.
The main reason for replacing a wheel bearing is due to normal wear and tear. The gap increases and eventually stops responding to adjustment.
How to check the wheel bearing of a VAZ-2107:
How to determine front wheel bearing wear:
Other causes of failure:
- wheel impacts;
- technological violations during the previous replacement;
- entry of foreign particles into the separator cavity (dust, dirt, metal shavings);
- aggressive driving style.
If at least one malfunction is detected, it is necessary to replace the parts. Continued operation of the vehicle is dangerous.
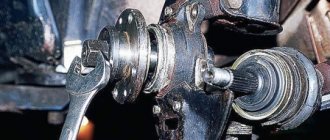
Steering knuckle on the VAZ 2107: what is it for?
Even the uninitiated can answer what a steering knuckle is: obviously, it is a mechanism that ensures the wheels turn while driving. The steering knuckle secures the hub elements of the front row of wheels on the VAZ 2107 and is mounted on the upper and lower suspension arms.
As soon as the driver begins to turn the steering wheel in the cabin, the gear lever acts on the steering rods, which, in turn, pull the steering knuckle to the left or right. This ensures that the front wheels turn in one direction or another.
The main purpose of the steering knuckle in the design of the VAZ 2107 is to quickly and without failure ensure that the front pair of wheels turns in the direction desired by the driver.
Steering knuckle device
The mechanism itself is made of high-strength cast iron, and therefore has a long service life. According to the designers, this unit should withstand serious loads and not “wedge” at the most crucial moment. It is worth emphasizing that on the VAZ 2107 the steering knuckle is indeed one of the most reliable elements: most drivers never change it throughout the entire period of operation of the car.
The design of the front suspension of the “seven” uses two steering knuckles at once - left and right. Accordingly, the elements have slight differences in fasteners, but in other respects they are completely identical:
- manufacturer - AvtoVAZ;
- weight - 1578 g;
- length - 200 mm;
- width - 145 mm;
- height - 90 mm.
The main elements of the steering knuckle are:
- The axle is the part of the axle on which the bearing is located. That is, the axle serves as a support for the rotational movement of the wheels.
- The kingpin is the pivot rod of the swivel joint.
- A wheel rotation limiter is a device that prevents the fist from turning to its maximum due to the risk of loss of control.
Design of the unit being repaired
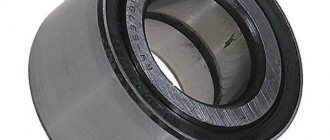
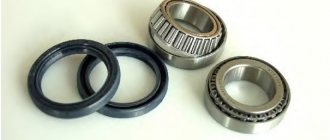
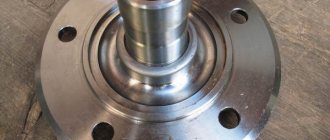
The VAZ 2107 hub consists of the following elements:
The diagram shows:
1 — steering fist; 2 — hub seal; 3 — remote ring of the front wheel hub oil seal; 4.5 — hub bearing; 6 — washer 2101; 7 — nut M18x1.5 left; 8 — hub cap.
All parts are located inside the hub housing.
Front-wheel drive features
For example, let’s take two cars – a “nine” and a “ten”. Let's first study the procedure for changing the bearing on the rear hub on a VAZ 2109 car. Breakage of our part in this car can occur due to the following factors.
- Reckless driving with constant sharp braking and acceleration.
- End of service life, shortened due to bad roads.
- Violation of the integrity of the oil seal.
Diagnostics is carried out according to the well-known principle: you need to shake the wheel. We list the tools and supplies needed for repairs in the following list:
- wrenches;
- hammer, round timber, wooden block;
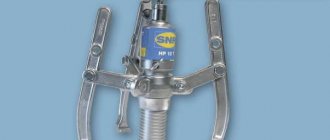
- puller;
- Litol lubricant.
- Using wrenches, remove the wheel nuts and the central hub nut.
- We lift part of the car on a jack and remove the wheel (here there is no need to hang up the entire half of the car).
- The handbrake must not be applied!
- We twist the pins of the brake drum and dismantle it, you can use a hammer and a block.
- Unscrew the hub nut and tighten the hub with a puller.
- If the inner ring of our replacement part remains on the suspension axle, we pull it off using a puller.
- We take the removed assembly, remove the retaining ring, and use a round timber and a hammer to knock out the broken part.
- After applying lubricant, we press in new parts.
- We do the assembly by moving point by point backwards.
Now, if we compare the two instructions we have given, it turns out that the presence or absence of a wheel drive under the trunk has little effect on the number of stages, as well as their essence.
Without puller
In order to confirm this assumption, let’s consider another replacement on a VAZ 2110 car. The reasons for the breakdown are the same.
- Ruthless operation of the car on bad roads.
- Incorrect driving.
- Wear of the oil seal and the part itself.
The fact is that its cost is higher than the cost of the spare part that we are replacing, by about two or three hundred rubles, that is, at a hundred-ruble price, the bearing is three times more expensive
Therefore, the purchase of such an important device for our operation is not entirely justified. But on the other hand, the puller will be useful for many other types of work, therefore, if further DIY repairs are planned, the purchase becomes justified
So, let’s try to do without this device using a chisel and a hammer. The same could have been done according to the previously described procedure. Thus, we will need:
- wrenches - standard set;
- hammer;
- chisel;
- round timber of suitable diameter;
- Litol type lubricant.
At the initial stage, we prepare new spare parts. Next we follow the beaten path.
- Just like with the “nine”, we first loosen the hub nut and wheel nuts.
- We turn off the handbrake, jack up the car, and then remove the wheel.
- We dismantle the brake drum similarly to the corresponding paragraph of the previous instructions.
- Unscrew the hub nut.
- We screw the bolts into two opposite holes in the hub one by one and pull the assembly necessary for disassembly towards ourselves - this is a way to do without a puller.
- The inner race of our replacement part almost always remains on the axle. We pull it off using a chisel and a hammer, after removing the brake pads.
- Having removed the retaining ring, as well as the oil seal, use a hammer to knock out the remaining part of the broken part using a round timber.
After lubrication, new spare parts are installed and reassembly is done.
So, we have described the process of replacing a VAZ 2110 bearing, you can study it in the video. One thing is clear: in a VAZ with front-wheel drive, changing a treasured part is also not so easy.
The same applies to replacing the bearing on a Kalina car. The technology is very close to what we described. Only the sizes of the turnkey nuts differ.
Well, those who had the opportunity to perform the operation we are describing in the unit of the corresponding Kalina suspension will easily be able to repeat the same thing on a car that is completely similar in design. More specifically, replacing a bearing on a Lada Granta car will not be difficult for them.
Repair prices by city
But not all car owners can or want to do such manipulations with their own hands. Many people find it easier to go to a car service center.
For such people, we have compiled a summary table of the average cost of replacing bearings in the rear hub of a VAZ in relation to different large cities of the Russian Federation. This is what happened.
| City | Price |
| Moscow | 800 rub. |
| St. Petersburg | 800 rub. |
| Ekaterinburg | 700 rub. |
| Kazan | 750 rub. |
| Samara | 600 rub. |
It turns out that the price for repairing the rear suspension of VAZ cars is relatively quite low, even in the capitals. Therefore, it is worth thinking about whether to perform the operation yourself or go to the experts.
At the same time, as we found out, its cost to craftsmen is low, so all that remains is to weigh the pros and cons before you start doing the procedure yourself.
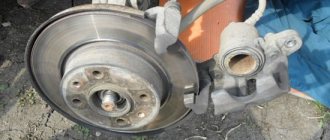
Wheel Bearing Adjustment
The main parameter when carrying out a replacement is setting the correct hub clearance. The procedure is performed in two ways: using a dial indicator or by touch.
First option:
- Prepare an indicator stand.
- Place the device on the brake disc and secure with bolts.
- Place the end of the indicator against the end of the trunnion, as shown in the figure.
- Rotate the hub to measure the play.
- If the value is more than 0.15 mm, it is necessary to loosen the nut and tighten it with a torque of 9.6 N*m. Spin the disk several times. Loosen the nut (approximately 20-25 degrees), tighten with a torque of 6.8 N*m.
- Check the backlash value.
- Lock the nut.
Setting the gap without an indicator:
- Put on the wheel.
- Evenly tighten the nut while rotating the hub.
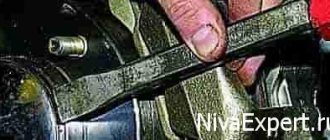
- Rock the wheel in a vertical plane to “feel” for play. To do this, place your finger on the end of the trunnion. A barely noticeable gap should be felt when the wheel rocks.
- If the play is caught, tighten the nut to a torque of 19.6 N*m. Don't counter.
- Rotate the assembly several times in both directions (to self-install the bearing). Check the gap.
- Lock the nut.
The rebuilt unit should rotate easily, without wedging.
Thematic videos:
Adjusting the hub clearance of the VAZ-2107:
How to adjust the backlash:
Manufacturers.
Domestic manufacturers:
- SPZ-Group
- LADA
- VBF
- Volzhsky standard
Foreign manufacturers:
- SNR (NTN)
- SKF
- INA
- NSK
- KOYO
- Timken
When choosing a quality product, it is better to buy from manufacturers of foreign brands. Domestic brands have a low price and are more widespread on the market than their foreign counterparts.
When replacing a product, it is extremely important to use high quality replacement parts. Low quality aftermarket products may not be sufficiently suitable for the application, causing end play problems. This can cause drivability problems that lead to costly returns. It is recommended to purchase only from official dealers or directly from the manufacturer.
Important Notes
A few points:
- When seating the clips using the impact method, it is necessary to carefully orient the plane of the spacer, avoiding accidental slipping;
- excessive application of the lubricant promises squeezing out the oil seal;
- Old bearing housings are suitable as a mandrel.
After adjusting the gap, you need to drive the car and listen to the bearing. If noise is noticeable or the wheel gets hot, you need to unscrew the nut, correct the play and tighten a new one.
Steering knuckle repair
Repair of the steering knuckle is possible with minor wear or minor damage. As a rule, if a unit is seriously damaged after an accident, car enthusiasts simply replace it with a new one.
Repair work is only possible after the steering knuckle has been completely removed from the vehicle. The repair schedule looks like this:
- Clean the surfaces of the fist from dirt and dust, wipe it with a clean cloth, and blow with compressed air.
- Clean the grooves for the retaining rings.
- Inspect the steering knuckle after dismantling for signs of deformation and wear.
- Install a new retaining ring and press the new bearing in until it stops.
- If it is necessary to replace the trunnion, replace it. If the axle and kingpin are severely worn, it is recommended to replace the steering knuckle assembly.
Repairing the steering knuckle involves replacing the retaining rings and bearing. In case of extensive damage, only replacement is recommended.
Spare parts sizes
List of suitable spare parts with nominal size:
| Manufacturer | Cat. number | Dimensions | price, rub. | |
| 1 | OberKraft | 103504 | 80*90*70 | 660 rub. |
| 2 | AVTOVAZ OJSC | 21010-3101800-86 | 700 rub. | |
| 3 | TD EPK LLC | 2101-185 | 720 rub. | |
| 4 | RUMELIA APS GROUP | ES737630 | 660 rub. | |
| 5 | PKF Niagara LLC | RG2101-3101800 | 330 rub. |
Installation of parts of other configurations is unacceptable by design.
To hammer a groove on the nut, you do not need to lower the wheel to the ground, since the blow goes to the nut and does not put a load on the bearing, and if you lower it, you will just hit the bearing. And a new cap must be installed since it should not let water through and is almost disposable. And there is no need to remove the wheel when adjusting, since the cap can be removed even if there is no wild cap. Don’t write heresy - it is read by sheep who then prove that they are smart.
Denis Reply: October 15th, 2016 at 11:56
and you apparently consider yourself very smart)) Everything here is written to the point, and not everyone has a new cap on hand, and sometimes there isn’t even a new nut. If you don't beat like crazy with a hammer, then in most cases you can use the old cap (there were no holes in it). Of course, a new nut is better, but you can also lock the old one (if the problem is discovered in the wilderness - there is nowhere to buy a new one) - simply lock it on another section of the shoulder.
Yes, I consider myself smart. And I have a diploma as a car mechanic. And the wheel is not removed when adjusting the bearing.
Denis Reply: October 17th, 2016 at 12:57
well - this is 100%) - when adjusting the hub bearing, the wheel must be dressed - because with it it is much easier to feel the play than when it is not there. You were right that the wheel does not need to be removed at all; - it’s faster. BUT - if the person is not experienced - there is a point in removing the wheel - this way the picture is visible better, and knocking out the cap may be more convenient.
In principle, there is nothing to write here and everything has been chewed up a long time ago in all the literature on how to regulate. But there is one caveat. When you tighten it for the first time (with a force of 2 kg*m, this is about 2 edges), the bearings wedge and the internal races on the trunnion rotate and the adjustment itself loses its meaning. The outer races are pressed in with good tension. The internal ones sit relatively freely on the trunnion (internal gap 0 - 0.023 mm, external -0.005 - 0.028 mm). When I started driving on a cold car, everything was fine. After some time, a slight “whistle” appeared. I couldn't figure out what was whistling there. I re-adjusted the wheel bearings and the wheels spin freely. It just started whistling on the other side))) When I started rebuilding the suspension in the fall (the car has been sitting in the garage for who knows how long, I don’t have time...) I think I’ll rebuild the hubs. I spin it by hand and everything is fine. I untwisted it with something like a drill and voila it whistled! I'm sorting it out. There aren’t really any signs of wear (I recently changed the bearings). Only the inner races spin on the axle if you press slightly on the outer race. I'm measuring the axle. I thought they were worn out. So there is wear beyond the lower limit. I was going to buy new trunnions, but there are no factory ones anywhere... The neighbor gave me away from the four. Almost new. So the trunnions there are practically the same in size. Measured with a micrometer. ABC sizes: 19.055-19.035 and 25.977-25.990. Accordingly, the dimensions ran away from the lower limit by 0.01-0.02 (there was radial runout). Well, it’s the same on the “new” ones. This means they are wasting the dimensions at the factory... Spraying or chrome-plating these seating surfaces for Lada cars is somehow extreme))) Moreover, there is nowhere) I decided to insert a conical elastic bushing between the inner races. It could shrink by 0.2 mm without deformation. This is later necessary for adjustment; the bearing must first be pressed.