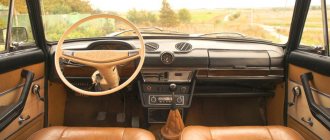
Cars of the classic series developed by VAZ do not particularly pamper our fellow citizens with additional equipment. Power steering was not installed as standard on the VAZ 2107; none of the rear-wheel drive models of this manufacturer can boast of such a sophistication. Additional equipment to reduce the load on the driver and facilitate control can only be installed as an option.
The power steering for the seven was specially designed and manufactured by one of AvtoVAZ’s development plants. The kit has been successfully tested and approved for use on vehicles of this model. It should be remembered that the operation of vehicles with changes made independently to the steering design is prohibited; in fact, this is a restriction on the use of non-certified equipment.
Steering device
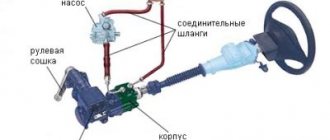
The “Seven” belongs to the category of rear-wheel drive cars; the front suspension uses a layout with two pairs of wishbones. The steering of the vehicle in the standard configuration without power steering consists of the following components and mechanisms:
- systems of three rods with tips;
- steering engine;
- pendulum;
- rotary axles with rods.
The steering gear has a gearbox with a worm gear; its bipod is connected to a similar part of the pendulum by an intermediate rod. It ensures simultaneous rotation of both nodes at a certain angle. The external rods, which transmit force to the wheel axles, consist of two parts. With their help, the toe angle of the front wheels is set.
Removing the outer CV joint of a VAZ 2109
All work can be carried out without an inspection hole or overpass; all you need is a good jack and supports. The disassembly procedure is as follows:
- Place stands under the rear wheels.
- Remove the cap from the front wheel.
- Unlock the nut using a sharp chisel and hammer.
- Using a 30" socket and a long lever, rip off the nut.
- Remove the four bolts securing the wheels to the hub.
- Place a jack under the side to be repaired and lift it up.
- Remove the wheel. It is advisable to install a support under the body.
- Pull the cotter pin out of the tie rod end pin and unscrew the nut.
- Using a puller, pull the pin out of the steering knuckle.
- Unscrew the two ball joint mounting bolts. This will be easier than using a puller to knock the pin out of the hub.
- The hub now “walks” freely on the stand. Personally, I knock out the inner CV joint using a small chisel and hammer. Literally 2-3 sharp and precise blows, as the drive comes out of the box. But be sure to drain 2/3 of the oil from the gearbox, otherwise you will lose it.
- Knock the outer grenade out of the hub.
You don't have to remove the drive completely, but that's not very convenient. It is much more pleasant to work with grenades if they are accessible and can be clamped in a vice, rather than bending over under a machine. Before replacing the external grenade boot, assess the condition of the entire drive for damage or defects. After all, it may turn out that not a partial repair is required, but a complete one.
Upgrade options
Installing a certified power steering makes the steering more comfortable and suitable for women and older drivers. There are many of these among car owners who own one of the most common cars in our country - the “seven”. The effort on the steering wheel is clearly excessive for them, especially when maneuvering at low speed or turning the wheels in place.
Installing a set of additional equipment allows you to successfully solve this problem. You can purchase mechanisms in retail stores or online. When purchasing, it is important to make sure that the proposed kit has a technical passport certified by the wet seal of the manufacturer. In addition, a special certificate is required; all the documents listed above are necessary to make changes to the PTS,
Equipment set
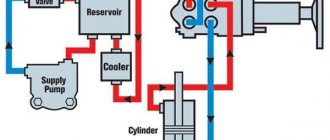
When purchasing a power steering for a VAZ 2107, you need to check the availability of parts and components according to the list below:
- power steering pump with pulley;
- expansion tank;
- gearbox with actuator;
- hydraulic cylinder;
- set of high pressure hoses and pipelines.
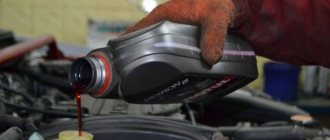
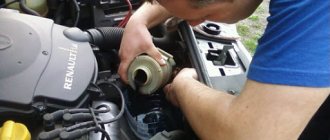
In addition to the equipment, it is necessary to purchase a special operating fluid for hydraulic systems. It is marked ATF; the use of substandard oils leads to rapid equipment failure.
Types of power steering
If you decide to equip your car with an amplifier, then you have several options - expensive and cheaper:
- Power steering for the VAZ 2107 is a more expensive option. Such a system consists of a pump, supply lines, a pipe and a reservoir for working fluid. In this case, the working fluid is oil, which is under pressure in the system. The installation procedure is quite complex, like the design of the system itself, and the car owner will also have to periodically maintain the system. As practice and prices on the automotive market show, there is no point in installing such a unit, since its cost is almost half the price of a used 2107.
- A cheaper and more suitable option for the “seven” is an electric booster. In practice, this unit allows you to cope well with the load placed on it, especially since its installation is simpler. In fact, the electric power steering works on the “seven” almost as efficiently as the hydraulic booster. It should be noted that the main advantage of such a system is the absence of the need for regular maintenance. The EUR on a VAZ is connected to the on-board network, since its operation requires 12-volt voltage.
Also check out
- Cover the belts with cellophane or a rag to prevent oil from getting on the rubber.
- Pump out the oil into the prepared container.
- After pumping out the oil, your assistant should turn the steering wheel as far as possible to the left/right. In this case, oil should appear in the tank; it also needs to be pumped out.
- Disconnect the return hose, lower its end into the bottle, and turn the steering wheel. The old oil will be expelled by the system.
- After the oil has completely drained, connect the hose. After the oil has been completely drained, the hose can be reconnected.
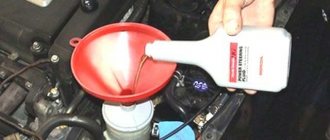
- Fill the power steering system with fresh oil to the top.
- After the oil is poured, an assistant should turn the steering wheel. At this time, the oil will decrease. It should be added to the system.
- When the oil stops decreasing, start the engine for 10-15 seconds. If the oil decreases during operation, add more.
- Turn off the engine, turn the steering wheel 5-7 times in each direction to the maximum. There should be no air bubbles in the tank.
- Start the engine again and turn the steering wheel. When rotating, there should be no hum or any other difficulties.
Detailed guide to installing electric power steering
Buying an electric amplifier today is not a problem; all you have to do is go to any specialized store. The design features of the “seven” allow the installation of an electric amplifier from the Lada Priora. But before you purchase this unit, you need to take into account that for installation you will need to make or additionally buy a cardan, as well as an adapter plate. We will not describe the entire process in detail, because if you understand what we are talking about, then the instructions below will be enough for the correct and complete installation of the system (the author of the video is the Anton Mariyan channel).
If you are faced with the need for installation for the first time, then it would be better to seek help in this matter from qualified specialists. After all, if you make mistakes, getting rid of malfunctions can be problematic, so if you lack experience, it is better to immediately entrust this matter to professionals.
So, here's how the installation procedure works:
- First, you should completely de-energize the on-board network to prevent a possible short circuit during repair work. To do this, simply open the hood and disconnect the terminals from the battery.
- Next, you will need to remove the protective cover from the steering wheel. To do this, simply unscrew the bolts that secure the two parts of the cover.
- At the next stage, the old steering cardan is removed, as well as the installation of a new part, which comes with the purchased system.
- After completing these steps, you will need to use a drill to drill holes to fix the electric amplifier. Depending on the design features of the new EUR, the holes may be different, so at this stage you need to use the installation instructions that should come with the kit.
- Once the holes are drilled, the electric amplifier must be fixed.
- Next, the wires from the speed and speed sensors are connected. When connecting, be careful - you cannot allow the presence of bare wires in the electrical circuit, so all cables must be carefully insulated.
- After completing these steps, the power circuit of the unit is connected; remember that the electrical circuit must include a safety element.
- Actually, at this point the process of installing the electric booster system can be considered complete. All you have to do is reinstall the protective steering wheel pads and tighten all the bolts that were unscrewed earlier. Then the battery terminals are connected and the functionality of the system is checked. If problems arise with the operation of the electric amplifier, you need to check the correct installation and also make sure that you did not make mistakes when connecting the wires. As practice shows, one of the main reasons for the incorrect operation of the ESD is incorrect wiring.
Video “Efficiency of the electric booster on the VAZ 2107”
You can see how the EUR installed on the “seven” works in the video below (the author of the video is Roman Patrikeev).
If you are the owner of a truly popular car, the VAZ 2107, then this article is just for you. In it we will look at how to add comfort and pleasure to driving this car.
Power steering on the VAZ 2107 is not included in the standard package; the manufacturer probably believes that the forces applied to the steering wheel are not so great to install it. And besides, this would undoubtedly increase the final cost of one of the most budget cars.
If you still want your steering wheel to rotate in place as easily as on foreign cars of the late 90s, then you need to think about installing power steering. Today there are several ways to solve this difficult problem.
You can choose a steering rack with a power steering system and consider installing it on a car, but in my opinion this is quite labor-intensive and energy-consuming. The easiest way is to purchase a ready-made kit for modifying a conventional steering rack installed on a car.
The kit includes a pump, pulley, special steering gear, hydraulic cylinder, expansion tank and a set of high-pressure hoses. Now let's move on to a description of the components and methods of their installation.
Steering. Part 1. Installing Shniva power steering on a classic. — Lada 2104, 1.3 l., 1989 on DRIVE2
Everyone remembers very well what a G**** the steering wheel of the classics is. Dull, sluggish, tight, etc. To solve this problem there are several options: installing a rack, EUR, or power steering. I settled on installing power steering from Shnivy. In principle, I did not consider the rack, the choice between the EUR and ShnivaGUR fell in favor of the latter because the power steering was successfully purchased at a disassembly for 4 rubles. I did not find information on installation on the Internet, which in principle is not surprising considering the price of the new kit, apparently everyone stupidly installs the EUR . Therefore, I will try to describe the entire process in as much detail as possible. What we need for installation: 1. power steering pump with a high-pressure hose (a standard one is suitable if the pump is installed on the left in the direction of travel. If on the right you need to either select the one you need according to the length, or make it, for example, in a hydroskand store NOT ADVERTISING, and you need to remember about the vibration damper with the hose)2. steering gear3. telescopic cardan shniva4. steering column VAZ 2110 or Shniva. I’ll explain why. The classic steering shaft has its own splines and requires a lot of cutting and welding to fit with the car, but 2110 or the shniva match. The column is installed easily, and we get a bunch of amenities in the form of normal steering column paddles, an ignition switch on the right, etc.5. oil-resistant hoses 12mm a couple of meters (exactly how much in the next part) 14mm, clamps6. a couple of meters of 12mm copper tube for the cooling radiator since the Shnivovsky one does not fit into a classic TV.
7. bracket for attaching the pump to the motor. It's a little more complicated here. Again there are several options. installation on a standard shniva bracket or a custom version, poly V-belt or simple. In my case, there will be a poly-V and custom option because there are no brackets in nature for the 2105 motor.
So here is the actual description of the installation. The Shniva GUR fits onto the standard holes of the classic easily and naturally, you just need to hit the spar from above at the bend a couple of times with a heavy hammer and press it down 5-6 mm, and saw the engine shield. Without much fuss, I sawed a 10*10 cm hole and after installing the machine, I sealed all the cracks from the inside with vibroplast. To fasten the machine to the spar, you need 10*105 standard short bolts. The pendulum is installed as a standard classic one, it fits without modifications, it is only important to align it correctly with the shaft so that we worked out both limiters. Next, you need to shorten both parts of the telescopic cardan by about 3 cm and flatten the tube with a hammer so that there is no play. The steering column is installed through a spacer. It's about who you like more. I made it from squares. I bought the steering column cover for a new VAZ 2110, installation will be later.
After installing the machine, the lower crosspiece began to touch the brake pedal, I will bend it.
That's all for now, don't switch, it will be more interesting later.
Installation of the kit
Let's start with the pump, it is necessary for pumping and creating the necessary pressure in the system, it is installed on the cylinder block and driven by a belt drive; for this it is necessary to install a new crankshaft pulley. Next, we are changing the steering gear, its dimensions are slightly different from the standard one, so you may need to modify the area around it before installation.
We install the hydraulic cylinder according to the instructions given, select a location for the expansion tank, connect the system with high-pressure hoses, fill the tank with special fluid for power steering, bleed the system and enjoy the result.
After such modification of the car's steering system, its behavior on the road should become more controlled and pleasant for the driver. Undoubtedly, installing power steering on a VAZ 2107 will please you with its results.
Adjusting the VAZ 2101 gearbox
Adjusting the VAZ 2101 gearbox consists of one thing - reducing the steering play. This is done quite simply; you do not need to know the structure of the steering gearbox from the inside. Just look at it from the outside and see that on top there is one large screw (adjusting) and one small one (for filling oil and controlling its level).
When adjusting the VAZ 2101, the help of a second person will be required. However, you can do everything alone, because even replacing a column on a penny turned out to be within your power. Completely unscrew the nut that is located on the screw and is necessary to secure it.
You try to tighten the screw with a screwdriver, when it refuses to go any further, your partner should pull the steering wheel in different directions. And the bolt will go easier. The steering gearbox on the VAZ 2101 is adjusted until the play is acceptable. At the end, the nut is tightened and the car is ready for further use.