I IMMEDIATELY WANT TO EXPRESS HUGE THANK YOU to Gogik173, WITHOUT HIM THIS WOULD NOT BE REALISTIC)
Well, it's time to tell everything in order.
Three days ago I decided to make an acoustic shelf for a Prioric Hatch. One large chipboard and one large sheet of plywood for the shelf itself, as well as several smaller boards for the sides.
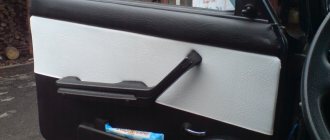
Started work. I removed the shelf and the side panels (the latter are held on by 4 screws - 2 on the trunk lid side, 1 in the center of the side panel and 1 on the seat side).
I drew out the left side panel, started cutting it out, took a long time and painfully to adjust everything to size, but... I’ve never seen wooden shelves before, obviously nothing worked out for me, I couldn’t figure out how to put it in its regular place.
As a result, the day went down the drain.
The next day I went to a friend to get patterns for the sides and shelves. He offered to help with the production, I couldn’t refuse, because... I was sure that I couldn’t cope on my own.
I went to the store and bought everything I needed, namely, several packages of self-tapping screws of different lengths with wide heads, a piano hinge, carpet - 1.5 m, mounting glue for wood, metal hangers (using them in the future we will secure parts of the side panels between each other and install them in their normal place.)
Then the procedure began for drawing the sides according to the pattern and then sawing them out.
After all the parts of the side panels were cut out, they were fastened with self-tapping screws, and the “hump” was screwed to the main part of the side panel using metal hangers.
We tried on the first side panel - it fit like a original, there were small gaps in some places - just under the carpet)
Then they cut out the second one and repeated the steps.
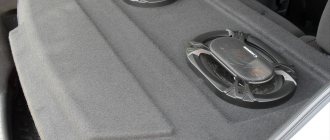
The next day we tried to fit the speakers into the side panels, as usual - from above, it turned out that we were a little wrong with the size of the holes for the speakers, but it was not scary, we just covered the holes with a secret mesh)) and covered them with carpet on top, and seated the column from below. How they covered it with carpet - glue was purchased for installation, and a construction stapler was also borrowed. The upper part of the side panel was coated with glue and a carpet was applied, then with a little effort the edges were tightened and stapled from below.
And voila - we got amazing sidewalls, just like straight from the factory)
Purpose of the acoustic shelf
This part serves to secure the sound speakers of the music system. It is carried out in such a form that the size and shape ensure the greatest purity and volume of the sound of the installed speakers.
Materials for making an acoustic shelf
In the practice of manufacturing this part, only two types of materials are usually used:
- Wood, usually plywood.
- Plastic base.
Each of them has its own advantages. Thus, the wood is softer and is better for applying decorative coatings. After all, they try to cover the shelf with beautiful fabric to match the color of the upholstery. And, of course, attaching fabric to plywood is much easier than to plastic, without gluing. However, the plastic is not damaged by moisture and does not delaminate like plywood. So you need to choose the material for the acoustic shelf wisely. And take into account all the conditions in which the Priora is operated.
What shape are Priora acoustic shelves made of?
These parts are made according to the shape of the space between the rear seat and the body under the glass. The best option is to take measurements from the standard shelf, and having made the appropriate layout, use it to make your own version, with recesses for the available speakers.
Where does the creation of a rear shelf for a Priora hatchback begin?
The first step in creating a high-quality acoustic shelf is the selection of materials for the body and the box outline itself. Here, the most popular among Priora hatchback owners are inexpensive types of wood materials, such as chipboard, samples of thick plywood or MDF boards. Such materials tolerate moisture well and have good durability indicators - on average, an acoustic shelf on a Priora will last you 5-6 years. The next stage of choosing materials comes down to selecting a method for connecting the cut out parts of the shelf layout and covering it. To glue the parts together, it is best to use carpet. Working with it is quite simple and the end result should definitely please you. It does not leave marks or burrs at the joints. However, many Priora hatchback owners choose more expensive combinations of materials to implement their ideas - for example, covering a body made of natural wood with leather. The last stage in preparation is to create a sketch or layout of the future shelf for the trunk or sidewalls. Here you need to accurately measure all the corners and sides of the car and recreate the image of the future shelf, indicating the places for the speakers.
Attention! Often, the rattling of the shelf is associated not so much with the use of low-quality materials, but with the occurrence of vibration after improper fixation of the rear shelf in the trunk. That is why, before checking the operation of the system, be sure to ensure that the rear side of the structure is firmly secured to the corners of the machine using appropriate fasteners.
Refinement of the factory version of the acoustic shelf
Of course, it is not always possible to invest, or simply not everyone has the ability to work with wood. But don't be upset. After all, it is quite possible to carry out minor modifications to a part installed at the factory. And although this is not the option of installing a shelf yourself, however, such a modification will significantly improve the sound. And you just need to treat the seats with regular foam and put a layer on the entire lower part of the part. This will allow you to secure the soundbar tightly enough and almost completely avoid vibration. This is, so to speak, a budget option.
For hatchback and station wagon
There is no particular difference between them in the manufacturing process. You just need to remember that on a station wagon body, the shelf rises when the rear door is opened, and therefore a more careful adjustment is needed. Well, it is advisable to make it heavier, for a confident landing in place.
Useful video on the topic of the Priora acoustic shelf:
Owners of domestic cars are trying to improve existing models. The most common type of tuning is the installation of a modern speaker system. For these purposes, the rear acoustic shelf of the Priora Hatchback is installed. You can either purchase such a shelf at a car dealership or make it yourself.
Ways to refine the product
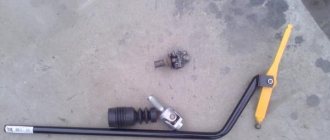
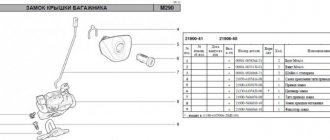
Removing the shelf from the trunk of a Lada Priora takes no more than a minute. In hatchback and station wagon you need to pull it up and then remove it. In a sedan body the removal process is more complicated:
- you need to disconnect the wire block from the additional brake light and from the speakers (if any);
- pull the locking strap up and remove the back of the rear sofa;
- lower the armrest down and unscrew the fastening screws of the luggage compartment hatch;
- press the 4 locking elements;
- lift the front part a little and pull it towards you, overcoming the force of the seals until the latter come out from under the rear window.
To put the shelf in place, repeat all steps in reverse order.
The process of finalizing the shelf in a sedan
The standard design is not of good quality and most often begins to rattle and creak. If it is not possible to make a shelf yourself, modify the factory one.
To work you will need:
- polyurethane foam;
- scotch;
- noise and vibration insulation material;
- glue, preferably epoxy;
- silicone sealant.
The upgrade looks like this:
- The standard shelf is removed from the car along with the speakers.
- All holes are sealed with tape - it is important to prevent polyurethane foam from getting into them.
- The bottom surface is moistened for better adhesion to the sealant.
- Polyurethane foam is applied to the lower part and after 40 minutes it is pressed down to increase rigidity. The sealant must be pierced in several places with a nail to expel excess air.
- You should wait until the foam has dried completely and treat all seams with silicone sealant.
- Noise-vibration insulation material is glued to the outside with epoxy glue.
- If desired, you can top the product with textiles.
This modification increases the rigidity of the structure, prevents squeaks, and improves sound quality.
To ensure that nothing interferes with the sound, no foreign objects are allowed on the acoustic shelf.
Improvement method without polyurethane foam
On Lada Priora hatchbacks and station wagons, using the method using polyurethane foam is undesirable. The thickness of the product is considerable, and for a large surface area this threatens sagging. For this reason, other materials are used for modification: modelin, anti-creak or vibroplast.
First you need to make the structure heavier. To do this, noise-vibration insulation material is glued to the bottom side. In this case, a construction hair dryer is used to heat the vibroplast and a tool for rolling out the insulation - any hard roller will do. Weighting will prevent rattling.
Then all surfaces that come into contact with each other are covered with modelin. This refers to the shelf holders on the sides and the contact points of the plastic linings with the luggage compartment pillars. Sealants for windows and doors, used in construction, may also be suitable for pasting. The purpose of this stage is to remove squeaks.
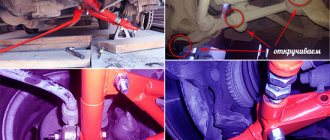
As additional measures, you can use components from foreign cars instead of standard rubber bumpers. They press the shelf more tightly to the trunk lid in the closed position and prevent it from moving and bouncing when driving on uneven roads.
Buy or make it yourself?
The installation of acoustics affects the entire interior of the car. Thus, it can be supplemented with decorative elements or changed completely. Installing speaker systems yourself allows you to:
- Take into account the dimensions of the trunk and column (the holes for the columns must correspond to their diameter).
- Select the speaker connection scheme and the ability to change playback modes.
- Select upholstery, decorative elements, color and texture (natural and artificial leather are ideal for upholstery).
- Possibility to save internal space (the size of the structure may be non-standard).
- Choose the main material, it is better if it is wood (chipboard, MDF, plywood).
Manufacturing process
You may be interested in: Michelin Latitude Sport tires: characteristics, description
Such car accessories should be made very carefully. Working out the smallest details. The Priora Hatchback acoustic shelf is made exclusively from a pre-made stencil. Creation sequence:
What happens in the end?
The rear shelf on the Priora, created with your own hands, will not be inferior in quality or appearance to standard models, which are sold in a wide range in any online store. In addition, creating a shelf for your own design from professionals or ordering it from an online store will cost you much more than you will assemble the option you like in your garage. The most important thing is that before starting work, be sure to read the photographs of the manufacture and installation of the shelf on the Priora.
Remaking a standard acoustic shelf
The Priora Hatchback acoustic shelf is perfect for modification, and it is several times cheaper than creating a new one. This will only require additional strengthening of the base of the standard spare part. To do this, you can use polyurethane foam in a can. Remodeling stages:
Also, a standard acoustic shelf can be decorated and supplemented with various decor, allowing for changing the upholstery or installing additional accessories.
Advantages and disadvantages of homemade products
A DIY shelf has a lot of positive aspects:
- precise adjustment to the dimensions of the luggage compartment;
- the ability to use any acoustics connection scheme;
- you can use any material for manufacturing and upholstery - in order to increase durability, it is better to choose natural wood treated with moisture-proof compounds;
- Compared to a standard acoustic shelf, a homemade one does not rattle or vibrate;
- you can create a product according to your own drawings and increase the amount of usable trunk space.
Among the disadvantages, they note only the need to spend free time, especially if you have to develop everything yourself. You also need to have skills in handling various power tools, for example, a jigsaw.
Result
As a result of independent production, you get exactly the same or a completely original rear acoustic shelf of the Priora Hatchback, not much different from the assortment in the store. In addition, making it yourself will, oddly enough, be faster and cheaper. You don’t have to wait for your order to be delivered, and the upholstery fabric can be selected at the right price and quality.
The main thing in this process is to study the specifics of the acoustic system, calculate the dimensions of the future shelf and then boldly take up the instrument.
It will be difficult for a non-professional to decide how to choose the size and material to obtain the most comfortable sound production. But if you want, it’s quite possible to find diagrams and instructions for any type of acoustics and car.
Selection of material for construction
It is recommended to choose natural wood for the manufacture of parts. The wood is pre-treated with special moisture-resistant compounds that improve the quality of the material.
LADA Priora sedan
And for finishing the base, materials are chosen based on the effective appearance of the product. For example, to achieve solidity, the structure is decorated with leather or its substitute (a cheaper option). Some people like suede, velvet, thick brocade. But, you should understand that fabric surfaces will collect a lot of dust. They are more difficult to clean and fade over time. While leather is quite easy to clean and lasts longer.
Speaker shelf