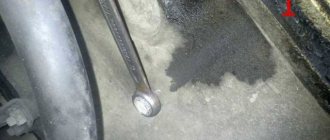
When the Hall sensor on a VAZ 2107 breaks down, this makes it impossible to continue driving. The Hall sensor belongs to the category of key parts of a contactless ignition system, and if this part begins to fail, the switch will stop sending impulses to produce a spark. To troubleshoot the problem, you need to understand in detail the purpose and operation of the device.
Why is a Hall sensor needed and how does it work?
The device of the contactless ignition system of the VAZ 2107 car has such an element called a Hall sensor. Its fundamental purpose is the ability to detect the angle of the crankshaft and camshaft of the power unit. The Hall sensor is not installed on injection models of sevens, it is installed only on carburetor ones.
According to the value of this device, voltage pulses are supplied to the spark plugs. The functioning of this element is based on increasing the voltage in the cross-section of a wire placed in a magnetic field. The element is connected by three terminals, two of which provide power supply (plus and minus), and the third contact is intended directly for supplying a signal. The device received this name due to a special effect that was identified by scientist Hall. In the distributor on the shaft there is a plate that is part of the control of the device controller.
When the motor operates, the metal in the slots alternately changes, and the magnet, which is located inside the controller, begins to be excited by oscillations of the magnetic field. In this case, the controller generates voltage pulses issued by the switch and supplied to the coil. The coil, in turn, raises the voltage to a high value and transports it one by one through armored wires to the spark plugs. Knowing the operating features, you need to deal with the malfunctions, but before that it is important to note that the Hall sensor on the VAZ 2107 is located in the distributor under the cover. To replace it, you will need to disassemble the distributor.
Basic sensor malfunctions
Any part on a car sooner or later begins to malfunction, and the Hall sensor is no exception, even though it has the simplest design. Its breakdown is detected by detecting the following defects:
- Inability to start the engine.
- Unstable and unstable operation of the motor.
- The occurrence of jerks.
- The engine begins to stall.
- The appearance of the detonation effect.
If the above symptoms appear, then there is no need to rush to change the Hall sensor, since similar phenomena can also occur due to other breakdowns of the ignition and fuel supply system. To verify that the device is faulty, you will need to perform a suitability test.
Check Features
The BSZ contactless ignition on the VAZ 2107 has a Hall sensor, the serviceability of which determines the normal operation of the internal combustion engine. If you suspect that it is faulty, then you need to check the Hall sensor. To do this, there are different ways on the basis of which one can draw a conclusion about the suitability of the element.
The following two methods are used to check an element:
- The simplest test method is to install a known-good element. If the signs of malfunctions immediately disappear, it means that the breakdown was detected correctly and successfully repaired. The disadvantage of this method is that you must first purchase a working element.
- Use a multimeter to check the voltage at the sensor output. The device switches on the voltage measurement mode, after which the value at the device output is measured. The value should be between 0.4 and 11 Volts, and if this is not the case, the element should be replaced.
- Simulation of device operation. The test diagram is as follows - the element terminal should be removed from the connector, and then turn on the ignition. Now we begin to simulate the operation of the Hall sensor, for which contacts 3 and 6 of the switch output are connected. If sparking occurs, the element must be replaced.
It is also important to check the serviceability of the terminal block to which the Hall element is connected. A multimeter set to voltage measurement mode is also used for this. One probe of the device needs to be thrown to ground, and the second one needs to check the readings on the red and green wires. The value of the readings should be equal to the voltage value on the battery.
If test manipulations show that the sensor needs to be replaced, then this action should be taken. Instructions on how to change the device on a VAZ 2107 are described below.
Replacing the Hall sensor on the seven
The device in question is small in size and is an integral part of the distributor. The process of replacing this part is not the most pleasant, since this will require removing the distributor or ignition distributor. Before you start work, you will need to purchase a new part (it is inexpensive, about 200 rubles), and also prepare the following tools:
- Wrench set to "13".
- Screwdriver with pliers.
- Hammer.
Replacing the Hall sensor on a VAZ 2107 begins with dismantling the distributor. Before this, you first need to use a marker to make marks on the distributor body and cylinder block, which will allow you to install the device in its place. This will eliminate the need to set the ignition after installing the distributor in place. To change the device, you will need to do the following:
- First you need to turn off the power to the car. To do this, remove the negative terminal from the battery.
- Remove the cover from the ignition distributor, as well as the vacuum hose.
- The device terminal is tilted away from the connector.
- Next, to dismantle the distributor, you will need to unscrew the bolt to “13”, and then remove the washer and remove the distributor.
- When disassembling the distributor, you will need to remove (knock out) the pin that holds the shaft with the oil slinger. To implement this action, you will need a suitable attachment, having first clamped the distributor in a vice.
- The plastic stopper with the washer is removed and the shaft is removed.
- To remove the sensor, you need to unscrew the two brass screws that secure the element, as well as the threaded steel connectors of the sensor.
- The vacuum corrector mount should be unscrewed, and then the device should be removed through the corresponding hole.
- The new element is installed in the reverse order of removal.
The replacement principle is not difficult, but the need to dismantle the distributor leads to the fact that it takes a lot of time. If the distributor is disassembled, it is recommended to immediately clean the shaft from carbon deposits by washing it in a solvent. After replacing the device, you can check the proper operation of the motor. Typically, the service life of the devices is quite long, and they rarely fail, but if this happens, you can replace it yourself without contacting a car service.
Since 1994, Tolyatti classics began to be equipped with contactless ignition (BSI). This is a system in which conventional cam contacts have been replaced by a pulse sensor. Among motorists, it is usually called a Hall sensor, which was also installed on the VAZ 2107. Some owners of “fives”, “sixes” and “sevens” older than 1994 independently switch their cars to contactless ignition in order to eliminate constant problems with contacts. Next, we will tell you how the pulse controller works, what signs indicate its problems, and what method to replace it with.
Checking the sensor
There are so many ways to check these devices that every motorist on this list will certainly be able to choose the one that suits him. Most often, car owners use the following methods:
Checking with a voltmeter
Checking the Hall sensor using a voltmeter is as follows: connect the device to the device itself and look at its indicators.
We already know what voltage is optimal for the device (0.4–3 volts). If the readings are lower, it means the device is faulty and will have to be replaced.
Checking with another sensor
A check performed using another device may be quite effective. Only you must be 100% sure of the serviceability of this analogue.
We remove the old device and install a new one in its place. And see if the problems disappear when you change the device.
We will talk later about how to replace the Hall sensor.
Verification using simulation
To do this, you should assemble a device that can simulate the operation of the device. If you decide to use this method, take the three-pin block available from the ignition distributor and a piece of wire.
We turn on the ignition, and bring the end of the wire to the switch outputs located at numbers 3 and 6.
If it does not spark, then the device is in order. But if at least one spark appears, then the device will have to be replaced.
Checking with LED
This method was invented by folk craftsmen. Anyone who knows how a soldering iron works can make a testing device. What you will need:
We solder the resistance to the light bulb. We attach two wires to it. The ends of the wires should be slightly exposed.
Let's start checking. We remove the distributor cover, the plug box must be disconnected. We connect a diode to terminals numbered 1 and 3. If the light comes on, it means the wiring is installed correctly. If not, swap them.
Then we leave the wiring on terminal 1 in place, and transfer the other one to the second terminal. Using the starter, slowly turn the camshaft. If the light does not go out completely and does not light continuously, but blinks, then the device is in order. Otherwise, it should be professionally inspected.
Audi 100 1993, 133 l. With. — electronics
In addition to the main function, the DC performs a number of other options - it increases the performance of the motor and the speed of operation of the units.
Expert opinion
Viktor Pavlovich Strebizh, lighting and electrical expert
Any questions ask me, I will help!
The current value should vary from 3 to 30 V, and the serviceability of the element is checked with a magnet; when exposed to it, the LED is activated. If there is something you don’t understand, write to me!
Principle of operation
The sequence of action of the Hall sensors on the VAZ 2107–21099 is formed according to the Hall effect. In the resulting magnetic field, the sensor reads pulses from a full revolution of the distributor shaft. Signals are generated thanks to slots, of which there are exactly the same number as cylinders. The sensor itself is placed on the distributor support panel along with a magnet.
Energy comes to the sensor from the switch. There are also wires on the DC - mass and output pulses. The reverse voltage changes taking into account changes in the magnetic field. When receiving impulses, the commutator will supply electric current to the coil, which increases it and sends it directly to the spark plugs.
For reference. The transition of automakers and classic owners to electronic ignition systems has contributed to the emergence of 2 main advantages. Firstly, the lack of a contact group, which burned out from time to time. There is no such problem with hall sensors. Secondly, a higher spark plug voltage (30 kV versus 15 kV). All this improves engine performance.
Device
When switching to a non-contact ignition system (BSI), the distributor was improved. The design of the ignition distributor itself was changed, and a switching device was added - an electronic ignition control unit. The cover and slider remained the same, but the place of the breaker was taken by a Hall sensor and a synchronization cup (screen with slots) was installed coaxial with the shaft.
The DH is attached with two screws to the bearing holder under the distributor cover. Three wires stretch from it through the connector to the switch: two of them supply power (+ and 0), and the third transmits a control signal to the switch. The sensor consists of two parts: a meter and a magnet. Between them there is a side of a rotating cup with 4 cutouts (according to the number of engine cylinders).
Household location:
Where is the Hall sensor installed?
The reading controller is located in the distributor housing. The ignition distributor itself is located vertically, on the left side of the cylinder block. To directly detect the DC, you need to unclip the steel fasteners of the distributor cover and remove it, and then look under the slider.
It is difficult, but it is possible to see the touch device. It is given out by thin wires (red, black and green) stretched in the distributor body. There is no point in repairing the Hall sensor on a VAZ 2107 or other classic (unless, of course, one of the 3 wires is unsoldered), since the cost of a new device is affordable for every motorist.
| Manufacturer | Number | Amount, rub. |
| FENOX | SID37001O7 | 250 |
| AVTOVAZ | 21070370680082 | 225 |
| STARTVOLT | VSHS0101 | 215 |
| GALLANT | GLSS134 | 185 |
| REMCOM | RK02007 | 150 |
It is recommended to take the original. In retail sales it can be found under the code A473.407529.001 (Autoelectronics).
Symptoms of a problem
Even a high-quality Hall sensor on a VAZ 2101–2107 (carburetor or injector) can sooner or later fail. The malfunction can be determined by the non-standard behavior of the engine. Here are the 6 main symptoms of DH disorder:
- The engine stalls.
- Power is lost.
- Jerks (dips) are felt in movement.
- Idle speed floats or disappears.
- The engine starts with difficulty or does not start at all.
- 3 spark plugs are working and popping noises are heard in the exhaust system.
The listed signs most often indicate a defect in the Hall sensor, but sometimes other factors can cause unstable operation.
How to check
If your car has an electronic control unit (ECU), then you can do diagnostics through an application on a smartphone (for example, ELM327 VAZ for Android). The program will show whether there is a misfire or not. In other cases, it is recommended to go to a car repair shop, where the system will be checked with a multimeter (tester). Sometimes you just need to move the connector and the problem goes away.
Checking the Hall sensor on a VAZ 2107 in three popular ways:
- Take a working DH from a friend’s similar car.
- Measure the output voltage with a tester; it should be 0.4–11 volts.
- Simulate the operation of a working Hall sensor.
The last method looks like this in more detail. Remove the three-pin block from the DH. We remove the central wire from the distributor cover and place it a few millimeters from the ground. Turn on the ignition.
Using a piece of wire exposed on both sides, we close the terminals of the green (signal) and black (negative) wires. At the moment of bridging, a spark may jump between the central wire removed from the distributor and ground. If it appears, then the DC is faulty (if not, then the cause of the breakdown is in the switch or coil).
Diagnostics using lambda probe
After all, it can tell us a lot about the processes in the engine control system.
Example No. 1.
As I wrote above, the lambda probe is not taken into account in many engine operating modes. This also applies to acceleration, since at this moment it is not the stoichiometry that is important, but the traction characteristics of the engine, so the environment is thrown into the background and the ECU pours as much fuel as is necessary for successful acceleration.
But if you think logically, then although the lambda probe is not taken into account, it produces a signal and we can see it.
Since the ECU pours fuel from the heart, the lambda probe should show this by rising as high as possible and remaining there while acceleration is underway. Like in this graph
If in your case the lambda probe does not hang at the top during intense acceleration, as in the graph above, but, on the contrary, falls down, then the engine does not have enough fuel
In this case, we pay attention to the fuel pump, filter, injectors, etc. It's better to immediately measure the fuel pressure
Example No. 2
This is a similar example, only in reverse. This example also destroys some stereotypes that people have formed after an incorrect theoretical explanation of how a lambda probe works.
As they explain the operation of the lambda probe - “a working sensor should produce a signal from 100 mV to 900 mV.” That’s it! And what you need is something like this - “a working sensor should produce a signal from 100 mV to 900 mV on a warm engine in idle mode or in partial load mode at steady engine speed.” Can you feel the difference?
Therefore, many times I had to answer the same questions - “My lambda probe goes beyond the limits and drops to zero. The new sensor behaves the same. What should I do?”, “My lambda probe periodically drops to zero. Replacement?”, “The lambda probe drops to 0. Isn’t this normal?”
Moreover, some, even after answering that this is normal, still don’t believe it and change the sensors. After all, the belief that the sensor signal can only be 0.1V-0.9V does not allow us to accept reality.
Here is an example of a graph where the lambda probe shows 0
I specifically set the engine operating mode. In cut-off mode (forced idling, engine braking), the ECU quite seriously covers the injectors (up to complete closure) and, naturally, the oxygen in the combustion chamber does not burn. Therefore, the lambda probe drops to zero. He sees virtually no difference between the amount of oxygen in the exhaust gases and in the environment.
Therefore, if in cut-off mode the lambda probe signal dangles somewhere at the top, then you need to pay attention to this and figure it out. Perhaps some injectors are not sealed and the huge vacuum (look at the DBP readings) in the cut-off mode literally sucks the fuel out of them
Or maybe the previous owner of the car just uploaded super-duper firmware from another “genius of calibrations”.
Example No. 3
Using the second lambda probe, you can evaluate the performance of the catalyst. And also find out if it is installed at all.
If the signal from the second lambda probe has an almost flat line, this means that the catalyst is working
And if the signal from the second lambda probe has the same form as the signal from the first lambda probe, this means that the catalyst is not working or is missing
These are the main conclusions that can be drawn by looking at the graphs of the lambda probe signal.
At the end, I will note one more important point. If you suspect a malfunction of the lambda probe, then it is better to look at its signal in the “Oxygen sensor test” mode. This mode allows you to receive only the lambda probe signal from the engine control unit. What's the point?
The point is that the exchange between the ECU and the diagnostic program occurs at a fairly low speed. And when there are a lot of parameters, then, naturally, this affects the exchange speed even more.
Therefore, this mode allows you to display only information related to the lambda probe.
It is also advisable to raise the engine speed to 2000-3000 rpm and analyze the lambda probe graph similarly to the examples given above.
Peace and smooth roads to everyone!
On this topic:
Replacing the Hall sensor on a VAZ 2107
If after diagnostics it turns out that the DC is out of order, then it should be replaced immediately. How to replace a Hall sensor? You can perform the operation yourself, saving money on visiting a car service. To work you will need a simple set of tools:
- hammer;
- flat screwdriver;
- open-end wrench 13 mm;
- pliers or small pliers.
It is advisable to carry out the operation in a garage, with a well-lit workbench, behind which you can sit comfortably and lay out the removed parts of the ignition distributor. The process looks like this:
- Disconnect the negative terminal from the battery.
- We set the top dead center on the 1st cylinder or mark with a marker the location of the distributor on the body (so as not to adjust the ignition later).
- We remove the high-voltage wires from the ignition distributor cover.
- Disconnect the rubber hose from the vacuum regulator.
- Disconnect the 3-pin connector from below.
- Using a 13 mm wrench, unscrew the bolt securing the distributor to the engine (under the nut there is a washer and a plate, do not lose them).
- We remove the distributor from its seat and transfer it to the workbench.
- We unclip the fasteners on the distributor cover and remove it (it is recommended to inspect the ember, side electrodes and the housing for the presence/absence of defects).
- We dismantle the slider by first unscrewing 2 bolts with a flat screwdriver and then pulling it towards ourselves (it is recommended to disassemble the unit for inspection).
- Using pliers, remove the lower spring pin from the shaft or help it pop out with a hammer.
- We take out the lower oil deflector and washer (wipe them with a rag).
- We pull the centrifugal machine and pull the shaft out of the distributor housing. (It must be wiped with gasoline, diesel fuel or solvent, after which it is recommended to sand it with fine-grained sandpaper).
- Unscrew the screws of the vacuum corrector and remove it.
- Unscrew the 2 screws securing the three-pin block.
- Using a flat-head screwdriver, unscrew the 2 bolts of the Hall sensor on the support plate.
- We remove the wires from the seat and completely remove the DH.
- We are installing a new DH.
We assemble the distributor and the entire assembly in the reverse order. It is recommended to first wash all parts with a special composition, for example, carburetor cleaner or similar acetone-based products.
How to replace the sensor yourself?
- The terminal clamps are disconnected from the car battery.
- The distribution mechanism is being dismantled. The block with conductors is disconnected from the device, the bolts securing the unit are unscrewed.
- The distributor cap is being removed. Depending on the distributor model, it can be fixed with bolts or special clamps. The fastening elements are unscrewed and dismantled.
- After removal, it is important to align the mark of the gas distribution device with the mark on the crankshaft of the power unit. It is also necessary to remember the position of the distribution unit. It is recommended to make a corresponding mark before removal.
- The housing fastening elements are unscrewed using a wrench. The clamps are dismantled if they are installed on the mechanism.
- The shaft is removed from the distribution unit.
- The clamps with terminals are disconnected from the Hall controller.
- The sensor is removed from the mounting location. To carry out the task, the device must be pulled towards you and carefully removed. The sensor is dismantled through the hole that appears.
- A new controller is taken and installed in place of the old one. The installation procedure is performed in reverse order.
User Uncle Sasha explained what could result from incorrect installation of the device and gave recommendations on how to fix this problem.
Expert opinion
Viktor Pavlovich Strebizh, lighting and electrical expert
Any questions ask me, I will help!
Using a drill and a metal drill, make a hole in the center of the Hall sensor, cut the wires flush with a knife, and use a file to lay grooves from the hole made to the outputs of the remote wires. If there is something you don’t understand, write to me!
Summary
The Hall sensor reads the pulses and sends a signal to the switch. Contactless ignition is much more efficient than cam ignition. Engine performance has noticeably improved, and there is no carbon deposits on the contact group. If the hall sensor on your VAZ 2107 (carburetor or injector) is malfunctioning, then the malfunction can be determined by the symptoms of defective engine operation or through simple diagnostics. Replacing the DH is easy to do yourself. To do this, it is recommended to prepare a well-lit garage with a workbench and a simple set of tools.
Many owners of a VAZ 2107 with a contactless ignition system are interested in the question of how to check the Hall sensor. The question is, in fact, quite relevant, since if the device fails, starting the engine becomes problematic or completely impossible. Therefore, it is important to know what actions to take to fix the problem and how to replace the sensor.
Hall sensor for VAZ 2107
The Hall sensor is one of the main devices in the contactless ignition system of gasoline engines. If a problem occurs with this part, the operation of the engine is disrupted. In order to be able to diagnose the problem in a timely manner, it is important to know and understand how the Hall sensor (HL) works and, in particular, on the VAZ 2107, how to determine the malfunction and replace the device. All these points are worth dwelling on in more detail.
Purpose of the sensor
A number of electronic car systems are equipped with sensors that send a signal to the corresponding unit responsible for the operation of the power unit to change certain parameters. The contactless ignition system of the VAZ 2107 also has a device called a Hall sensor (HL). Its purpose is to determine the position angle of the crankshaft and camshaft of the power unit. The sensor is installed not only on modern, but also on old cars, for example, VAZ 2108/09. According to the readings of the element, current is supplied to the spark plugs.
Operating principle of the device
The operation of a DC is based on the effect of increasing voltage in the cross section of a conductor placed in a magnetic field. At the moment when a spark should appear, a change in the electromotive force occurs; a signal from the distributor is sent to the switch and spark plugs. If we consider the Hall sensor, which is used today in contactless ignition systems, it is a device for detecting changes in the magnetic field during camshaft operation. To trigger the element, a certain value of magnetic induction is required.
The sensor works as follows: there is a special crown-type plate on the distributor axis. Its special feature is the slots, the number of which corresponds to the number of engine cylinders. The sensor design also includes a permanent magnet. As soon as the ignition distributor shaft begins to rotate, the driven plate intersects with the sensor space, which leads to the generation of a pulse that is transmitted to the ignition coil. This impulse is converted and causes a spark to form on the spark plugs, as a result of which the air-fuel mixture is ignited.
As the engine speed increases, the frequency of pulses coming from the DC increases, which determines the normal operation of the power unit. Despite the fact that the phenomenon considered was discovered long before production cars appeared, it is nevertheless used in automotive production today. The sensor is a fairly reliable device, the breakdown of which does not occur very often.
Video: Hall sensor operation
The Hall sensor has three contacts:
- weight;
- plus power (about 6 V);
- communication with the ignition system switch.
Where is the DH on the VAZ 2107
If you are the owner of a VAZ “Seven” with contactless ignition, then it will not be superfluous to know where the Hall sensor is located. Finding the ignition distributor is not difficult, but the sensor itself is located under its cover. To access the DC, you need to remove two latches and remove the distributor cover, after which you can see the sensor itself.
Connection diagram
The Hall sensor has a direct connection with the switch and is connected according to the diagram shown in the figure.
The switch itself performs the following functions:
- amplifies the pulses to 12 V and transmits them to the ignition coil;
- receives a signal from the DC in the form of an impulse.
In simple words, the switch is a regular amplifier, which is designed in a similar way to an assembly based on field-effect transistors. Despite the simplicity of the circuit, the device is easier to purchase than to make yourself. The main thing is that the Hall sensor and the switch on the VAZ 2107 are correctly installed and connected. Otherwise, the sensor will not work properly.
Application area
The widespread use of Hall devices began with the mass production of semiconductor films. With the development of microelectronics, devices have become miniature in size; their housings contain a magnet, a sensitive element and a microcircuit. They are used in mechanical engineering, aviation, and in servomotor designs.
In a car, the device is used to monitor the position of various components and mechanisms, including the camshaft and crankshaft. It works as a contactor and circuit breaker. The permanently mounted transducer is influenced by a magnet located and rotating in the distributor.
Under the influence of a magnetic field, the device generates a pulse that causes an ignition spark. In the photo you can see how it is located in the distributor.
Placing the device in the distributor.
Signs of a malfunction of the Hall sensor on a VAZ 2107
The Hall sensor, like any other element of the car, can fail over time. However, even experienced drivers cannot always determine that the problem that has arisen is related to the device in question, since the malfunction can manifest itself in different ways. For diagnostics, quite often you have to check for possible signs of sensor failure before you can find out that this particular sensor is the “culprit”.
At the same time, there are basic symptoms by which one can determine that not everything is in order with the DH on the VAZ 2107. Let's look at them:
- the engine does not start or starting is difficult;
- there are interruptions or jerks in the operation of the power unit at idle speed;
- the engine stalls while the vehicle is moving;
- twitching is observed when driving at high speeds.
If one of the listed symptoms appears, it is recommended to check the Hall sensor and, if necessary, replace it. Owners of cars with a contactless ignition system would do well to carry a working element with them as a spare part.
DH malfunctions or why the sensor dies
So, why does the DH fail? One of the common reasons for failure is ridiculously banal. This happens due to dust and dirt accumulating on the part.
As for the camshaft sensor contacts, there are 3 of them. One of the wires must be connected to the negative (ground), the other to the positive (terminal + battery), and the third directly to the switch.
DH, if it is faulty, lets you know about it instantly. First of all, the motor itself signals sensor malfunctions. It starts up much longer than usual, the number of revolutions changes sharply, the internal combustion engine operates jerkily even in idling mode (idling shaft rotation).
By the way, the engine can also stall spontaneously at the most inopportune moment.
However, it is also wrong to immediately cast doubt on the DH by starting to replace it. We'll have to check everything completely. There are many proven methods for this.
One of the most common symptoms of a diesel engine malfunction is the disappearance of the spark on all spark plugs. In such cases, even the most inexperienced service worker points to the DH. And this is 99 percent justified.
However, there is a more specific method of verification, based on the use of a simulator. This is a device that copies the operation of the sensor. In other words, the same piece of wire with a block for the wires and an end for the spark plug entry.
A few more checking options:
- take a working DH and install it (the engine works better - that means the problem was in the sensor);
- The DC is removed from the distributor, a multimeter is connected to it (the measurement range must be within limits equal to the battery value).
There are many ways to check the DH without removing it.
An interesting version of the DH check is offered by domestic drivers. Although, this can only be done on VAZ models.
- One of the SZ is removed and placed on the motor.
- The ignition is turned on, the current to the bobbin (coil) is checked.
- The main armored wire of the distributor is disconnected and connected to the main brake cylinder of the GTZ (it is located between the brake pipes).
The following is done:
- the central contact of the distributor is connected to the negative terminal of the battery with a piece of wire;
- the wire from the distributor is connected to the GTZ.
If a spark jumps, it means that the DH is dying or has already completely failed.
DX is one of the cheapest components of the SZ of a modern car. It costs around 4-5 dollars. For this reason, it makes sense to buy a new sensor and always carry it with you, just in case. If an old DH dies on the road, replacing it with a new one will not cause any difficulties, everything is at hand.
The check, as described above, can be carried out in different ways. Let's say you're driving, and the engine starts behaving strangely on the road. The speed does not pick up, the car moves jerkily, etc. What do we do?
Everything is simple, if you have a second, working sensor:
- the main armored wire is removed;
- a working candle is threaded into it;
- the wire is placed in such a place that a spark is visible;
- the block with wires is removed from the distributor;
- a new DH is inserted into the block;
- the ignition is turned on;
- A sharp knife is taken, the blade is inserted into the slot of the DH and drawn across the contact.
If the spark strikes normally, does not disappear, and does not appear jerkily, like the engine itself, then there are no other problems in the ignition system. All that remains is to remove the distributor and replace the dead old DH.
Replacing the DH yourself is not a very complicated operation if you understand the nuances. You must understand that the algorithm for performing actions may differ, because distributors are different.
For example, if a sensor on a V8 car has died, on all similar models the replacement is carried out as follows:
- the terminal from the battery is removed;
- the armored wires are thrown off the distributor cover;
- the hose going to the VK (vacuum regulator) is removed;
- the distributor is removed from the cotter pins (it is held in place by nuts on the cotter pins);
- the timing indicator is set relative to the position of the crankshaft;
- the distributor is disassembled, the shaft is removed;
- The DH itself is dismantled.
When carrying out all the activities described above, you must always remember the main rule of an auto electrician - troubleshooting is carried out along the chain from the battery to the ignition unit
It is important to clearly understand the sequence of your actions and their consequences. An experienced motorist always takes a multimeter with him on the road.
This device can easily check the switch fuses, the hall sensor itself, connections, connectors and much more.
- Absolutely legal (Article 12.2);
- Hides from photo and video recording;
- Suitable for all cars;
- Works through the cigarette lighter connector;
- Does not cause interference to radios and cell phones.
How to check the sensor
To find out the condition of the sensor, you need to check the element. There are several ways to do this. Let's look at them:
- The simplest option is to install a known-good device, which you can borrow, for example, from a friend in the garage. If the problem disappears during the check and the engine starts working without interruptions, you will have to go to the store to purchase a new sensor.
Video: checking the sensor with a multimeter
Checking the Hall sensor on a VAZ 2107 can be done without the device. In this case, the sequence of actions will be as follows:
- We unscrew the spark plug on one of the cylinders or use a spare one and connect it to the high-voltage wire from the ignition coil.
- We connect the spark plug thread to the body mass.
- We remove the sensor, connect the connector from the switch and turn on the ignition.
- We hold it with a metal object, for example, a screwdriver, near the sensor. If a spark appears on the spark plug, then the device being tested is operational.
Installation of contactless ignition for VAZ 2107, 2106
To install the BSZ with your own hands, you will need the following tools:
- Screwdrivers (flat and Phillips);
- Open-end wrenches 8, 10, 13 mm;
- Pliers (pliers);
- Candle key;
- Drill or screwdriver with a drill diameter of 3-3.5 mm. You will have to drill two holes in the body to secure the switch.
- A special wrench for rotating the crankshaft of an internal combustion engine or a regular open-end wrench of 30 mm.
The procedure for installing contactless electronic ignition on a VAZ 2106-2107.
- Drill and attach the commutator next to the coil. But, do not place it under tanks with liquid.
- Remove the cover of the new distributor and put on the gasket.
- Install into the seat for the distributor so that the moving contact is opposite the drawn mark on the valve cover. Do not immediately tighten the nut all the way.
- Install the new coil where the old one was. The wires from the ignition switch relay, tachometer, and switch must be connected to the reel terminals. The wire from the electronic unit number 1 is connected to the coil terminal marked “K”, the wire from the 4th contact is connected to the coil terminal marked “B”.
- Check the gaps of the spark plugs (should be 0.8-0.9 mm) and screw them in place.
- Snap the distributor cover and connect the high-voltage wires (the central one from the coil and 4 wires to the spark plugs). We connect the wires to the spark plugs strictly in accordance with the designations.
- Connect the vacuum hose.
After installation in the correct sequence, we start the engine and begin setting up the ignition. If after installing a new electronic contactless ignition the engine does not start, you should check the correct connection of the coil wires and the high-voltage wires to the spark plugs. If the wires are normal, then the marks are not aligned.
Replacing the Hall sensor on a VAZ 2107
The process of replacing the DC is not the most pleasant, since you will have to not only remove, but also completely disassemble the ignition distributor. First you need to purchase the sensor itself and prepare the following tools:
- wrench 13 (open-end or socket);
- screwdriver;
- pliers;
- hammer.
Before you start disassembling the distributor, you need to pay attention to how it is located. It is best to make marks on its body and cylinder block. If adjusting the ignition is not a difficult task for you, then the distributor can be removed without any marks. The procedure for removing and replacing the sensor on the “seven” is carried out in the following sequence:
- We remove the negative terminal from the battery, the cover from the ignition distributor, the vacuum hose and disconnect the connector that goes to the sensor.
After dismantling and disassembling the distributor, it is recommended to clean the shaft from carbon deposits, for example, by washing it in diesel fuel. As for repairing the sensor, this element is considered non-repairable and if it fails, only replacement is necessary. In addition, its cost is not so high, within 200 rubles.
Video: how to replace the Hall sensor on VAZ family cars
If malfunctions occur in the vehicle's ignition system associated with the Hall sensor, it is not necessary to contact a service center to eliminate them. You can diagnose a malfunction on your own, even in the absence of special devices. The main thing is to familiarize yourself with simple and understandable recommendations and strictly follow them.
Electrical equipment VAZ 2107
One of the key elements of the contactless ignition system is the Hall sensor of the VAZ 2107. If this element breaks down, operation of the car is practically impossible, since the switch will not produce impulses for sparking. Let's figure out how this sensor works, how its malfunctions manifest themselves, and how you can replace the Hall sensor with your own hands.
Examination
The easiest way to test a switch is to try replacing it with a known good one. But this can only be done if a working switch is at hand. It is not advisable to buy a new unit just to test the operation of the old one. There is a cheaper and not particularly complicated way. To test the switch, you only need a standard set of keys and a test lamp. This is enough to verify the presence or absence of pulses supplied to the ignition coil. Before checking the switch, make sure that “plus” is supplied to it and the ignition coil. Also check the connection contacts of the Hall sensor and the functionality of the sensor itself. Checking the VAZ 2107 ignition switch is performed as follows:
- turn off the ignition;
- unscrew the nut on the ignition coil and disconnect the brown wire marked “K” (the wire goes to connector “1” on the switch);
- connect a test lamp to the gap between the wire terminal and the coil terminal;
- turn on the ignition;
- turn the key and start the starter.
A flashing light indicates a working switch. If the lamp does not light, the switch needs to be replaced.
Replacing a VAZ 2107 switch
To replace the switch, you must complete the following steps:
- turn off the ignition;
- disconnect the wire block from the switch connector;
- unscrew the fastening nuts;
- remove the old switch and put a new one in its place;
- tighten the fastening nuts;
- connect the wire block to the connector.
At this point, the replacement of the VAZ 2107 switch is completed and you can check the operation of the ignition by trying to start the engine.
Repair of distributor for VAZ 2101-VAZ 2107
Welcome! The distributor is an integral part of the car, even if you remove the cover from it, the car simply won’t start, so this unit is definitely needed on carburetor cars, although in injection systems it has already been abandoned and a crankshaft position sensor is used instead, if it fails which, the car will also not start.
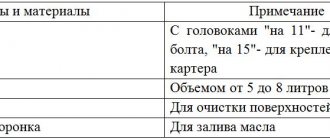
Note! To repair this unit, take: A set of wrenches, as well as two types of screwdrivers, a set of flat feeler gauges, buy a set of flat feeler gauges at a car store, or specifically buy feeler gauges for 0.35, 0.40, 0.45, you will need them, another hammer and one mandrel for pressing out and Buy one for pressing distributor bearings, and take tweezers (if you have them) too!
Working principle of the Hall sensor
The device is installed on cars with a contactless ignition circuit and serves to monitor the camshaft position. It has three terminals: power, ground and output. This element works thanks to the Hall effect, which is how it got its name.
The voltage at the sensor output changes depending on changes in the magnetic field. A plate with slots installed on the shaft of the VAZ 2107 distributor enters the space of the sensor controller. As the motor rotates, the slots are constantly replaced by solid metal and a magnet installed in the controller responds to changes in the magnetic field by generating voltage pulses. When pulses arrive, the switch supplies voltage to the coil, which increases the voltage and supplies it to the spark plugs.
Signs of a malfunction of the Hall sensor VAZ 2107
If the VAZ 2107 Hall sensor (carburetor or injector) begins to fail, this manifests itself in the following:
- The engine will not start;
- the engine runs unsteadily;
- jerking is felt when moving;
- the engine suddenly stalls.
The problem is that similar manifestations also occur when other elements of the fuel supply and ignition system are in good condition. Therefore, before changing the sensor, you need to make sure that it is the problem.
Where is the Hall sensor located in the VAZ 2107 (injector and carburetor)
The sensor is fixed under the distributor cover. To access it, you need to unclip two latches and remove the cover.
How to check the sensor
The device can be checked in three ways:
- replace the sensor with a known good one (the method is good if such a part is already available);
- check whether the voltage at the sensor output corresponds to the nominal value of 0.4-11 volts (a tester is required for this);
- simulate the operation of the sensor by connecting pins 3 and 6 of the plug going to the sensor with the ignition on (if a spark occurs, the sensor needs to be replaced).
What is needed for replacement
To change the Hall sensor, you will need:
- flat screwdriver;
- pliers with extended jaws;
- new Hall sensor.
Verification methods
Where is the oil pressure sensor on Kamaz?
You can use several diagnostic methods for the sensor located on the distributor.
Depending on the available means and capabilities, the motorist can check the current condition of the Hall controller with his own hands, evaluate its performance and make the appropriate decision on replacement.
As soon as you notice one or more of the symptoms presented, you should get checked. You can do it in several ways. I propose to consider them separately.
Wedge with wedge
The simplest and most effective method that does not require you to equip yourself with a tester or multimeter. But you will need a known-good similar Hall sensor.
The essence of diagnosis is outrageously simple. You remove the old controller and install a new one in its place. If after the manipulation the symptoms go away and engine operation returns to normal, then simply leave the new part in place. If you borrowed a DH from a friend or neighbor in the garage, remove the device, say thank you, and go to the auto parts store.
Voltmeter and multimeter
Using a voltmeter or a classic tester, you can easily check the condition of the device.
I think every motorist can use the tester. The task is to measure the voltage at the sensor output.
If the DC is in good condition, the tester will produce values in the range of 0.4-11 V.
A universal multimeter is used in exactly the same way. You just need to select the voltmeter mode on it.
Sensor simulation
Quite an interesting and effective method. But here you will have to do a little work with your own hands.
The principle of imitation is as follows. First, remove the block from the DH, which has 3 plugs. Next, start the ignition on the car, then connect outputs 3 and 6 to each other.
If a spark appears during such manipulation, then most likely the DC has failed.
Without testers
When testers are not available, testing can be done using a slightly different method.
Here you need to carry out step-by-step manipulations:
- the spark plug is connected to the wire terminal from the coil;
- the threaded part of the spark plug is connected to the ground;
- the carriage with the sensor is dismantled;
- connector is connected;
- the ignition is turned on;
- a metal object is held near the sensor;
- When a spark appears on the spark plug, the DH is operational.
Just be extremely careful when doing such manipulations with your own hands.
Homemade tester
You can assemble an analogue of the tester from practically available materials.
The testing device consists of a regular LED, a 1 ohm resistance and two pieces of flexible wiring that need to be soldered to the leg.
Wires are connected to terminals 1 and 3 of the DC plug box. If the polarity is correctly selected, the LED should light up. If not, try swapping. Now you need to do the following:
- the first wire on the first terminal remains in place;
- the wire from the third terminal is connected to the second terminal;
- the camshaft turns (using a starter or manually);
- The behavior of the diode is monitored.
If the diode starts blinking, then everything is fine with the ignition sensor, and there is no need to change it.
There are really quite a lot of verification methods. Choose according to your taste.
Have you ever had to check a Hall sensor? What diagnostic methods did you use and what was the result?
Subscribe, leave comments, ask questions and don’t forget to tell your friends about us!
Replacing the Hall sensor on a VAZ 2107
Once you have confirmed that this particular part is faulty, you need to replace it. It is better to carry out the work by first removing the distributor from the car. To replace the Hall sensor of a VAZ 2107, you must perform the following steps:
- unclip the distributor cover fastenings;
- remove the cover;
- remove the rotor (“runner”), pulling it towards you with a little force;
- remove the black plastic cover;
- Using a flat screwdriver, unscrew the bolts holding the plug and wire block;
- unscrew a pair of bolts holding the sensor support plate;
- unscrew the two bolts holding the distributor vacuum corrector;
- Use pliers with long jaws to remove the retaining ring from the hole;
- remove the vacuum corrector tag located on the pin of the support plate;
- dismantle the corrector;
- Use a screwdriver to remove the electrical wiring from the clamp on the distributor;
- pull the support plate up along the distributor axis and remove it;
- Unscrew a pair of bolts securing the Hall sensor using a flat screwdriver;
- remove the Hall sensor.
To install the Hall sensor, you need to do the above steps in reverse order.
It should be noted that the VAZ 2107 camshaft controller has only 3 terminals. One is connected to the minus, and the other supplies a voltage of six volts, the 3rd one transmits the impulse directly to the switch.
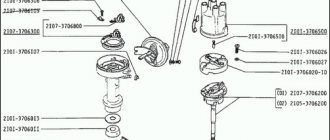
How to change a faulty element
Hall sensor disassembled
This operation is quite simple; a minimum of tools is required: two screwdrivers (flat and Phillips) and pliers. Replacing the Hall sensor is carried out with the distributor removed; it will have to be completely disassembled, and doing this on a car is problematic. The work order is as follows:
- Unscrew and remove the cover with high voltage wires from the distributor and put them aside.
- Pull out the rubber plug from the inspection window of the engine flywheel, turning the crankshaft with a wrench, align the mark on the flywheel with the slot. In this case, the distributor slider will be turned towards the contact of the first cylinder on its cover. Then unscrew the distributor mounting bolts, disconnect the connector and remove it from the engine.
- Remove the slider from the shaft, this is done manually with little effort, and then remove the round plastic boot.
- The connector to which the external wires are connected is unscrewed with a flat-head screwdriver, after which it is removed from its socket. Now you can unscrew the metal plate, which is secured with two screws.
- Next you need to disconnect the vacuum corrector. In the opening near the plate, its rod is visible, which is secured with a locking pin. The latter is removed with round pliers, the corrector body is unscrewed and disconnected from the distributor.
- The metal clamp that holds the wires inside the distributor must be carefully unbent so that these wires can be removed. Now nothing prevents you from pulling out the plate itself along with the wires, which was unscrewed earlier. It is on the other side of this plate that the Hall sensor is installed on two screws. It should be unscrewed with a flat-head screwdriver and replaced with a new one.
- Assembly is carried out in reverse order. When installing the ignition distributor in its place, make sure that the slider is turned with its contact towards the first cylinder, after which the distributor can be screwed on. Finally, put the cap on and start the engine. This completes the replacement of the Hall sensor on the G8.
If everything is done correctly, there will be no problems starting the engine. If the engine does not start, you need to once again check that the marks match and the correct installation of the ignition distributor: perhaps you mixed up the cylinders and placed the slider in the wrong direction. At the same time, do not forget to put a rubber plug in the inspection window on the engine so that dirt does not get through it onto the flywheel.
The cost of a photoelectric Hall sensor is low.
Therefore, owners of “eights” and “nines” with such an ignition system are recommended to carry it with them, since this element can fail at the most inopportune moment.
Replacement
Tools
- screwdriver;
Stages
It is advisable to carry out work in a well-lit room.
- First of all, it is necessary to remove the distributor itself from the car and then unscrew the cover.
- Next, pull up a little and remove the slider.
- Remove the plastic cover.
- The plug is secured with a bolt and needs to be unscrewed.
- Let's take him out.
- The sensor plate is held on by bolts that need to be unscrewed.
- The vacuum corrector is fixed with bolts, we also unscrew them.
- Remove the retaining ring.
- We remove the traction and the corrector itself.
- To get the wires you need to move the clamps apart.
- Remove the support plate.
- Now all that remains is to unscrew a couple of bolts and remove the Hall sensor.
- We install a new one.
- Assembly work is performed in reverse order.
Important! If any signs of breakdown occur, do not delay repairs. Check the Hall controller immediately and replace it if necessary.
As you can see, everything is very, very simple. It is worth spending just an hour of your time to save several thousand rubles, which you will have to pay to the service station.