VAZ 2107
VAZ 2107 (seven) is a classic, in the past the pride and beauty of the Volga Automobile Plant. Currently, this morally and technically outdated car has ceased to be produced, but until recently it was not only sold by the car plant, but what is most surprising was that it found its buyers! In fact, the answer is simple - the simplicity of the design, the unique appearance and price of the car did not leave other models in this category much chance of winning the fight for a buyer. As a rule, the owner of the “seven” was a not very rich car owner, who with his own hands could not only go through all the “guts” of his iron friend in the middle of a field, “on his knees,” but also significantly improve its appearance and technical characteristics. That is, the owner, who was not indifferent to his car, sooner or later still began to tune his car to one degree or another.
What is this operation and what is hidden behind the word tuning?
- Firstly. Tuning is a change, an improvement to suit your personal needs, that is, in essence, adjusting the product to suit you;
- Secondly. Tuning is divided into 3 stages:
- Engine.
- Appearance.
- Salon.
This procedure was in demand more than ever in the domestic automotive market. Ask why? Yes, because a new domestic car is like a new apartment - no repairs, no conditions. Theoretically, you can use it, but is it convenient?
Usually all improvement work starts with the engine, this is:
- Carburetor improvement;
- Replacement of valves, spark plugs and armored wires with foreign ones
- Installing a zero-resistance air filter;
- Installation of lambda probe;
- Enlargement of the combustion chamber.
The interior of the Seven is so unattractive that you can redo literally everything here without hesitation or regret. Removing, reupholstering, and replacing the VAZ 2107 ceiling is a standard procedure for owners of used cars.
Also some of the most common jobs are:
- Reupholstery of seats, interior;
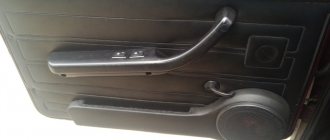
- Installation of electric windows;
- Improvement of the heater, in particular the left pipe;
- Noise insulation;
- Installation of a smaller diameter steering wheel, decent acoustics.
External tuning includes:
- Body painting;
- Installation of alloy wheels, body kits;
- Tinting.
Do I need this? Everyone decides for themselves.
In essence, tuning the “Seven” does not require large financial investments, but it brings enough “hemorrhoids” to the performer of this trick. In general, this activity qualifies as a hobby, a passion, much like collecting stamps... Most car owners pay too much attention to the external appearance of the “iron horse” while forgetting about the car’s interior. But the quality and materials of the interior directly affect the comfort of driving a car. Therefore, the entire impression of tuning the interior depends on the condition of the VAZ 2107’s ceiling upholstery . To get a taste for it, I would first suggest changing the steering wheel to a more modern model, after which you can move on to the interior itself. For example, purchase additional sets of accessories for the dashboard, since there is nowhere to put ordinary small things in the cabin, and these simple pockets and recesses are the best suited for storing various small things. Just looking at the classic Lada, I immediately have an irresistible desire to change something about it. And therefore, in this article I propose to analyze such a moment as tuning the ceiling of a VAZ 2107, which includes replacing the rear view mirror and sun visors. Next, we present to your attention detailed instructions - VAZ 2107 ceiling tuning.
About the hard ceiling on the VAZ 2107
Owners of the domestic car VAZ 2107, known as the “seven,” often resort to the need not only for repairs, but also for tuning. Most of the elements and components of this car, the design of which was developed back in the 80s of the last century, need modernization. One of the elements that needs tuning is the ceiling. How to make a hard ceiling on a VAZ 2107, and why such modernization is needed, we will consider in detail in the material.
Let's start with dismantling
Removing the sun visor
So:
- Pull the visor axle out of the holder by pulling it in your direction.
Stage 1
- Three self-tapping screws are unscrewed with a Phillips screwdriver.
Stage 2
- We remove the visor.
Stage 3
Removing the interior rear view mirror
- Stage 1.
Using a screwdriver, remove the decorative trim of the mirror bracket
- Stage 2.
Unscrew the two screws with a Phillips screwdriver
- Stage 3.
Removing the mirror
With a mirror, the issue is easily resolved - I bought a larger one and secured it on a standard mount, but the visors force me to make a choice - either re-tighten it with a carpet or buy tuning ones. For most, the second option is preferable; they both look and cope with their duties better than standard ones.
Removing a hard ceiling
Many car owners have a question: how to remove the hard ceiling on a VAZ 2107? Most of the advice boils down to the need to dismantle the windshield, but I suggest trying a more gentle, although also labor-intensive, method. I wanted to post a video, but I think we’ll make do with instructions and photos. In a VAZ 2107, replacing the ceiling begins with dismantling the rear seats, removing the side plastics on the rear and front pillars, as well as dismantling the front passenger door. After unscrewing all the fasteners on the ceiling, it easily fits into the opening of the removed passenger door. And although this method seems very difficult, believe me, the new ceiling upholstery of the VAZ 2107 is worth the effort!
Advice! Buy four new plastic plugs that secure the ceiling to the roof.
Removing the rear seats
Unscrew all fasteners
We take you out of the salon
We pull out
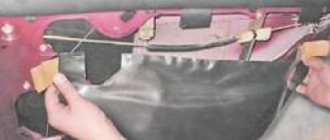
Removing a soft ceiling
The soft ceiling lining of the VAZ 2107 can also be removed in two ways - both with removing the windshield and without dismantling it. In the second case, you will have to be a little nervous, since picking out the brackets holding the ceiling from under the windshield sealing rubber is not a pleasant task (it can be solved by using a screwdriver and some kind of mother).
In order to remove the ceiling of a VAZ 2107 with soft upholstery, you need to dismantle:
- Door seals;
- Handles above doors;
- Sun visors.
We begin to remove the upholstery from the windshield. And then step by step:
- We feel for the first arc (the first seam from the windshield);
- We push it by the middle, towards the trunk;
- The arc rotates around its axis, thereby weakening the upholstery;
- We remove the arc from the side niche of the roof profile, slightly squeezing it in the center.
- Further, with other arcs, in a similar order.
Now we are faced with the question of whether to stitch the leatherette so that we get hinges (a high-quality, but labor-intensive option with a big disadvantage - the seams are visible) or glue a new one directly onto the new skin.
In any case, having removed the ceiling from the VAZ 2107, you first need to wash it...
Old ceiling
...and cover it with material...
Sheathing
Result
...or cover it with vinyl.
Vinyl
Dedicated to all those who are tired of the stretched roof!
Unfortunately, the tension roof never pleased me. I have a station wagon and often stuff all sorts of crazy things into it (such as refrigerators, washing machines, skis...), but of course this doesn’t go away without a trace, as a result, cuts and holes appeared on the ceiling, through which you can see something similar to glass wool. Well, you can still come to terms with this because... you don’t really focus on this, and it doesn’t affect the speed) But let’s face it – when every passenger, getting into the car, says, “OOOOH…. you have a hole here” At this time, poking a finger into it and examining what’s inside is simply impossible.
Somehow I got a hardtop from 07 for free. I threw it in the far corner of the garage with the pretense of “it’ll come in handy someday.” And it came in handy...
For the remodel we will need:
We remove (I tore off with hatred and without any pity) the old roof...
Then we measure everything and cut off as much as needed. I cut off the front so that 1-2 cm would go under the canopy base (you can not cut off the front, but just buy the original canopies for this roof and leave everything as is. I didn’t get pinned like that...). At the back I cut off the part where the area becomes more even, i.e. the roof is rounded at the end and it was at this rounding that I cut it off.
So! Trim, then we trimmed, but now we need to grow as much as we need. For this I used simple hardboard! The thickness is about 4 mm. So, we measure the required piece again, only so that it fits under the plastic paneling at the hinges! After this, you need to wet the ends of the cut piece, or rather soak it (it is better to do this with boiling water). When the hardboard gets wet, you can put it on our future structure and press it down with something so that it takes the desired shape, and at this time we help it dry with a hairdryer.
After the hardboard dries, in the piece from which we cut everything off, we make a recess the thickness of the hardboard. To make it seamless!
Next we take epoxy resin and glue these two pieces together. When the resin dries, sand it a little.
Next, we take the glue with the carpet and begin to tighten it.
I threw out the old sound insulation and stuck on a new one.
Next, we install the roof. This is done within 5 minutes. We screw on the handles, then the cover with the visors, and all the other plastics. That's all in principle.
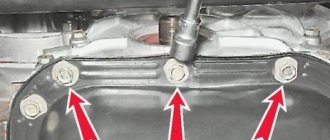
As practice has shown, due to the fact that the roof became longer and heavier, it began to sag in the center! This was easily fixed by 2 self-tapping screws screwed into the stiffening ribs of the lampshade.
For those who have sedans, it will be a little simpler, i.e. there will be no need to cut off the back part (front part if desired) of the roof and extend it, but simply cover it with carpet and install it. But the rear window will have to be removed 100%
Body work
This stage is the first and perhaps the most important in the entire process. Repairing the body of a VAZ 2104 begins with the most ordinary washing, during which it is cleaned of various contaminants and debris. It is advisable to wash the body part using various synthetic detergents, which will not only make the work easier, but will also allow you to identify various minor defects.
Painting of the car must be carried out with the decorative elements and glass removed. Therefore, it is more advisable to dismantle locks, bumpers, moldings, and tuning elements of the VAZ 2104 at this stage.
Many people prefer to cover them with special masking tape. However, this should not be done, since condensation accumulated under it can damage the subsequently applied decorative coating.
If serious defects are detected, it is advisable to repair the body using straightening and a welding machine. All unattended defects subsequently appear under the decorative layer and their elimination will require additional expenditure of both effort and money.
At this point, the first stage of the process of painting your VAZ 2104 can be considered complete.
Tools
Any work requires a tool, sound insulation in a VAZ, VAZ 2104 in particular, requires:
- Shoe knife and scissors for cutting materials
- Construction hair dryer, warm up vibration insulation
- Solvent – degrease surfaces
- Rags and a bucket of water - for cleaning surfaces from dirt
- A hard roller is used to roll vibration insulation; you can also use a hammer handle, but you’ll get tired quickly
- Screwdrivers and wrenches - you will have to remove the trim and seats
Roof noise insulation on a classic
In the process of soundproofing a car, the roof is often forgotten, but in vain.
This huge surface contributes significantly to the overall noise that needs to be eliminated. If we talk about classic AvtoVAZ models, there are two types of ceilings - soft and hard. The labor intensity of soundproofing the roof of these cars directly depends on this, because the ceiling will have to be completely or partially removed. It’s easier with a soft ceiling - you just need to bend it at the edges, but a hard one may not bend that way. Then you will have to pull it out of the cabin, and for this you need to remove the front or rear window... The prospect is not pleasant, but the soundproofing of the roof on a classic is worth it!
Sound insulation of a roof with a soft ceiling
Everything is quite simple here. The soft ceiling is a piece of dermantine, which is stretched around the perimeter of the ceiling and is held on by metal hooks and brackets. The hooks are located under the seals of the front and rear windows, so in order to completely remove the ceiling, you need to remove these windows. However, the soft ceiling does not need to be removed - to soundproof the roof, it is enough to bend it at the edges.
Why is such a ceiling needed?
From the factory, all VAZ 2107 cars are equipped with a suspended ceiling, which has some disadvantages. Due to these shortcomings, some car owners are trying to replace it with a VAZ 2107 hardtop. You can do this yourself, and you don’t need to go to a car service center to carry out easy tuning of the interior.
First, let's look at why many owners of sevens strive to replace the soft ceiling with a hard one. The reasons for this are varied:
- The standard suspended ceiling does not have an attractive appearance, so when modernizing the interior, it is important to update the roof.
- Over the course of the car's operation, the upholstery becomes very yellow, which greatly spoils the interior of the car.
- A thin layer of material does not in any way affect the noise reduction of the car roof.
- The soft upholstery is easily damaged, so it is enough to catch it with a sharp object to disturb the interior of the car.
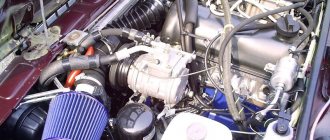
We improve the engine and suspension of the VAZ 2104 with our own hands
It is best to start a radical update of the “middle-aged four” with its “internals”. In this case, you can go in two ways - replace small elements or start modernizing the main “organs” of the car. It’s clear that we will achieve the best result only with the second method. Therefore, it would be quite logical if, first of all, we consider improving the car’s engine.
The power unit of the VAZ 2104 is far from one of the most powerful. This is the first reason that even after tuning the engine the car will not “growl” like a brand new Mustang. However, we will still achieve a certain effect. The first thing to start with is increasing the displacement of the “four” engine. To do this, you will need to bore the cylinders and increase the piston stroke, which will add several tens of horsepower and increase torque. The first of the operations is performed by dismantling the cylinders and lengthy processing of their surface with a drill. After 1–2 hours of work, we receive updated parts that will better withstand the load, accelerating the VAZ 2104 much faster.
As the piston stroke increases, things get a little more complicated. First, you will need to replace the standard crankshaft, and only then install new forged connecting rods and pistons. The tuning performed will significantly increase the efficiency of the car’s engine and reduce the pressure on the suspension.
Remembering the chassis of the VAZ 2104, it is worth considering tuning this part of the car. This element, along with the engine, plays a key role in increasing the speed of the car. If you adjust the suspension correctly, you can achieve tremendous changes. And the first thing we will do for this is to replace the standard racks with sports ones. The latter have double springs, thanks to which the car will feel much more confident, regardless of the condition of the road surface.
The rigidity of the “four” chassis can be adjusted by changing the ground clearance. After completing the adjustment, do not forget to take the car to a car service center to check the angles of the installed wheels. If you ignore this need, you risk losing important parts of the VAZ 2104 suspension.
Changing the ceiling of a VAZ 2107
VAZ 2107 (seven) is a classic, in the past the pride and beauty of the Volga Automobile Plant. Currently, this morally and technically outdated car has ceased to be produced, but until recently it was not only sold by the car plant, but what is most surprising was that it found its buyers! In fact, the answer is simple - the simplicity of the design, the unique appearance and price of the car did not leave other models in this category much chance of winning the fight for a buyer. As a rule, the owner of the “seven” was a not very rich car owner, who with his own hands could not only go through all the “guts” of his iron friend in the middle of a field, “on his knees,” but also significantly improve its appearance and technical characteristics. That is, the owner, who was not indifferent to his car, sooner or later still began to tune his car to one degree or another.
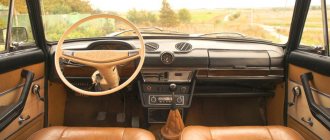
Front Panel
Some owners of “fours” modify and improve the dashboard, since the standard product has poor lighting for the instruments and glove compartment and generally does not attract attention.
Dashboard
To improve the illumination of devices or change the color of the glow, you can use LED elements instead of light bulbs.
To improve the lighting of the dashboard, you can install LED elements instead of light bulbs
In addition, modern scales are often installed to make the instrumentation more attractive and readable. For such modifications, the panel will need to be removed from the car and disassembled, avoiding damage to the indicators, and then new scales must be glued on.
The dashboard of the VAZ 2104 can be modified by applying modern scales
Glove box
All owners of the car in question are aware of the problem with the glove box lock, which creaks, cracks and opens when hitting bumps. To solve this nuance, you can install magnets from computer hard drives instead of a standard lock and control it through a limit switch.
To ensure the glove compartment closes securely, you can install magnets from your computer hard drive.
Backlight
Another nuance of the front panel is the illumination of the glove compartment. On later VAZ 2104 models, although it is provided from the factory, it has such poor lighting that there is practically no sense in it. To improve the situation, you need to purchase a lamp of suitable size (VAZ 2110 glove box illumination) and an LED.
To illuminate the glove compartment, you can install a lamp from a VAZ 2110
To install a new part, remove the glove box itself and build the lamp into it, connecting the wires to the end switch and to the standard positive wire.
After installing the lamp, the lighting of the glove compartment improves significantly