VAZ-2110, also known as the “ten”, is one of the popular and widespread models of the domestic automobile industry in the CIS countries, which has received popular recognition. Its development began in 1983 in the Soviet Union, but the projects became reality in another country, in 1995. This model was produced for 12 years, until 2007, when it was replaced by Lada Priora. But, until now, you can find this model in the vastness of our country, thanks to its cheapness and simplicity, it is still used today.
Features of model 2110
The features of this model include the following:
- Availability of ventilated brake discs.
- Galvanization of parts that most often rusted in older models.
- On-board control system.
The gas distribution mechanism on the VAZ 2110 suffers from frequent breakdowns, or more precisely, from damage and ruptures of the timing belt, which is a closed rubber ring, the dimensions of which vary in different engines. It is possible to replace it without any particular difficulties; if you have time, you can figure out this procedure yourself, saving on repairs in the workshop.
And also, its damage may indicate problems with the gas distribution system, which are worth investigating. Let's look at how to replace a belt and analyze damage to the timing belt.
About the engine
The engine performance of the 2110 is quite good for the time it was produced.
On 2110 cars, a variety of engines were installed, both carburetor and injection, with 8 valves (VAZ 2111, 21114) and with 16 valves (VAZ 21120, 21124).
List of VAZ 2110 engines:
- 2111,
- 21114,
- 21120,
- 21124.
According to the standard, the VAZ 2110 was equipped with an 8-valve engine, in variations numbered 21114 and 2111, which differed in minor characteristics. The 8-valve engine, marked 21114, earned the greatest recognition due to its high power and relatively low fuel consumption.
The standard operating mileage for this engine is 250,000 km. When using high-quality oil poured into the engine, you can extend the life of the car by 20–30 thousand km.
Video review on replacing the timing belt and rollers with 16-cl. engines VAZ 2110, 2111 and 2112
The video review below was prepared, among other things, for this article in order to show everything as clearly as possible:
If after watching the video you still have any questions, you can ask them either here in the article, or subscribe to my channel and you can discuss everything under the video! I'm glad if I helped anyone, see you later!
Regarding the price of these parts, it is worth saying that many kits have completely different price tags, and the difference depends primarily on the manufacturer. Eg:
Rem. timing belt kit + two rollers (VBF) - RUB 3,980;
As you can see, prices for parts can vary quite a bit. From personal experience I can say that I have seen both BRT (for 8-class) and GATES (for 16-class) from the factory - the factory ones, of course, run for 70,000-100,000 km, but it’s quite easy to find such quality in a store problematic!
Source
Replacement procedure
The replacement procedure for a VAZ 2110 is quite simple, but varies significantly on different engine models, depending on the number of valves. According to the standard opinion, it is easier to change the timing belt on an 8-valve engine than on a 16-valve engine, but this is not entirely true. Let's look at the replacement process in two cases.
VAZ 8 valves
It is believed that replacing the timing belt on a VAZ 2110 with 16 valves is more difficult than the classic model. Let's look at this myth by looking at the replacement procedure for 8 valves:
- Remove the negative cable, thus disconnecting the battery.
- Tighten the bolts on the protective casing and remove the cover.
- Remove the wheel from the front passenger side, removing the engine compartment protection and mud flaps.
- Install the generator pulley so that its mark matches the mark on the cover.
- Remove the protection from the gearbox and check that the marks match.
- Lock the flywheel.
- Remove the generator pulley.
- Remove the old belt.
- Before installing a new belt, clean it, then dry the area with any clean cloth.
- Install the new roller, checking the direction arrows, move it clockwise while tensioning the belt.
- Check that the timing and tension marks are correct.
- Reassemble all components.
VAZ 16 valves
The 16 valve version of the engine in the VAZ 2110 did not gain much popularity, despite its power, and became famous as being difficult to repair, in contrast to the easy procedure of replacing the VAZ 2110 timing belt with 8 valves. Let's look at the process and its differences from the standard:
- Remove the protective cover by unscrewing the 6 nuts.
- Release the crankshaft sensor.
- Find an area on the pulley that does not have a tooth. This is a reference point for finding the dead spot at the top. The piston from the first cylinder should be installed at this point.
- Align the crankshaft sensor and pulley, lock and remove the latter.
- Loosen the tensioner pulley nut, pull out the old belt, removing the roller along with it.
- Clean the area before installing a new part.
- Install and tension the belt.
- Perform two full revolutions of the crankshaft, make sure that the marks are aligned correctly and install all parts in place.
Installation process
First, about what we will need for this:
- jack;
- screwdrivers with different blades;
- hexagons;
- socket wrenches;
- roller tension wrench;
- extension tube.
- We install the car in a level position and fix it.
- Now you definitely need to turn off the power to the car. To do this, disconnect the left terminal of the battery.
- We remove the bolts that secure the belt drive housing.
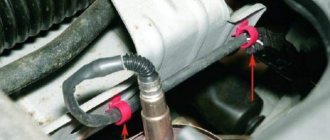
- Disconnect the crankshaft sensor. Now it’s very important: we check the alignment of the marks that are located on the camshaft gears and on the rear surface of the housing.
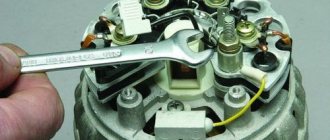
5. The marks on the flywheel crown must also match. Their combination must be checked. To do this, unscrew the plug located on the crankcase. The flywheel gear is located above it, and the mark is located on it. It should be aligned with the notch on the crankcase. 6. Now we need to loosen the gear tension and check the position of the mark on the crankshaft pulley. Now you can remove the belt. In this case, the flywheel must be fixed. To do this, you need to insert a metal pin between the crankcase and the crown. 7. Now take the 17 key and unscrew the bolt securing the generator pulley. We check the marks placed on the oil pump and crankshaft gear.
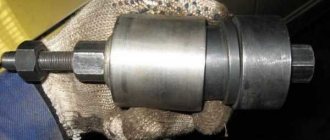
8. Take a 15mm wrench and remove the tension roller. We remove the timing belt drive and begin installing a new consumable. 9. First, pull the belt onto the generator pulley. Use a special wrench to turn the tension roller to the right. This is done using a special key. If you don’t have one, then pliers with curved tips will do just fine. Adjust the belt tension. It should be optimal - the belt should not sag, and it should not be overtightened. If you grab the belt with your fingers and can only turn it 90 degrees, then everything is fine. Incorrect tension will certainly lead to premature wear of the belt drive. 10 We assemble all other parts from the reverse. Don't forget to remove the screwdriver that we jammed into the crankcase. 11. Now all that remains is to start the engine and check its operation. If there is no extraneous noise and the engine runs as usual, then everything is fine.
Belt tension
Tension plays an important role in the proper operation of the engine and reduces the effect of wear on its condition. It’s worth knowing when to stop – too much or too little tension leads to interruptions and rapid damage. Let's carry out this setup step by step:
Turn the crankshaft counterclockwise by two camshaft teeth to tighten the belt. Check the tension. If everything is done correctly, then it will turn at a right angle between the pulleys, with a slight force of the fingers. Otherwise, loosen the fastening nut and turn the roller counterclockwise 10 degrees to loosen the tension. Adjust until tension is set to medium. Remember not to turn the crankshaft by the camshaft pulley to avoid engine damage.
Set the timing marks correctly - otherwise you will bend the valves!
The VAZ-21124 engine has a special feature: no matter how its pulleys are turned, it does not bend its valves. With the 21120 engine (16v 1.5 l) such jokes will not work! If the pulley positions are not too far off, try putting on the belt and turning the mechanism to the “TDC 1 and 4” position. From now on, always use the following instructions:
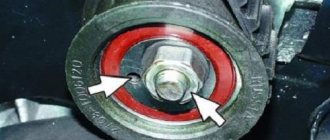
- The crankshaft is set to the required position by checking the mark on the generator drive pulley (photo 1) or on the crankshaft pulley (photo 2);
Alternator drive pulley and crankshaft pulley
- Let us clarify: there should be 20 teeth between the DPKV sensor and the “pass”;
- The marks on the “upper” pulleys should point straight up (photos 3 and 4). These pulleys must be fixed, after which the tension can be released;
Exhaust and intake shaft pulley
When the belt is loose, the crankshaft cannot be rotated.
In theory, on the VAZ-2112, marking is carried out the same way, no matter what engine we are talking about. Here are photos for engine 21120.
What it looks like in reality and in the instructions
Take the time to find the inspection window on the gearbox housing. There is another mark under the plug.
The last step is optional. And they do it so as not to redo all the work “from scratch.”
The number of belt teeth between the “upper pulley” marks is exactly 16; The mark on the crankshaft pulley sometimes breaks off - use the control method “1” (photo 1) or “3” (lower photo).
Updates for VAZ-21124
On a 1.6 engine, all actions are performed in the same way as described above. There is one exception - the generator drive pulley is aligned according to the mark on the casing (see photo).
Generator drive pulley, motor 21124
However, if this mark is not there, use the proven method: 20 teeth are counted from the DPKV body. Instead of the 21st there should be a “pass”.
The timing pulleys can be rotated as you like - the pistons will not touch the valves in any case. Compare what the pistons of two different engines look like and it will become clear what we are talking about.
Two different 16 valves
For those who don't understand anything
The number of teeth on the crankshaft pulley is 21, on the camshaft pulleys – 42. When the crankshaft rotates 360 degrees, the camshafts rotate 180. In general, the full engine operating cycle consists of two crankshaft revolutions (720 degrees).
In theory, you can use an alternative configuration method. Let the camshaft pulley marks point straight down. Then the mark on the crankshaft pulley should face up (TDC 1 and 4).
Belt problems
When replacing the timing belt, you should pay attention to the type of damage that caused the belt to fail. Using these symptoms, you can easily identify signs of a malfunction. Let's consider the causes and consequences of untimely replacement, listing the main ones:
- If it’s frayed, torn or damaged – it’s almost always due to the reupholstery.
- The absence of one of the teeth means weak tension.
- A high degree of tooth wear indicates incorrect tension, as does the presence of wear between several teeth or the appearance of abnormal noises.
- Cracks – temperature differences beyond the calculated limits.
- An oily surface suddenly indicates an oil leak. It is worth replacing the timing belt as soon as possible and finding the leak.
- End wear indicates misalignment, angular or parallel.
Do valves bend on a VAZ 2110?
This problem is considered common among some individual VAZ 2110 models.
Groove for valves
To understand whether the valve is bent on a VAZ 2110, it is necessary to determine which engine is installed. On certain engines (VAZ 2111, 21114, 21124 engines) there are special grooves on the pistons and when the valves break into the pistons, bending does not occur.
On other VAZ 2110 engines such grooves are not provided. (VAZ 2112) Some car enthusiasts grind such grooves on their own on VAZ cars, but this should be done carefully and in checked places because engine compression may be impaired.
Recommendations for purchasing consumables
When buying a timing belt, choose only high-quality consumables. Here are the best belts to buy:
- The Lada automobile plant produces fairly durable belts. By the way, here excellent quality is combined with low cost, which may well be the deciding factor for some car enthusiasts.
- The Japanese company Lynx produces very high quality consumables. The belt is made of high quality material and at the same time it is inexpensive.
- Bosch belts are the embodiment of quality and durability. Consumables from this company have proven themselves well in the market and are very popular among car enthusiasts. They will definitely work out the allotted time to the end.
- The German company ContiTech also produces consumables that you can pay attention to. The belt drive here is made durable by adding fiberglass, synthetic rubber and polyamide fiber to the structure.
- Optibelt. The service life of this company's belts is very high. There is not yet a single case known when they failed ahead of schedule.
- Gates. Belts are made here only from high-quality materials. Cases of their breakage have not yet been recorded.
- The Russian company BRT produces belts that are not inferior in quality to their foreign counterparts. Moreover, they are cheaper.
Possible malfunctions in the electric generator drive and ways to eliminate them
Replacing the fuel line of a VAZ 2110 with your own hands
Malfunctions in the belt drive of an electric generator during use, of course, manifest themselves in different ways:
- you will like the whistle of the unfamiliar drive layout;
- This is a weak generator voltage, due to weak tension and repeated slipping of the belt drive. Slippage occurs even with normal, standard belt tension due to water, antifreeze or oil getting on the working elements of the drive;
- more unsafe for the motor and very strong tension in the drive. Due to excessively huge loads, bearings are destroyed (how to change a bearing on a VAZ 2114 generator?), gears or shafts are damaged, and in addition, sometimes the belt breaks. Here the upcoming movement will be unrealistic until it is replaced with a new, working one. The worst situation is when a gust occurs on the highway, in a deserted place. Driver practice suggests that this does not happen very occasionally.
We carry out what remains to be done for our client without panic and in no hurry. What remains for our client to do is trivial, weakly tightened, strongly weakened. Roller when moving
This is my personal method for tensioning the timing belt.
, I think many people will need this. And if you need it, there will be belts.
Attention! Experts and experienced car enthusiasts advise having a new belt in a spare set in the trunk, although a driver can learn how to correctly tighten the alternator belt on a VAZ 2114 in 10 minutes. And they recommend reading how to remove the alternator belt, so that you can be “savvy” for any occasion
Since the condition of the belt drive
Since the generator is a fundamental problem, monitoring it is the responsibility of the driver. Checking the belt is quite simple - you just need to simply press it with a force of 10 kg to check the deflection. For an electric generator of brand 9402.3701 it is 0.6 - 0.9 cm, for brand 37.3701 - 1.0 - 1.5 cm. Today, you need to inspect the cleanliness of all parts of the drive.
If the driver hears that the generator belt is whistling, then immediately, immediately, you need to check the condition of the belt drive. It exists that if the belt is really loose, it can twist and break at high speeds.
When, if during inspection it is determined that weakening occurs, then it is necessary to tighten the generator belt. For this purpose, you need to perform a number of easy steps and keys from “10” to “13”.
- Place the car on a level surface and set it to speed and handbrake.
- Open the hood and before tightening the
alternator belt on the VAZ 2114, use a key set to “13” to loosen the nut securing
the alternator housing
to the adjusting rail.
Loosening the lower bolt of the VAZ 2114 generator
Using a key set to “10”, tighten the adjusting screw of the tensioner mechanism, while the body of the electric generator should move along the rail towards the front of the machine.
Alternator belt tension
- As the tensioner screw rotates, the belt deflection must be kept under control. If it is within the norm for the type of electric generator installed on the machine, you need to use a “13” key to firmly tighten the nut on the adjusting rail
. - When the fastening nut is tightened, you need to turn the crankshaft twice by hand and check the deflection again. If it turns out to be within the normal range, then, after starting the engine, you need to check the operation of the belt drive in operating mode. During this check, there is no extraneous noise; the belt should spin without bending and without moving to the side.