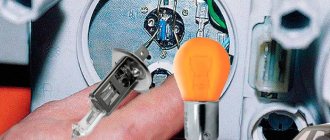
One of the most problematic places in domestic cars is the rear lights of the VAZ 2114. In most cases, the problem lies in low-quality, unreliable rear light circuit boards. As a result, contact with incandescent lamps disappears or is lost over time.
Often the problem is solved by using brute force, by striking the body or base of the lamp. However, such actions do not completely eliminate the problem; periodic failures in the operation of the turn signal, side lights or brake lights occur.
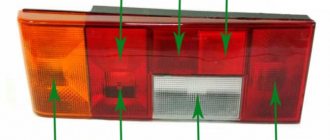
Replacing lamps
We have figured out the type of lamps, what we know to buy for replacements, now we will find out how to replace them. Let's start with “stops” and reverse.
Brake and reverse lights
We open the trunk lid, look under it and see the back of the lamp. Squeeze the two latches at the edges and remove the board with the lamps. The power connector does not need to be disconnected - the length of the wires is quite sufficient for this operation.
Removing the board with lamps
We find the desired lamp, guided by the picture at the beginning of the article, slightly recess it, turn it counterclockwise and remove it from the socket. We install a new one in place of the burnt one and fix it by turning it clockwise.
Replacing the reverse lamp on a VAZ 2110
Turns, dimensions and fog lights
Let's move on to the rear light of the VAZ 2110 installed in the body. Here we have to replace the turn indicator lamps, side lights and fog lights. We open the trunk lid and opposite the lamp in the upholstery we find a valve with Velcro. We open it and see the back of the lantern.
The rear part of the tail light of the VAZ 2110 is closed by a valve in the upholstery
At the top and bottom we find two latches. Push them towards the center of the lantern.
The board with lamps is secured using two latches
We take out the board with the light bulbs. On the removed board we see 3 turn signal lights and two more nearby: a large one for the fog light and a small one for the side light.
Removed board with lights
All three bulbs are removed in the same way - by lightly pressing and turning counterclockwise. We take out the burnt one.
Turn signal lamp removed
We install a new one in its place and fix it by pressing and turning clockwise. We return the board to its place, snap it into place with the latches, and close the back of the lamp with the trunk trim flap.
Manufacturing of diode rings
To create taillights with your own hands, you need the same epoxylin and strong glue. The basis is diode rings or tape. The body will be made from small and large reflectors, which can be found on the hardware market. The last element is the paint, which the motorist likes best. Most VAZ 2114 owners choose chrome paint.
- Diode rings must be installed in cylinders, which are best made from tin cans. Coffee or canned food cans are suitable for this.
Processed tin can
- They must be carefully cut out so that at the end something similar to a well appears. There should be two of them - internal and external. If a coffee can can serve as the basis for an external well, then the internal one can be made from an ordinary 0.5 liter plastic glass and then painted.
- Now simple Soviet cataforts should be installed in the internal wells. They should provide illumination according to the standard scheme: turn signals - orange, reverse - white, fog lights - red. After this, extra elements may remain from the large catafort, which will look great inside the module. The rest of the space can be decorated with any LED ring.
Decorated wells look impressive, but you can’t see what they were made of
- The next procedure is to install the reflectors and LED rings. In order for them to hold securely, it is necessary to make stiffening ribs, as an option - epoxylin.
- You can put additional lighting on the plexiglass and secure it with epcosilin.
As a result, you should get such tuning yourself. Detailed visual aid for installing LEDs in VAZ optics:
Modernization of standard lights
Now it’s time to start tuning the rear lights of the VAZ 2110. The easiest option to improve the appearance of the car is to replace the standard lights with, for example, Osvar sticks.
Rear LED lights for VAZ 2110 “stick” type
This is not difficult to do. We go to the store, buy them, remove the standard ones (see section “Removing block headlights”), and put the purchased ones in their place. As a rule, there is no need to make any modifications to the connectors or solder connections. Moreover, the “sticks” from the 112 model will fit perfectly on the VAZ 2110. The result will be something like this:
“Sticks” installed instead of the standard rear lights of the VAZ 2110
But we don’t look for easy ways, especially if we like to do things with our own hands and according to our own ideas. You can modify and modify the standard taillights, but to do this you will have to disassemble them.
How to take them apart
According to the designers' idea, the rear lights of the VAZ 2110 are non-separable - the glass is tightly nailed to the headlight body. Maybe with some creepy solvent like dichloroethane or using ultrasonic or microwave welding. But we will still try to disassemble the device, and in such a way that it can be assembled afterwards.
To work, we will need the headlight itself, a knife that we don’t mind, and a gas stove or any other burner.
Since glass cannot be removed by any other methods, we will literally cut it off. We remove the board with the light bulbs from the device. We heat the knife and begin to slowly cut off the glass around the perimeter.
Cutting off the rear light glass of a VAZ 2110 with a hot knife
We cut through on three sides - on the side of the side lamp and on the sides. We don’t touch the top side, because there the glass overlaps with the lantern body, and it won’t be possible to cut it off neatly.
The glass is placed on top of the device body
Having made several passes with a knife, we begin to disconnect it at the top
Insert the knife as shown in the photo below and gently rock it, trying to tear the glass away from the body at the gluing site
Removing the glass at the top of the headlight
After the glass comes off on top, there will be two more places that hold it. They are marked with arrows in the photo below. We do the same: we insert a knife between the glass and the body in the place where it still holds, and tear it off with light rocking.
Peeling off of glass in the area of the reflector
If everything is cut well, the glass can be easily removed.
Removing glass from the rear light of a VAZ 2110
All that remains is to bring beauty. Take a file and align the melted edges of the glass and body.
All that remains is to remove these melted burrs
Checking the main relay in a Lada Samara car
One of the most important parts of the VAZ 2115 electrical wiring is its main relay. Before replacing any part in a car, you first need to determine where it is located. And to understand this, you will need a wiring diagram. As for the main relay in the VAZ 2115, it is installed next to the fuel pump and the system that includes radiator cooling. Fuses responsible for the operation of the engine and fuel system are also usually installed there.
When the ignition is turned on, the relay should make a clicking sound. If this does not happen, you need to check that there is power on contacts 85 and 86 of the main relay. This is done using a test lamp, which is connected to the minus. The control current consumption should not be higher than 0.25 A, otherwise the controller may be damaged. If the light on one of the outputs does not light up, the relay is disconnected from electricity. This happens when a fuse blows or when the supply wire breaks.
It happens that the lamp on one of the terminals burns brighter, and the relay is triggered. Then you need to turn off the ignition, remove the relay from the connector, connect contacts 85 and 86 with a control, and the lamp will light up normally. If this does not happen, you need to check the connection between the relay and the block. When this does not help, you should ensure the integrity of the conductor connecting the relay to the controller, and also check the connections of the controller wires to the motor housing. On the Lada Samara, these contacts are located at the end of the cylinder head, directly above the thermostat.
On cars manufactured by AvtoVAZ, when the main relay does not function, you can use the most suitable part from the mounting block to test the system. Relays for turning on signals, low beam or high beam headlights are suitable.
When troubleshooting problems due to which the main relay does not turn on, it is necessary to take into account the possibility of anti-theft systems in the car. When installing them, blocking blocks are often included in the relay circuit, which break the power circuit when the alarm is triggered.
10.06.2014
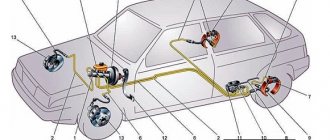
On Samara 2113 2114 two engines are installed: 1.5i (Euro-2) 1.6i (Euro-2/3) 1.6i (Euro-3/4 e-gas).
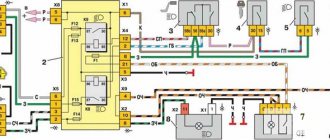
Accordingly, we provide you with all the electrical equipment and engine power diagrams for these engines.
The photo shows a diagram of all electrical equipment on the VAZ 2115. Wire colors may vary. To enlarge a photo, click on it.
How to check the functionality of the frog?
The contacts from the sensor are removed and clamped together, after which the ignition is turned on. If there is light, then you need to replace the sensor. And if not, then the problem is in the circuit, but the frog is fine.
When the reverse lamp does not light up, it is often necessary to replace the old sensor with a new one.
What should be done:
- place the car on the overpass;
- install the handbrake;
- remove protection;
- remove the contacts of the old sensor;
- place the container and remove the frog;
- Unscrew the faulty device and replace it with a new one.
Then let it sit for a while and check the oil in the gearbox. Fill it up to the required level and put the entire structure back together.
Attention, the price of a new sensor is within 250 rubles. The next option, if the reverse light does not light up on a VAZ 2114, then the problem is in the light bulb
To replace it, you need to disconnect the wire block, remove the plastic contact panel from the flashlight, while squeezing the side fixing elements
The next option is if the reverse light does not light up on a VAZ 2114, then the problem is in the light bulb. To replace it, you need to disconnect the wiring block, remove the plastic contact panel from the flashlight, while squeezing the side fixing elements.
We rotate the light bulb counterclockwise and, pressing slightly on the socket, remove it. Now we install a new one, check the contacts and put the entire unit back together.
We visually assess the condition of the wiring; if necessary, we strip the wires, check for breaks using the ringing method, and check the contacts on the headlight film.
Why aren't the reverse lights on yet?
A blown fuse is a common cause, which means you need to know exactly where they are located and how they change.
The products are located in the fuse box, which can be found under the steering wheel on the left side. It can be easily removed with just one touch of your hand. There is no need to unscrew anything.
When the reverse light does not light, you need to check the condition of the fuses. How to do this? You can visually look at the fuses and determine the breakdown - the integrity of the middle part.
But the burnt jumper is not always so clearly visible, so you need to turn on the dimensions and, without removing the fuses, check the voltage; if one end is lit and the other is not, the device is faulty.
Attention: when such a breakdown often occurs, you need to check the entire electrical wiring system, which causes such malfunctions in the car. To replace the product, you don’t need tools, just take tweezers, remove the old unit and install a working one
To replace the product, you don’t need tools, just take tweezers, remove the old unit and install a working one.
Key conclusions and recommendations from professionals
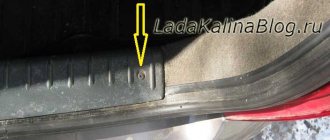
You can find out where the VAZ 2114 reverse sensor is located very simply by looking up at the gearbox, and if the driver cannot get under the car, then the hood opens and thus the condition of the frog is checked.
To completely verify that the brake gearbox is damaged, you need to turn the wheels to the left and look at the gearbox from the driver’s side. There is a protection with contacts inside on the side, remove it, close the contacts on the DZH and turn on the ignition. When everything is in order, a white light appears.
If not, then use a tester to measure the voltage on ground and on the orange wire that comes from the frog. If voltage is present, then we check the flashlight board itself and clean the contacts.
There is also a chance that the contact between the frog and the fuse block has “frozen”; you need to find it and check its condition.
Attention: when everything is normal, but the lights do not light, the reason may be the contact of the lamp, so even when screwing in a new one, you must check its functionality. As the people say, the devil never jokes, because a breakdown can be the easiest, but lead to a lot of troubles
This is why the reverse light on the VAZ 2114 does not light up, as you can see, there can be many reasons, and for the motorist it is important to carefully check the integrity of all frog mechanisms, identify the malfunction and repair the functionality of the lighting
This is why the reverse light on the VAZ 2114 does not light up, as you can see, there can be many reasons, and for the motorist it is important to carefully check the integrity of all frog mechanisms, identify the malfunction and repair the functionality of the lighting. Have a nice journey, good fellow travelers and a smooth road!
Have a nice journey, good fellow travelers and a smooth road!
Why don't the lights light up?
Malfunctions that occur in the operation of side lights worry every motorist because it makes it difficult to use the car at night. After all, the traffic rules clearly state the requirements when stopping the car and turning off the ignition at night to indicate the car with illuminated side lights. Failures in the side light circuit can manifest themselves in different ways.
One of the side light bulbs does not light up. The most likely cause is a burned out light bulb. Less common problems with poor contact are oxidation or poor connection. And very rarely - a breakdown in the wiring to the contact group of this light bulb. Although rare, this also happens. If the light bulb burns out, it needs to be replaced. To do this you need:
a) when replacing the marker lamp in the front headlight:
- turn off all exterior lights and open the hood
— unscrew the screws securing the plastic casing on the headlight with inoperative headlights
— having pulled out the socket with the burnt-out light bulb, remove it and replace it with a working one, without needing to disconnect the block with wires
- install the cartridge and casing in place
Front side lights
b) when replacing the side light bulb in the rear light unit:
- turn off the lights and open the trunk
— remove the decorative upholstery and pull out the block with wires from the contact group
- squeeze the side clamps and pull out the contact panel for the rear light with the non-working bulb
- remove the burnt out lamp by pressing it and turning it counterclockwise
- install a new lighting fixture and install the panel in the reverse order
Rear marker lights of VAZ 2114
- The side lights button does not turn on (the indicator lamp on the button does not light up). The reason is mainly due to oxidized contacts, which must be cleaned and washed with alcohol by removing the key block from the socket. Fuse F10 may fail, but then the sidebar lamps on the left side should not light up. On a VAZ 2114, an oversized fuse does not blow out very often, especially since wide plastic fuses with good contacts are currently installed in the mounting block.
- Blinking when the lights are on or dim lights. The main reason for such manifestations is the oxidation of contacts in the chain. First of all, you need to check and clean the contact group in the mounting block in the fuse circuit. The same is possible in contact groups of specific side light lamps. Do not forget that the machine is operated in conditions of high humidity and oxidation is a normal physical phenomenon that must be taken into account.
- The headlight fuse is constantly on. The reason must be sought in the mounting block. Possibly bad contacts in the fuse contact group.
Design of the rear lights of the VAZ 2114
In order to carry out repairs, diagnose and eliminate emerging problems, it is necessary to understand the structure and diagram of the rear lights of the VAZ 2114.
The taillight device consists of three main elements:
— boards with fasteners, connections for connecting light bulbs;
— external decorative cover, light diffuser.
Connection diagram for wires of components (lamps):
1. direction indicators;
2. overall glow;
3. signaling (brake lights);
5. designations for reversing.
Causes of breakdowns
The most common reasons for node failure:
- the narrowest point in the entire structure is the elastic board;
- in second place, banal burnout or mechanical damage to light bulbs;
- the third reason is a problem with the fuse or relay;
- oxidation of contacts;
- broken wiring.
First of all, it makes sense to check those elements that do not require removing the entire headlight (for example, fuses, relays). Then check the quality of the connections, the presence of oxidation and the voltage supply level to the illuminator. The last step is to disassemble the taillight, remove and inspect the board.
Legality of homemade brake lights
The rules regarding car tail lights do not contain any detailed data on the spectrum of light color, focus, etc., there are only geometric rules for the distribution of light on the car, generally defined colors and a precisely defined range of visibility.
In the end, commercial LED lamps are often too overloaded, they have too small limiting resistors, because the manufacturer thinks that when he puts 3 or 4 diodes in a row, it is already almost 12V and puts a tiny resistor accordingly. Consequently, the likelihood of problems with headlight failure increases.
Modern cars are equipped with a wide variety of signaling devices and illumination. They can be located both outside the car and inside its interior. All these devices are combined into a single vehicle lighting system. Tail lights play a big role in safe driving.
Car tail lights
Many car owners today do their own tuning of rear lights, converting them into LED lamps. To carry out such tuning efficiently and quickly, you need to know not only the functional design of the headlights, but also the stages of the headlight conversion process. Our article today will help you understand all the nuances of this work.
Replacing light bulbs
Now let's replace the rear light bulbs. We lift the trunk and look for a valve in the upholstery located opposite this device.
On the trunk side the lamp is covered with a Velcro flap
We open the valve (it is on Velcro) and observe the back of the flashlight with the power supply connected to it.
Rear part of the lamp VAZ 2114
We pull out the block by pulling it towards the central axis of the machine.
We release the latch located on the side of the lamp that is located closer to the center of the machine, and remove the board along with the lamps.
Removing the board with lamps
We unfold the board with the bulbs facing up and observe the picture shown in the photo in the first section of the article. All lamps are removed in the same way - by turning them counterclockwise. We find the burnt out lamp and replace it with a new one.
Replacing the reverse indicator lamp
PRICES OF COMPONENTS
There is also a separate section for prices for all the parts that may be needed when repairing this part of the car, because if the side lights on a VAZ 2114 or the fuses have blown, they will still have to be replaced with new ones. In any case, all the components are quite cheap, all we might need:
- Marker lamp;
- Fuse;
- Power button;
- A whole fuse block.
Today, an ordinary white light bulb costs up to 30 rubles; of course, the price depends on the individual pricing policy of a particular seller. Individual fuses can be selected for up to 50 rubles, unless, of course, you want to install a higher quality option. Button, if you look for exactly the same one as the original one, you will have to pay up to 300 rubles. In some situations, more serious problems may arise and you will have to change the entire unit, this is quite an expensive proposition, together with all the wires it will cost up to 1000 rubles.
Replacing the rear lights of a VAZ 2114
In order to remove the rear lighting equipment you will need: - a key to “8”; - a convenient Phillips screwdriver.
All work consists of seven simple steps:
The first step is to open the trunk of your car. If it is filled with things that may interfere with the work process, free up the interior space. In order to gain unhindered access to the rear light housing, it is necessary to remove the decorative fabric trim. It is attached using several self-tapping screws, which can be easily unscrewed with a screwdriver. We remove the casing so that it does not interfere with the future process. On more modern VAZ 2114 models, the trim is attached using regular fabric Velcro. We feel for the contact chip that is attached to the headlight circuit board and carefully pull it out of the connector
In this case, do not shake the chip from side to side; carry out all manipulations extremely carefully. Now is the time to remove and remove the board itself. To do this, press on the special plastic clamp and pull the product out of the headlight housing. At this stage we will unscrew the mountings of the rear lights. Using an “8” wrench, we will need to unscrew one nut from the four mounting studs, which are located in the corners of each lamp. All that remains is to disconnect the device body from the car body
To do this, grab the headlight with both hands and pull it towards you. The reverse connection of the rear lights on the VAZ 2114 is carried out in a similar way, as well as the removal process.
Using an “8” wrench, we will need to unscrew one nut from the four mounting studs, which are located in the corners of each lamp. All that remains is to disconnect the device body from the car body. To do this, grab the headlight with both hands and pull it towards you. The reverse connection of the rear lights on the VAZ 2114 is carried out in a similar way, as well as the removal process.
Conclusion
In order to get rid of the annoying VAZ sore with rear lights, there are two solutions. The first is to periodically check, modify, repair or change the board. The second is to replace the two tail lights (assemblies) with more reliable, alternative products. There are several types of them on the auto market now.
Manufacturing of overlays
To make your own overlays you will need the following tools and materials:
- Working taillights and a set of LEDs;
- Stationery knife;
- Fiberglass;
- Paints and varnishes;
- Masking tape;
- Epoxy adhesive.
You can make such overlays with your own hands according to the instructions.
The instructions are suitable for homemade decorative decorations or purchased ones. The diode strips are attached with tape or its alternative:
- The taillights need to be covered with masking tape. After this, you need to apply fiberglass cloth to the tape.
- LED overlays will be installed in it, then the fiberglass needs to be impregnated with epoxy glue. It should be applied in 2-3 thin layers. All irregularities must be removed, and then wait for complete drying, which in normal garage conditions lasts 12 hours.
- When the glue has dried, you can remove the workpiece and then outline the contours of the future decoration with tape or a marker. After this, the designed profile is cut out with scissors. Once the two shapes are cut out, you can move on to putty. The dried surface should be sanded with fine-grained sandpaper. Afterwards the primer is applied, and then the main coat of paint.
- After 100% drying, a protective varnish is applied. LED covers are installed on the rear lights. Tuning is complete.
What to do if the VAZ reverse light does not work
There are times when the light fails and stops lighting up after we have engaged reverse gear. This creates discomfort for the driver when reversing, and also stops informing other road users of your intentions. Therefore, after detecting a malfunction, it is necessary to urgently repair the electrical circuit of the reversing light.
First of all, always check the condition of the fuse. The mounting block can be installed either in the engine compartment or under the instrument panel. In any case, it must be opened and the condition of the fuse assessed. As for the number under which the protective device is located, reference books regarding the electrical equipment of your car will help you here. If the fuse is blown, do not replace it immediately. First, find the short circuit and fix it. To find the location of the short circuit, it is necessary to check the length of the entire wire route. However, if the fuse is intact, then move on to the next step.
Now the performance of the lamp is checked. It is possible that the light bulb has burnt out. To check it, you can use a standard tester, which includes a regular 12-volt battery. Connect it to the lamp contacts and check its operation. If the lamp does not light up, it means it is burnt out and needs to be replaced. However, if the lamps light up, it means that the problem is not in them at all and further diagnostics need to be carried out.
The third in line is a device called a “frog”. The fact is that finding it is not as easy as it seems at first glance. This is due to the fact that it is usually located in the lower part of the car, in particular on the gearbox. During the inspection process, it is necessary to check the contact connections and, if they are dirty (and this is what happens in most cases), clean them. If this does not help in solving the problem, then the fault must be looked for in the car’s ignition switch.
The fact is that the reverse light circuit passes through the car's ignition switch. Disassemble the lock housing and check the condition of the contacts that are responsible for turning on the reversing light. As a rule, in addition to the flashlight, consumers whose power is supplied through the ignition switch also do not work. These may be a heater fan, etc.
Open your car's electrical diagram and note the color of the wires that should supply power to the reverse light. Checking the electrical wiring begins with checking the power to the lamp. Set the tester to 12 volts and place the probes on the terminals at the rear of the car. In this case, reverse gear must be engaged and the ignition must be turned on. If the output voltage is zero, further testing is carried out on the “frog”. If there is power on it, then most likely the wire leading from the “frog” to the reversing light is damaged. If there is also no power, check the mounting block. Power should appear near these two elements. Based on the values obtained, find the faulty wire and replace it.
Tips for motorists
According to these Rules of the Road, on any moving vehicle, including the VAZ-2114, the headlights must be turned on, along with which the side lights must also be turned on. In addition, they must be turned on when the car is stopped or parked on the road in the dark and in conditions of insufficient visibility. Therefore, they must always be in good working order.
The electrical circuit of the side lights of the VAZ-2114 is not so complicated and, if desired, any self-respecting driver will be able to find a malfunction associated with the failure of its operation. To do this, you need to know that terminal No. 1 of the side light switch is always supplied with positive voltage from the battery, bypassing the ignition switch. If the side light switch key is in the on position, then electric current flows to two fuses F10 (7.5A) and F11 (7.5A), which respectively protect the electrical circuits of the left (F10) and right (F11) side lights. The further path of the current lies to relay K4 (lamp health monitoring relay), and then to the front and rear side lamps.
When only one of the side light bulbs does not light, then we check whether it has burnt out. If it burns out, then we replace it with a new one of similar power, but if it is intact, then we will have to look at the condition of the contacts of the cartridge in which it is inserted. In the rear lights, due to moisture getting into them, oxidation is possible, both of the tracks and the pads through which voltage is transmitted to the terminals of the side light lamp.
Another reason why the headlight lamp does not light up may be the lack of voltage at the corresponding terminals of the rear light blocks or headlight blocks. Then, using a tester, you will have to ring the corresponding wires:
- The right front marker does not light up (check the yellow wire from terminal No. 4 of the headlight to terminal No. 8, block X6 of the mounting block);
- The right rear light does not light up (check the yellow wire from the right rear light block to terminal No. 9, block X9 of the mounting block);
- the left front marker does not light up (check the yellow-black wire from terminal No. 4 of the headlight to terminal No. 10, block X6 of the mounting block);
- the left rear light does not light up (check the yellow-black wire from the right rear light block to terminal No. 17, block X9 of the mounting block);
If both lamps on the right or left side of the car stop working, then troubleshooting should begin by checking the corresponding fuses located in the mounting block under the hood of the VAZ-2114 car, since the simultaneous burnout of two dimensional lamps at once is unlikely. The blowing of fuse F10 is very easy to determine, since it will lead to the cessation of combustion of the backlight lamps of the instrument switches. Also, the reason for turning off the side lamps may be the failure of relay K4.
3 comments
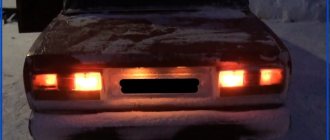
When you press the brake pedal, the rear turn signals turn on. When you turn on the turn signals, the rear lights begin to switch and shine like garlands?
When connecting to the board in the chip (connector), the wires were not connected correctly. And the chip itself is apparently not original, but was attached by someone illiterately, despite the diagrams. You have the wire that is responsible for the turns - in place of the dimensions. It is easy to treat. You need to transfer the wires from the wiring to the chip. You need to find the ground on the rear stopper board (there is a green stripe on the board that runs under each light bulb socket); see which wire is connected through the chip and connect to the black wire from the rear wiring. Then we take the wire on the chip below and connect it in the following sequence: 1 wire in the chip with black (ground), 2 - blue (turn signal), 3 - red (stopak), 4 - yellow (marker)
On the right side, the dimensions do not light up, the fuses are intact, and the light bulbs are intact. Could it be K4?
Guys, tell me, the lights on the left side do not light up! The fuse is intact!
Recommendations
Comments 28
And that’s it., finally)) the mounting block turned out to be working, but still left a new one as a spare, because everything on the old glass heating fuses burned out. I replaced the rear boards and harnesses with wire plugs, all the wiring was rotted in the plugs, and the stop on the spoiler was also replaced with a new one, the old one somehow broke along with all the stops for the company.
Total. Stop in spoiler 250 rub. Boards cost 220 rubles each assembled. Flagella 20 RUR, mounting block from disassembly 1000 RUR.
The new stop spoiler is of much worse quality, the factory one was much brighter. The lamps in the new stop are terrible
We got around to replacing the mounting block with a new one. I rearranged everything and ooooopppppaaaa. The feet still don't work)))
To be honest, I don’t know where to dig anymore...
In the meantime, I’m waiting for my salary, I’ve already gotten used to pressing the rear PTF button when braking))) so that no one will correct my ass))) at least somehow attract attention that I’m braking)))
Still, I decided to disassemble the mounting block and the forecast is disappointing, fuse f4, which seems to be used for heating the rear window, the cigarette lighter and somewhere else, melts the board, everything around it is scorched, the board can’t even be reached, the plastic has already melted to it, next to fuse f3 it is is responsible for the brake lights, perhaps the whole reason is this, how reluctant I am to buy a new unit... but I’ll have to go on a hike. So far I have only treated it with liquid electrical insulation before replacing the unit
That's all we have. all 3 brake lights (spoiler) do not work. The light bulbs are intact, the grounds have been cleaned, the boards are in more or less perfect condition, the tracks are intact, the lamp serviceability relay has been replaced with a new one, the frog is working, the frog is receiving power. for a mystic?))))
In short: in the footsteps, today it was the same, two lamps stupidly burned out at the same time. The spoiler most likely has some wiring cut somewhere. Regarding the turn signal: this is a jamb of the board, either change the lights completely, or just start the car, turn on the lights, turn signal and lightly hit the glass with your palm several times until it is fixed (the contact comes off there). Cleaning doesn't help for long.
stripping does not save for very long. If the weather is rainy or winter, then a month at most (
Check the limit switch (frog) under the brake pedal, it may be damaged. Better yet, buy it and replace it right away, the price is reasonable.
I removed the wires from the frog, shorted it out, nothing lights up, I’ll buy a tester, I’ll have to see if there’s any current flowing to it at all
Check the limit switch (frog) under the brake pedal, it may be damaged. Better yet, buy it and replace it right away, the price is reasonable.
There are 12 V on the wires to the frog, so what?) I shorted the wires, everything is quiet. Let's go to the relay then
And if it burns out, the stops don’t burn? It is also responsible for the fact that if they do not light up, it signals or I do not understand its essence correctly
How can I check the relay? With others, it’s clear they click) should this also be?)))
if it’s burnt, you’ll know by the smell)) and you can open it, there are 2 latches on the sides, you can pry them off and the relay housing will come off
The problem with the blinking of the fog lights along with the turn signals was solved by cleaning the contacts of the headlight. My feet don't still burn. I'm looking at the relay
Are both feet missing? Look at the relay for monitoring lamp malfunctions (the largest in the ChYa) when I paralleled the stops with the PTF, the relay burned out from overload, but yours may have just burned out from a bad ground))
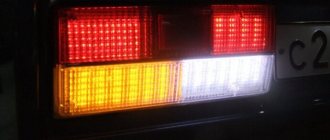
What options are there for decorating taillights?
Quite often, car owners choose so-called angel eyes to decorate the front optics, and LED elements for tuning the rear lights of the VAZ-2114, and other models. Independent tuning for rear optical devices is quite simple, but it is worth considering that this process will require the installation of diodes, so you need to decorate the lights taking into account the recommendations, step by step and slowly.
It is worth noting that LED lighting is not only used for car decoration, but also for practical use. Among the main advantages are the following:
- since LEDs illuminate the road much better than conventional incandescent lamps, driving safety increases several times;
- the driver will be able to travel more comfortably, both at night and in adverse weather;
- This type of tuning is permitted by law, so the driver will not be fined for such decoration.
Car owners can decorate car optics in the following ways:
- LED overlays;
- diode rings that are installed on the lights;
- additional LEDs or more powerful light bulbs that are pre-tinted.
Let's look at each tuning option in more detail:
- LED overlays. The most inexpensive and, of course, popular tuning option for the rear lights of the VAZ-2114 is the use of LED overlays. Car owners can buy ready-made linings in various designs or make them themselves. Most often, it is independent overlays that are used to decorate optics, since drivers are able to create the most original and best-suited decoration option for flashlights without any problems. And for this you only need two main components: fiberglass and special epoxy glue.
- Car owners began to use tuning with diode rings relatively recently. This method of decorating optics can be done independently by those who understand electronics. Its essence lies in the fact that you need to completely replace the rear lights, having first removed the old ones, and you will need to install those optical lighting devices that are modernized independently.
- Upgrading the rear lights with more powerful lamps, as previously mentioned, is necessary after preliminary tinting, so that the bright light does not blind the eyes of oncoming drivers. According to experts, this tuning option can be used for VAZ-2114 cars, but only as a last resort, since this option implies some disadvantages:
- the load on the generator increases;
- fuel consumption increases several times;
- Car wiring overheats.
And since the engine on the VAZ-2114 does not have enough power, as indicated by numerous reviews from car owners, the use of powerful lamps, one might say, is a rather dubious tuning option for this car model.
- Installation of additional individual LEDs. This tuning option is the most creative, because it is possible to turn your own design fantasies into reality, however, this option will require more time to create a design solution and the installation itself. To speed up the process, experts recommend purchasing ready-made individual LEDs and doing further installation yourself.
Dashboard functionality
The instrument panel installed in the vehicle will allow the driver to see a lot of useful information, monitor the main systems of the vehicle, as well as timely diagnose and repair faults. For example, light bulbs in a VAZ-2114 may come on for the following reasons:
- lack of battery charging;
- lack of fuel in the tank;
- decrease in oil pressure;
- excessive amount of water in the filter;
- problems with the fuel system;
- The handbrake is stuck;
- problems with the motor system and so on.
From all this it is clear that the lamps on the panel allow you to identify problems with the car, and if they themselves do not work, then an important breakdown can easily be missed, which can not only reduce the service life of your VAZ-2114, but also cause an accident
It is for this reason that when malfunctions are detected, it is very important to change the lamps in a timely manner (they cannot be repaired)
Tail light repair
The most common reason for the failure of a VAZ 2114 rear light is the failure of a flexible printed circuit board or a connector made directly on it with conventional metallization. You can, of course, just buy a new printed circuit board and replace the faulty one with it, but, firstly, for how long?
And secondly, we are not looking for easy ways. So we will try to eliminate this malfunction on our own, at minimal cost and in such a way that it will last forever. Let's start with the connector for connecting the flashlight to the on-board network. It looks something like this:
The connector for connecting the rear light to the on-board network is part of a flexible circuit board and cannot be replaced separately
There are many reasons for this connector to fail. For example, we removed the power supply from the flashlight too often and simply partially erased the traces, which have a very small thickness of copper deposition on the plastic. Another reason is that the conductive paths next to the connector broke due to constant vibration. Well, the most banal thing is that the tracks burned out due to overload or short circuit.
Due to burnout of the conductive tracks of the flexible board, the rear fog lights do not light up
The photo shows a flashlight connector of a different modification, but the meaning of the problem is the same. All these issues can be solved with the help of a soldering iron, mounting wire and a regular six-pin (or more) connector with a mating part.
For repairs you will need this block with a mating part
We clean the connector contacts on the board using a student eraser (not sandpaper - the foil is very thin!) and service them.
We solder the wires from the block onto the tracks, not forgetting to mark them, and fill the soldering area with sealant or a hot glue gun.
Mounting block soldered to the rear light board
We cut off the standard power harness block, and in its place we solder the mating part of the new one. We assemble the flashlight, connect it to the on-board network - and check it. If we haven't messed up the wiring of the pads, then everything will work right away with a bang.
What to do if the tracks are burned out or broken? You can get out of this situation as follows. Immediately after the fracture, we clean the protective varnish from the tracks, tin, and solder the block. It will look like this:
You can solder the header anywhere on the flexible board.
You can, of course, limit yourself to this (until next time), but if you spend a little more time and effort, you can make more serious repairs. Flashlights modified in this way will serve faithfully for many years. Such a repair will save you from the eternal problem of contacts of flimsy standard sockets - this is also a very common malfunction of VAZ 2114 headlights.
To implement this idea, in addition to the six-pin block with a mating part (see above), you will need five cartridges from the VAZ 2106 direction indicators and a dozen terminals for them.
You will need 5 such cartridges and 10 terminals for them
We remove the lamps, standard sockets and flexible printed circuit board from the panel. We place the purchased cartridges in the right places on the panel and mark their centers. Special precision is not required here, the main thing is that each lamp shines into its own “window”. We drill holes according to the diameter of the base parts of the cartridges.
Holes for future cartridges
We insert the cartridges into the holes, mark the mounting holes, drill them, and screw in the screws. Now the cartridges are firmly fixed in the panel.
We secure each cartridge with two self-tapping screws
Using a mounting wire with terminals pressed onto it (you can crimp it with ordinary pliers and solder it to be sure), we assemble a circuit that repeats the layout of a standard flexible printed circuit board. To be sure, the terminals can be insulated with heat-shrinkable tubing, but in principle this is not necessary - the panel on which the cartridges are mounted is plastic. We solder our block to the ends of the wires.
This block will connect the rear light to the on-board network
We solder the mating part of the block to the power supply harness of the lights, having first cut off the old one. We solder it, not twist it together. The twist will oxidize in a week, and problems will begin again - sometimes it burns, sometimes it doesn’t. We insulate the solder joint with heat shrink or cotton (black rag) tape. PVC electrical tape is an extremely bad option. It can unfold over time. This kind of isolation is no good.
Everything is ready, you can connect and check
We admire our work for a couple of minutes, insert the lamps, connect them, check them. Is everything working as expected? We assemble the lantern and connect it.
The lantern is in place, all problems are solved for a long time
LED analog P21W
Adapter
Alas, the quality and efficiency of the standard cabin filter provided for the VAZ 2114 leaves much to be desired.
Essentially, it is a strip of filter material that is located between two plastic grilles. The effectiveness of this design is insignificant, which forces car owners to take certain measures.
The best measure is to install a filter adapter. Making it yourself is not difficult, although there are other ways to obtain this design.
Adapter drawing example
Thanks to the adapter, it becomes possible to install a truly effective air purifier for the cabin, which retains the smallest particles and does not allow the driver and passengers to breathe dust.
Externally, the adapter is an improved housing for the interior ventilation system with a filter built into it. The design consists of two elements - the rear and the front. A filter is inserted into the rear component, and the joints between the adapter parts are sealed with rubber gaskets. This ensures the necessary tightness. The design nuances will allow you to avoid moisture penetration even when washing the car.
Article on the topic: How to properly start a car from a pushrod: injector and carburetor
When planning the installation of the adapter, experts strongly recommend using a pleated cabin filter borrowed from the VAZ 2110.
The simplicity of the adapter design makes it possible to replace the filter with your own hands in the shortest possible time. And during installation you do not have to remove the heater. So this is an ideal solution to significantly improve the ventilation system of your VAZ 2114.
Options for obtaining an adapter
If you have made the right decision that you want to get an adapter for your VAZ 2114, you need to decide how exactly you will get it.
There are three main options for this.
You should start making your own adapter only if you are completely confident in your own abilities. Spend the money you save on purchasing a high-quality carbon filter from a VAZ 2110.
Making the adapter
The instructions for creating an adapter with your own hands are quite simple. Another question is how accurately you can implement your plans.
- Find diagrams to create an adapter. Now there are many of them on the Internet. Just keep in mind that you need an adapter specifically for the VAZ 2114.
- Make a layout out of paper so that you understand exactly where each part goes and how they are connected to each other.
- Stock up on the required amount of stainless or galvanized steel. Some people use plastic, but it is a little more difficult to work with, plus it can cause problems when getting bends.
- Cut out the necessary adapter elements from the material, guided by the drawing and layout.
- Use a vice and mallet to make bends. The walls will be thin, so do not use a metal hammer. It is better to take a wooden or rubber mallet.
- The parts are connected using M3 bolts or rivets.
- The advantage of rivets is that you do not need to drill holes in the metal. But they also have a drawback - a high probability of damage to a thin sheet of metal.
- At the last stage, carefully treat all joints, connections and holes with sealant. This will allow the structure not to make unnecessary noise while driving.
Article on the topic: H4 lamps on the VAZ 2114: why halogen, lamp test, all-weather models
Finished design
The manufacturing process will take at least 6 hours. Plus, you will additionally have to spend time studying diagrams, drawings and creating a layout. So be patient.