Safety when driving a car is ensured by several systems, however, the main role is still assigned to the car's brake system. Timely braking saves you from traffic accidents, and the hand (parking) brake helps to secure the car on an inclined surface. It is these elements of the car that need to be given special attention. Timely diagnostics and repairs will help protect you and your car.
A properly functioning braking system is a guarantee of safety.
BRAKE SYSTEM DEVICE
Like any other mechanism in your car, the brake system consists of several elements that work together. The VAZ brake system is no exception. It is much simpler both in structure and functionality than in popular foreign cars, but it also deserves attention.
Its main elements are:
- Front wheel brake structures;
- Pipelines (both sides);
- Hydraulic drive main cylinder;
- Tank;
- An amplifier that has a vacuum structure;
- Braking mechanisms located on the rear wheels;
- Two pressure control levers;
- The hydraulic system also has a regulator that controls the pressure;
- Pedal;
- Hoses made of flexible material.
The system is designed so that if one of the circuits fails, the second will provide safe braking. This is done in order to make driving as safe as possible. The brake system of the VAZ 2115 works on the same principle.
The hand brake consists of:
- Lever with locking button;
- Cable in a protective sheath;
- Adjustment nuts;
- Equalizer;
- Locknuts;
- Protective cover.
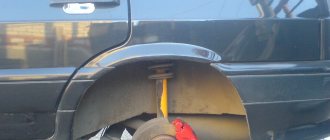
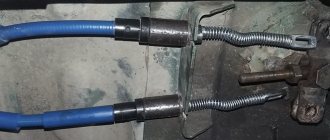
The weak point of the handbrake is the cable . It requires constant attention. Its stretching or rupture can lead to disastrous consequences. It is also worth remembering that the pads are constantly worn out (especially with active use). It is important to pay attention to the brake force regulator of the VAZ 2113.
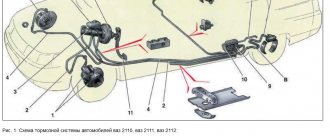
Diagram of the brake system of a front-wheel drive VAZ car (device)
These are the elements that make up the brake system of the VAZ 2114. Everything is quite simple, both in repair and in preventive maintenance. Any adjustments are also made without much effort. For example, you can adjust the handbrake in half an hour yourself, and adjusting the brake pressure regulator of the VAZ 2114 will not cause stupor even for a beginner. These are the key features of the domestic automobile industry - everything is easy and simple.
Features of operation
By paying attention to the following signs, you can determine that the brake system needs adjustment or repair:
- If the pedal does not have the usual tension, then air has entered the system. It can be removed by completely disassembling and sealing the system.
- Vibration or excessive disk runout occurs. This defect is caused due to damaged disks. The problem is solved by grinding, but if the thickness of the discs becomes less than 11 millimeters, then replacement is required.
- If grease appears in the parking space, it means the sealing rings are worn out.
HOW TO ADJUST HYDRAULICS PRESSURE
As you know, hydraulic drives use fluids and pressure in the system instead of conventional mechanics, where any force is applied either directly or through transmission mechanisms. The key to clear hydraulic responsiveness is the presence of the required amount of brake fluid in the system and, of course, correctly adjusted pressure.
To properly adjust the pressure in the drive, you need to find an assistant. Doing this work alone is extremely inconvenient, and for the final test you will need an outside perspective.
The VAZ 2114 brake pressure regulator allows you to adjust the operation of the brakes to the required level. To do this you just need to do certain things:
- First you need to drive the car into the pit and rock its rear end. This will bring the suspension to the middle position, and this is exactly what needs to be achieved;
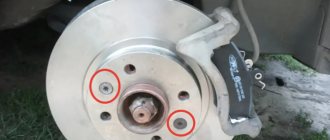
- Then slightly unscrew the front bolt on the VAZ brake pressure regulator mount;
- Using a screwdriver, make a small gap (2 mm) between the lever and the spring. For convenience, insert wire or whatever is at hand. A special protrusion on the lever allows you to move it to achieve the desired clearance;
- Tighten the previously loose bolt.
Now you need to check whether everything was done correctly. Accelerate to 35-40 km/h and brake. If the car does not drive away, then everything is done perfectly. In addition, you need to check the wheel locking sequence. Here you need a second person who will see how smoothly the brakes of the VAZ 2114 work. The whole point is that when working correctly, the front wheels should lock a little earlier than the rear ones. If this happens, then the system is set up with a bang.
If the front wheels lock later, the clearance must be increased. It is also possible that the rear wheels will be very late, in this case we reduce the gap. After completing all the work, securely tighten the regulator mount.
It is important to consider that all tests should not be carried out with flat tires. The result depends on this, and accordingly the brake system can be adjusted incorrectly. The tire pressure of the VAZ 2114 must meet the requirements specified in the vehicle documentation.
Operation diagram of the VAZ 2114 brake system
DEVICE OF BRAKE MECHANISMS
Many people wonder what is the difference between the brake mechanisms of the front wheels and the rear ones. The fact is that when braking, they are subject to different loads, and they do not operate synchronously. But this is not the main reason for the differences.
The front mechanisms consist of:
- Brake disc of classic design;
- Direction pads;
- Calipers;
- Directly the pads themselves;
- Cylinder;
- Piston;
- Seal rings;
- Protection casing;
- Direction finger;
- And its cover, which performs a protective function.
The design of the front brakes is a little simpler than the rear, however, this does not mean that they play a lesser role in braking. After all, these are the mechanisms that work first.
- Nuts that secure the hub;
- Actually, the hub itself;
- Tension springs (lower and upper);
- Brake pads;
- Directional springs;
- Wheel cylinder;
- Expansion bar;
- Handbrake lever finger;
- Handbrake lever;
- Mechanism casing.
As we can see, this difference in design is caused by the presence of parking brake elements in the rear mechanism. Therefore, the part itself looks much more massive. The operating principle of the hydraulic part is the same as in the front. The only difference between the rear brakes is this.
A simple diagram of the VAZ 2114 brake system allows you to easily carry out any repairs yourself. Spare parts for domestic cars are inexpensive and quite common, which greatly simplifies operation and repair work. This is why VAZ cars are in such demand and provide good competition to foreign cars.
Handbrake diagram (photo of handbrake)
Handbrake diagram
Handbrake device:
- Drive lever.
- Lever pawl pull.
- Traction spring.
- Lever button.
- Front cable axle.
- Bolt M6x14.
- Spring washer 6.
- Drive traction.
- Lock washer 6.
- Protective cover.
- Cable equalizer.
- Washer 8.
- Nut M8.
- M8 nut is low.
- Lever axis.
- Washer 10.
- Cotter pin 2x20.
- Lever right.
- Left lever.
- Right expansion bar.
- Left expansion bar.
- Nut M6.
- Lock washer 6.
- Cable clamp.
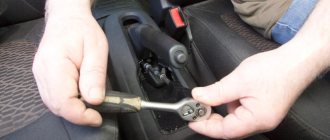
If the handbrake does not hold, then it needs to be tightened. The process of adjusting the handbrake is not very complicated, but it does require some equipment and suitable conditions.
So, before you learn how to adjust the handbrake, you should know the following: the working stroke of the parking brake should be 2-4 clicks, but the handbrake stroke of 8 clicks is not excluded - here you already need to adjust the parking brake stroke.
What does the VAZ 2114 brake system consist of?
The brakes of the VAZ 2114 are a vital system of the car. These are not loud words and every driver will agree with this. Also, every driver knows that timely, high-quality repair of the VAZ 2114 brake system is the key to its trouble-free operation.
The brake system on the VAZ 2114 consists of two main parts:
- Wheel mechanisms - directly affect the elements rotating with the wheel and slow down its rotation.
- Drive – a system for transmitting force from the pressed pedal to the wheel mechanisms.
The “fourteenth” has a dual-circuit system with a hydraulic drive. This means that the force created by pressing the pedal creates fluid pressure (hydraulics) throughout the system. This same pressure forces the wheel cylinders to work. The concept of “dual-circuit” means that the pedal force is transmitted along two lines (circuits) independent of each other to pairs of wheels. The contours have a diagonal distribution: the rear right wheel works together with the front left one, and the rear left one works with the front right wheel. If one of the circuits fails, this solution allows you to maintain vehicle stability when braking, especially on slippery roads and when turning.
Important: the main condition for the system to work is its tightness. Therefore, it is extremely dangerous to operate a car with fluid leakage. It is also extremely dangerous for air to enter the system. According to its physical properties, air, when compressed, decreases in volume many times over, unlike liquid, which, when compressed, practically does not change its volume. When braking a car with a leaky system, the pedal may “fail” and the brakes of the VAZ 2114 will not work.
VAZ 2114 brake system diagram
Examination
You should make sure that the master cylinder is the culprit for the malfunction of the brake system. This is easy to do; you don’t even have to go to a service center and spend money on it.
Unit location
- Press the brake pedal with the power unit off.
- Start the engine without taking your foot off the gas pedal.
- During normal operation, the gas turbine engine fails under the influence of vacuum.
- If the pedal does not fail, you will need to conduct more thorough diagnostics and restore the device to functionality.
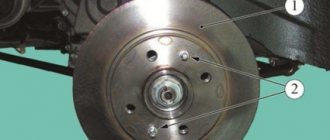
Front brake mechanism
The design of the front brake mechanism on the VAZ 2114
The front brake mechanism consists of the following components:
- Brake disk. Directly connected to the wheel hub and rotates with it. Slowing down the rotation and stopping the disk leads to the slowing down and stopping of the wheel.
- Pad guide. Serves as a holder for the pads and a base for the guide pins.
- Caliper. It combines the pads, cylinder, and piston into a single unit and ensures uniform transmission of force from both pads to the disc.
- Brake pads. They directly act on the disc, squeezing it on both sides and slowing down the movement.
- Cylinder. A sealed cavity in which the piston moves.
- Piston. Under the influence of hydraulic fluid pressure, the pad is pressed against the disc. Thanks to the “floating clamp” system, the second block is pressed simultaneously. This ensures uniform wear of their linings and discs and guarantees effective braking.
- Seal ring. Prevents fluid leakage and ensures system tightness
- A cover to protect the guide pin from dirt, allowing for unhindered movement of the pads.
- Guide finger. Allows the pads to move evenly and adhere to the disc with their entire plane.
- Protective cover. Protects the disc from road dirt.
The front wheels are equipped with disc brakes. They automatically adjust the clearance from the pad to the disc. The caliper and cylinder form a floating caliper, which creates the same even force on both pads. This ensures uniform wear of the linings. To monitor their wear, there is an indicator on the inner block.
Rear wheel brake
Rear wheel brake on VAZ 2114
- Hub nut
- Hub flange. The brake drum is attached to it
- Lower tension spring
- Left pad
- Thrust spring
- Cylinder
- Upper tension spring
- Guide bar
- Eccentric
- Right pad
- Pad cover
Tip: when driving through deep puddles or fording a river, the brakes get wet. This dramatically reduces braking efficiency. Immediately after overcoming a water obstacle on a straight section and at low speed, brake several times. The pad linings, discs and drums will become hot and dry. The system's efficiency will be restored.
In general, the braking system of the VAZ-2114 is simple and reliable. For a person who has experience driving cars of other brands, servicing it on a “fourteen” will not be a problem. But even those drivers who got behind the wheel of a car for the first time can easily understand the operating principle and operating features of the VAZ-2114 brake system. But remember: it is better to service the brake system at warranty service stations from experienced technicians.
Communities › VAZ: Repair and Modification › Blog › Modification of the brake system of the VAZ 2114
If you want to improve the brakes on your car without paying a lot of money for it, then this article is for you.
We purchase: 1) Vacuum booster 21214-3510006 + GTZ 21214-3505010 2600 rubles 2) Brake reservoir 2123 20 rubles 3) Brake fluid RosDot-4 Super 1l 170 rubles 4) Metal drill 8.5 mm 130 rubles 5) WD-40 200 ml 130 rub.
Why exactly VUT and GTZ from the new model three-door Niva? many will say that TorgMashevsky VUT or viburnum is better, etc. ... However, TorgMash is quite expensive, and there are many fakes, and with Kalinovsky components there are an order of magnitude more improvements. The rod of the VUT Niva is the same as on the VAZ 2114 (on the Kalinovsky VUT the rod needs to be lengthened), and the VUT itself is larger in diameter, therefore the productivity is higher, besides, the GTZ from the Niva is 4-circuit, and from the Kalina it is 2-circuit and with it I had to fence tees and adapters for other fittings. With Nivovsky you only need to drill 2 holes for mounting the VUT.
Using such a device we pump out old brake fluid.
Everything becomes without problems, but there are several nuances: - it is advisable to buy a GTZ with a tank already attached to it, because putting it on is very difficult (I probably spent about 1.5 hours fiddling with it). If it is not possible to take everything together, then to simplify the process of putting the tank into place, try installing rubber bands from the holes under the tank from the old GTZ (if they are not very worn out). This will greatly simplify the process - the brake pipes will have to be bent a little so that they fit into the new GTZ. Do this carefully so as not to break it, otherwise you will get hemorrhoids. - It’s better to do all the work together. It’s more convenient and time-saving. It took me and my friend about 4-5 hours (we spent most of our time fiddling around with installing the tank)
Result: The brakes are just silky smooth. The pedal is pressed more easily, and the braking force is simply crazy, the car stops with a stake. I'm incredibly happy. A very useful modification And don’t forget, SAFETY FIRST!