Serviceable headlights on the VAZ 2114 do an excellent job of illuminating the road surface at any time of the day. If a malfunction occurs, the beam strength deteriorates, the daw disappears and harmful flare appears. For safe driving, you need to monitor the optics, make adjustments and change modules in case of damage.
Xenon and LED equipment is not installed in VAZ from the factory. The optics of the VAZ 2114 are equipped with several modules using a classic halogen lamp for the main light.
The headlight design of the VAZ 2114 is not complicated or modern. To replace the lamps, the optics do not need to be dismantled, and the beam is adjusted using built-in thumbwheels.
The disadvantages of front optics include the appearance of cracks in the glass due to stones or sudden temperature changes during operation.
Headlights
On sale there are lensed headlights for the VAZ 2114 for halogen and xenon. Sports modifications are covered with transparent glass with no reflective lines. The internal reflector of the lens is used to form the daw. In such VAZ optics, two separate lamps are used - for the high beam and low beam.
Factory installed front light design:
A distinctive feature is a glass shield with special lines that direct a beam of light onto the road surface.
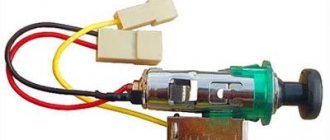
When installing modified flashlights, it is necessary to connect additional power, ignition units and adjust the beam position angle. To turn on the high beam using the standard button in the VAZ interior, you need to correctly identify the contacts and apply them to the module.
The advantages of installing sports optics include an increase in the light spot, while the disadvantages are additional manipulations with the wiring and the low quality of the proposed replacement.
Rear optics
If the standard front optics are reliable and of high quality, then the rear lights of the VAZ 2114 are often capricious and do not work properly.
What kind of lighting do you prefer?
Built-in Chandelier
The VAZ 2115 also suffers from a similar illness and requires constant attention to the rear blocks.
Due to the poor quality of the contact group, the direction indicator, reverse signal or tail light disappears. When the board gets wet, the optics do not work properly and may blink as a brake light instead of a turn signal. Low-quality plastic bends when heated; due to the gaps formed, the flashlight fogs up and the lamps shine dimmer.
Expert opinion
It-Technology, Electrical power and electronics specialist
Ask questions to the “Specialist for modernization of energy generation systems”
Modernization of rear lights VAZ 2108-2115,2110-2112 - Articles on auto electrics - Articles - AUTO ELECTRIC To replace it, you need to disconnect the wiring block, remove the plastic contact panel from the lamp, while squeezing the side fixing elements. Ask, I'm in touch!
Malfunctions and repairs
To repair a VAZ headlight, it must be removed.
In the case of rear lights, you should replace standard sockets and chips with high-quality ones, and seal the joints with sealant. This will eliminate problems with contacts and improper operation of modules.
If the front lights of the VAZ do not work, then you need to inspect:
If problems are detected in the wiring, the faulty parts are replaced. Burnt-out light elements are removed and new ones are installed. If glass is broken, it is not difficult to re-glue it with sealant or remove the defect using special glue.
If after all the work the headlights do not shine well, then the optics need to be replaced with new ones. To do this, you need to decide on the manufacturer and purchase a set of suitable lamps.
Car modifications 2114
VAZ-21140 . Modification with an 8-valve injection engine VAZ-2111, 1.5 liters and 77 horsepower. Serial production from 2003 to 2007
VAZ-21144 . Modification with an 8-valve VAZ-21114 engine, 1.6 liters and 81.6 horsepower. Years of serial production: 2007-2013.
VAZ-211440 . Another modification released in 2007, it was equipped with a VAZ-11183 engine with a volume of 1.6 liters and a power of 82 horsepower. The car was discontinued in 2013.
Repair of rear light connector VAZ 2115
The brake light keeps disappearing, sometimes on the left, sometimes on the right. Placing all sorts of pieces of paper and matches does not solve the problem for long. I went online to learn my mind. I came across a master class from one dude at https:/forum/showthread. php? t=7835
He uses some tricky connectors there called Wieland Electric GmbH “25.303.0653.0”
I scratched my butt and went to Young Technician in search of similar things. But the TOAD was strangling me to give 200-300 rubles for two stray items.
And then my mind brightened. Shouldn’t I attach our, so to speak, native MOLEX instead of the bourgeois Wieland connectors?
Arriving home, I reached into my bins in search of MOLEX dads and moms. Miraculously, I had just two sets and I didn’t have to go back to this “Young Technician”.
One of the most problematic places in domestic cars is the rear lights of the VAZ 2114. In most cases, the problem lies in low-quality, unreliable rear light circuit boards. As a result, contact with incandescent lamps disappears or is lost over time.
Often the problem is solved by using brute force, by striking the body or base of the lamp. However, such actions do not completely eliminate the problem; periodic failures in the operation of the turn signal, side lights or brake lights occur.
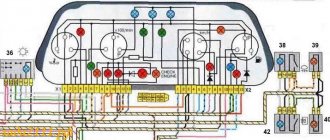
VAZ 2114 taillight pinout
To accurately determine the cause, it is advisable to use a multimeter. If only the rear lights do not light up, this indicates:
Expert opinion
It-Technology, Electrical power and electronics specialist
Ask questions to the “Specialist for modernization of energy generation systems”
Rear lights VAZ 2114, 2115 - connection, modification of fog and headlights Therefore, if for some reason there is no power to the rear fog lights, you should start by checking the fuse and cleaning the contacts. Ask, I'm in touch!
conclusions
There are few reasons for the malfunction of the interior light in the VAZ-2114, and every novice car enthusiast will be able to determine the cause of the malfunction. It is worth remembering that if a car enthusiast is not sure that he can deal with the problem, then it is best to contact a car service center.
Schematic electrical diagrams, connecting devices and pinouts of connectors
The fourteenth model was previously equipped with a 1.5 liter eight-valve engine, borrowed from the VAZ 2111 model with an injector. A little later it was replaced by the VAZ 11183-1000 version, which complies with the Euro-3 standard. The VAZ 2114 injector received a more powerful engine, and this is one of the reasons that the wiring of the 2114 has also changed.
A wiring harness has been added for connecting to the electronic switch. A harness has also appeared for connecting to the ignition module terminal.
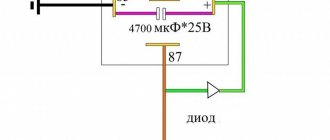
Relay for rear fog lights VAZ 2114 wiring diagram
- open the trunk;
- bend the trim to provide free access to the dimensions;
- Unplug the power connector. To carry out such an activity, it is necessary to tighten the block with the wires, but there is no need to make excessively sudden movements so as not to damage the fragile wires.
- press the specialized latch;
- remove the cover on which the specialized board and light bulbs are located;
- remove the headlight using the key. That is, you need to remove the headlight fasteners and disconnect it from the body;
- After dismantling the old dimensions, you can begin installing the new part.
- assembly is carried out according to a similar principle, but in reverse order.
Do-it-yourself headlight replacement
Replacing headlights on a VAZ 2114 does not require expensive tools. For this work you will need a set of wrenches and screwdrivers.
For convenience, you should prepare the car and materials:
- Wash the body and engine compartment.
- Buy dry wipes.
- Prepare sandpaper to clean contacts or new chips protected from moisture.
To change the front headlight, you need to follow these steps:
- Disconnect the battery terminal.
- Unscrew the four bolts and remove the plastic in front of the radiator.
- Disable the chips from the optics and turn signal.
- Press out the turn signal angle retaining spring.
- Press the plastic fasteners and pull the corner along the direction of the car.
- Unscrew the screws holding the headlight.
- Turn the adjuster rod counterclockwise and disconnect it.
- To remove the eyelashes under the optics, you need to loosen the screws of the bumper near the lamp, bend the corner and unscrew the fasteners.
There is a method for removing the headlight assembly with the “eyelash”. To do this, you need to additionally unscrew the three screws holding the “eyelash” and pull out the block assembly.
Do-it-yourself dismantling of rear lights:
- Disconnect the battery terminal.
- Open the luggage compartment and free up space from unnecessary parts.
- Bend back the soft covering.
- Disconnect the plugs.
- Unscrew the nuts from the studs.
- Remove the reverse sensor.
- Carefully pull the headlight out.
When unscrewing the nuts, do not rush. A part that accidentally falls under the trim will require additional disassembly of the trunk and will take extra time.
Options for replacement
On the assembly line, VAZ cars are equipped with Bosch or Kirzhach headlights. The main difference is the modified design, which provides spot lighting with optics from Bosch. Despite all the advantages, German optics do not sufficiently illuminate the road directly in front of the car. Therefore, it is better to use such headlights in conjunction with fog lights.
Taiwanese manufacturers offer lensed headlights with LED eyelashes, a dark mask and an improved appearance. Lenses configured for xenon have a wide beam and increased brightness. To install such a headlight, you will need to integrate it into the standard wiring. The seats and fasteners are not subject to modification.
Factory VAZ taillights quickly fade and fail. On store shelves you can find a worthy replacement from Taiwan. LED lights are connected to the standard on-board network and operate under the control of an electrical board in a waterproof case. The advantages of the modification include improved brightness, as well as the absence of problems due to water ingress. Installation of lighting does not require intervention in fasteners or electrical connections.
Why don't FZH work?
There are several reasons why FZHs can fail. Let's try to understand them.
There are a lot of reasons for the failure of the FZH, so the driver must know exactly how to eliminate this or that type of breakdown.
Removing the rear light board
To remove the board, you will need to perform a few simple manipulations:
- Open the trunk;
- Remove everything unnecessary from the space so that it does not interfere with your work;
- Remove decorative trim;
- Remove the plastic casing;
- Remove the back panel;
- Having gained access to the socket and the license plate lamp, you can remove the devices;
- Remove the reversing sensor mounting studs and the headlight itself.
Many people confuse the reverse sensor with the speed sensor, since these devices are located in close proximity to each other.
Checking the functionality of the sensor
If the taillights do not turn on, the culprit may be the reverse sensor, that is, a frog in the people.
Remove the contacts from the sensor and clamp them together, then turn on the ignition. If the light appears, the sensor needs to be replaced. If there is still no light, the integrity of the circuit is broken, but everything is fine with the frog itself.
- Place the car on a pit or overpass;
- Apply the handbrake;
- Remove the protection from the bottom, opening access to the gearbox;
- Remove the contacts from the old sensor;
- Place an empty container under the sensor and remove the frog. The container is needed because when the device is removed, oil will leak out of the gearbox;
- Remove the old frog, insert a new one in its place;
- Let the car sit for a while;
- Check the oil level inside the gearbox;
- If necessary, add oil to the required level;
- Reassemble.
Such repairs can be done with your own hands, and the cost will be approximately 250 rubles. This is exactly how much a new sensor for a VAZ 2114 costs now.
Problem with the light bulb
It is not uncommon for taillights to stop functioning normally due to the failure of the bulb itself.
- To replace it, you need to disconnect the block with wires and remove the contact panel from the flashlight. Here you just need to squeeze the side latches to remove the plastic panel;
- Apply a little pressure on the cartridge and unscrew it counterclockwise;
- Check the condition of the contacts and wiring;
- Screw in a new light bulb that matches the previously installed one;
- If necessary, before screwing in the new lamp, clean the contacts and test the wiring with a tester. There may be a break in the circuit, so a new light bulb will not work.
Useful tips Connection diagrams Principles of operation of devices Main concepts Meters from Energomer Precautions Incandescent lamps Video instructions for the master Testing with a multimeter
Causes of breakdowns
The most common reasons for node failure:
- the narrowest point in the entire structure is the elastic board;
- in second place, banal burnout or mechanical damage to light bulbs;
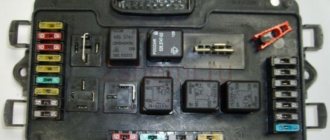
- the third reason is a problem with the fuse or relay;
- oxidation of contacts;
- broken wiring.
First of all, it makes sense to check those elements that do not require removing the entire headlight (for example, fuses, relays). Then check the quality of the connections, the presence of oxidation and the voltage supply level to the illuminator. The last step is to disassemble the taillight, remove and inspect the board.