Guide to removing and installing rear lights on Lada Kalina
- The first step is to open the Velcro windows in the trunk trim, which give access to the headlight mounting bolts. Although, I would recommend bending the corner of the trim completely in the right place. To do this, you need to unscrew two screws. The first one is located on the threshold of the trunk, closest to the corner:
- The second bolt is on the plastic panel at the top, unscrew it completely, since the casing is located under this fastener, and below we take out the piston, which also secures the upholstery. In the photo below these elements are marked with arrows:
This is what it should look like after the work has been done, as shown in the picture below:
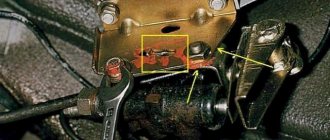
- Now that we have free access to all fasteners and electrical wiring, we can begin removal. To do this, take a head with a ratchet size 8 and unscrew the three nuts securing the rear light, which are marked with yellow arrows, and immediately insert the rubber seal of the wiring harness inside, marked with an orange arrow in the picture:
- Now disconnect the rear light wiring plug by pressing the latches on both sides:
- After which you can safely begin to remove the rear light of our Kalina, simply by pulling it from the outside, since nothing else holds it.
- We install the rear lights in the reverse order of removal. This manual is suitable for all owners of Kalina in a Station Wagon or Sedan, although for the Hatchback there are no fundamental differences in dismantling, all work is done by analogy - the only difference is in the mounting locations of the headlights themselves.
Replacement process
The process of replacing lights on the Lada Kalina 2 differs depending on its type. There are “Kalina 2” hatchback and station wagon. For a hatchback, the replacement sequence is as follows:
- open the 5th door of the car;
- Remove the 2 bolts securing the rear lighting component to the luggage compartment side. Use the key on 8;
- pull the light from the back of the car towards you, using little force;
- remove the fastener studs from the headlight fixing fasteners at the rear;
- move the lighting component away from the car body;
- if you need to replace the lamp, remove the socket with the broken product;
- After installing a new lamp in the lighting system, perform the entire process in reverse order.
Removing the rear light on Lada Kalina hatchback
The principle of removing the headlight on a Kalina (station wagon) and replacing the lighting unit differs depending on the shape and structure of the car itself. For the process of replacing the rear light unit you will need:
- open the 5th car door;
- open the hatch located in the trunk trim;
- disconnect the block with the light cables at the rear of the car from the harnesses and wires;
- Unscrew the 3 nuts securing the product to the car body;
- disconnect the device lock;
- remove the lamp retainer from the car body.
If you are interested in replacing the lamp, then after the above steps you need to remove the broken socket by turning it counterclockwise. This way you can remove it from the headlight housing. The new lamp is inserted into the socket by pressing and turning it clockwise. If you need to completely replace the lighting, simply insert the new product into place and perform the reverse steps of disassembly.
How to remove the tail light of a Lada Kalina station wagon? Replacing bulbs in the taillights of Kalina 1
Hello everyone, dear motorists! Today in the “Repair” section I’ll tell you how to remove the taillight and replace the bulbs in the taillights on a Lada Kalina. The work is not difficult, but it does require certain skills.
Light bulbs can be called consumables; they don’t burn very often, but unfortunately, this still happens to almost everyone from time to time. However, there are cases when the lights come on very often, almost every week or more often, in which case you should check the on-board network and some other points, which are discussed below.
Why do the car lights light up?
- The first thing you should pay attention to is the increased voltage in the car’s on-board network; if it exceeds 14.5 Volts, replacing the headlight bulbs will be frequent. In addition, other energy-dependent nodes will suffer.
- If the headlight glass is leaky or poorly ventilated, condensation may accumulate inside the headlight, causing the bulbs to burn out.
- The frequent failure of lamps can also be explained by the poor quality of the product itself. If the light bulbs are cheap, of low quality, you can hardly expect long service from them. Cheap non-original lamps do not have special gas and the correct pressure; as a result, after some time, tungsten evaporates and the lamp burns out.
- Poor contact. If the bulb is loose or has poor contact, it will most likely cause the bulb to burn out prematurely.
Before removing the rear light on Kalina, you need to prepare:
- Key to "8";
- New light bulbs;
- And straight limbs (just kidding ;-))
Lighting tuning options
The most common options for tuning Lada lighting products are:
- tinting;
- installation of an additional brake light.
Tinting of car lights occurs by painting or wrapping with film. The second method is more popular among drivers, because the film does not reduce the lighting intensity so much. In addition, covering the lantern with film can be done faster and better than conventional painting.
Tinted tail light
For the coloring process you will need:
- hair dryer (household or industrial);
- plastic scraper;
- clean scraps of fabric;
- vinyl film (1 square meter is enough);
- stationery knife;
- water sprayer.
It is possible to carry out the tinting process without removing the lighting, but performing such work at the highest level is only available to trained specialists. It would be better to first dismantle the products according to the standard scheme.
After this, you need to clean the components from dirt, spray water (if indicated in the instructions for the film) and apply the vinyl. To give it the desired shape, heat it with a hairdryer, and then smooth it with a scraper, removing excess water. Cut the film with a knife and wait for it to dry. The whole process will not take more than an hour. Remember that applying paint or film will affect the brightness of your lighting, so you may need to install brighter bulbs.
An example of painting the lights on a VAZ 2109
Often, to improve safety on the road, Lada drivers decide to install an additional brake light at the rear. For this you will need:
- knife or file;
- key to 8;
- LED strip;
- glue;
- soldering iron;
- wiring;
- sealed substance.
If you install additional components, it is not necessary to dismantle the Lada bumper - just stick your hand under it at the location of the light sources and unscrew the corresponding nut with a size 8 wrench.
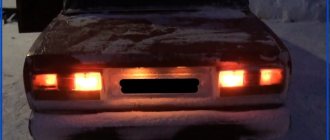
After this, disassemble the reflector: cut off the layer of sealant with a sharp knife and clean the edges with a file. Next, take the LED strip, cut it into pieces and place it on the glue inside the reflector. Connect the wires coming from the tape to the lighting system using a soldering iron. After installation, check that the connection is correct by turning on the brake lights.
New Lada: Unstable operation of the LADA Kalina engine - LADA forum (VAZ) Kalina
If you did everything correctly, assemble the reflector using a sealing substance. Pull the wiring coming from the tapes through the rubber in the reflector body. Wait for the sealant to dry. Route the wiring to the left (right) side of the car, depending on the installation location of the first reflector. Route the wires into the luggage compartment after removing the plug. After this, connect the brake light to the lamp wires, isolate the wiring and check the operation.
How to remove the rear light on a Lada Kalina - step-by-step instructions
- The first step is to remove the “-” terminal from the battery.
- Then we open the trunk and find these technical holes that look like pockets. In them we find nuts that need to be unscrewed (two in the left “pocket” and one in the right).
- After this, turn off the power; to do this, simply unclip the wire block.
- When the light mount is unscrewed and the power is turned off, the rear light can be removed without any problems.
Removing the rear light, replacing lamps VAZ (Lada) Kalina 1117 2004-2013
Tool:
- Driver for socket attachment
- High nozzle on the wrench 10 mm
Parts and consumables:
Note:
The work is shown on the left lantern.
1. Disconnect the wire terminal from the negative terminal of the battery.
2. To replace the lamps in the rear light, simply unscrew the mounting nuts and remove the light from the body without disconnecting the wiring block. Inside the trunk we bend the cut out part of the upholstery. Using a wrench or a high 10mm socket, unscrew the three nuts securing the light (the third nut is located under the upholstery and is not visible in the photo).
3. We move the lamp away from the body. By turning the side and fog light lamp socket counterclockwise, remove the socket with the lamp from the lamp housing.
4. Pressing the lamp, turn it all the way counterclockwise and remove the lamp from the socket.
5. Install the new lamp in reverse order. The combined parking and fog light lamp has two protrusions located at different levels.
6. When installing it, the protrusions must fit into the corresponding grooves of the cartridge. The grooves on the flashlight body have different widths. This should be kept in mind when installing the lamp socket.
7. We carry out the operations for replacing the remaining lamps in the same way.
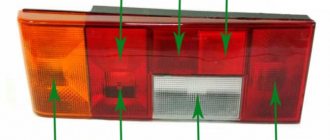
Position of the lamps in the rear light: 1 — reverse lights; 2 — brake signal; 3 — direction indicator; 4 - side and fog lights.
8. To remove the light, squeeze the clamps of the wiring harness block and disconnect it from the rear light wiring block. Using your hand, push the rubber sealing cover of the wires out from the hole in the body.
9. Having unscrewed the nuts securing the lamp (see above), remove the lamp by pulling the wires with the block through the hole in the body.
10. Install the lamp in the reverse order.
The article is missing:
- High-quality photos of repairs
Replacement process
The process of replacing lights on the Lada Kalina 2 differs depending on its type. There are “Kalina 2” hatchback and station wagon. For a hatchback, the replacement sequence is as follows:
- open the 5th door of the car;
- Remove the 2 bolts securing the rear lighting component to the luggage compartment side. Use the key on 8;
- pull the light from the back of the car towards you, using little force;
- remove the fastener studs from the headlight fixing fasteners at the rear;
- move the lighting component away from the car body;
- if you need to replace the lamp, remove the socket with the broken product;
- After installing a new lamp in the lighting system, perform the entire process in reverse order.
Removing the rear light on a Lada Kalina hatchback
The principle of removing a headlight on a Kalina (station wagon) and replacing the block lighting differs depending on the shape and structure of the car itself. For the process of replacing the rear light unit you will need:
- open the 5th car door;
- open the hatch located in the trunk trim;
- disconnect the block with the light cables at the rear of the car from the harnesses and wires;
- Unscrew the 3 nuts securing the product to the car body;
- disconnect the device lock;
- remove the lamp retainer from the car body.
If you are interested in replacing the lamp, then after the above steps you need to remove the broken socket by turning it counterclockwise. This way you can remove it from the headlight housing. The new lamp is inserted into the socket by pressing and turning it clockwise. If you need to completely replace the lighting, simply insert the new product into place and perform the reverse steps of disassembly.
How to remove the tail light of a Lada Kalina hatchback
On the Kalina hatchback version, the rear light bulbs can only be changed by removing the headlight completely. You will need a 10mm socket or tube to remove the 2 nuts.
First of all, we open the trunk, the first nut is located under the plastic plug where the seat belt comes out.
The second nut is located at the bottom, near the seat belt reel.
Unscrew both nuts and lift out the taillight. Important: when unscrewing the nuts, it is advisable to do it with your fingers at the end so that they do not fall in, making it difficult to remove.
Headlights
Replacing a headlight yourself will require preparation of the car and tools. To work you will need:
- set of wrenches;
- screwdrivers;
- rag;
- gloves to protect hands.
For ease of work, you need to wash Kalina in advance and clean the space in the garage. To replace the headlights, you need to remove the bumper and unscrew several mounting bolts.