Wiring diagram for rear lights of VAZ 2109 of all modifications
The VAZ 2109 car was produced at the Volzhsky Automobile Plant from 1987 to 2004 (in Ukraine it was assembled from ready-made VAZ 21093 car kits from 2004 to the end of 2011).
During production, it received five main modifications regarding electrical equipment. In fact, there are more varieties, but we are interested in changes in electrical circuits.
- Classic hatchback VAZ 2109, produced since 1997 (low panel). Hatchback body with mounting block 17.3722.
- Updated hatchback and sedan VAZ 2109, 21093, 21099 (high panel, produced 1988 - 1999). The mounting block is the same, but with knife-type fuses - 17.3722.
- The same updated hatchback and sedan VAZ 21093, 21099, but in the “luxury” configuration (manufactured 1988 – 1998). Mounting block – 17.3722 with knife-type fuses.
- Hatchback and sedan VAZ 21093 and 21099 produced since 1998. A new mounting block 2114-3722010-60 has appeared.
- Sedan 21099 (manufactured since the same 1998) received an instrument panel 2114 and a mounting block 2114-3722010-10 or 2114-3722010-18.
During all this time, the electrical circuit was, of course, significantly improved, but the changes practically did not affect the connection circuit for the rear lights. Even the color of the wires in their power supply harnesses remained unchanged. But since the mounting blocks in these modifications are different (and the rear lights of the VAZ 2109 are powered through the mounting block), it makes sense to provide electrical wiring diagrams for all modifications. Here they are:
Electrical installation diagram for VAZ 2109 since 1997
Electrical installation diagram for VAZ 2109, 21093, 21099 (1988 - 1999 production)
Electrical installation diagram for VAZ 21093, 21099 “lux” (1988 - 1999 production)
Electrical installation diagram for VAZ 21093, 21099 with mounting block 2114-3722010-60 (from 1998)
Electrical installation diagram for VAZ 21099 with mounting block 2114-3722010-10 or 2114-3722010-18 (from 1998)
Well, at the same time, let’s get acquainted with the appearance of mounting blocks of various modifications.
Mounting block 17.3722
Mounting block 2114-3722010-18
Mounting block 2114-3722010-10
Mounting block 17.3722 with blade fuses
Pinout of connectors and design of lamps
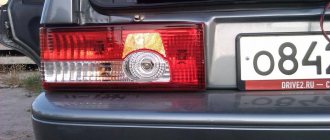
Now about the rear lights. Structurally, this is a single block in which there are five light bulbs. The location and purpose of the lamps in it is as follows:
Location and purpose of lamps in the rear left lamp of the VAZ 2109
In the photo the numbers indicate:
- Turn indicator.
- Side light.
- Fog light.
- Reverse indicator.
- Brake indicator (brake light).
- Retroreflectors (“reflectors”).
All lamps are placed on the back wall of the device, and are powered using a flexible board with metallized tracks.
External view of the rear wall of the flashlight from the side of the lamps (top) and the printed circuit board
The purpose and numbering of the lamps is the same as in the photo above. As shown in the bottom photo, the power connector for the lamps is etched directly onto the rear light PCB. Let's look at its pinout.
Pinout of the power connector for the rear light of the VAZ 2109
Here the numbers indicate:
- Side light (yellow-black).
- Fog light (orange-black).
- Direction indicator (blue-black or blue).
- Fog light (green).
- Minus power supply for all lamps (black).
- Stop light (red).
The electrical circuit of the brake lights is faulty
It is necessary to identify an oxidized contact, a burnt-out wire or a failed connection in the mounting block. To do this quickly and efficiently, you need to know the electrical diagram for connecting brake lights and its features: “VAZ 21083 (21093, 21099) stops, connection diagram.”
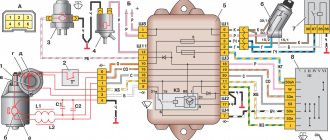
Stops (brake lights) of the VAZ 21083 (21093, 21099), connection diagram
Plus, the brake lights come from output 30 of the generator to block X8 (Ш8) (far left in the engine compartment, pink wires) to the mounting block. Next, through the fuse (No. 6, F3) in the block to block X4 (Ш4) inside the passenger compartment to the white wire going to the brake light sensor. That is, current is supplied to the sensor through the white wire. Next, from the sensor along the red wire to block Ш2 (Х2) (second from the right inside the cabin) and through the mounting block to block Ш9 (Х9) (the large transverse one in the cabin) to the red wire going through the entire cabin to the rear left block, and then to the rear right headlight.
Minus - black wires coming out of the blocks to the headlights. Mounts to the body next to the rear lights.
"Ground" of the rear light of VAZ 2108, 2109, 21099 cars - if the bad foot contacts do not work
You can check the presence of current in the circuit elements using a test lamp - connecting one end to the terminals and the other end to ground. Or by supplying current with a separate wire from the battery positive to the elements of the electrical circuit.
What kind of lamps are there?
Now a few words about the lamps used in the rear light of the VAZ 2109. The A12-5 (T5W) bulb with a power of 5 W is responsible for the side lights.
T5W bulb, responsible for the side light of the VAZ 2109
All steel lamps - direction indicator, fog light, reverse indicator and brake light - are of type A12-21-3 (P21W). Their power is 21 W.
Lamp P21W
Instructions for replacing light bulbs
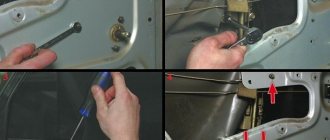
It's time to learn how to change lamps yourself so as not to waste extra money and your time on trips to a car service center. Open the trunk lid and find the rear part of the lights. Disconnect the power supply.
Removing the power supply from the rear light of a VAZ 2109
Press the side latch that secures the light fixture. The latch is located on the side of the light device, which is closer to the central axis of the car.
The back of the lamp is secured using side latches
We take out the back part of the flashlight along with the circuit board and bulbs.
Removing the rear part of the right lamp VAZ 2109
Place the module with the lamps facing up.
Removed module with lamps
We find the burnt-out light bulb, guided by the photo in the section “Pinout of connectors and design of lamps”, turn it counterclockwise, and remove it. Fix the new lamp by turning it clockwise. We install the module in place, connect the power supply.
Cover covering the rear part of the lamp VAZ 2109 (left) and VAZ 21099
Dismantling and replacing rear lights on a VAZ 2109
Now let's talk about replacing tail lights, since they often break and break. Remove the protective cover or trim (see section “Instructions for replacing light bulbs”). We disconnect the power supply; the board does not need to be removed. We find four nuts that secure the lamp to the body. They are marked with arrows in the photo below.
The lamp is attached to the body using four 8mm nuts.
Unscrew the nuts and take the lamp out.
Removing the rear light of a VAZ 2109
We install the new light fixture in the reverse order and connect the power supply.
The most common reason why the brake light on a VAZ 2109 does not work
Hello everyone, today I would like to look at the main reasons why brake lights on a VAZ 2109 (nine) car do not work. In order to find out the reason, the first thing you need to do is check whether there is power to the rear lights. To do this, you need to ring the end of the brake light wire.
If there is voltage, but the brake light on the VAZ 2109 does not light, you need to check the ground on the rear lights. Also, are the light bulbs ok? If only one of the number nine lights is off, then you need to check the board and the condition of its tracks. Sometimes the following happens on a VAZ 2109: the light bulb is fine, and there is voltage, but the brake light still does not light up. Then you need to check the contacts of the light bulbs with the base.
If the power supply to the rear lights of the nine is not suitable at all, then you need to check the brake light switch or the Frog, which is located under the brake pedal. If there is voltage on the frog, but the brake light does not light up, then most likely there is a break in the wires that go to the rear lights, or there may also be a bad contact somewhere. In order to eliminate it you need to find a break.
Next, we look for the cause in the fuses; we need to check the serviceability of the interior lighting; if the interior lighting does not work, then the sixth fuse in the mounting block is to blame. The mounting block on the VAZ 2109 is located under the hood on the driver's side.
We check the brake light fuse and, if necessary, replace it with a new one, observing the amperage. If even after the above manipulations the stop signals do not work, then you need to check the mounting block itself by ringing it or replacing it with a new one.
Ideas for tuning and modifying taillights
Tuning has always been popular among car enthusiasts, and with the advent of super-bright semiconductors, it also affected lighting devices. Today we will not study step-by-step modification instructions, but will consider the most interesting options for tuning the rear lights of the VAZ 2109.
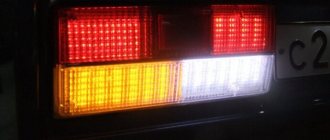
The simplest, but quite effective method of transforming a car is to install ready-made tuned lighting devices. There are a lot of them on sale, for every taste. As an example, let's take a look at the semiconductor taillights for the VAZ 2109. They cost around 3,500 rubles. Not the cheapest, but practically no labor costs, no invention.
LED rear lights “Osvar” for VAZ 2109
A smaller amount may be enough if you don’t take the entire lanterns, but only the tuned glass. For such tinted windows you will need about 500 rubles, but the appearance of the car will not be worse.
Tinted glass for rear lights of VAZ 2109
Healthy. It is not necessary to buy ready-made tinted windows; it is enough to purchase a tint film and stick it on the standard glass. Then you won’t even need to remove the lighting devices.
You can use tint film to tint both windows and lights.
If you want to modify the standard lighting fixtures, you can use LED strip. This modification will cost a maximum of a hundred rubles.
Tuning the rear lights of a VAZ 2109 using scraps of LED strip
The next tuning option looks original, but the taste and color...
Tuning option with LED strip
Instead of an LED strip, you can also use individual LEDs. It’s like it’s not a lantern, but a New Year’s decoration for the Christmas tree.
This tail light is assembled using individual high-power LEDs.
If desired, you can find modular LED lights with complex control circuits, multi-color LEDs and dimming.
Important. Such lights may be beautiful, but they may not be liked by other road users, and certainly not by the traffic police.
Taillight tuning ideas
To highlight the car and make it unique and unique, that is, tuned, you can use several tips. You can use alternative optics.
These lights are much more reliable and beautiful than regular headlights. Among other things, tuning the rear lights can protect the VAZ 21099 from some problems. You can resort to modernization, and then the glass will not fog up and the contacts will not oxidize.
In addition, the rear lights on a VAZ can be painted from the inside. Of course, you need to use a special mixture, because the usual one becomes deformed when heated. In order for it to last as long as possible, the headlights must be disassembled and the additional turn signal reflector removed. Then, using sandpaper, remove the chrome from the lamp and then apply a primer to the surface.
The primer should dry for about 1 hour, in addition, the mixture must be applied in several layers. The dye must also be applied in several layers, and wait about an hour until it dries completely. After completing the work, you can assemble the lantern. When applying sealant of an identical color, the old one must be removed and then the surface of the lantern must be degreased. If the procedure is carried out incorrectly, it will create new problems.
In addition, you can resort to the following methods of independent tuning:
- LED headlight covers. This element looks quite beautiful and unusual. In addition, overlays can be used to decorate not only the rear headlights, but also the fog lights and turn signals. Some even decorate the rims on wheels or the inside of the interior with them, if working with the headlights is no longer possible.
- Diode rings. Also a very popular option. When designing such a decoration, it is best to use high-quality materials and not slack in the work, then the effect will be excellent. Ready-made rings or tape are used for the product.