This type of malfunction, such as non-working brake lights on a VAZ 2107, is a common situation that every owner of this brand of car faces. The reasons why the brake lights on the VAZ 2107 do not light up are factors such as burnt out light bulbs, short circuit in the wiring or oxidation of the contacts. Driving with faulty feet is not only prohibited, but also dangerous, so let’s find out how to find and fix the problem yourself.
Troubleshooting procedure
Lamps fail most often. It's best to start with them. If they are working properly, remove the plugs from the frog and connect them together. The plugs should have +12.
If there is no voltage, check the fuse. If the fuse is intact, check connector Ш12. By applying 12V to pin 3 of the Ш12 connector, voltage should appear. Check the voltage at the fuse contacts. If there is voltage on the fuse on both sides, we try to apply +12 directly to the frog plug. If the lights come on, change the fuse box.
The fuse box can only be repaired in specialized workshops. In this case, the board track could have burned out.
When there is voltage at the frog plugs, but the lights do not light up, we check 12V directly at the contacts of the lights board. If there is voltage, but the lamp does not light, check the connector contact. When there is voltage at the board contact, but the lamp does not light up, remove the lamp and check for the presence of 12V directly on the current of the conductive surface of the base. If there is voltage and the contact is clean, check the housing part of the base. If necessary, replace the flashlight board.
It is extremely rare for the brake light wire to break. The wiring harness comes out from under the instrument panel and runs along the floor of the car under the carpet. Both brake lights are connected in parallel. We check the integrity of the wire from the frog to the lights. If necessary, replace a separate stop wire.
Methods for troubleshooting
Troubleshooting is not a complicated process and even novice car enthusiasts can do it (the author of the video is Avtoelektika VC).
Using a multimeter, you need to test the wiring. Damaged or torn sections should be replaced intact or soldered. If there are traces of oxidation processes on the contacts, they need to be cleaned.
If the LEDs burn out, they need to be replaced in pairs. If the breaker fails, it must be replaced with a new one, as it cannot be repaired. Before replacing, turn off the vehicle's power by removing the negative terminal from the battery. Then disconnect the power wires from the breaker. Next, you need to loosen the lock nut and unscrew the main nut securing the switch to the bracket.
Replacing the brake light switch
Before installation, the new frog should be checked for functionality. This can be done using an ohmmeter. We connect the device to the device and measure the resistance. When the contact is closed, the resistance should be zero. If you press the rod, the contacts should open; the resistance in this case tends to infinity.
Removing and replacing rear lights
The procedure for replacing rear lights is as follows:
- First you need to turn off the ignition, open the hood and disconnect the terminals from the battery.
- Then open the trunk of the car and remove the protective cover on the headlight, disconnect the mount and disconnect the wiring connector from the contacts on the board. Be careful not to damage them.
- Using a size 8 socket wrench, you need to unscrew the four nuts that secure the taillight. Having done this, under the nuts of the studs you will be able to see the tips of the ground cable.
- Next, you need to carefully remove the taillight from its seat. To change the diffuser, it must be removed from the optics body.
- The procedure for installing and assembling optical elements is performed in reverse order.
Total information
| Options | VAZ 2107 | VAZ 21074 | VAZ 2107-20 | VAZ 21074-20 |
| Weight of the equipped vehicle, kg | 1060 | 1060 | 1060 | 1060 |
| Payload, kg | 400 | 400 | 400 | 400 |
| Permitted maximum weight, kg | 1460 | 1460 | 1460 | 1460 |
| Ground clearance of a vehicle with a permissible maximum weight, with tires 175/70 R13, not less, mm: | ||||
| to the front suspension cross member | 162 | 162 | 162 | 159 |
| to the rear axle beam | 157 | 157 | 157 | 154 |
| Permissible weight of cargo on the additional (top) luggage rack, kg | 50 | 50 | 50 | 50 |
| Maximum speed, km/h: | ||||
| with permissible maximum weight | 148 | 148 | – | – |
| with driver and passenger | 150 | 150 | 150 | 150 |
| Acceleration time from standstill to 100 km/h, s: | ||||
| with driver and one passenger | 17 | 16 | 17 | 16 |
| with permissible maximum weight | 19 | 17,5 | – | – |
| Minimum turning radius along the track of the outer front wheel, m | 5,6 | 5,6 | 5,6 | 5,6 |
| The greatest rise overcome by a car with a permissible maximum weight without acceleration in first gear, % | 36 | 36 | 36 | 36 |
Fuse box VAZ-2107
The VAZ-2107 fuse box is located in the engine compartment, to the right of the engine (if you look in the direction of travel of the car). It contains the main fuses and relays. To check whether any of them have burned out, you need to open the hood and the plastic cover of the block, on which the names of the fuses and their nominal values should be indicated.
R1 - relay for turning on the heated rear window . If the heating does not work, check this relay, as well as fuse F5, replace the burnt or faulty ones. If the relay and fuse are working, check the contacts for connecting the wires to the heating strips on the rear window (on the side closer to the side doors)
R2 - headlight high beam relay . Works in conjunction with fuses F12 and F13. If only one headlight does not shine on high beams, most likely the problem is in the lamp, which is time to be replaced or in fuse F12 or F13 (right/left headlight, respectively)
R3 - headlight low beam relay . Works in conjunction with fuses F16 and F17. If the low beam does not work in both headlights, it is most likely the problem with this relay. First of all, replace it with a working one. If it doesn’t help, both lamps could have burned out (this happens) or their fuses.
1 — connector for the relay for turning on the headlight cleaners and washers . If your car does not have these devices, then the presence of a relay is not necessary.
We recommend: Valve desiccant - how to make a special tool with your own hands?
2 — connector for the horn relay . In the figure, a jumper is installed so that the sound signal works without this relay.
3 — connector for the cooling system fan motor relay . In the figure, a jumper is installed so that the fan operates without this relay. Be careful with this connector. Failure to contact the jumper in the absence of a relay can cause the fan to fail, and this can lead to overheating of the coolant and, accordingly, the engine. When the first signs of overheating appear (according to the temperature sensor and boiling of the liquid), turn off the engine as soon as possible.
4 — tweezers for replacing fuses 5 — spare fuses 6 — tweezers for replacing relays
Try to always have spare fuses of different ratings, so that if they blow out on the road, you don’t have to look for the nearest car shop.
parking lights
Dimensions on the VAZ-2107 are activated by the leftmost of the four key switches located under the gearbox control lever . This switch is a three-position switch: the side light, along with the license plate light and instrument lighting, is turned on in the second position.
On the fuse block, which is located under the hood of the car near the windshield closer to the passenger seat, the rear side lights fuses are numbered F14 (8A/10A) and F15 (8A/10A). In this case, fuse F14 is responsible for the operation of the side lights of the left front headlight and the right rear light, as well as:
Expert opinion
It-Technology, Electrical power and electronics specialist
Ask questions to the “Specialist for modernization of energy generation systems”
Preparation Then you need to remove the connecting block with the wires; this should be done very carefully by grasping the connector body and pulling in the direction from the base. Ask, I'm in touch!
Brake lamps, how to check their functionality
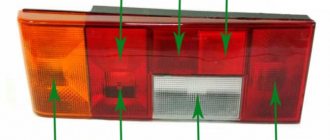
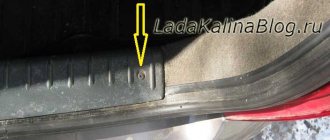
If the fuses are okay, you need to move on. You should open the luggage compartment and remove the taillights to check the integrity of the brake lamps.
It is advisable to check them by inserting spare lamps, since very often upon visual inspection the lamp may appear to be working. If replacement bulbs are not available, remove suitable bulbs from other locations, such as turn signals, parking lights, etc. After replacement, press the brake pedal and check for the presence of light. It is necessary to carry out replacement and other operations in both headlights, because in some vehicles, when one brake light fails, the second one also stops working.
If the light appears, then the cause of the breakdown was indeed the brake lamps, but if the fault could not be eliminated, we proceed to the next stage - checking the contacts.
INSTALLATION OF LIGHTING DEVICES
Installing components on a VAZ 2107 car will not cause any particular difficulties. The procedure is as follows:
- Open the trunk and use a screwdriver to remove the canopy cover that closes it from the inside.
- Use a wrench to unscrew the fastening nuts and unplug the electrical connector.
- Carefully remove the flashlight unit from its seat and clean it of dirt with a rag.
- We install new taillights instead of the old ones and secure them, after inserting a sealing gasket.
Upon completion of the installation of the lights, we connect them and check their functionality in all modes. The installation of new lighting devices on a VAZ 2107 car that complies with regulatory documents does not require registration.
The main causes of brake light failure
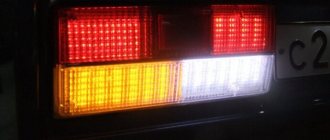
Unlike dimensions and hazard lights, your car must have working brake lights. They signal to cars behind that the driver is slowing down. Notifying drivers behind when braking helps prevent collisions and accidents. It is quite difficult to detect a stop fault on a VAZ 2107 yourself, since these signals are located at the rear. In order to see the operation of the brake lights, you will need two people, one of whom must press the brake pedal, and the second must control the effect.
When you press the brake pedal, the following effects may occur:
- The brake lights are on - there is no malfunction and the car can continue to be driven.
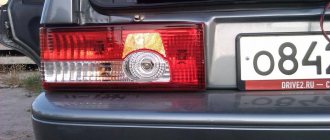
- If they don’t light up, you need to look for the problem. Moreover, the signal that both lamps on the car are not lit indicates the need for a global check, since paired light elements burn out in rare cases.
- They are half lit - if only one brake light is on, then you need to disassemble the second headlight and check the serviceability of the lamp. It is more likely that the lighting element (light bulb) has failed, and less often the cause may be a broken contact.
The reasons for the stop malfunction on the VAZ 2107 are:
Flashlight weight
- Fuse F11(10A) has failed. A fuse consists of a fuse-link that burns out when a large current passes through the circuit. The fuse is designed for the appropriate current value, so its blowout may be due to a short circuit or the installation of high-power lamps.
- Wiring is shorted or damaged. This type of malfunction often occurs after work has been carried out in the interior or luggage compartment.
- Oxidation of contacts. Oxidation may form over time at the junction of the lamps with the socket, or at the junction of the wires to the headlights, which is caused by poor contact and moisture getting inside the taillight headlight unit.
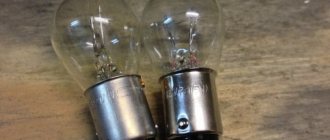
- Burnout of incandescent lamps - lamps have their own resource, so often the inoperability of the brake light is associated with their burnout.
- The malfunction of the toad or frog is a sensor that is located in the brake pedal structure. The sensor closes the contact when the brake pedal is pressed, causing the brake light to come on.
Causes of failure of the rear parts of the lighting system and driver actions
What to do if the brake lights or headlights in general do not work? Main causes and ways to eliminate them:
- The first reason is the burnout of the lighting source, that is, the lamp. If this happens, then most likely only one headlight will not work. In this case, the light source must be replaced.
- If the brake light does not light up, this may be due to a faulty board. In this case, you need to either repair the board by resoldering the failed elements or change it in the assembly. It is better to entrust the re-soldering to a qualified electrician, but if you have experience in carrying out such repair work, you can re-solder the board yourself.
- Poor contact between headlight and wiring. It is necessary to diagnose the circuit. If you find that the contact of the lighting source with the car’s electrical network is oxidized or burned out, then it must either be cleaned or replaced. Oxidation is not a problem; it is much worse if the contact is burned out, then it is necessary to look for the cause of the voltage drops.
- Broken wiring. Also one of the most unpleasant reasons why optics do not function. An open circuit can be found by diagnosing the wiring using a multimeter or a test light. The damaged area must be replaced.
- Chafing of wires. If chafing occurs on one section of the chain, this may cause the headlight to operate unstably or not at full power. Most likely, the insulation on the power wiring was damaged, which led to a current leak. A damaged cable should be replaced or additionally insulated with electrical tape.
- The switch located in the cabin has failed. It is also possible that it has poor contact with the wiring. Carefully check the operation of the switch, clean the contacts, if necessary, replace the device.
- The fuse located in the mounting block has blown. It is necessary to check the functionality of the safety device and, if necessary, replace it (the author of the video is the Jena Pon channel).
Typical faults
If the brake lights do not light up, then it may be the car's brake light lamp itself. The simultaneous failure of lamps from both lampshades is rare, but such a breakdown does occur.
- The brake lights on the VAZ 2107 may fail due to poor connection of the vehicle's electrical connectors.
- The fuse has failed.
- The brake frog has failed.
- Brake light problems.
Recommended: Check Engine Light Is On - What Does It Mean?
A lamp can burn out for a number of reasons. This includes a long service life, manufacturing defects, and dirt or water that gets on the base.
The most common manufacturing defect is the lack of connection to the lamp body wiring. In this case, the lamp base often begins to rotate even with minor efforts.
Sometimes the solder on the base oxidizes. This problem can be easily fixed by scraping off the solder with a knife or sandpaper.
The lamp board also oxidizes. In this case, the surface is cleaned with a washing eraser until shiny.
Different lamps may experience different malfunctions at the same time. It can happen at the same time!
A visual inspection of the lamp may not reveal anything. It should be checked by direct connection to the +12 source.
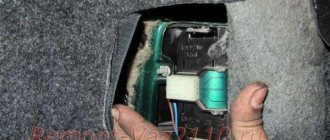
Poor connector connection. The taillights are connected to the electrical circuit using connectors. This is where the maximum amount of trouble lurks.
Stoplights may not burn due to a poor connection or board oxidation. Remove the connector and wipe the board with a washing eraser until it shines.
The failure may also be in the connector itself. The connector contacts are very delicate. They may move away or burn out. If they move away, they are lifted up a little with a needle. If the contact is burned out, then either replace it or replace the entire connector.
There is a Ш12 connector in the fuse block. Contacts may also come loose there. Move it.
Fuse failure. The brake light lamps operate through fuse 11. You can check it with a tester. The fuse in older units is 8A. The new blocks have 10A. Fuses must be installed only with the calculated rating. They are designed to operate at a certain current in the circuit. All current-transmitting electrical wiring elements are designed for a slightly higher current. Excessive current in the circuit can lead to failure of both the wiring itself and the fuse box tracks.
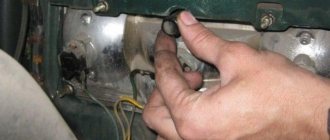
Frog malfunction. The frog is located on top of the brake pedal. It is very easy to check its serviceability. Remove both connectors from the frog and connect them together. If the brake lights come on, it means it needs to be replaced.
The frog is secured with a nut on the rod and a lock nut. Remove the retaining plastic nut, remove the lock nut and remove the frog from the bracket.
When installing the frog, ensure that the stoppers light up when you press the brake pedal 1.5-2 cm. Be sure to install the protective plastic rod nut. This will protect the rod from failure.
History of creation
VAZ 2107 is a modified luxury version of the VAZ 2105 car. The first models were presented to the country's leadership in 1978, and serial production began much later, as was already said in March 1982.
The VAZ 2107 was exported under the names Lada Nova, Lada Riva, Lada Signet, Lada 1500.
In 2001, a model configuration program was developed. VAZ 2107 was available in “norm” and “standard” versions, and for VAZ 21074 – “norm” and “luxury”.
From 2002 to 2012, the VAZ-21070 (modification of the VAZ-2107) was produced in Ukraine (LuAZ, ZAZ and KrAZ). In May 2008, the assembly of the VAZ 2107 was established at Argun in the Chechen Republic. Since March 2011, the production of the “Seven” has been mastered by the Izhevsk Automobile Plant.
In April 2012, the AvtoVAZ concern decided to finally stop production of the classic VAZ2107 sedan. This decision was made due to the greatly decreased demand for this model, as well as due to the acceleration of work in Izhevsk to prepare production for the release of the Lada Granta. The last VAZ 2107 sedan rolled off the assembly line on April 17, 2012. In Egypt, LADA 2107 was assembled until the beginning of 2014.
Production of the 2104 station wagon, unified with the sedan in terms of power plant, exterior and interior of the front part of the body, continued until September 17, 2012.
In March 2022, the analytical agency Autostat conducted a study, according to the results of which the VAZ 2107 sedan became the most popular passenger car in Russia. At the time of the study, this model was driven by 1.75 million Russians.
There are no particularly sharp turns in the history of the VAZ 2107 production. Good exterior and interior design has been positively received for many years. The only major change was the use of distributed injection on this model.
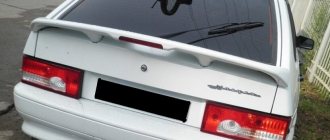
Taillight tuning ideas
How can you improve the rear optics in the Seven:
- Installation of sports optics. This lantern includes four round and two rectangular light elements.
- The next option is to use Skyline headlights. Such devices are equipped with three round light indicators, as well as two rectangular lights and brake lights that are located above them. In this case, the body of the product is made of transparent plastic, which is coated with chrome.
- Installation of so-called eyelashes instead of traditional lights. The main difference between the cilia is their original shape, as well as the presence of diode direction indicators. As practice shows, they burn well even in bright sun.
- Using glass tinting as tuning. You can buy tinted optics that are ready for use, or you can tint them yourself. The tinting procedure itself can be carried out using a film or a special varnish. It should be noted that it is better to install more powerful lighting sources in tinted devices to ensure good visibility of the signals.
- You can also use diode headlights in the classic version. You can also buy such products at an auto store or install LED elements yourself. One of the main reasons why owners of “sevens” choose this option is the speed of operation, as well as good brightness.
Additional items
Under the hood
Additional headlight wiper fuses (2A rating) protect the motor windings. They are located on the supply wires next to the gearmotors.
The starter activation relay 113.3747 or 90.3747-10 is located in the engine compartment on the right mudguard.
In the cabin
The windshield wiper relay (PC-514) is mounted under the panel on the left under the trim.
The ignition relay and the hazard warning and turn signal relays are installed on the front panel behind the instrument panel. The ignition relay (113.3747-10 or 90.3747-10) and the hazard warning and turn signal relays (23.3747 or 231.3747) have a bracket for direct mounting on the body.
The fog lamp fuse is located in the gear shift compartment, not far from the radio.
Expert opinion
It-Technology, Electrical power and electronics specialist
Ask questions to the “Specialist for modernization of energy generation systems”
The main causes of the malfunction and methods of elimination Therefore, if you are sure that this is the problem, you can at least temporarily transfer the positive wire from the side lights to the backlight bus. Ask, I'm in touch!