The “brake system emergency” indicator came on. This is roughly what it looks like - ((!)), in the photo below, on the left. It lights up when the level of brake fluid in the reservoir decreases. I arrived home, I raised the hood, it was like the level had been lowered. But the photo on the right shows it very well!
There is still something on the right side of the tank, but the left side is dry! And I’m driving, my mother (the autocensor won’t let me through any further...). On the right side is what goes to the front brakes.
The car has two brake circuits: front and rear. The front brakes mainly stop the car, the rear brakes only help. If last year my brake hose burst on the front brakes, I immediately noticed, but here, even with the indicator on, I didn’t notice anything. Well, maybe the brake pedal is not so sensitive...
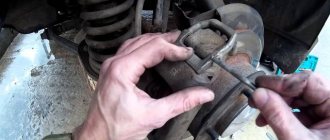
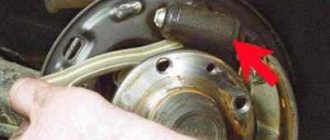
However, it’s still a mess! The brake fluid pipe to the rear axle goes under the bottom, but I can’t get under the car, that’s the last thing. First, just look from behind, look at the hubs from the inside. Well, here it is, the right wheel:
Everything around is free of dirt (it has dried up and floated away), but here there is greasy dirt. Moreover, the tube is dry right up to the nut and there are no traces of drip under the nut.
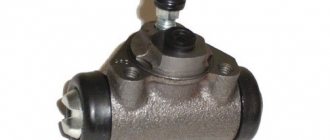
We can assume that the diagnosis has been completed! I won’t look for anything further. I think everything is intact on the outside. But there is nothing inside except the brake cylinder, the rest is all mechanical.
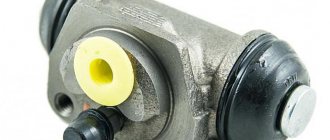
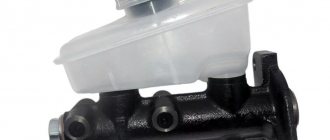
I went to auto parts and bought a cylinder for the Niva (and also for the classics 01, 03, 06, the same one. I don’t know about the others, which one they have). Previously, when I still had a penny, they bought a repair kit for the brake cylinder and changed the rubber bands. It cost a penny. Now three hundred rubles is not a lot of money, I doubt that anyone will bother with this repair kit. I didn't even ask the store about it. I took the cylinder and a bottle of brake fluid to bleed and top up after the repair.
400 rubles were enough.
Replacing the rear brake cylinder
Preparatory work: raised the right side, placed a chock so that the wheel was suspended and removed the wheel itself. I spilled WD-40 around the hub in case the brake drum had stuck to the hub. At the same time, I sprayed it from the inside onto the brake cylinder mounting bolts and the nut that presses the tube to it.
The brake drum is bolted to the hub with two bolts:
I don't have them anymore. Apparently the old owner threw it away as unnecessary. I won’t argue with him, I’ll leave it the same, without bolts. I wrote about them simply for information. So you won't be surprised if you see bolts there. It is also proposed to screw them into the other two holes to facilitate removal of the drum. I remember I tried to do this back when I had a “penny”, I didn’t see any point in it, so now I can do without additional bolts.
In order to remove the brake drum, I take a wooden block (can be metal) and a heavier hammer. The photo below shows how I install the block and lightly tap it with a hammer. A heavy hammer is needed to make the blow more sensitive - with a light hammer there is not much room to swing it.
The same photo shows that someone tried to hit the drum directly, without a spacer. This should not be done under any circumstances - the drum is fragile and breaks very easily. Not only may the edges break off, but the drum itself will crack, and you will have to look for a new one. There are minor chips on my drum as long as I drive like this.
I tap on the block and rotate the drum 30-45 degrees so that the drum does not warp. If you can’t turn it, it means it’s warped. In this case, you need to either knock on the opposite side of the drum, or in the same place (if the opposite side is not convenient) knock on the outside, pushing it back a little. If it’s warped, you can be happy: it means it’s gone, it’ll come off soon!
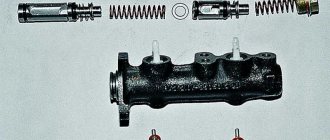
The drum has been removed. I can't make out anything inside. I’m adjusting the wrench from (I forgot the word, I don’t know how to write it) socket heads, so what? In general, so that this knob is almost opposite the left end of the upper spring that tightens the brake pads and engage first gear at the gearbox. Then I use a screwdriver to remove the spring from the block through this knob:
That's all. The cylinder is free and can be replaced. First, I unscrew the nut on the tube from the inside until the cylinder is secured and does not move. To do this, you need either a special wrench, as I showed in the note “Replacing the brake hose,” or just a 10-socket wrench, but choose one that is as thick as possible. These nuts are very easy to get by:
I unscrew the nut, I don’t move the tube anywhere: then I don’t tighten it well, as soon as it fits unevenly, the nut just won’t fit onto the thread, you have to bend it back and forth until you catch it! After the nut, you can already unscrew the cylinder mount.
For the new cylinder, while it is not secured, I check the pistons to make sure they are fully compressed, tighten the nut, then tighten it with two bolts and then tighten the nut on the tube. New cylinder in place:
I press the pads to the cylinder and wrap them in a circle with tape, one turn is enough to free up my hands - the pads themselves have fallen apart, but my hands are needed because the spring is tight and it’s not very easy to put it back in place!
I put it in the same way as I removed it, through the knob from the heads:
Almost everything is in place, ready to be assembled. Now the main thing is not to forget to remove the tape! And also fix the handbrake plate so that the handbrake works as it should. The photo shows that the plate fell down. I used two screwdrivers: one in the same way as removing/installing the spring, only this time I rested directly on the top of the block, and with the other screwdriver I lifted the plate into place so that I wouldn’t have to put my fingers in there.
I put the brake drum in place and the wheel right on top, without additional drum mounting bolts. All that remains is to bleed the brakes - I drove around without any fluid in the reservoir, and naturally air got into the pipe!
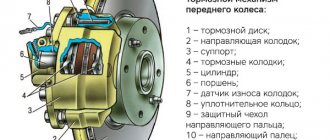
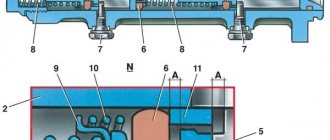
Disassembling the front brake caliper Chevrolet Niva
Tools:
Parts and consumables:
Note:
The front brake cylinder block is replaced when brake fluid leaks through the O-rings, as well as when the pistons jam due to corrosion.
1. Remove the caliper from the vehicle as described here.
2. Clamping the brake caliper in a vice with soft metal jaw linings, use a drift to remove the cylinder block retainer.
3. At the same time, we recess the cylinder block retainer with a rod with a diameter of 3-4 mm and, hitting the cylinder block with a hammer with a plastic tip, we begin to move the block along the caliper guides.
4. After moving the cylinder block by 1.5-2.0 mm, remove the rod. Using a hammer with a plastic tip or a mallet, knock out the cylinder block from the caliper guides. Cylinder block and brake caliper.
5. We remove the retainer and its spring from the socket of the brake cylinder block.
6. The retainer fits into the caliper hole and limits the movement of the cylinder block.
7. We assemble and install the front brake mechanism in the reverse order. To facilitate assembly, use a file to remove the chamfers from the guides of the cylinder block.
8. Having sunk the latch into the block socket, insert the block into the grooves of the caliper. Using a hammer with a plastic tip, hammer the cylinder block until the retainer fits into the caliper hole.
9. Install the caliper on the car.
10. Bleed the hydraulic brakes as described here.
The article is missing:
Source: Chevrolet niva device, operation, maintenance and repair. Publishing house “Behind the Wheel”.
Source
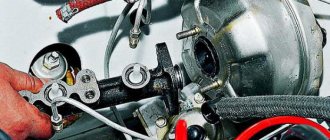
How to properly bleed the brakes
Usually it takes two people to bleed the brakes: it’s much faster than one person. We prepare a tube (hose, cambric) 30-40 centimeters long, 6-8 mm in diameter. A container for brake fluid - a jar of some kind. We pour three centimeters of brake fluid into a jar, and put one end of the tube on the brake bleeder fitting (in the photo it is above the fluid supply tube with a rubber cap), lower the other end into the fluid in the jar.
One person gets behind the wheel and starts pumping the brake pedal. Having pressed it several times, building up the pressure in the system, he says to the second: “I press” or “hold”, something like that. At this time, the second person under the car, near the jar with a straw, after the command, unscrews the fitting one turn or half a turn to bleed air from the system. The brake pedal falls at this time, but you cannot release it. The second person, the one under the car, screws the fitting into place until it stops and tells the first person that the pedal can be released.
This is done to prevent air from being pumped back into the system through the fitting. The end of the tube is immersed in the brake fluid for the same purpose: if there is a newbie in the car and, God forbid, he releases the pedal, then it is better to suck this fluid into the system, although air can still get in if the tube is not tightly placed on the fitting.
This is repeated several times until air bubbles stop coming out of the tube. If the tube is transparent, then you can see air bubbles going right through it until all the air is squeezed out of the system. I saw it myself!
Well, you can feel the pedal when it becomes hard, which means there is no air, the liquid is not very compressed. When there is air in the system, the pedal becomes soft, this compresses the air.
But this time I was alone again - it was daytime, everyone was at work!
How to bleed one person's brakes
I have already described how to bleed the brakes on a car yourself without an assistant in a note about “Replacing the brake hose.” I can only add that it takes much longer to pump the rear brakes this way, the pipes are longer!
I did not pump the brakes of the left wheel; I figured that all the fluid should be there. If there's something wrong with the brakes, I'll bleed the left wheel as well.
And there is one more difference from the front brakes: there is a “sorcerer” at the rear. If scientifically - a pressure regulator, well, and a few more complex names, like “braking torque regulator of hydraulic systems” and the like...
It works in such a way that when the car is more loaded, it opens more passage for liquid. In our case, in order not to wait too long for the liquid to run through the tube, you need to either load as much as possible into the trunk, which does not suit me for several reasons: why the hell do you need to move the weights, and you also need to figure out what to load there. And then unload it back?
I unscrewed the fastening of the “sorcerer” drive lever from the bridge, lifted it as much as I could and put a log under it, fixing it in the highest possible position: simulating a fully loaded car
I unscrewed the rod, filled the brake fluid reservoir full and went to lunch. At first a little brake fluid leaked out of the hose on the fitting, it was still visible in the tube, you can see by the color that it was old, then it stopped dripping. While I was having lunch, nothing changed. About three hours later my tube started leaking. I tightened the fitting, tried to press the brake pedal - everything was fine, the pedal was hard.
How to check your brakes
I started it up and went for a drive around the outskirts of the village. Everything is fine! There were brakes before, the car would stop without rear brakes, but now the pedal has become sensitive and immediately responds to pressure.
To check, I didn’t even need to look for some special place - it rained a little, and there were no fresh traces in front of the gate home. I drove up to the gate a little faster than usual and slammed the brake pedal all the way so that the wheels blocked. Then he got out of the car and looked at the tracks: everything was fine, they blocked almost simultaneously. The brake mark from the front wheels is slightly longer than from the rear wheels. Of course, it would be necessary to do it at the same time, but that would be absolutely ideal! But does that really happen?
OK it's all over Now. I changed the brake cylinder, it only took me half an hour of time and 400 rubles of money. It takes a long time to bleed the brake system alone. How do you do things like this? If I haven’t described something exactly or you know a better way, write in the comments!
Question answer
- Why do this? The factory says that the boxes contain lubricated cylinders, ready for installation.
The factory doesn't even lie. Since 2017-18, the cylinders come with lubricant under the boot. But “by gravity” this lubricant will not reach the entire surface of the piston-cylinder pair and the sealing ring. If you take the cylinder apart you will see the following. There will be a few drops of grease under the boot, and the inside of the cylinder will be ABSOLUTELY DRY. The result is “dry friction”, and then scuffing of the surface and the sealing ring.
- What is the reason to replace or repair a cylinder?
Pay attention to the cylinders AT LEAST when replacing pads. There are only two criteria. This is a intact, unfractured piston boot and the piston moves when pressed with a finger. And finally, an excerpt from the manual for the military Gelendvagen, especially for “Russian drivers”. *It is recommended to inspect rubber seals twice a year, and MANDATORY service of brake system cylinders once a year*. The Germans' annual operation is equivalent to 20,000 km. Toyota has similar recommendations.