From this article you will learn how to properly bleed the brakes on a Daewoo Nexia. At the bottom of the article there will be a diagram and video of bleeding the brake system.
Bleeding the brakes is a mandatory procedure if you change the brake fluid if your brake fluid level has gone low. (Usually, when the brake fluid level drops, this is indicated by a light on the dashboard. It lights up in the form of a red exclamation mark)
Bleeding will also be required if work has been done to replace elements of the brake system, for example, brake hoses, brake cylinders, calipers, brake pipes.
Bleeding the brakes is necessary to remove air from the car's braking system. If the brake pedal is sluggish or you have to press hard on the pedal for the brakes to work, and the brakes grab poorly and late. This means one thing - your brake system is airy, there is air in it.
How to bleed the brakes on a Daewoo Nexia
After replacing the brake fluid with bleeding (according to the old familiar Zhiguli method), the brakes on my Nexia became soft. I pumped it again, the same result. Confused? I read the manual CAREFULLY and realized my mistakes when pumping. General sequence of actions: 1.
The working cylinders are pumped in the following sequence:• Right rear• Left front• Left rear• Right front
2. Before bleeding, place a transparent tube on the fitting of the working cylinder, long enough so that it reaches the bottom of the bottle to collect old brake fluid.
Through the walls of the transparent tube, the presence of air in the expelled brake fluid will be clearly visible.
3. SMOOTHLY press the brake pedal all the way, 4. Unscrew the fitting, release the fluid, and press the brake pedal to the floor.5. Tighten the fitting and SLOWLY release the brake pedal.6. Repeat the procedures with pauses of 15–20 seconds between pedal presses.
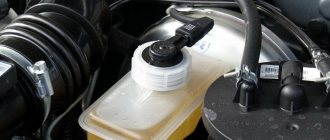
7. Do not forget to timely add brake fluid to the expansion tank.
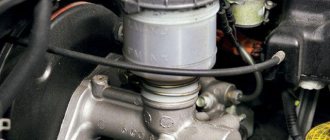
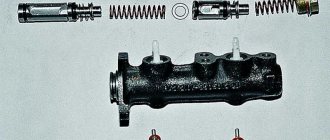
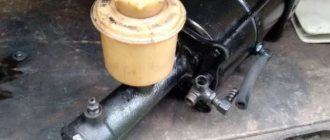
If the MAIN brake cylinder has taken in air or has been replaced, then FIRST you need to bleed it. For this: 8. Fill the expansion tank completely with brake fluid.9. LOOSEN (without unscrewing) the FRONT nut of the fitting for the front piston of the master cylinder, from which the metal brake pipe comes out.10. Place a rag under the fitting to collect the drained liquid.11.
Have an assistant SLOWLY press the brake pedal all the way.12. Unscrew the union nut until an active leak of liquid appears and the pedal falls down.13. WITHOUT RELEASING the brake pedal, tighten the fitting nut and ONLY AFTER THIS SLOWLY release the brake pedal.14. Repeat the operation until the air bubbles in the released liquid disappear.
15.
Repeat the procedure with the REAR NUT fitting for the second (rear) master cylinder piston.
This bleeding will completely remove air from the MASTER brake cylinder. If this is not done, then bleeding the WORKING cylinders will be useless, no matter how much you pump it strictly according to these instructions.
This sequence is described in many manuals for Nexia and Espero. Anyone can read and be convinced that I did not discover America. Explanations of these actions: SMOOTHLY pressing the brake pedal all the way and SMOOTHLY releasing the pedal excludes
WHIP the brake fluid in the working cylinder into a foamy emulsion, especially after the first release of fluid through the unscrewed fitting.
For clarity, shake the brake fluid in a transparent bottle and you will see that the liquid appears cloudy. It was tiny microscopic air bubbles that formed in it. They will float to the surface for a very long time. If such an emulsion has formed in the main or working cylinder, then it is almost impossible to expel such air, because Quick and sharp pressing and releasing of the pedal will only contribute to the formation of a new foam emulsion.
You can pump forever, but the foam will always be present in the cylinder and the brakes will be soft.
After the fluid is released through the fitting of the working cylinder and the brake pedal falls through, releasing it SMOOTHLY WILL PREVENT AIR SUCTION through the cuff of the working cylinder. This is not fantasy, but a proven reality. When the pedal falls down and is then abruptly released, a very strong vacuum will be created in the master brake cylinder, which does not occur during normal operation of serviceable brakes. After all, the piston stroke of the master cylinder in real braking mode is much less, therefore, the vacuum when releasing the pedal is much less.
If the expansion tank is filled with brake fluid, then in the master cylinder there is simply nowhere for air to come from - there is liquid all around, both from above - in the tank, and from below - from the brake pipes. But the working cylinder is a dead-end piston, like a medical syringe. For clarity, take a syringe, put on a needle and draw a little brake fluid into it, and then lower the needle into a container with liquid and sharply pull out the piston. You will see air appear in the syringe, which has been sucked through the piston. Exactly the same effect occurs with the working cylinder when the pedal is suddenly released.
A foam emulsion will immediately appear in the working piston, which is impossible to cope with if you operate the pedal suddenly. And so, we remember. When bleeding the brakes, you need to work the brake pedal SMOOTHLY. Now about the need for a pause of 15 - 20 seconds between pumping. During this time, the bulk of possible air bubbles in the working cylinder will have time to rise up and reach the point of the outlet fitting. (Remember a shaken bottle of brake fluid.
) The next time you press the pedal to bleed the brakes, the collected air will leave the working cylinder through the unscrewed fitting and your brakes will become informative and firm.
Source: www.drive2.ru
17.5. Removing air from the brake system
The operation to remove air from the brake system is carried out in all cases of air entering the hydraulic drive. If the brake fluid level in the reservoir drops and air enters the system through the master cylinder, or if the lines are disconnected from the master cylinder, air is removed from all hydraulic circuits and lines. If only one bracket or wheel cylinder has been disconnected, then only these cavities and associated piping need to be bled. When dismantling any pipeline and subsequent reassembly, it is necessary to remove air from the circuit and cylinder that are served by this pipeline.
Source: https://autosystems24.ru/tormoza/kak-prokachat-tormoza-na-deu-neksiya.html
Daewoo Nexia Phoenix › Logbook › Replacing fluid in the brake system and clutch
Good day!
The time has come to replace the brake fluid in the clutch and brake system. The brake fluid itself is very hygroscopic (absorbs moisture), which reduces its boiling point and, as a result, braking efficiency. Plus, over time, a lot of dirt accumulates in the brake fluid and the color of the brake fluid changes, at best, to dirty yellow. Accordingly, the brake fluid must be replaced either when it becomes unsightly in appearance, or once every two years, at least. Well, this is according to theory, which, by the way, is often supported by practice.
Once again looking into the expansion tanks of the clutch and brakes, an immediate decision was made to replace the operating fluid with fresh and not yet sour)
To replace it, two bottles of the well-known brand of brake fluid CHEREPASHKA were purchased - about 1.5 liters in total. Looking ahead, I’ll say what’s left for refilling
Along the way, it turned out that the rubber seal under the clutch reservoir cover was bubbled, decomposed and became unusable. The middle was cut out and discarded. I couldn’t find a separate order number in the catalog for this same rubber sealing gasket.
Instead, a plastic round gasket from the lid of a mayonnaise bucket was inserted into the lid. A hole was carefully made in the center of the cut-out gasket (to balance the pressure in the expansion tank and the environment)
Armed with a 20 cc syringe with a tube, I pumped out the excess old brake fluid from the expansion tanks and added new brake fluid almost to the brim.
For bleeding, I used a silicone tube, which is placed one by one on the fittings of each brake cylinder. The bleeding procedure itself is standard: with an assistant, the circuits of the brake system are pumped. To speed things up, an experimental pumping method was tested with an open fitting and pumping 7-8 times directly into a vertically raised tube. However, in this case, the escaping liquid was aerated with small air bubbles, which could indicate a strongly unscrewed brake fitting (considering that there was not that much air in the system). But in general, the brake fluid is pumped quite quickly. Towards the end - I pumped it classically a couple of times - after a few pumps, I opened the fitting and drained a fresh portion of light brake fluid, at the same time making sure that it was free of air bubbles. It took about 900 ml to replace the fluid in the entire brake system.
With the clutch, everything is quick and clear at the end of the day - one fitting and 300 ml of TURTLE
D2 has already talked many times about simple modifications and methods for pumping brakes alone 1; 2; 3; 4; 5; 6; 7 well enough...
There is a desire to make an additional cap for the expansion tank, but for now I am enthusiastically looking for a cap for the brake reservoir of a suitable diameter. I think that I will soon purchase a fuel return valve 2108 (VAZ/UAZ) and a vacuum hose as described, and.
The procedure for completely replacing the brake fluid can be carried out once every six months or once a year, for example in the fall, before the start of winter operation - this is everyone’s business - like changing the oil - some more often, some less often. But in any case, with regular replacement, the pumping fittings do not become sour and the cylinders benefit from all the accumulated dirt and old liquid being expelled from them. Well, I’m not even talking about the fresh “balm” in the brake system.
Peace, kindness, smooth roads and strong brakes to everyone!
#daewoonexia #clutch_fluid replacement
How to bleed the brakes on a Daewoo Nexia: procedure and bleeding scheme
The braking system of the Daewoo Nexia is not much different from similar systems in small class cars. However, there are some nuances that should be taken into account when servicing and repairing Nexia brakes. Today we will figure out how to bleed the brakes on a Nexia and find out all the intricacies of this issue.
When the brakes are pumped on a Daewoo Nexia
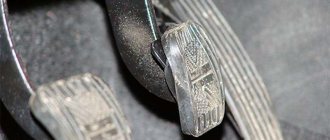
Naturally, the first signal of a malfunction in the brake system will be an inadequate response of the car to pressing the brake pedal.
Before bleeding the brakes, it is worth remembering the last time the brake fluid was changed.
The pedal may feel weak or sink almost to the floor, but there will be no effective deceleration. It is also worth looking at the brake fluid level warning lamp in the reservoir. A burning lamp will indicate that air has most likely already entered the system.
After any repair of the brake cylinders, main or wheel, it will also be necessary to bleed the brakes . The ultimate goal of the operation is to completely remove air from the system or completely replace the brake fluid. When fluid leaks, air can also enter through leaks in the brake lines and worn brake cylinder seals. In short, pumping technology will come in handy more than once.
Necessary tool
Socket wrenches for 10 and 12 with cutout. New brake fluid. For this work, we will need a union wrench (socket wrench with a cut out segment), a transparent tube about 50-70 cm long, a transparent container for draining waste fluid, and new brake fluid.
Pumping scheme
When bleeding the system, we will remove air from each circuit and from each working cylinder in strict order:
- Right rear wheel.
- Left rear wheel.
- Right front wheel.
- Left front caliper.
In the event that we repaired only one caliper or one working cylinder, most likely there is no need to bleed the entire system.
It will be enough to remove air only from the cylinder being repaired. Before starting work, do not forget to unscrew the reservoir cap and add fluid to the maximum mark. In addition, during the pumping process, we will monitor the liquid level in the tank and will not allow it to be more than half empty.
Before pumping, add brake fluid to the expansion tank using a syringe or bulb.
Pumping technology
If the car is equipped with an ABS system, then bleeding begins by turning on the ignition and pressing the brake pedal five times. After this, fresh liquid is added to the tank if necessary. When bleeding air from the rear cylinders, the ignition must be turned on. This is necessary so that the ABS hydraulic pump is activated and creates pressure in the circuit.
Otherwise, the pumping technology is no different:
- We ask the assistant to slowly press and release the pedal until it becomes elastic with maximum pressure resistance, the pedal is held in this position.
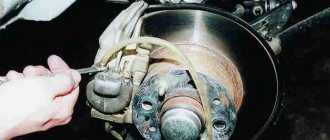
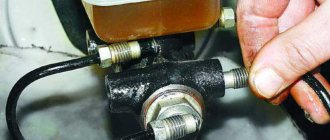
- Remove the protective cap from the fitting of the rear right cylinder, put a tube on it and lower it into a container half filled with liquid.
We clean the rear fitting from dirt and put the tube on it. - We unscrew the fitting 1/2 turn, at this time the pedal falls. An assistant holds it in this position until we tighten the fitting.
- We repeat pumping the cylinder until air bubbles stop coming out of the tube.
Bleed the brake cylinder until all the air is released. - An assistant holds the pedal in the lower position, at this time we tighten the fitting with a force of about 10 Nm and put on the protective cap.
- Using the same technology, we pump the remaining cylinders in the specified order.
At the same time, do not forget to monitor the fluid level in the tank. We pump the remaining cylinders according to the order.
Tools for work
Before replacing the brake pads on the rear wheels, you need to prepare the tools. You will need:
- Flathead screwdriver.
- Jack (use only reliable structures).
- Set of spanners and sockets.
- Wheel chocks (installed under the front wheels).
- Pliers.
- High temperature silicone grease.
It is also necessary to replace not only the pads, but also all elements that are heavily worn. This is the only way you can protect yourself while operating the car. Be sure to evaluate the degree of wear of system elements. Only after this can you replace the Daewoo rear brake pads.
How to properly bleed the brakes on a Daewoo Nexia?
» Other »
Question for experts: how to properly pump the brakes on a Daewoo Nexia How to press the pedal correctly
Best regards, Alexey Schastnov
Best answers
Bleeding the brakes is necessary when replacing brake fluid, as well as to remove air that has entered the hydraulic drive during the repair or replacement of individual components of the brake system. We carry out the work together with an assistant in an inspection ditch or lift. We remove air first from one circuit of the system (front right - rear left cylinders), then from the other.
Bleeding the brakes Remove the protective caps from the bleeder fittings of all working brake cylinders.
If the fitting cannot be unscrewed, before pumping it can be pre-stripped with an 8-point hex wrench or a high socket of the same size.
We put a transparent hose on the fitting of the brake cylinder of the left rear wheel and lower its free end into a container with brake fluid.
An assistant presses the brake pedal three to four times at intervals of one to two seconds and holds the pedal down.
Bleeding the brakes Using an “8” wrench, unscrew the bleeder fitting 1/2-3/4 turn.
When you press the pedal, some of the brake fluid and air are forced into the reservoir, and the pedal drops to the floor. Air bubbles are clearly visible in a transparent hose or in a container with liquid. We close the bleeder fitting and continue bleeding until the release of air bubbles stops.
When removing air from the system, monitor the fluid level in the master brake cylinder reservoir, adding it if necessary.
Bleeding the brakes We bleed another cylinder of the same circuit - the front right one.
Similarly, we bleed the second circuit of the brake system.
As air is removed from the system, the brake pedal should become “hard”, i.e., when pressed, it should travel no more than half the distance to the floor.
After complete removal of air from the brake system, when the ignition is turned on, the brake system warning lamp usually lights up, indicating that the warning device pistons are not in the middle position.
To move the pistons and thereby extinguish the warning light, it is necessary to create pressure in the brake system (an assistant must press the brake pedal smoothly but firmly, watching the warning light with the ignition on). At this time, slightly loosen one of the brake pipe fittings on the master cylinder, depressurizing the brake system circuit. If the lamp goes out, immediately tighten the fitting.
If the lamp does not go out and the brake pedal slowly drops to the floor, then, while holding the pedal pressed, tighten the fitting of this circuit and repeat the operation with the other.
You can adjust the alarm device in another way. We unscrew the brake system emergency warning lamp switch and insert the rod into the opened hole (see “Removing the warning device”). While the assistant presses the brake pedal, depressurize one of the circuits of the brake system and monitor the movement of the rod, resting it on the ball. If the ball has entered the piston bore, keep the pedal pressed and tighten the loose fitting. If the ball does not fit into the groove, repeat the operation with the second circuit. from the manual
Pumps up exactly the same as on a Zhiguli!!!!
like on a Lada.1 unscrew the cap of the barrel with brake fluid2 unscrew the wheels3 remove the cap from the brake cylinder and put the key on 104. while one pumps (presses) the pedal 5-10 times until it becomes very, very hard to press5. the man presses the pedals and holds!!! until you loosen the nut on the brake cylinder, after which the brake fluid leaks out (to do this, it is advisable to insert a pipe through which it will flow gently) - you tighten the nut again and only then does the person begin to pump again
6. and so pump each cylinder 7 times
Pump the pedal 3-4 times and press it to the floor without letting go. You shout to the assistant - HOLD! He turns off the pump, releases the brake, tightens the pump and shouts - PUMP!
I pressed the pedal 3-6 times and pressed it to the floor, the second person unscrews the bolt, lowers it, and tightens it back. Shouts: Download more.
-answer
This video will help you figure it out
Preparing for repairs
Before replacing the rear brake pads (Daewoo Nexia), be sure to perform the following manipulations:
- Place wheel chocks under the front wheels.
- Loosen the mounting bolts on the rear wheels.
- First jack up one side of the car, then the other. Your goal is to hang out the entire rear of the car.
- Remove the wheels.
- Remove the nuts that secure the rear brake drums.
- Carefully, trying not to damage, knock down the drums.
After carrying out these manipulations, you can begin replacing the rear brake pads. Your Daewoo Nexia will be like new! Pay attention to the inner surface of the drums - if it is uneven, you will need to sharpen the parts. This should only be done on a lathe. After such an intervention, it is necessary to carry out balancing so that there is no axial runout after installation.
This is interesting: Causes and methods of troubleshooting that could cause unstable engine operation or stopping at idle Daewoo Sens
Operating principle of the parking brake system
Each of them must be considered separately. The parking brake system is responsible for keeping the car stationary during long periods of parking in one place. Among car enthusiasts, this system is called a hand or parking brake. It is the handbrake that is also an emergency option for braking the car in the event of a malfunction in the working brake system. Achieving immobility of the car using the parking brake is possible thanks to standard mechanisms that are installed on the rear axle of the model.
At the moment when the driver raises the parking lever, a special cable is tensioned, which fixes the rear wheels in a given position. The presence of a special ratchet in the design does not allow the handbrake to lower to its original position.
The working system is activated after the driver presses the pedal. Such brakes are designed to provide a systematic reduction in speed. It is impossible to use a parking system for these. But the handbrake can become an indispensable assistant when there is a need to move away while on a slope.
General rules for repairing the brake system of various car brands are described here. What is the brake system of the VAZ-2109 and what faults can most often be found in it, see here.
Reasons for replacement
Before starting the replacement procedure, it is necessary to diagnose the brake pads.
- Rear wheel jamming. Indicates that the brake pad linings have broken.
- The thickness of the rear brake pad lining is less than 1.5 mm. This cannot be verified. Car owners identify it by the characteristic creaking sound of metal when braking.
- Presence of oil or brake fluid on the pads.
When diagnosing one of the points on your car, you need to replace the pads.
Replacement frequency
No one can say for sure after what period it is worth replacing brake pads, since it depends on a large number of conditions:
- Quality of the lining;
- Condition of the brake drum and cylinder;
- Serviceability of the sliding mechanism;
- Vehicle operating conditions;
- Driver's driving style.
Attention! If the drum is severely damaged, the pads will quickly fail.
Brake pads can last 5-100 thousand kilometers. The service life depends on the above factors and luck. Therefore, their serviceability must be closely monitored. You can identify failing pads by the sound from the brake drum, as well as by the intensity of braking.
Pad selection
At the moment, there are no problems with choosing and purchasing pads, since pads suitable for Daewoo Nexia are found on a large number of cars: Daewoo Lanos, Espero, Nubira, as well as on some budget Chevrolet models, which are descendants of the Opel Kadett.
The advantage of drum brakes is their cost and ease of maintenance.
Some models of brake pads, sorted by descending price:
- The highest quality and most expensive are Ferodo FSB-335. These German-made pads are popular in Russia, although they do not sell very well. The price is about 5 thousand rubles.
- Another German model is Zimmermann. They cost 4 thousand rubles, which is twice as expensive as the original ones.
- Factory pads Hi-Q SA-055 from a Korean manufacturer. The quality is not much inferior to their German counterparts, but they cost only 2 thousand.
- Onnuri is also a Korean model, but costs a little less – 1.5 thousand.
- Rider is a model from a Hungarian company. The cheapest on this list.
Prices are approximate. They may vary in different regions of the country, and also become more expensive/cheaper over time.
When dismantling old brakes, it may turn out that it is not only the pads that need to be replaced. It will not be superfluous to buy a complete repair kit, which includes almost all components of the brake mechanism. It costs around 500 rubles.
Removing old pads
And now more about how to replace the rear brake pads with your own hands. You need to start by disassembling the entire mechanism:
- Using pliers, you need to disconnect the spring, which is installed on the automatic adjustment device. After this, remove the spring completely.
- Gently hold the stand and press down on the cup to rotate it 90 degrees. After this, remove the spring from the support post and the cup.
- Remove the support post.
- Repeat the operations with the second block.
- Hold the pads and disconnect the springs that tighten them at the top. First, disconnect the spring from the block that is located closer to the front of the car.
- Move the pads apart and disengage their levers from the handbrake cable.
Be sure to check the condition of all springs. They should not have any defects. If there is wear or other damage, replace these elements. It is recommended to install new springs and spacers during assembly.
Installing new pads
In fact, the entire installation procedure is performed in reverse order. The order is:
- Apply silicone grease to the places where the pads and the mechanism shield come into contact.
- Connect the block lever to the parking brake cable.
- Install the support stand. To do this, you will need to use forceps to press on the bowl and rotate it 90 degrees.
- Install the adjuster bar. Align it with the groove located on the rear block.
- Be sure to apply silicone grease to the threads of the adjusting mechanism.
- Wrap the rod, the bar should be as short as possible.
- Install the shoe, bracket and upper tension spring. After installing the support post, you need to press on the bowl and rotate it 90 degrees.
After this, you need to install all the springs in their places and check the quality of the assembly. This concludes the replacement of rear brake pads on Daewoo. "Nexia" is considered a great car. By the way, the second side is repaired in a similar way.
image007
Similarly, we bleed the brake mechanisms of the other circuit.
When pumping, you need to monitor the fluid level in the tank and add fluid.
Replacing clutch fluid
We work with an assistant.
Before pumping, check the fluid level in the reservoir on the master brake cylinder. If necessary, add working fluid.
It is advisable to install the container below the level of the fitting.
An assistant presses the clutch pedal several times and holds it down.
With the clutch pedal pressed, unscrew the bleeder fitting 1/2–3/4 turn. In this case, the liquid is forced into the container. Keeping the pedal pressed, tighten the fitting and repeat this operation until new brake fluid (lighter than the old one) comes out of the fitting.
Remove the hose and put a protective cap on the fitting.
After bleeding the brake and clutch hydraulic drives, bring the fluid level in the reservoir to normal.
There is an even simpler option for replacing brake fluid. This method does not require the presence of an assistant. With this method, a certain supply of brake fluid is desirable (at least 1 liter).
We place the car on an inspection ditch or overpass and ensure free movement between the brake fluid reservoir in the engine compartment and the brake cylinders of all four wheels.
Use a rubber bulb or syringe to pump out the brake fluid from the reservoir. Add new fluid to the top edge. To speed up the process (to release fluid from all cylinders at once), it is advisable to select four pieces of tubes that fit tightly onto the bleeder fittings of all cylinders. We lower the free ends of the tubes into small transparent bottles.
We unscrew the fittings of all brake cylinders. We make sure that the liquid has flowed through all four tubes. We control the decrease in fluid from the reservoir located on the brake cylinder and immediately replenish the reservoir. We observe an increase in the level of liquid in bottles located near the wheel brake cylinders.
It is necessary to move several times from the position of observing the flow of fluid from the brake cylinder fittings to a position where you can check and replenish the fluid level in the reservoir located on the brake cylinder in order to prevent the reservoir from drying out.
Usually the level rises most quickly in the bottle into which the hose coming from the brake cylinder of the front left wheel is lowered. As soon as there is about 200 ml of liquid in the bottle of the front left wheel, wrap and tighten the fitting of this cylinder. Next, we wait for the same result for the front right wheel cylinder and tighten its bleeder fitting in the same way. The process can be completed after 200–250 ml of liquid comes out through the fitting of each rear wheel.
We make sure that all fittings are tightly tightened. We put on protective caps. Check the fluid level in the master cylinder reservoir.
Rear brake pad arrangement
Manufacturers install drum-type rear brakes on Daewoo Nexia. The rear pads interact with the hydraulic brake cylinder. A mechanical adjuster maintains the gap on the spacer bar.
The Daewoo Nexia parking brake is mechanically driven. Parking brake components:
- lever arm;
- sheathed cable;
- equalizer;
- expansion springs.
During repairs, you need to pay attention to the elements of the parking brake. If they are worn out, replace them.
Contact us
The brake system of the Nexia model is equipped with both drum and disc brakes. This was done with the aim of completely or partially blocking the rotational movements of the car’s wheels.
The front axle of the model is equipped with a disc system, and the rear axle is equipped with a drum system. A disc brake system consists of a caliper, pads and the brake disc itself. The support in this design is fixed above the rotating disk using a bracket. The caliper has small grooves designed for working drive cylinders.
In addition, the caliper contains pads that are pressed very tightly to the body using springs. Each of these pads has special friction linings, which are made of a material that can withstand high friction temperatures. The brake disc is screwed to the hub using bolts.
How to service brakes?
And not only for Daewoo, but also for Kia and Hyundai. The quality is always excellent, the price is always reasonable. For a year, such pads cost rubles per set. Onnuri Wonil Korea, article number, is also a Korean brand, perhaps not inferior in quality, but at a price cheaper by three hundred than the original ones. We don’t know much about them, but Opel breeders actively used them about 20 years ago. German pads of excellent quality at a high price.
Rider Hungary, catalog number A budget option if you don’t want to spend money, but you have to go. German Ferodos are well known here, but they are not very popular.