Law and GOST
It is necessary to take into account one of the important points when installing PTF is subsequent adjustment and LAW. According to traffic rules, lighting equipment should not blind cars moving in the opposite direction. To do this, it is imperative to adjust the headlights.
It is prohibited to install lamps not specified by the manufacturer, such as xenon and LED. PTF priors must have H11 type halogen lamps installed.
How to install PTF correctly, and why do you need to replace standard lamps?
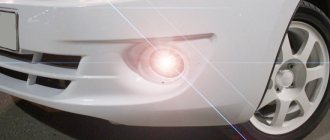
Fog lights on Priora, as well as on any other car, are installed quite low, at a level of 0.3-0.7 meters from the road level. In this case, a narrow beam of light enters an area free of wet condensation and actually improves visibility.
But located on the roof of the trunk (additional lighting is often installed on jeeps), they are absolutely useless in a curtain of rain, in fog or during a dust storm. Therefore, fog lights used to be placed under the bumper (for old-style metal structures), but today they are placed directly into it (for modern integrated parts).
Fog lamps must comply not only with traffic regulations, but also comply with UNECE standards. The latter suggest that the fog beam on the Priora and any other car must have a special wide-angle light distribution, with a clearly defined upper limit and dispersion of up to 70 degrees horizontally. Only compliance with these parameters gives the required anti-fog effect.
The most common today are fog lights with halogen lamps with a power of 55 watts. They create a luminous flux of 1.1 thousand lumens, which is enough to illuminate a space of 25-30 meters in front of the car.
Replacing conventional incandescent lamps with them is almost always required, because... old-style lamps provide the necessary illumination at a distance of about 8-10 meters, which is clearly not enough for modern driving conditions.
Standard PTF Priora 1 and 2: article number, price
AvtoVAZ installs fog lights on Lada Priora from Bosch and Avtosvet (Kirzhach). The difference is that Bosch is 40% larger in installation depth than fog lights from Kirzhach. Lighting equipment from BOSCH was installed in luxury versions, and from Kirzhach - in standard ones. Two options for the kit are being considered. The first set is a PTF for Priora 1 (pre-restyling), the second is for Priora 2 (restyling). The difference is the shape of the headlights and installation points. PTFs are sold complete or separately.
For Priora 1:
- PTF set of Kirzhach “Avtosvet” 21700-3743010-52. Price – about 700-800 rubles. One headlight costs about 500 rubles.
- PTF kit Bosch 21700-3743010-54. Price – about 1600-1900 rubles. One headlight costs about 900 rubles.
For Priora 2:
- PTF set Kirzhach “Avtosvet” 21700-3743010-53. Price – about 800-900 rubles. One headlight costs about 500 rubles.
- PTF kit Bosch 21700-3743010-50. Price – about 1000-1200 rubles. One headlight costs about 600 rubles.
Additionally, you will have to purchase an installation kit or just a set of wires for installing fog lights for the Lada Priora-2170; it comes with a button and a relay. The kit costs about 600 rubles.
Prices for headlights and work
Installing headlights in the showroom (where you buy a car) will cost 2,000 - 3,000 rubles, plus the price of fog lights is 2,600 rubles, which is much more expensive than in a store. Installation of fog lights in a car service center averages from 1,500 to 2,000 rubles. You can buy headlights yourself. It is not necessary to pay money for installation, because fog lights can be installed on your own.
The price of a set of fog lights varies from 1200 to 1800 rubles. For headlights you need to purchase a connection kit - 400 rubles.
Fog lamp models
Kirzhach and Bosch are not a death sentence, and if the light of these models does not suit you, there is a good choice from other manufacturers:
- Automotive lighting (Ryazan);
- Beam (Ryazan);
- DAAZ;
- Orion-7 (diode);
Made in China (lensed or diode). The Chinese also sell frames for the restyled version, which are installed instead of a plug and leave a hole exactly for the old-style foglights - on the pre-restyled Priora. A non-diode or non-lensed analogue of fog lights costs much less, but you shouldn’t rush into purchasing - bright white light does not always come with a long service life.
Connecting PTF via Mus Priora
The installation of fog lights on the Lada Priora was necessary to improve the lighting of the road, which was not very good leading to my house. PTFs are also used for their intended purpose, in poor visibility - they simply save. I installed the PTF with my own hands, the result is simply fantastic.
Kirzhach PTFs and N11 ceramic connectors for them were purchased in advance. I also bought corrugation, wires, relays, buttons, pres and other little things necessary for installation.
1. Installing fog lights in the bumper and running wires under the hood.
2. Pulling wires from the engine compartment to the interior.
Adjustment of PTF according to GOST
What should you pay attention to first when buying headlights in a store? Check the integrity of the housing, scattering filter and light bulbs, and the presence of plugs for fastening electrical wires. The material from which the fog lights on the Priora are made deserves special attention.
Expert opinion
It-Technology, Electrical power and electronics specialist
Ask questions to the “Specialist for modernization of energy generation systems”
Adjustment If the PTF is to be installed in the bumper body, then it is necessary to clearly determine the size and shape of the part for further smooth installation. Ask, I'm in touch!
Description of the scheme
The relay must be connected according to this diagram. The relay has only 4 contacts, which are assigned numbers: 85, 86, 87 and 30.
- We connect contact number 86 to the negative of the battery;
- We connect contact number 30 to the “plus” of the battery;
- Contact number 87 is connected to the power wire (plus) of the PTF;
- We connect contact number 85 to the PTF ON/OFF button with a blue wire through a fuse;
Location of Priora fuses under the hood
- F1 (30 A) – power supply fuse for the electronic engine control system (ECM);
- F2 (60 A) – fuse for the power supply circuit of the engine cooling system fan (power circuit), additional relay (ignition relay), rear window heating, electrical package controller;
- F3 (60 A) – fuse for the power supply circuit of the electric fan of the engine cooling system (relay control circuit), sound signal, alarm signal, ignition switch, instrument cluster, interior lighting, brake light, cigarette lighter;
- F4, F6 (60 A) – generator power circuit fuses;
- F5 (50 A) – fuse for the power supply circuit of the electromechanical power steering
Relay and fuse box for Halla air conditioner
- right electric fan power supply fuse (30 A);
- fuse for the power supply circuit of the left electric fan (30 A).
- right electric fan relay;
- additional relay (sequential activation of left and right electric fans);
- left electric fan relay;
- heater fan power supply fuse (40 A);
- compressor power supply fuse (15 A);
- heater fan relay;
- compressor relay.
Panasonic air conditioner relay and fuse box
- Heater fan maximum speed
- Right fan
- Fan sequential relay (low speed)
- Left fan
- Left fan fuse (low speed)
- Right fan
- Heater fan
- Compressor
- Heater fan
- Compressor
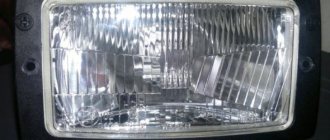
How to replace a burnt out lamp
Let's start with replacing the lamps in the foglight of the Lada Priora. This is a simple matter, and there is absolutely no need to go to a service station for such a trifle - everything can be done on your own. First of all, what lamps are installed in the PTF of this car? The manufacturer installs H11 type halogen lamps with a power of 55 W on both regular Priora and Priora Restyling (production since 2013).
Light bulbs in PTF Lada Priora of any modifications
In addition to, in fact, new lamps, we will need:
- Torx key T-30;
- socket wrench (head) 10;
- cotton gloves;
- inspection pit or overpass.
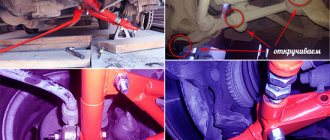
Removing the power unit mudguard
We drive the car into a pit or overpass. To get to the PTF of the Priora, you need to remove the engine mudguard or, as it is also called, the engine protection. To do this, use a T-30 wrench to unscrew the four screws that secure the mudguards to the engine mudguard. The photo shows two, the remaining two are on the other side of the mudguard.
Now we arm ourselves with a 10mm wrench and unscrew first the two rear mounting bolts (the second on the opposite side), and then the five front mounting bolts.
The mudguard can now be removed to gain access to the fog lights.
Replacing lamps
We look under the bumper and get to the back of the PTF. In front of us is a lamp base with a power supply inserted into it. Press the latch and pull out the block.
Turn the light bulb counterclockwise until it stops and remove it from the flashlight housing.
We put on cotton gloves, remove the new lamp from the box and install it in place of the burnt one, not forgetting to lock it by turning it clockwise until it stops. We connect the power supply (the latch should snap into place). Similarly, we change the light bulb on the second PTF and install the engine mudguard in place.
How to connect fog lights on Lada Priora?
When there is not much left in stock, you just have to disassemble everything and install the PTF, then put everything back together and enjoy the work done. Kidding :-).
- Let's start with the fact that we need to de-energize everything, to do this we remove the “-” terminal of the battery.
- Next, you need to remove the bumper; to do this, unscrew the screws that secure it one by one. The screws that need to be unscrewed are marked in the photo. After all the fasteners are unscrewed, carefully unclip the bumper from the latches and dismantle it completely.
- Next, take a screwdriver and remove the foglight plugs, which are attached with self-tapping screws.
- We prepare our fog lights and proceed to an important stage called “installation of fog lights.” We carefully place the PTFs in their regular places and secure them with the self-tapping screws that secured the plugs. Then we start laying the wiring. The wiring is routed from the inside of the bumper; it is advisable to use corrugated wire.
- The wires need to be pulled into the cabin in the GTZ area; to do this, we take out a special plug, under which the holes we need are hidden. For convenience, it is recommended to remove the frill along with the wipers, as well as the expansion tank with bracket.
- In the cabin, in order to extend and connect the fog lights, you should pull off the trim (sound insulation) and pull the wire into the cabin.
- When the wires are brought into the interior, you can start connecting. The diagram according to which it should be connected is usually included with the PTF kit, but just in case I decided to post the diagram.
- Connecting the fog lights to the button requires the removal of the central panel. When installing the PTF relay in the unit, it is important not to mix up the wires and follow the PTF connection diagram.
Installing fog lights on a Lada Priora is quite an extraordinary task and can be done by any car enthusiast. The only problem is the connection; as a rule, difficulties arise with it. However, if you follow the instructions and carefully study the connection diagram, then everything should work out. If difficulties arise during the connection, I recommend contacting an experienced electrician, he will easily help you for a minimal fee. Before final assembly, do not forget to check everything and make sure that the PTFs are working as they should.
That’s all for me, thank you for your attention and see you again at VAZ Repair! Bye!
Step-by-step instructions for installing PTF on Priora
Now let’s try to install fog lights on the Priora ourselves - after all, they do not come with all car trim levels. First of all, you need to buy the lanterns themselves: they can be either lensed or with regular glass. Which ones to take? There are 4 most common and available options:
- Bosch (Germany-Russia).
- Luch (Russia).
- Kirzhach (Russia).
- "Noname" (China).
Which one to give preference to is a purely personal matter. Everything will depend on financial capabilities, although the PTFs of the first three companies are almost equal in both quality and cost. The Chinese nonname, sold literally “in bulk”, of course, is, to put it mildly, not up to par with the others, and even does not always have the appropriate certification.
Fog lights on Lada Priora (from left to right): Bosch, Luch, Kirzhach, China
If on your Priora the places in the bumper reserved for PTF are not round, but like on the Priora Restyling SE (see differences in PTF below), then you will additionally need to purchase special decorative trims.
Important! When purchasing PTFs, be sure to ensure that they are certified in accordance with GOST R 41.19-99 (UNECE Rules No. 19). Otherwise, you will not pass the next technical inspection, and if you meet a traffic police officer on the road, you may even lose your license for a year.
What is included in the kit for installing fog lights
In addition to the headlights, you need to purchase a special kit for connecting fog lights. It includes:
- PTF power button;
- set of installation wires;
- fuses (optional);
- PTF control relay;
- connecting blocks.
Healthy! If desired, you can choose a complete set, which even includes fog lights.
Installation process
If everything is purchased, then you can start installing. Let's start with the PTFs and put them in their regular place. To do this, remove the bumper from the Priora by unscrewing all the screws around its perimeter.
Now we cut out the plugs that cover the holes provided for the PTF.
On some Prior modifications, the plug is not molded into the bumper, but is screwed with three self-tapping screws to the places where the lights are attached.
We install the purchased PTFs in place and secure each one with three self-tapping screws.
If you have the SE modification, then before installing the headlight, you need to install the decorative trim, which I wrote about above.
That's all for the installation. We put the bumper aside and work on the PTF power button. The ideal place for installation is next to the heating button. We remove the plug and in its place we will install the PTF control button. But first it needs to be connected, so it’s time to move on to assembling the electrical circuit.
Connection diagram
How to connect PTF to the on-board network? Let's not reinvent the wheel, but connect it the way the manufacturer intended. Let's look at the standard connection diagram:
Electrical diagram for connecting PTF to Lada Priora
Here, in principle, everything is simple and clear, but it can be made even simpler. Let's start with the fact that we absolutely do not need to go into the mounting block (fuse box). We will place the relay in the engine compartment, and the button, including its backlight, will be powered from the heating button. To do this, pry up the heating button with a screwdriver and remove it along with the power supply.
We arm ourselves with a tester, turning it on in the DC voltage measurement mode (the limit is not lower than 15 V). We connect one probe of the device to the car body (minus power). Now, with the ignition off, turn on the headlights and use the second probe to find the voltage of 12 V on the heating button block. Connect the backlight LED to this wire. According to the above diagram, this is the white (yellow) wire, terminal “B” of the PTF button.
Now we also turn on the ignition - the side lights will light up. We look for the contact on the heating button where 12 V appears, and connect contact “2” of the fog light control button to it (according to our diagram, red/pink wire). Contact “A” is connected to the body, contacts “D” and “1” are connected to each other, and the wire from them is brought out into the engine compartment. We put the buttons in place - and that’s it with the Priora’s interior, let’s move on to the engine compartment.
We choose a place to install the relay, guided by the fact that it can be connected to the positive terminal of the battery, the body, fog lights and the button with wires of a minimum length. And, of course, this place should not get too hot from the engine. We fasten the relay to the body using the provided mounting eye, and under the same screw we insert a wire connected to the 86th contact of the relay (numbering on the device body).
To pin 85 we connect the wire that we routed from the button from the interior. We apply “+” of the on-board network to pin 30, taking it, for example, from the battery terminal. There are lights left, and they need to be connected through fuses (indicated in the diagram as F15 and F16) with a nominal value of 15 A to pin 87 of the relay. We connect the second power wires for the fog lights to the body. We insert the power connectors into the PTF.
We check the operation of the fog lights: they must be controlled by a button, but only when the ignition is on. The button itself should be illuminated in the same way as all the others in the cabin + signal that the PTF is turned on. If everything works as expected, install the bumper in place - and have a safe trip in any weather!
How to adjust the light flow
In order to prepare for testing and debugging fog lights, the Priora should be placed in conditions as close as possible to real ones. You need to place a load weighing approximately 200 kilograms in the cabin, a spare tire in the trunk, and completely fill the tank with fuel.
After this, the car is installed five meters from a flat wall. The tester measures the distance from the ground to the center of the fog, and draws a horizontal line on the wall five centimeters lower. If the headlights have been adjusted correctly, the light spot will be approximately at the level of this line. You can also test and debug each of the headlights separately (to do this, you need to repeat the procedure, closing each of the headlights in turn).
Many car enthusiasts who bought a car called VAZ 2170-2172 find out very late that not all trim levels are equipped with fog lights (FTL), and then they wonder how to install them themselves. This is what this article will be devoted to. So, brief instructions for installing fog lights on a VAZ Priora.
Step one
You need to purchase a ready-made installation kit from a car store to install headlights on your car. Be careful, it must include: a wiring harness of the required length, a switch button, a relay and wires for connecting it, connectors, clamps and fuses. PTFs are usually sold together with an installation manual; the installation kit also includes a connection diagram.
Step two
Don't forget, this is very important!
To prevent a dangerous short circuit from occurring during installation of the headlights, it is necessary to disconnect the ground wire from the battery before starting work.
Step three
Carefully study the diagram for installing fog lights on a Lada Priora car. It will be given below.
Step four
Prepare all the tools. You will need:
- two types of screwdrivers: Phillips and flat;
- two keys. One for eight, the other for ten;
- knife (you will need it to cut out the standard plugs in the bumper and to strip the cable).
The installation process itself can be divided into three stages.
First stage: installing headlights in the bumper
For installation of fog lights in Lada Priora there are standard places located in the bumper and closed with plugs. First you need:
- remove the protection from the engine crankcase;
- Remove the standard headlight covers.
Install new headlights in place of the standard plugs. In this case, there is no single instruction. After installation, you need to secure them with self-tapping screws. Then connect the electrical connector to the lamp.
Then lay the wiring harness along the cable under the hood, and the harness must be secured with a clamp. This must be done so that on the right side the tourniquet is long, and on the left, on the contrary, short. After this, you need to connect the negative wires directly to the car body.
Next, we install the crankcase protection back and fasten the bumper itself in place.
Second stage: installation and connection of the PTF switch
We fix the headlight switch on the front panel of the car. This is done like this:
- open the decorative panel under the steering column. To do this, you need to turn three locks ninety degrees;
- remove the plug, which is located slightly to the left of the clock.
- you should see wires in the opened hole. The switch is connected to them. We connect short wires to wires with the same contacts. We do the same with the contacts of the glass heating button.
Third stage: connecting headlights
After you have completed all the above operations, you will need to connect the new headlights to the mounting block. This process comes down to simply installing several parts into the mounting block.
- We install the K10 relay and two fuses.
- Once these parts are installed, simply place the mounting block in place. If you did everything correctly, then after installing the battery mass you should have new headlights.
Do not forget to carefully check the quality of the insulation of connections, since most fires occur due to electrical wiring faults that are not corrected in time.
Stage four: adjusting the fog lights
The performance check and adjustment of the PTF must be carried out immediately after installing the PTF. The adjustment can be made either independently or at a service station.
PTF adjustment is carried out on a fully equipped vehicle. The gas tank must be full, a spare tire and a tool kit must be present.
The work is shown on the left headlight; on the right headlight we perform the operations in the same way.
Attention! The fog lamp is halogen. You should not touch its glass bulb with your fingers, as traces from them will lead to darkening of the lamp when heated. You can remove dirt from the flask with a clean rag soaked in alcohol.
Hi all. Today at VAZ Repair another photo report on the installation of PTF. This time we will install fog lights on the Lada Priora at home. The work is not difficult, but it requires certain knowledge and adherence to a sequence of actions.
I will not delve into the details of what fog lights (FTL) are and what use they are, anyone interested can read about it on the Internet, fortunately there are many detailed, understandable explanations. I will only say that not all trim levels had fog lights installed, so we will fix this problem ourselves. Therefore, without unnecessary preambles, I propose to proceed directly to the process.
So, to install PTF on Priora you must have:
- Set of fog lights;
- Wires, corrugation, pads, adapters, relays and buttons;
- Heat shrink, electrical tape;
- Pliers, a set of keys and screwdrivers.
Installing PTF in Priora 1 and 2: are there any differences?
The PTF connection on the Priora differs in the position of the headlights: in the pre-restyling version, the round headlights are located closer to the center of the front end, and in the Priora 2 - restyling: the trapezoidal PTFs are located closer to the edges of the front bumper.
Installing PTF in Priora 2 can be complicated by the fact that instead of a trapezoidal headlight, the headlight of a pre-restyling Priora car will be installed; you will have to stock up on screws and patience in order to secure the headlight well in the frame, and the plastic frame to the bumper. You can install fog lights in a couple of hours, the main thing is to understand the wiring connection order.
The procedure for installing the button inside the cabin, powering the circuit
In order to connect the PTF button, you need to perform the following steps:
- Remove the negative terminal of the battery;
- Disassemble the steering column. It is secured with three plastic latches; they need to be turned 90 degrees. Find the safety block;
- The block holds a self-tapping screw, unscrew it;
- Disassemble the center console by unscrewing four screws: under the ashtray, under the radio and near the OPEN sign. In place of the plug, put the on/off button for the fog lights and connect the blue wire to the safety block, possibly through a relay;
- Using clamps, connect the remaining wires to the heated rear window button.
Adjustment (setting) of PTF according to GOST
It’s not enough to just install PTFs, they also need to be configured, otherwise they will just be spotlights freely shining at an incomprehensible point - without fulfilling their functions. As in the case of other light devices, adjusting PTF on 2170 begins with checking the tire pressure (it should be equal), placing the car on a flat surface opposite a smooth wall at a distance of 5 m from the extreme point of the bumper.
On the wall, mark the distance from the floor to the center of the headlight, then a point 5 cm below. The PTF base on the Priora must be placed so that when the PTF is turned on, the upper limit of the light passes through the lower point marked on the wall. Fog lights, as statistics show, are rarely installed even after purchase, but with the correct settings they will serve as a good assistant.
Installation of fog lights on Priora, connection diagram
The schematic diagram for connecting fog lights is as follows:
To install PTF, in addition to a set of headlights and an installation kit for connecting fog lights, you will need:
- insulating tape;
- heat shrink;
- corrugation (to insulate the wires);
- flat screwdriver;
- Phillips screwdriver;
- key number 10;
- key number 13;
- pliers.
The algorithm for working on installing headlights is as follows:
- Open the hood, remove the negative terminal of the battery. Remove the frill and wipers, dismantle the fastenings using a 13mm wrench. The expansion tank and its mounting bracket must be removed using a 10mm wrench - without this it will simply be inconvenient to work, but putting them back is not difficult.
- Unscrew the screws securing the front bumper. There are 10 of them in total.
- The screws that secure the plugs can be easily unscrewed with a Phillips screwdriver. Fog lights are installed in standard places and securely fastened with self-tapping screws (so that the fastenings do not become loose when driving on uneven roads - because of such a trifle, you will have to return to the garage and remove the bumper).
- Proceed to wiring. It is recommended that all wires be corrugated to prevent chafing, and then secured so that the contacts do not come off.
- In the set of wires, select the longest wire (it is blue). It is “divided” into two “ends”: one is attached to the right headlight, the second to the left. The wire is then pulled into the engine compartment, closer to the master cylinder.
- Pull off the interior trim (a flathead screwdriver will help) and insert the wire into the interior.
- Connect the wire to the safety block.
After work, adjust the fog lights, otherwise all the work will be done in vain!
Basic Setup Aspects
After the fog lights are installed, their luminous flux will need to be properly adjusted so that the operation of the optics is most effective. Adjustment of fog lights should be carried out in conditions that are closest to real ones. Therefore, make sure that there is a spare tire in the trunk, the tank itself is fully filled, and the tire pressure should be the same. In addition, for greater realism, a load weighing about two hundred kilograms can be placed in the car interior.
When all these conditions are met, you can begin adjustment. First of all, the vehicle must be placed on the most level surface, this will allow you to get the most accurate result. If this condition is not met, the adjustment will be incorrect. The setting is done in front of a wall or garage door, this is a prerequisite.
To begin the adjustment, measure the distance from the ground to the middle of the lantern. After this, you should draw a straight line on the wall or garage door that corresponds to the distance measured earlier. Having done this, you will need to draw another stripe - it should be 5 centimeters lower, while the first line can be erased. The anti-fog optics should be adjusted so that the upper limit of illumination is located on the horizontal strip that you draw on the network.
Relays and fuses
The PTF relay from Priora must be secured with an eyelet under any fastening nut so that the wires do not “dangle” and are not pulled under the hood too much. The relay has four contacts, which are labeled: 85, 86, 30 and 87.
- The 86th contact is connected to the negative side of the battery;
- The 30th contact is connected to the “plus” of the battery;
- The 87th contact is connected to the “plus” of the fog lamp;
- Pin 85 is connected to the button with a blue wire through the PTF fuse on the Priora.
A long and old story about PTF.
Notes from the past.
From the inside, the car was in the “Lux” configuration, but without PTF. These were the very first SE
, and perhaps this was the reason. Even the factory bumper had welded places for the PTF, but the rest of the fasteners (stands for self-tapping screws) were in place. In 2011-2012, there was a lot of talk on the priorovod.ru forum about how and where to get original frames for PTF and make holes in the standard bumper.
I really wanted PTF. The previous 21093i had PTF from the factory (also “Lux” trim level). This lighting technology really helped to move safely in the dark, because... The roadside was very well lit. And in St. Petersburg it’s dark for half a year after 17.00...
In order to somehow prepare for the installation, I first had to convert the standard factory MUS (without a PTF button) into a MUS-LUX (with a PTF button). There was soldering and metal work. In the end it turned out like it came from the factory. Maybe I'll post about it if I find a photo. It was difficult to find the part numbers of the original PTF frames. Fortunately, the order was accepted by the largest St. Petersburg dealer - “Piter-Lada” on Kingiseppsky 50. But without delivery time. I started waiting... I found out another nice feature of my car - the wiring for the PTF was completely installed from the factory. All wiring, fuses and relays. This was also confirmed after a successful modification of the ICC: pressing the PTF button caused the relay to click somewhere under the steering column. And when I installed Volgov signals (autumn 2011), when I removed the bumper and connected a voltmeter to the dangling PTF connectors, I received the coveted +12V when I pressed the MUS button. The connectors were then wrapped in polyethylene and wrapped with electrical tape.
06.04.2012
.
"Hooray! Today, after almost 4 ( FOUR!
) months, according to my order at Peter-Lada, the foglight trim for the SE arrived! I called them almost every week. How much did it cost? Have you seen any offers on the Internet? A week ago at the FUchik car market they offered to “bring it to order” for 1,500 rubles. So, I paid 200 rubles. per set (right-left, 100 rubles per piece). + Gasoline from the Moskovsky district to Krasnoye Selo and back. This is their actual price.
What is the difference between PTF for Priora 1 and Priora 2
In fact, the Lada Priora does not have any generations or numbers. In 2013, this car was restyled, which significantly changed the appearance of the Priora, but this did not make it the second generation. As for PTFs, after restyling they did not change, just as the types of lamps used in them did not change. The only exception is the Lada Priora Restyling SE, which received new PTFs, but with the same H11 lamps.
Third-party developers also produce LED versions of such headlights, and some of them can additionally serve as daytime running lights.
PTF with LED daytime running lights for Priora SE
That's probably all. If you carefully read the article, you will be able to equip your Priora with PTF yourself, and, if necessary, change the light bulb in the headlight.
About low beam and diode PTF
Good evening, readers!