Payment for goods and downloading of the book in electronic form (PDF format) is made on the website.
To do this, you need to find the book you are interested in and click on the “Buy” button. The price of the book is indicated on the button.
For convenience, the price on the website for residents of Russia, Belarus and Kazakhstan is presented in rubles.
For residents of Ukraine in hryvnias, and for all other countries - dollars.
After clicking on the “BUY” button, a payment window will open where you can select a payment system with which you can pay for the selected book using any bank card (Visa, MasterCard, MIR, etc.)
When you click on the “Pay by bank card” button, the Portmone payment system will open, which is the easiest way to make a payment.
In addition, the website offers four payment systems for payment:
- Yandex (payment from any bank cards, Yandex Money account, QIWI Wallet, terminals, etc.);
- Portmone (payment from any bank cards, Portmone account);
- PayPal (payment from any bank cards, PayPal account);
- WebMoney (payment from any bank cards, payment from WebMoney wallets).
Payment via Yandex Cashier
After selecting payment via Yandex, the Yandex Cashier payment system will launch, where you need to select a convenient payment method (bank card, QIWI, Yandex Money account, etc.)
After specifying payment details and confirming payment, payment for the goods will occur.
If you have a bank card in a currency other than the ruble, then the money will be debited from the card at the rate of the Central Bank of Russia at the time of the purchase.
This payment method is optimal for residents of Russia, Kazakhstan and Belarus.
Official website of the Yandex Kassa payment system https://kassa.yandex.ru
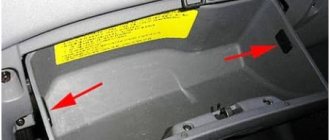
Replacement carried out on your own
Note. Before you start replacing the cabin filter, you need to know where it is located. It’s interesting, but the location of this element in the VAZ 2112 differs from the standard location. The place where it is located is indicated in the photo below.
As you can see, it is placed under the frill, the so-called convex grille. It is this very frill, or rather, the unfortunate placement of the filter that causes the element to constantly flood during rainstorms with water flowing down from above the glass. Apparently, when this component of the car was being developed in Tolyatti, the weather was dry and sunny.
Note. When the cabin filter is filled with water, the windows in the cabin often begin to fog up.
Tools
We will need:
- Flathead screwdriver. A flathead screwdriver should preferably have a thin and wide blade. It is needed to pry up the edges of the plugs. If you use the “old-fashioned method”, that is, prying it with a nail or other improvised means, you can damage the decorative components.
- A screwdriver is figured or Phillips. It is needed to remove the necessary screws and self-tapping screws.
- You also need a 10mm socket or a socket wrench that is bent at 90 degrees. The fact is that the nuts that secure the frill at the edges are located in a certain recess and an ordinary wrench will not fit there in any way.
Algorithm for the replacement operation
So:
- We remove the wipers (see Repairing wipers on your own). This is the very first thing you will need to do. To do this, remove the caps and then unscrew the nuts with a 10 mm wrench.
Advice. It is highly recommended to mark the wipers so that during assembly you do not confuse the right with the left. It happens that the driver's side wiper is longer.
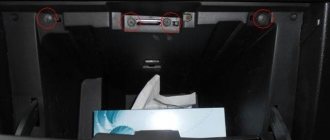
- Now you need to remove the plastic plugs placed on the frill. To do this, you need to unscrew 4 screws, being careful not to drop the washers.
- We take a socket or a special socket wrench and unscrew the end nuts from the studs, which are located in an inconvenient place. You'll have to suffer a little.
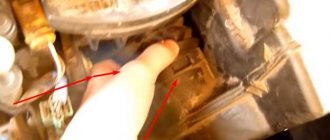
- It's time to remove the six screws that connect the frill and the engine compartment. In the photo below, the nut is on the left.
- We move the frill, doing it very carefully.
- On the driver's side, under the hood, we find a thin hose designed to supply fluid to the windshield washer. You don't have to touch it.
- We find the cabin filter grille cover, the so-called protection grid.
- We remove it, first removing the rear window washer reservoir, which may be in the way. It can be easily removed, just unfasten the rubber strap.
- We turn out the screws with a curved screwdriver.
- Remove the cover.
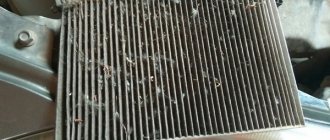
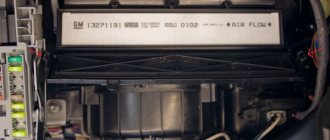
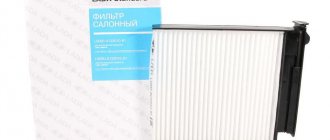
- We take out the cabin filter, which in most cases is not in its best shape.
- We install the new one, trying to install it in the same way as the old one. The filter should rest on two shelves in front.
- We put up a grid.
- We collect everything as it was.
Advice. We are assembling the frill in place, it is advisable to first attach the screws and only then tighten them. This will allow the frill to sit better in place. In addition, when tightening the end nuts, it is better not to overdo it, because the part is made of plastic and can be easily broken.
In the process of performing manipulation with your own hands, it is recommended to study photos and video materials. This will make it possible to better understand the instructions. By doing the work yourself, you can successfully save money. Usually the price for services of this property from professionals is unreasonably high today.
Payment via Portmone
After selecting payment through Portmone, the payment system will launch, where you need to select the payment method: bank card or Portmone account.
The price in the Portmone payment system is converted into dollars at the exchange rate of the Central Bank of the country where you are located.
If you have a bank card in a currency other than the dollar, then the money will be debited from the card at the rate of the Central Bank of your country at the time of the purchase.
After specifying payment details and confirming payment, payment for the goods will occur.
Official website of the Portmone payment system https://www.portmone.com
Design features of the cabin filter of the VAZ-211 family
We have already noted the imperfection of the design of this protective device in relation to the VAZ family with the index “211”.
What is it? Typically, such a filter element is placed directly next to the heater in the area where the main air duct branches. In most cases, this is the area behind the glove compartment, that is, inside the cabin. The VAZ team decided to go their own way. Where is the cabin filter of the VAZ-2112? It turns out that it is in the engine compartment under the frill - the facing panel of the windshield. Obviously, the designers believed that access to the engine compartment was much easier than from the front passenger side inside the cabin. Quite a sensible idea, but not very well implemented. The fact is that until 2003, the VAZ-2112 cabin filter was located vertically, but then, for an unknown reason, they decided to install it horizontally. And since the air intake for the ventilation system is carried out through the frill, in case of rain or when visiting a car wash, water flows in a powerful stream into the openings of the air intake grille, abundantly wetting the filter itself. This instantly manifests itself in the form of glass fogging and does not at all contribute to increasing the life of the filter element.
What is the function of the cabin filter?
The cabin air cleaning element is often called a stove filter. It is through this that air enters the cabin. It is necessary not only so that the driver and passengers can breathe fresh air, but also so that the heating equipment can work properly.
Cabin filter location
The cabin filter on the VAZ 2112 is located in the engine compartment. It is located directly behind the power plant on the passenger side.
On cars before 2003, the filter was located vertically. After updating the vehicle, the consumables were placed horizontally. According to reviews from car owners, this design solution turned out to be extremely unsuccessful.
Water constantly gets into the cabin filter, causing it to fail faster. To solve the problem, drivers add additional visors made from a plastic bottle over the consumables.
Types of cabin filters
There is no official classification of products designed to provide high-quality protection of the car interior from dust and other pollutants that are abundantly present in the atmospheric air. However, experts distinguish two large subgroups of cabin filters:
- conventional dustproof ones, the main task of which is to prevent microparticles of a certain size from entering the cabin;
- coal, designed, among other things, to prevent external odors and substances harmful to human health that are in a gaseous or suspended aggregate state from penetrating into the car.
Conventional filters are made from special paper or synthetic fibers. The first such car filters were single-layer, but now the de facto standard is the presence of two layers: the first carries out rough cleaning, preventing small twigs, insects and other contaminants of similar sizes from penetrating further. The second layer performs final cleaning of the inlet air flow from fine particles and dust.
The advantage of carbon filters is their ability to resist the penetration of unpleasant odors from outside. This is achieved through the use of certain additives and activated carbon in the third layer. As is known, activated carbon is an excellent adsorber that qualitatively absorbs a wide range of volatile substances. It also does not allow the passage of the smallest particles of soot present in car exhausts, as well as powdered rubber - the result of abrasion of car tire treads on the road surface. A carbon filter can be distinguished from a regular one purely in appearance: it has a darker color, while a regular one is made from white synthetic fiber or special paper.
This is interesting: How to bind a BMW E39 key? Step-by-step guide to binding
Domestic car enthusiasts are used to saving on everything they can. Even if he belongs to the category of very disciplined drivers, accustomed to performing all maintenance operations on time. In particular, it is not uncommon to reuse cabin filters after cleaning and washing them. There are also individuals who do not want to spend even 500 rubles on this consumable, preferring to make it from available materials - foam rubber, padding polyester and the like. Such a replacement of the VAZ-2112 cabin filter, as a rule, is characterized by extremely low efficiency - homemade filters retain no more than 20-30% of dust, which makes such an operation pointless.
Payment via PayPal
After selecting payment via PayPal, the PayPal payment system will launch, where you need to select the payment method: bank card or PayPal account.
If you already have a PayPal account, then you need to log into it and make a payment.
If you do not have a PayPal account and you want to pay using a bank card via PayPal, you need to click on the “Create an Account” button - shown with an arrow in the picture.
PayPal will then prompt you to select your country and provide your credit card information.
After specifying the information required to make the payment, you must click on the “Pay Now” button.
Official website of the PayPal payment system https://www.paypal.com
Where is the cabin filter located?
The air entering the car interior, passing through the heater radiator, first of all enters the cabin filter, located on the left side of the engine, directly under the trim.
Old and new cabin filter
Removing this lining will not be difficult. Below we will tell you about options for replacing mounted elements of the air circulation system in the cabin on two options.
Tool for the job
Before you get started, you need to prepare the following tools:
- The key and socket head are set to “10”.
- Phillips screwdriver.
- Clean rags.
- New cabin filter.
Payment via WebMoney
After selecting payment via WebMoney, the payment system will launch, where you need to select the payment method: bank card or WebMoney wallet.
If you already have a WebMoney wallet, then you need to log into it and make a payment.
If you do not have a WebMoney wallet and you want to pay in another way, you need to select any of the methods that WebMoney offers and make the payment
After specifying payment details and confirming payment, payment for the goods will occur.
Official website of the WebMoney payment system https://www.webmoney.ru/
Downloading a book
After successfully completing the payment (by any method) and returning to the KrutilVertel store from the payment system website, you will be taken to the successful payment page:
On this page you need to indicate your e-mail, where access to download the book will be sent.
If you are already registered on our website, then simply follow the link to your personal account.
The book you purchased will be in your personal account, from where you can always download it.
Please note that after making the payment, you need to return back from the payment system website to the KrutilVertel website.
If for some reason you did not return back to the site and closed the payment system tab with a message about the successful completion of the payment, please let us know - we will send you a letter indicating access to download the book.
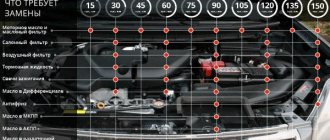
Replacement frequency
The frequency of replacing the cabin filter is not standardized based on mileage. The filter service interval is directly related to many external factors. On average, replacement of consumables is necessary every 10-20 thousand km. At the same time, there are a number of factors that can shorten the interval, for example, abundant flowering of plants, standing in traffic jams or traveling on dirt roads.
Problems when paying with bank cards
Sometimes difficulties may arise when paying with Visa/MasterCard bank cards. The most common of them:
- There is a restriction on the card for paying for online purchases
- A plastic card is not intended for making payments online.
- The plastic card is not activated for making payments online.
- There are not enough funds on the plastic card.
In order to solve these problems, you need to call or write to the technical support of the bank where you are served. Bank specialists will help you resolve them and make payments.
That's basically it. The entire process of paying for a book in PDF format on car repair on our website takes 1-2 minutes.
If you still have any questions, you can ask them using the feedback form, or write us an email at [email protected] .
Air filter replacement work
So, before posting the video, I wanted to say a few words about the work itself. Below will be listed all the actions that will need to be performed in order to get to the cabin filter and safely replace it with a new one.
- Unscrew the nuts securing the wiper arms and remove them.
- Unscrew the screws securing the insulation from the frill.
- Unscrew all the fastening bolts and two nuts of the plastic cover (jabot) and remove it, or rather, simply move it to the side.
- Remove the old filter through the hole on the right side of the car.
- Clean everything inside, as well as the water drain hole inside.
- Install the new filter in reverse order.