The front suspension is the weak point of any car. Many owners of domestic cars are interested in how to replace the front suspension of a VAZ 2106 with their own hands. There is nothing difficult about this if you follow the instructions and use a good set of tools.
The quality of roads in our country has always not been of high quality, and it especially deteriorates after winter. After the snow melts, numerous potholes and cracks are found in the asphalt. As you know, the VAZ 2106 suspension is designed to soften vibrations transmitted from potholes on the road to the vehicle body. Over time, the chassis wears out and requires repairs, which you can do yourself.
Front suspension device for VAZ 2106
Smooth movement and maneuvering in corners depend on the front suspension of the car. Periodic inspection and maintenance are required to ensure safe driving. If while driving you hear any extraneous sounds and knocks, grinding or feel swaying - all these are signs of a malfunction in the front suspension of the VAZ 2106.
Suspension diagram
It is recommended to carry out diagnostics every 15 thousand kilometers. In this case, it is important to inspect in detail the hinges of the levers, check the condition of the lower and upper ball joints, springs and shock absorbers, as well as the levers themselves. If there are no defects, just do a wheel alignment.
How is the repair carried out?
Do-it-yourself repair of a VAZ 2106 chassis can include a wide range of works, including:
- Adjusting the bearings on the hubs.
- Replacement of grease and bearing seals.
- Replacement of front suspension shock absorbers.
- Replacing springs in pairs.
- Installing new joints on the upper and lower control arms.
- Replacement of arms, both upper and lower.
- Replacing anti-roll bar cushions on a VAZ 2106.
- Installing new upper or lower supports.
After completing all of these or one of the listed works, it is necessary to have the wheel alignment done in a specialized workshop.
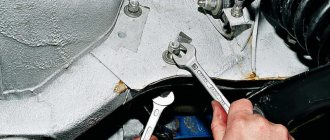
Replacing the front cross member
To replace the front suspension cross member of a VAZ 2106 you will need a small set of simple tools:
- keys for 13, 17, 19 and 22;
- screwdriver;
- hammer;
- extension cords
Jumper under the hood
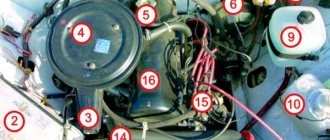
Having prepared all this, get to work. First, remove the lower front suspension arm from the car (we'll tell you how to do this below). It should be removed assembled with the ball joint and silent blocks. After this, open the hood, remove the carburetor air filter and cover this hole with something to protect it from the penetration of contaminants during operation.
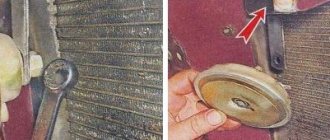
Prepare a cross member that will be needed to support the engine in a suspended state when dismantling the front suspension cross member. The material used is an ordinary construction board 5 cm thick. The length of the crossbar should be made equal to the distance between the flanges of the front wings. In the middle of the traverse, make a hole into which a long bolt or pin with a bracket is inserted.
Supports under the cross member
Install a traverse on the flanges of the front wings of the VAZ 2106 under the hood and insert a long bolt and bracket into its hole. The latter should be connected with a bolt to the eye of the power unit. By slightly tightening the nut on the stud, you need to remove the gaps in the connections between the bracket bolt and the motor eye.
Using a socket, through the hole in the cross member on both sides, you need to unscrew the nuts holding the motor mounts and remove the nuts with spring washers. Next, place supports under the cross member and lower the car onto them so that the cross member lightly touches them.
On each side it is necessary to unscrew the horizontal and vertical bolts that secure the cross member to the side members. When jacking up the car, the cross member will remain on the supports. At this point, the process of dismantling the VAZ 2106 front suspension cross member with your own hands is completed: replace it with a new one and reassemble everything in the reverse order of disassembly.
Replacing torque rod bushings on a VAZ 2106
The rubber joints of the rear axle torque rods are replaced when they are worn out or have visible damage. To do this, the rods themselves are removed from the machine, and the rubber-metal products are replaced by pressing out the old ones and pressing in the new ones.
On the “six”, the rear suspension links are installed in the amount of five pieces - 2 short and 2 long, located longitudinally, as well as one transverse link. Long rods on one end are fixed to special brackets fixed to the floor, on the other side - to the rear axle brackets. Short rods are mounted to the floor member and to the rear axle. The transverse element of the rear suspension is also held in place by special brackets.
To replace the rod joints, you need to prepare the following tools:
- keys to 19;
- new silent blocks;
- penetrating lubricant;
- metal brush;
- mounting blade.
The bushings on all rods are changed according to the same principle. The only difference is the need to unscrew the shock absorber mount from below to remove the long rod. The procedure is performed in the following sequence:
- We drive the car onto an overpass or pit.
- Use a wire brush to remove dirt from the fasteners and apply a penetrating lubricant.
When I had to change the rear axle rod bushings, I didn’t have any special tools at hand, nor did I have a bolt of a suitable size from which I could make a cone for pressing in the inner bushing. I quickly found a way out of the situation: I took a piece of a wooden block, broke off a part from it and cut out a cylinder, the diameter and length of which corresponded to the dimensions of the metal sleeve. The edge of the wooden cylinder was ground into a cone. After that, I lubricated the wooden device with detergent and, without much difficulty, pressed it into the rubber part with a hammer, after which I drove the iron bushing. If it was not possible to press the bushing in the first time, I simply re-lubricated the parts with detergent and repeated the procedure.
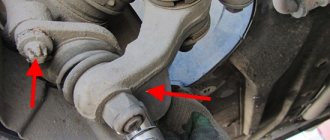
Replacing ball joints
Sometimes self-repair of a VAZ 2106 chassis requires replacement of ball joints. First you need to diagnose the element as follows:
- hang the wheel;
- place something under the lower arm;
- lower the car.
When lowered onto the stand, the lower arm will stop putting pressure on the suspension. Grab the wheel with both hands from below and above, and make several sharp movements: the top towards you, and the bottom away from you, and then vice versa. If at the same time you hear a knock and feel play in the hub and caliper in the area of the ball joints, the front suspension of the VAZ 2106 requires repair.
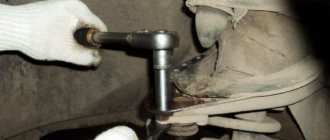
To replace, you will need a jack, a hammer and a regular set of wrenches. First you need to dismantle the wheel and unload the suspension, and then use a 22mm wrench to unscrew the nut of the lower or upper support. Give a few blows with a hammer to the protrusion of the steering knuckle, releasing the ball joint, and then release the support from the lever.
Using a 13mm wrench, unscrew the 3 nuts on the bolts securing the ball to the lever. When removing the ball from the lever, be careful. It is better to dismantle the plate along with it, not forgetting to put it in place when installing the ball joint. Don't forget that the lower and upper supports are different from each other. Assembly is carried out in the reverse order of disassembly.
Steering knuckle and front wheel hub
1 – bearing;2 – nut, 73–90 N•m;3 – stand;
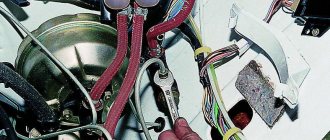
4 – steering knuckle;5 – tie rod end;6 – nut, 15–34 N•m;7 – front wheel hub;8 – brake disc;9 – nut, 220–260 N•m;10 – brake shield;11 – nut, 60–72 N•m; 12 – bolt, 65–75 N•m; 13 – retaining spring ring. Removal PERFORMANCE ORDER 1. Raise the car and remove the front wheel.2. Unscrew the drive shaft securing nut.3. Remove the caliper and secure it to the front strut with soft wire.4. Remove the speed sensor from the steering knuckle.5. Remove the cotter pin and unscrew the nut securing the tie rod end ball joint to the steering knuckle. Using a puller 09568–34000, press the ball joint pin out of the steering knuckle.
6. Mark the position and remove the bolts securing the lower part of the front suspension strut to the steering knuckle.
7. Use a nylon hammer to knock the drive shaft out of the front wheel hub. If the drive shaft is tightly seated in the front wheel hub, spray impregnating spray solvent into the spline area and then rethread the flange nut until it is flush with the end of the shaft. Using a brass hammer, hit the nut to knock the drive shaft out of the hub.8. Using puller 09568–34000, disconnect the ball joint of the lower arm from the steering knuckle.
9. Remove the steering knuckle along with the front wheel hub.10. Installation is carried out in the reverse order of removal. Disassembly PERFORMANCE ORDER 1. Remove the brake disc from the front wheel hub.2. Remove the snap ring.
3. Install special tools as shown in the picture.
4. While turning the special tool, remove the front wheel hub from the steering knuckle.5. Remove the special tool and dust ring.6. Using a special tool, remove the inner bearing race from the hub.
7. Using a special tool, remove the outer bearing race from the steering knuckle.
Check PERFORMANCE ORDER 1. Check the hub for cracks and wear.2. Check the brake disc for wear and damage.3. Check the hinge for cracks.4. Check the spring ring for cracks or damage. Assembly PROCEDURE 1. Apply a thin layer of grease to the steering knuckle bore and to the bearing outer race.2. Using a press with a mandrel of the appropriate diameter, press in a new wheel bearing.
Warning Do not apply pressure to the inner race of the bearing.3. Install the dust ring.4. Using a press with a mandrel of the appropriate diameter, press the hub into the wheel bearing.
WarningDo not apply pressure to the outer race of the bearing.5. Install the brake disc.6. Using a special tool, screw the hub to the steering knuckle, tightening the bolt of the device to a torque of 240 N•m.
7. Rotate the hub several times until the bearing elements are in place.8. Measure the torque that must be applied to rotate the bearing. Torque: 1.3 N•m9. If the torque is 0 N•m, measure the end play of the hub bearing.
10. If the torque exceeds the required value, it means that the bearing is not installed correctly in the steering knuckle and on the hub. Disassemble the steering knuckle and reassemble it. Bearing endplay: 0.08 mm
11. Remove the special tool.
Replacing the upper arm
Removing the upper arm
To replace the upper arm of the VAZ 2106 front suspension yourself, you will need keys 13 and 22, a jack, a support, and a wheel wrench for removing the wheel. To dismantle the upper front suspension arm, you must follow the instructions:
- Raise the car on a jack and remove the wheel, then place a support under the lower arm and lower the car. This is necessary to load the suspension to the point that the car is standing under its own weight. The levers will then be aligned.
- Secure the upper arm axle with a wrench and loosen the axle nut by unscrewing it until it aligns with the end of the axle.
- Unscrew the bolts that hold the upper ball joint in place, and then move the lever up a little and completely unscrew the axle nut, pulling the axle out of the lever.
- Remove the lever together with the silent blocks without dismantling them.
Next, carry out all the work that required you to remove the front suspension arm of the VAZ 2106, and install it in place or replace it with a new one. The assembly process is the same as disassembly, but in reverse order.
Suspension upgrade
The standard suspension of the “seven” is considered soft and imperfect. That's why many people decide to do tuning and modifications. This helps to significantly improve handling and overall comfort, as well as increase the service life of springs, balls, bushings and other elements.
Reinforced springs
Springs are the main element responsible for a smooth ride, directional stability and good handling. When they weaken or sag, the suspension is not able to compensate for the load, so breakdowns of its elements and other troubles occur.
Owners of the “Seven”, who often drive on bad roads or drive with a loaded trunk, should definitely think about upgrading the standard springs. In addition, there are two main signs by which you can judge that elements need to be replaced.
- Upon visual inspection, it was discovered that the springs were damaged.
- The car's ground clearance has noticeably decreased, as the springs sagged over time or due to excessive load.
Spacers are the first thing that comes to mind for VAZ 2107 owners. But this conclusion is not entirely correct. Yes, they will restore the stiffness of the springs, but will have a negative impact on the service life of the elements. Soon cracks will be found on springs reinforced in this way.
Therefore, the only correct solution would be to replace conventional springs with reinforced ones or modified ones from the VAZ 2104. At the same time, it is necessary to change the shock absorbers to more powerful ones, otherwise the reinforced springs will easily damage the standard system.
Before you begin the replacement procedure, you need to arm yourself with the following tools.
- By lift.
- A set of various keys, including a cylinder key.
- With a tire iron.
- Bar.
- Wire hook.
Now more about the replacement.
- Place the car on a jack and remove the wheels.
- Remove struts or conventional shock absorbers.
- Loosen the upper arm clamps.
- Place a block under the car and jack up the lower arm.
- Unscrew the stabilizer beam fastening.
- Remove the lift.
- Loosen the lower and upper ball joint nuts, but do not completely unscrew them.
- Drive the support pin out of the steering knuckle using a pry bar and hammer.
- Secure the upper lever with a wire hook and lower the lower one.
- Use a pry bar to pry the springs from below and remove them.
Then you need to free both springs from the gaskets and check the condition of the latter. If they are in good condition, install the new spring using electrical tape. Install reinforced springs in place of the standard ones.
The reinforced spring is installed in place of the standard one in reverse order.
Air suspension
The “Seven” has great potential in terms of modernizing the front suspension. And many car owners decide to install an air suspension with an electric compressor, hoses and a control unit.
The air suspension kit includes a compressor, hoses, tubes, struts and other equipment
This is a real electronic assistant that makes it possible to change the ground clearance depending on driving conditions. Thanks to this innovation, the stability of the car at high speeds increases, trips over long distances become comfortable, the car goes over bumps more smoothly, in a word, it becomes like a foreign car.
The system modernization goes like this.
- VAZ 2107 is installed on a pit.
- The battery is de-energized.
- The wheels are removed from the car.
- The front suspension is completely disassembled and air suspension elements are installed in its place.
- Under the hood there is a control unit, compressor and receiver. Then the elements are connected to each other by pipes and hoses.
- The compressor and control unit are integrated with the vehicle's on-board network.
Video: air suspension on a VAZ, is it worth it or not?
Electromagnetic suspension
Another modernization option involves the use of an electromagnetic suspension. It is a set of mechanisms and components that serve as a connecting link between the road and the body. Thanks to the use of this type of tuning suspension, a smooth ride, high stability, safety and comfort are ensured. The car will not “sag” even during long-term parking, and thanks to the built-in springs, the suspension will remain operational even in the absence of commands from the on-board network.
The electromagnetic suspension is controlled by a microcontroller and provides a smoother ride and safety
Today, the most famous manufacturers of electromagnetic suspensions are Delphi, SKF, Bose.
The front suspension of the VAZ 2107 requires timely maintenance and control of the main components. Remember that road safety depends on this.
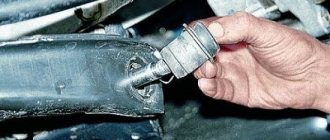
Removing the lower arm
When a VAZ 2106 chassis is being repaired, it may be necessary to replace the lower front suspension arm. To work, you will need wrenches 13 and 22. First, remove the front suspension spring, and then, using a wrench, unscrew the two nuts that hold the arm to the cross member. Remove it from the cross member bolts without removing the silent blocks, axle and ball joint. If necessary, replace the ball joint or change the lever. Reinstall it in the reverse order of disassembly.
Preparing for replacement
But there are certain features in the replacement. The fact is that all silent blocks are installed in the holes of the levers with interference, that is, they fit very tightly and are not easy to remove. For this purpose, special pullers are used to press out and press in the hinges.
Additionally, a ball joint remover may be required.
There are many methods for performing the operation without these pullers, and we will consider one of them using the example of a VAZ-2107 car.
Tools you will need:
- Set of spanners and sockets;
- Mount;
- Heavy hammer or small sledgehammer;
- WD-40;
- Jack;
- Wooden stands;
- Soap solution;
- Nigrol.
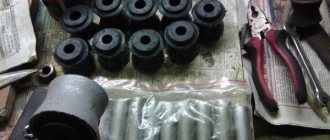
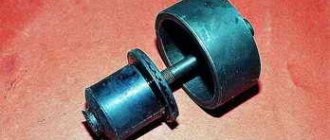
A few words about the selection of silent blocks.
They need to be selected according to the car model. At the same time, the market offers two types of these hinges - some use rubber as a damping spacer, and others use polyurethane.
The latter are more reliable and have a longer service life, but also cost more. Which type to choose is up to the car owner to decide.
Adaptations.
The method that will be described below requires the presence of a puller for silent blocks, but it will only be needed to replace the hinges of the upper arm.
At the same time, you don’t have to buy the device; you can make it yourself.
To do this, you will need a long bolt with a nut, two wide washers and two pieces of thick-walled pipe of different diameters.
One size should be larger than the circumference of the silent block (used when pressing out).
The second segment along the inner diameter should correspond to the circumference of the hinge, but so that the pipe wall rests against the metal side of the outer ring (used for pressing).