Disassembly begins with removing the shock absorbers. It's not hard to do. The top nut securing the rod is unscrewed. It unscrews without much effort. If the rod starts to rotate when unscrewing the nut. There is a double-sided groove at the end of the rod. Into which you can insert a key or a special device and fix the shock absorber rod. After unscrewing the upper nut, the lower bracket is unscrewed. To which the shock absorber is attached. It is secured to the lower arm with two nuts.
When unscrewing the nuts, applying little force, the studs broke. You can, of course, later weld bolts instead of them, but it’s better not to do this and buy a new lower arm. Because welding will weaken the lever. And in this place a crack will subsequently appear. As a result, the lever will break.
The shock absorber is removed along with the lower bracket. To do this, the car is jacked under. It is very important to place a reliable support under the body in addition to a jack. Since all work will be carried out on a jacked car and it is necessary to secure it securely. To eliminate the possibility of falling.
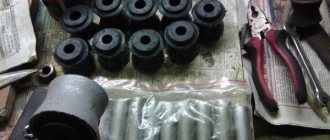
List of new spare parts and tool kit required for replacement
The domestic spare parts market offers a wide range of new parts of several types, with polyurethane and rubber filling, and to replace the front silent blocks on a VAZ 2107, the automaker recommends using the former, namely:
- a set of polyurethane silent blocks for the upper arm (art. 2101 - 2904040);
- a set of polyurethane silent blocks for the lower arm (art. 9RU01N);
- upper front arm mounting bolt;
- lower front arm mounting nuts.
Installation of new spare parts is carried out using standard tool kits and some specialized pullers, which significantly simplify the entire work process, namely:
- silent block remover for classic VAZ models;
- ball joint remover;
- open-end spanners with 13, 22 and 24 mm diameter;
- socket heads in a set from 10 to 24 mm and wrenches;
- hammer;
- medium mount;
- bottle WD – 40 for cleaning threaded connections;
- brush;
- gloves for hand safety.
The process of replacing the upper silent blocks on a VAZ 2107 is very different from the lower ones, both in terms of the volume of work performed and the cost in auto repair shops. Official service stations at the end of 2022 estimate this service at 1500-2000 rubles for the upper and lower levers, respectively, and private services at approximately 1300-1800 rubles.
Suspension design features
Cars use different types of suspension structures, so the installation locations and the number of silent blocks are different.
For example, classic VAZ models (2101-2107) are equipped with a double-wishbone front suspension, including upper and lower A-arms.
Below is the front suspension of the VAZ 2107.
Each of them has two hinges, on the side where the lever is attached to the car body. But the upper element is secured with a long bolt, and the lower one is mounted on the lever axis, screwed to the body. On the other side, the levers have ball joints.
But in more modern models, starting from the VAZ-2108 and ending with the VAZ-2115, only one lower lever is used.
Below is the front suspension of the VAZ 2109.
There are 2 silent blocks installed in it - at the place of fastening to the body bracket and at the junction of the lever with the spacer.
Another rubber-metal hinge is used on the other side of the spacer, where it is connected either to the mounting bracket (VAZ 2108-21099, VAZ 2113-2115) or to the cross beam (VAZ 2110-2112).
Since the suspension designs are different, the algorithm for replacing silent blocks is different. But in general, this procedure is quite doable in a garage environment, so it is not necessary to contact the service to replace silent blocks.
Signs of malfunction of levers and silent blocks
One of the signs of a malfunction is noise in the suspension when driving, especially on a bad road. Among other things, it occurs when silent blocks (rubber-metal hinges of levers) are severely worn. Also, if the silent blocks are worn out or the VAZ 2107 lever is deformed, it becomes impossible to set the alignment angles of the front wheels. The same problem occurs when the axes of the front arms are deformed.
If the levers are deformed, the car may pull to the side when driving on a flat road. An extremely unpleasant phenomenon - self-excited vibrations of the front wheels - is often a consequence of wear of the silent blocks.
Elimination of any of the listed malfunctions of the levers and silent blocks requires the removal of the suspension arms.
Tools
For repair you will need:
- jack;
- wheel wrench;
- keys 13, 17, 19, two keys 22;
- upper arm;
- ball puller;
- silent block remover (you can do without it).
Replacing the upper suspension arm of a VAZ 2107
The upper suspension arm of the VAZ 2107, as well as the lower one, is replaced in case of mechanical damage, as well as to replace worn silent blocks.
To make it easier to unscrew the nuts, we recommend spraying them with WD-40 before dismantling.
The sequence for disassembling and removing the upper arm is as follows:
- Remove the wheel from the side to be repaired.
- Disconnect the upper ball joint from the lever; to do this, use a thirteen key to unscrew the three nuts of the ball joint housing bolts (see Replacing ball joints on a VAZ 2107).
- After the ball joint is disconnected, slightly lift the lever up and use a 22mm wrench to unscrew the self-locking nut of the bolt securing the lever to the car body, hold the bolt from turning with a second 22mm wrench.
- Remove the bolt and lever. In order to remove the bolt (it is long), you may need to unscrew the front part of the plastic fender liner. The bolt may rest against the fender liner.
If the bolt of the upper arm of the VAZ 2107 does not come out, treat it with a WD tool, then turn it with a wrench and lightly knock on it.
After the lever is removed from the car, it is necessary to remove two silent blocks:
- Clamp the lever in a vice and install the puller. When tightening the puller bolt, first press one, then the other silent block out of its place.
- Replace the lever or make some other repair and use the same puller to install new or old silent blocks in place.
Install the upper suspension arm of the VAZ 2107 in the reverse order of removal
Having installed the lever, install its fastening bolt, tighten, but do not completely tighten the self-locking fastening nut, then load the suspension by placing a spacer under the lower arm and lowering the car on a jack, screw the ball joint housing to the upper arm and without unloading the suspension, tighten the nut of the lever fastening bolt .
If the ball joint was disconnected by pressing out the pin, then it is recommended to replace the self-locking nut securing the pin, as well as the nut securing the lever axis, with new ones. At this point, the repair work of removing and replacing the upper arm is completed.
After replacing the lever and/or silent blocks, it is necessary to re-adjust the wheel camber/toe angles.
Spring
To replace a damaged or sagging spring, you will need to remove the shock absorber and disconnect it from the stabilizer bar arm.
Then you need to loosen the nuts securing the lower arm axle to the cross member. The lower arm is pressed with a jack, but without loading the suspension. The ball joint pin is removed from it using a puller.
After which the jack is slowly lowered, weakening the spring. The weakened spring is removed from the lower support cup with a spatula.
Before installing a new spring, it must be compressed using special spring ties, otherwise the spring will not fit into place.
The new spring is placed in the lower support cup, after which the lower arm is pushed up with a jack to insert its ball joint into the steering knuckle.
Having secured the support, remove the ties from the spring. The remaining parts of the suspension are assembled in the same sequence as they were removed.
To summarize, we can say that repairing the front suspension of a VAZ 2107 may not seem difficult at first glance, but as a rule, it can cause difficulties for an inexperienced driver.
And this is connected not only with the presence of certain knowledge, which, we hope, you received from our article, but also with the presence of a certain skill, without which you are unlikely to be able to repair any domestic car.
Replacement of silent blocks of reaction rods
Tie rods are an integral part of the rear suspension of classic Zhiguli cars. They are secured by a bolted connection, and rubber bushings are used to reduce loads and compensate for impacts from uneven road surfaces. Over time, these products also become unusable and require replacement. It is best to change them comprehensively, rather than individually.
Tools and materials you will need:
- keys to 19;
- new silent blocks;
- penetrating lubricant;
- metal brush;
- mounting blade.
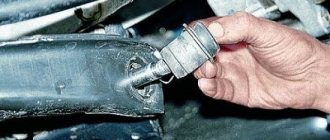
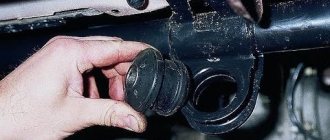
Let's consider replacing torque rod bushings using the example of a long longitudinal rod. The procedure with other suspension elements is carried out in a similar way. The only difference is that to remove the long rod, you need to remove the lower shock absorber mount. The work consists of the following steps:
- Clean the fastener from dirt with a brush, treat it with a penetrating liquid and wait for a while.
If the inner race protrudes slightly on one side, it needs to be leveled with a hammer.
After replacing the silent block, the rod is installed in the reverse order, not forgetting to lubricate the bolts, for example, with Litol-24, which will make it easier to dismantle the fasteners in the future.
Video: replacing torque rod bushings on a VAZ 2101–07
Polyurethane or regular?
On sale you can find two types of elements - polyurethane and rubber-based. The question is: which ones are better to use on the VAZ 2107? Rubber ones have many disadvantages:
- Even the new ones squeak.
- They have a relatively small resource.
- Under the influence of an aggressive environment they quickly become unusable.
But they also have a big plus - a fairly low price. Depending on the “appetites” of the seller, you can purchase a set for 500-700 rubles. But polyurethane ones have higher characteristics. They are practically not exposed to aggressive environments, have a long service life (at least twice as long), but there is one drawback - the price. It is within one and a half thousand. Look at how you are used to using your car.
Which ones should you install on your VAZ 2107? The question is not easy, you need to weigh everything to answer it. And most importantly, assess your financial capabilities. You also need to pay attention to your driving style. If it is aggressive, then polyurethane ones will be more suitable for the job. But if you drive quietly and the suspension is not subjected to significant loads, then you can install regular rubber ones. But we need to make a reservation again - it all depends on your capabilities and preferences. Polyurethane ones are many times better than rubber ones on the VAZ 2107 and similar models. And they are free from the main drawback of rubber joints - they do not creak.
Replacing silent blocks in the upper control arm of a classic with your own hands.
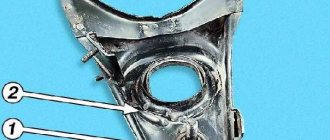
So, let's begin! In rear-wheel drive VAZs, the silent blocks in the upper arm can be changed without even driving into a hole and without removing the arm from the ball (provided that you have a remover for silent blocks). But first you need to determine whether the bushings of the silent blocks are stuck to the bolt securing the lever to the body. To do this, jack up the car and remove the wheel.
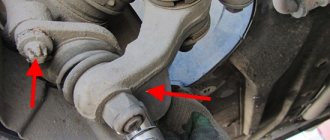
Arrows point to bolt and nut
We loosen the nut securing the upper arm with a 22mm wrench and try to turn the bolt. If it spins and the bushings stay in place, then you're in luck! But if this bolt rotates with great force and the bushings rotate with them, then as they say: “Houston, we have problems!” Next we will consider both cases.
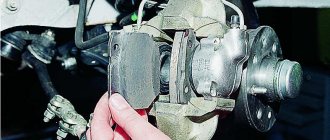
Diagnostics of rubber-metal joints
To check the condition of silent blocks, you need to use a pit or overpass. Without such amenities, it will be problematic to drive the seven, so there should be a pit in every garage. therefore, it can be repaired by hand without any problems. But you need to determine whether the VAZ-2107 silent blocks need to be replaced; the price of one is approximately 50 rubles. For a set of 8 silent blocks you will pay 400 rubles.
Carefully inspect the suspension on the lever, evaluate the appearance of the rubber-metal hinge. If the rubber has obvious damage - it has begun to become cracked, or there are any cuts at all, then all elements must be replaced. When carrying out repairs, try to do as much work as possible. Therefore, you not only change all eight silent blocks, but also, after assessing the condition of the balls, replace them if necessary. It is also worth looking at the condition and tightening the nut if necessary.
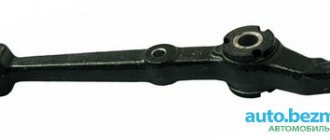
How to replace the lower arm on a VAZ 2101-VAZ 2107?
Removal: 1) The lever is easy to remove and install, but you can spend a lot of time on this, otherwise you will essentially need to unscrew the nuts that secure it and after that the lever can be removed from the car, first remove the front spring (How to remove spring, read the article: “Replacing the spring in the front part of a VAZ”) and when it is removed, use a wrench (a cap wrench is most convenient, but a wrench will also be convenient with a cap wrench) unscrew the two nuts (Indicated by red arrows in the large photo) , which attach the lower arm to the cross member and after that, remove the lever completely assembled with the ball joint, with silent blocks and with the axle, but just remove it carefully, because there are metal washers behind the lever in the places where it was attached to the cross member (see. small photo) we do not recommend that you remove them at all, or if you decide to remove all the washers, then remember where they were, otherwise the alignment angles of the front wheel will be lost and it will not sit straight.
Note! When the lower arm is removed with everything assembled, you can remove the ball joint from it, but it is better to buy a new arm assembly so that everything new is installed on it, but still, to remove the ball joint, you need to unscrew the three nuts that hold it attached to the lever and after that, you can completely remove it from the lever!
Installation: Install the new lever in the reverse order, and all the washers must be in their places so that the adjustment angles of the front wheel are at a minimum and by the way, when you tighten the nuts that secure the lever to the cross member, be sure to tighten them all the way, lowering the car to do this and having loaded the side on which you are replacing the lever with a new one, tighten the nuts until they stop and that’s it, the replacement is successful.
Additional video clip: Watch the video that explains the process of removing the lower arm and the process of installing it, in addition, this video shows some nuances that we did not indicate in this article, so be sure to study it in order to obtain additional material in order to so that the replacement is simply remembered much better and is done not from paper but from memory.
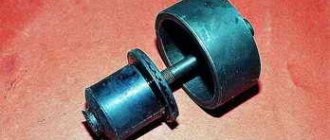
What is a silent block
Front arm bushings made of polyurethane
These parts are typical hinges made of metal and rubber. They are designed to neutralize noise, shocks, and various vibrations that occur when driving on our roads, which are not always of the highest quality. These parts are installed in reaction rods, supports, levers, and shock absorbers.
Rubber and polymer silent blocks that have become unusable should be replaced as quickly as possible. Failure of parts of levers and other suspension components significantly worsens the vehicle’s maneuverability and increases wear on the rubber of the front wheels, resulting in camber and toe problems.
Before changing the silent blocks on a rear-wheel drive VAZ 2107, you need to prepare the following tool:
- devices to facilitate the pressing process;
- remover for VAZ 2107 silent blocks and control tips;
- jack;
- a set of open-end and ring wrenches for 22 and 13;
- perfectly sharpened chisel;
- plumber's hammer;
- mount.
Mounting the upper arm of the VAZ 2107
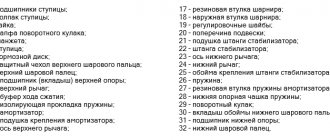
The front suspension of the car (Figure 1) is independent, on two wishbones on each side, with coil springs, telescopic shock absorbers and a stabilizer bar.
The upper 13 and lower 36 suspension arms are connected to the steering knuckle by 10 ball joints. The upper ball joint 14 is secured with three bolts to the upper suspension arm of the vehicle. The hinge body contains a bearing 12, the base of which is resin, and the friction surface is Teflon fabric, tightly fitting the spherical surface of the pin 9. The hinge parts are protected from contamination by a reinforced cover 11. The conical part of the pin fits into the conical hole of the steering knuckle and is secured with a self-locking nut.
The lower ball joint 45 is connected to the steering knuckle and suspension arm in the same way as the upper joint. In the hinge housing 46 there is a pin 49 with a hemispherical head. A metal-ceramic bearing 48 with a hemispherical surface is mounted on the pin rod. An insert 47 made of oil-resistant rubber is inserted into the lower part of the housing with interference fit. A plastic layer (a mixture of nylon and molybdenum sulfide) is applied to the surface of the liner in contact with the hemisphere of the finger 49. There is a hole in the lower part of the hinge body through which lubricant flows to the hinge. It is closed with a stopper.
The upper suspension arm 13 is connected by an axis 22 to the front pillar, and the lower arm 36 is secured by axis 35 with bolts 37 to the suspension cross member 30, which is attached to the side members by brackets 29. Spacer 28 and adjusting washers 27 are installed between the cross member and the axis of the lower arm. By changing the number of washers 27, the longitudinal angle of inclination of the turning axis and the camber angle of the front wheels are adjusted. Both suspension arms are connected to the axles through rubber-metal joints, ensuring a backlash-free connection of these parts. Such a hinge includes a rubber bushing 25, an outer 24 and an inner 23 metal bushing. A thrust washer 26 is installed between the nut and the hinge.
Spring 38 with its upper end rests through the support cup 21 with rubber gasket 20 on the front pillar of the body. The lower end of the spring rests on the support cup 44 of the lower arm. According to their length under a load of 435 kgf, the front suspension springs are sorted into groups “A” and “B”. Springs of group “A” are marked with yellow paint on the outside of the coils, and springs of group “B” are marked with green paint. The upward travel of the front wheel is limited by the stop of the upper lever 13 in the rubber buffer 15 installed in the bracket 16.
The lateral roll of the body when turning the car is reduced by a stabilizer bar made in the form of a rod 33 made of spring steel. The ends of the rod are secured to the brackets of the lower suspension arms with clips 39 through rubber pads 32. The rod itself is attached to the side members 34 by two brackets 31, in the holes of which rubber bushings are located. Shock absorbers 40 are attached to the lower suspension arms. The shock absorber rod passes through the hole in the support cup 17 and is secured with a nut. Rubber cushions 18 are installed between the cup and the shock absorber casing, as well as between the support washer 19 and the cup. The shock absorber is attached to the lower arm using a bracket 43 and nuts 42 and bolts 41.
Determining the condition of front suspension parts
During each maintenance, as well as during repair work, it is necessary to carefully check the condition of the protective covers of the suspension ball joints, paying special attention to the absence of mechanical damage to the covers. Find out if there are any cracks or signs of contact with road obstacles or the body on the suspension parts, deformations of the lower control arm axle or suspension cross member, and also carefully check the clearance in the upper ball joint and the condition of the lower ball joint.