Causes and breakdowns
In reality, the resource of the CV joint turns out to be significantly less, which is caused by operating conditions, poor quality of roads, driving habits and other factors.
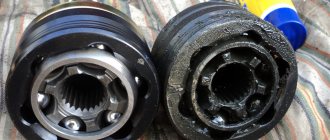
The CV joint is popularly called a “grenade,” which is due to the external similarity of the element to this explosive device.
Here's what you should know about grenade malfunctions:
- Practice shows that the most common cause of CV joint failure is dirt, dust, and sand that enter the mechanism through a damaged boot;
- Sometimes the problem of a non-functioning grenade can be solved by replacing the boot. This is possible if the CV joint itself has not yet worn out due to exposure to contamination;
- If the damaged boot is not detected in time, the grenade will be completely worn out within literally 200 kilometers;
- If the CV joint fails, a strong crunching sound appears when cornering and accelerating. Such a symptom indicates the need to urgently replace the CV joint;
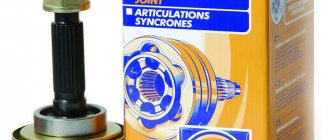
- The cost of new grenades is quite affordable; they are available at any auto parts store. But you should purchase those that meet the technical requirements of the VAZ 2109;
- If you have at least a little experience in repairing cars yourself, it is quite possible to replace a grenade with your own hands.
Types of auto parts
Various types of CV joints are sold. Among all the diversity, it is worth highlighting the following types:
- Twin cardan joints (these are two cardan joints mated to each other).
- Tripod (allow large axial movements).
- Ball ones (are the most common).
- Cam-disk (KrAZ-255B, Ural-4320).
- Crackers (prone to overheating at high shaft rotation speeds, installed more often on cargo vehicles).
A grenade can also be:
- Internal (connects the axle shaft and gearbox).
- External (connects the wheel hub to the axle shaft).
Depending on the condition of the CV joint, you can purchase:
- New.
- Old, in working order.
- Used, requiring replacement of individual components.
Different factories can produce grenades for the VAZ 2109. Based on this, parts are classified into two types:
According to the manufacturer, CV joints can be of the following brands:
Grenades for VAZ 2109 are sold at various sales points. Therefore, you can buy a car part:
Types of CV joints
Before you begin repairs, you need to find out exactly how the unit is designed.
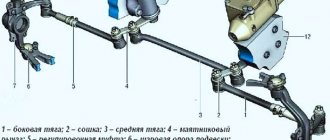
The pair of drives on the VAZ 2109 is equipped with a total of 4 CV joints.
| CV joint type | Peculiarities |
| Interior | There are 2 of them. They transmit torque to the axle shaft from the gearbox |
| Outer | There are also two of them. Installed on the ends of the axle shafts and transmit torque directly to the wheels |
This arrangement of grenades allows the wheels to rotate during turns and constant operation of the suspension system. To put it simply, the outer CV joints are responsible for transmitting torque when cornering, and the inner ones are responsible for the vertical movement of the wheels. These are collisions with bumps, holes, roll in turns, etc.
Signs of failure of the outer grenade (CV joint).
There are two options here:
- signs that your grenade has already broken,
- signs that the grenade will soon come out and break.
How to understand that a grenade will soon break.
Of course, the first sign of a malfunction of the external grenade is a crackling sound. If you hear a crackling noise while driving with the steering wheel turned, it is definitely a CV joint. The greater the angle of rotation of the wheel and the harder you press on the gas, the louder the clicks. Another sign that does not always appear is vibration on the steering wheel at speeds above 80 km/h. The vibration is only slightly similar to the vibration from an unbalanced wheel. It usually manifests itself as a slight twitching of the steering wheel.
How to understand that the outer CV joint has broken.
If the CV joint breaks, the car will stop moving. In any gear engaged, press the gas, the speed increases, but the car does not move.
How to understand that it is the outer CV joint that has broken, and not the internal one or the clutch in general (the first signs of failure are similar to the signs of a clutch failure)? First of all, start the car and put it in any gear. Next, open the hood and look in turn at each of the shafts going from the box to the wheels (one short, the other long). If any shaft is spinning, it means that the CV joint has broken on this side.
I recommend not just visually looking at the shaft, but touching it with some long, hard object, such as a stick. The main thing is that there is nothing on it that can wrap around the shaft!!! When you touch the shaft with a stick, if it is spinning, you will feel a slight vibration. This is usually done in the dark, because it is difficult to understand whether a cylindrical object is spinning, especially in the dark.
Step-by-step CV joint replacement
Unfortunately, not each of us has the opportunity to use an overpass or pit to repair our car, and we have to go to a service station to repair even simple car components. However, prices and quality of service in these services very often force you to postpone repairing your car until “better times.” Therefore, I recommend reading an article that will allow you, using some techniques, to replace a unit that requires a hole - without it.
The drive of each wheel consists of two constant velocity joints (CV joints) connected to each other by a shaft. The CV joint located closer to the gearbox is called internal, and the one located closer to the wheel is called external. The outer CV joint ensures rotation of the wheel to the required angle, and the inner one provides angular and axial movement of the drive shaft.
Rice. 1 — Wheel turning pattern
As can be seen in the figure, the outer CV joint allows you to change the direction of rotation at a much larger angle than the inner one. But in addition to changing the direction of rotation, the internal joint compensates for the axial movements of the shaft caused by the steering geometry of the front wheels. Despite the fact that the outer and inner hinges are links of the same chain, the outer one fails much faster. This is explained by the fact that the dynamic loads on the wheel are much higher than on the gearbox.
The outer joint is replaced when there is obvious wear, namely a characteristic crunch in motion when the wheel is turned at a large angle. A crunch when starting the car indicates wear on the inner joint.
Determining the malfunction
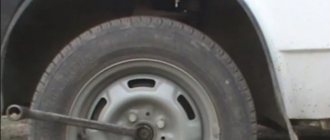
First of all, when driving, there may be extraneous noise from the front. First you need to make sure that the CV joint boots are not torn and there are no cracks or oily marks on the surface. To check, just turn the steering wheel all the way and carry out a visual inspection behind the wheel.
Found any damage? Change the boot immediately so that stones, small particles, and water do not subsequently get into the CV joint mechanism. Otherwise, the hinge will quickly become unusable.
It is quite easy to determine the need to replace the hinge itself - during turning maneuvers the driver notices characteristic knocking noises. The presence of play during swinging of the drive shaft will help confirm this fact.
Tool
Tools needed to replace the outer CV joint:
— a “30” head with a long handle (for unscrewing the hub nut); — head on “19” (for unscrewing wheel bolts); — head at “16”; - jack; — bricks or hemp (for hanging the front of the car); — WD-40; - flat (slotted) impact screwdriver; - wire cutters; - hammer; — a new set of outer CV joints.
Rice. 2 - Necessary tool
Note:
Contrary to popular belief, to replace the outer CV joint it is not necessary to drain the oil from the gearbox.
Basic procedure
First of all, you should put the car on the parking brake and secure the rear wheels with blocks. After this, while the car is on the ground, the hub nut is loosened. You will first need to remove the protective cap. It should also be taken into account that this nut is tightened quite tightly, so you will have to make a significant effort. At this point you can loosen the wheel bolts.
Next, you need to raise the front of the car by placing the body on supports. After this, you can unscrew the wheel bolts completely, removing the wheels, and remove the hub nut stop washer. The next step is to disassemble the steering rod, or rather its tip. The fastening bolts of the lower part of the steering knuckle support are screwed together, after which it is necessary to turn the steering wheel in the direction from which the replacement is being made until the extreme position is reached.
Next, the spitz end of the outer CV joint of the VAZ 2109 is pulled out from the hub, after the steering knuckle and strut have been pulled out. The next step is to press out the inner CV joint secured in the gearbox, for which it is better to use a pry bar.
It is important to pay attention to the fact that if it is necessary to carry out work on all CV joints, it is recommended that after removing one drive, install a retainer in the box, which can be an old similar part of the inner CV joint. Otherwise, the gears will shift, due to which the CV joints will not be able to be installed in place
If traces of oil were observed in the area of the gearbox during operation of the vehicle, then the seals on the CV joints will also need to be changed. Next, you need to clamp the drive shaft with a vice, remove the clamps from the hinges and unscrew the boots if they are intact. It is enough to cut off torn anthers with a knife.
The CV joints are knocked off the shaft with a hammer and drift, with the main forces being applied to the hinge cage. The same is done for the outer CV joint.
If you only need to replace the anthers, then the joint should be washed with gasoline to get rid of old grease and traces of dirt.
The new boot is placed on the shaft, but it is important to keep in mind that the right shaft is longer than the left. In addition, it is better to immediately replace the lubricant in the CV joint, making sure there is enough of it
Removing the hinge
It is advisable to treat all unscrewed bolts and nuts with WD-40 a day before replacing the outer hinge, thus significantly reducing the effort spent on unscrewing these elements. If this is not possible, we process the bolts and nut immediately before starting repair work.
Rice. 3 - Place of treatment with WD-40
Rice. 4 - Areas of treatment with WD-40
Set the car's steering wheel straight, engage first gear and apply the parking brake. For those for whom it does not work, I suggest reading this article. Under the front wheel, in which the outer joint is changing, we install two bricks, as shown in the figure below, to prevent rotation and scrolling. Use an impact screwdriver to loosen the nut. Using a “30” socket with a long handle, unscrew the hub nut, turning the wrench counterclockwise, regardless of which side the CV joint is being replaced from (!).
Rice. 5 — Unscrewing the hub nut
Having removed the nut, unscrew it and remove the washer. Then loosen the wheel bolts and jack up the front wheel. We place stump or bricks under the front side member so that when the jack is removed, the front wheel still remains raised a few centimeters above the ground. Now you need to hang the other front wheel in the same way. This is necessary in order to break the transmitted force from one suspension to another through the transverse stability beam. Then unscrew the wheel bolts and remove the wheel from the side we need. The result should be the same as in the figure below.
Rice. 6 — Hanging the front wheels using bricks
Now, using the “16” head, you need to unscrew the two bolts securing the ball joint to the steering knuckle. It’s not very convenient to do this without a hole, but it’s quite possible.
Rice. 7 — Unscrewing the ball joint bolts from the steering knuckle (body elements have been removed for clarity)
Next, move the strut to the side so that the outer hinge comes out of the hub.
Rice. 8 — Output of the outer hinge from the hub
We loosen the clamps of the CV boot and remove them, and cut the boot itself so that it does not interfere. To remove the outer joint from the shaft, you need to use a flat (slotted) impact screwdriver to crawl between the retaining ring and the joint separator, and use a lever to pull it off the drive shaft, while holding the shaft with the other hand, as shown in the figure below.
Attention! Never pull the drive shaft towards you, as it may come out of the inner joint!
Rice. 9 — Removing the CV joint using a screwdriver
Rice. 10 — Installing a screwdriver between the retaining ring and the hinge separator
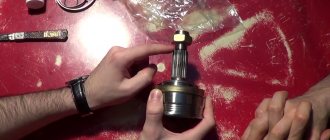
If you did it as shown in the figure, the hinge should be easily removed from the shaft. Replacing the locking half-ring is completely optional if its external integrity is intact. Then we take out a set of new outer CV joint and get ready for installation.
Drive design features
The main advantage of CV joints, in comparison with conventional joints, is the transmission of rotation without loss, even with a strong change in the angle between the components of the shaft (up to 70 degrees).
In total, the VAZ-2108 drive shaft includes three components:
- Shaft (with connecting splines);
- Internal CV joint (for interaction with the box);
- The hinge is external (provides interaction with the wheel hub).
Both hinges used on the VAZ-2108 are of the ball type; they are almost identical in design, but differ in size. Thus, the outer ring of the internal element has a significantly greater depth. This provides the possibility of axial displacement of the inner race, and as a result, a change in the length of the shaft, which is necessary for the drive wheels to make turns. In addition, the left and right drive shaft assemblies are different lengths.
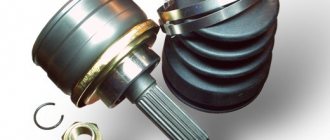
The main components of the CV joint are:
- Outer ring (made in the form of a glass, special grooves are made on the inner surface);
- Inner race (represents a power fist, which also has grooves);
- Balloons;
- Separator (prevents balls from falling out);
All this is assembled into a single structure, so it is generally impossible to check the VAZ-2108 CV joint, even if it is completely disassembled.
The inner races are connected to the shaft using splines. They are secured against removal with locking rings.
The outer races are made integral with the limit switches, which are splined into the gearbox and hub. But the end stop of the inner CV joint is secured in the box with a retaining ring, but the outer joint is secured with a threaded connection (nut).
Installation
We take out the boot and put it on the drive shaft, after which we fix its inner part with a small clamp. The fixing process is very simple - after the hole gets into the recess, we tighten the clamp using wire cutters. Inside the boot we place at least 40 cm3 (the equivalent of two matchboxes) of CV joint grease-4, which comes complete with the new hinge.
Rice. 11 — Installing the boot and clamp tie
Attention! Never reuse parts such as clamps and hub nuts, as these parts are disposable!
After this, we put on the hinge and, with light blows of a hammer, hammer it in until it stops. We put on the boot and secure it with a large clamp, similar to the small one. Now you need to get the hinge splines into the spline hole of the hub, and then put on the washer and hub nut. Next, we bring the strut into position above the ball joint and tighten the pre-oiled bolts.
Rice. 12 — Installing a new hinge
Rice. 13 — Clamp tie
Note:
It is recommended to lubricate all bolts discussed in this article. This will slow down the oxidation of the bolts, and in the future will allow you to unscrew them with less effort.
We put on the wheel and first tighten the oiled wheel bolts. Next, you need to lower the car onto the wheels, and then place bricks under the “operated” wheel. Tighten the wheel bolts with normal force and the wheel nut with a torque of 220 Nm. If there is no special wrench, tighten the nut with maximum force, after which you need to lock it using an impact screwdriver and a hammer.
After the car has driven 500-1000 km, re-check the tightness of the ball joint bolts and, if necessary, tighten them.
How to remove a vaz shruz
Having determined that it is the external grenade that is broken, we begin to remove it.
How to unscrew the hub nut on a VAZ?
First of all, unscrew the hub nut. To do this, take a 30mm head and a lever, the larger the better. We put bricks under the wheels to prevent the car from rolling (simply putting it in gear is not an option, the wheel will spin) and begin to unscrew the hub nut.
In this matter, the more you weigh, the better, since I very often lacked my weight and leverage of about one and a half meters. I got out of the situation in the following way: I stood completely on the lever, as close to the edge as possible, thereby giving maximum tension to the nut, and hit the lever with a hammer. Usually this method helped me unscrew even the most soured wheel nuts.
One more nuance: if the outer walls of the head come into contact with the walls of the hub, it is better to lubricate the head with mining or lithol, or, in extreme cases, with silicone grease. Thanks to this trick, the head will not bite in the hub.
How to remove a grenade?
The hub nut is unscrewed, now we remove the wheel, unscrew the two bolts that hold the ball joint, disconnect the suspension arm and the hub, move it to the side of the car while lightly tapping the grenade, remove it from the hub. At this point, two options are possible:
- The grenade is already broken.
- Replacing the grenade due to its crunching sound.
In the first case, you simply remove the outer part of the CV joint from the shaft, then the retaining ring from the drive shaft and knock off the cage with a hammer.
In the second case, removing the CV joint becomes more difficult. You need to deflect the grenade relative to the shaft at the maximum angle so that the bearing balls and their cage are visible.
Now use a hammer to break the jumpers of the cage between the bearing balls and take out the balls one by one. When you take out the last ball, you can remove the body of the grenade, and then its inner part sitting on the shaft, after first removing the locking ring from the shaft.
Of course, you can simply try to knock the grenade off the shaft, but due to the locking ring this will be problematic.
That's it, the CV joint is completely removed. Now let's start installing the new part.
- Jack;
- Wheel bolt wrench;
- Power wrench;
- Ratchet driver;
- Steering and ball pin remover;
- Head at seventeen, thirty;
- Magnet;
- Hammer;
- Oil collection container;
- Mounting lever;
- Vise;
- Slotted screwdriver;
- Dull wire cutters;
- Engine cleaner in aerosol;
- The extension is sharpened to a cone;
- Torque wrench.
- Loosen the wheel bolts, jack up and remove the wheel.
- Remove the cap and unscrew the hub nut using a 30 mm socket. When unscrewing the nut, ask an assistant to press the brake pedal. You can also remove the nut while the car is on its wheels.
Use a magnet to remove the washer that is placed behind the hub nut.
Unscrew the nut securing the steering joint to the shock absorber. Head nut for seventeen. Use a puller to squeeze your finger out of your ear. If you don’t have a puller, you can hit the end of the eye where the finger is inserted several times with a hammer. Unscrew the two bolts securing the ball joint to the steering knuckle and move it to the side.
Remove the outer grenade from the splined part of the wheel bearing.
Place a container to collect the oil and remove the internal grenade from the manual transmission. To remove the grenade, insert the mounting lever into the cut in the drive housing and manual transmission. Next, tap the lever with a hammer until the grenade moves.
Pull the inner grenade out of the box and remove the drive shaft.
Remove the boot from the grenade by opening the clamps in advance. The clamps can be opened with a slotted screwdriver.
Grab the slotted part of the grenade with one hand and use a hammer to hit the outer body of the grenade with the other hand. After two or three hits the grenade will be in your hand.
Remove the old boot from the shaft and clean the spline part of the old grease. Fill the new CV joint with grease and, if necessary, replace the retaining ring on the shaft. Place the boot on the shaft with the narrow side facing inward.
CV joint assembly process
When assembling the outer CV joint, you must perform the following steps:
- We put a rubber part on the shaft.
- We stuff the CV joint (new or cleaned) onto the shaft until the part is secured with a retaining ring.
- We place fresh lubricant in the hinge and boot.
- We put the boot on the outer race.
- We remove excess air from the boot by pressing it with your hand.
- We secure the boot with clamps.
Then the drive is put in place, the hub is clamped with a nut. It is also necessary to put back the tie rod end, support and wheel. Next, you can lower the jack and tighten the nut securing the drive. To prevent it from unscrewing on its own, the nut should be capped.
Replacing anthers and hinges
Often, problems with CV joints occur due to damage to the anthers. In this case, you can get by by replacing these protective parts. It will cost much less than replacing the entire CV joint. To do this work, remove the drive and secure it in a vice. Replacement is done as follows:
Remove the clamps from the boot. Using pliers, remove the old boot. If there is no need to dismantle the grenade (hinge), then you can install a new part and secure it with clamps;
If there is a need to dismantle the hinges, you will need to remove the old ones. This is done with a hammer. The blows should be applied through a wooden drift; You need to take a plastic tip from the removed CV joint. It will then need to be installed on a replacement part; Be sure to fill the new grenade with lubricant, this will extend its service life. Carefully hammer the CV joint into place through a wooden block. Do not harm him; Place the boot on the hinge
At the same time, pay attention to the distance from the beginning of the grenade to the end of the boot should not be less than 21 centimeters; We carefully tighten the clamps on the boot, the service life of the CV joint depends on this.
Pay attention to the need to select hinges. They must be from the same set
Otherwise, they will not work for very long, and with some interruptions. Conclusion. Domestic cars for the most part cannot boast of increased reliability. That is why replacing the CV joint on VAZ 2109 and 21099 is familiar to many drivers. This is not a tricky thing, no special skills are required
But it is important to do everything as carefully as possible. This can significantly extend the service life of the part.
Features of repairing the internal CV joint
To replace the inner CV joint, it is necessary to completely remove the drive, for which the outer joint is first disconnected without subsequent dismantling. Next, using a pry bar, remove the hinge end from the gearbox. To do this, we insert the flat part of the tool between the outer frame and the box, and then move it like a lever.
Further, the procedure for replacing the unit will be similar to the actions when repairing the external hinge. The inner CV joint must be correctly inserted into the transmission. It is recommended to insert the part into the hub, with the help of which the unit is brought into place by pushing movements. But it is also possible to drive the already assembled shaft with a mallet or a wooden pointer and a hammer. The hinge must be secured with a locking ring.
At the final stage, all removed parts are installed back. At this point, the replacement of CV joints is considered completed.
How to remove the drive
In order to remove the drive assembly, you need to perform the following steps:
- Completely unscrew the nut on the outer joint to free the hub.
- Remove the nuts from the bolts that secure the strut to the hub steering knuckle. This will allow you to move the hub to free the joint. But it will be much more efficient not to unscrew the nuts on the strut, but to disconnect the ball joint.
- If you unscrewed the ball joint, you need to remove the tie rod end pin from the hole in the strut knuckle. This is done using a special puller.
- Now you need to pull the outer joint out of the hole in the hub. How to do this depends on the situation. You can use a thin drift, but without fanaticism, so as not to damage the mechanisms. You should also not hit the CV joint axle with a hammer - this will cause the edges to flatten and make it impossible to remove the element.
- After you pull out the outer joint, you can proceed to the inner one - to remove it from the hole in the gearbox, just apply a few light blows with a small chisel. You can also use a mounting spatula.
That's all, now the drive has been completely removed, you also need to learn how to remove the CV joint on a VAZ-2109.
Malfunctions and their symptoms
The hinge components are made of high-quality materials, and the working surfaces have high-quality processing. Therefore, VAZ-2108 CV joints can work for a significant period without any intervention or maintenance of the unit itself.
But there is one caveat - the reliability of the unit is maintained only if there is no contamination. The ingress of sand and dust, which are abrasives, intensively wear out the working surfaces, which leads to the destruction of the hinge.
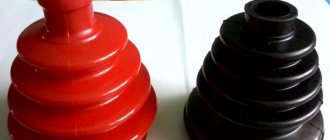
The assembly is protected from contamination by anthers - special rubber elements, fixed on the shaft with a clamp on one side, and on the outer race on the other.
But the resource of the anther is limited. Due to constant contact with the external environment, the rubber “ages”, which leads to the formation of cracks through which sand and dirt penetrate into the unit.
Diagnostics of the drive comes down to inspecting the anthers. If even minor cracks are detected, an immediate replacement of the CV joint boot 2108 is required. Additionally, the element is washed and fresh lubricant is added.
If you do not change the CV joint boot on a VAZ-2108 in a timely manner, the sand will wear out the working surfaces so much that the joint will simply crumble. It is noteworthy that even with slight wear of the surfaces, it will no longer be possible to correct the damage, since the unit cannot be repaired.
A sign that a VAZ-2108 CV joint needs to be replaced is the appearance of a pronounced crunch and clicking sound when turning the steering wheel. With slight wear, third-party sounds appear only at the extreme positions of the steering wheel, but as wear progresses, a crunching sound appears at lower turning angles.
Related link:
What kind of oil to fill in the engine, gearbox and axles for the winter in a VAZ
At the initial stages, you can still try to extend the service life by washing, adding lubricant and replacing the boot. But we note that if a crunch appears, it means that the working surfaces have already begun to wear out, and these procedures will only delay the replacement of the unit, but in the end it will have to be done.