Replacing the rear suspension arms on a Ford Focus 2 is required depending on the mileage and the wretchedness of the roads on which you travel. Of course, if the levers themselves are not deformed, then you can limit yourself to replacing the rear silent blocks of the Ford Focus. The rear suspension features a complex multi-link and fully independent suspension. This scheme allows you to achieve excellent controllability and driving comfort, but replacing the lever assembly (as prescribed by the manufacturer) can cost a pretty penny.
The stamped trailing arms of the Ford Focus are connected to the subframe by three transverse arms through silent blocks. Below is a photograph of the entire structure, indicating specific elements for clarity.
Ford Focus 2 rear suspension elements
- 1 — silent block of the trailing arm
- 2 - trailing arm
- 3 - lower front arm
- 4 - upper lever
- 5 - shock absorber
- 6 - spring
- 7 — subframe
- 8 — adjusting bolt (bolt securing the rear lower arm to the subframe)
- 9 - anti-roll bar
- 10 - lower rear arm
- 11 — brake shield
All rear levers of the Ford Focus 2 are made of stamped steel with silent blocks pressed into them. There are 4 levers in total, these are the longitudinal, upper, lower front and lower rear levers. Next, we will tell you in detail how to remove each lever individually.
Replacing the upper Focus arm
Replacing the upper arm of the Ford Focus rear suspension is carried out when there is mechanical deformation or wear of the silent blocks (cracked rubber, peeling, etc.) To remove the arm, we will need a platform or hole, ties for removing the rear spring and an adjustable stop for the lower arm.
We remove the spring using zip ties, remove the wheel, install an adjustable stop or hydraulic jack under the lower rear arm at the junction of it with the trailing arm, and use the stop to raise the arms so that the rear suspension is in the “car on wheels” position.
Using a 15mm socket, unscrew the bolt securing the upper arm to the trailing arm. This bolt also secures the brake hose bracket. Using a 15mm socket, unscrew the bolt securing the upper arm to the subframe.
Using a screwdriver, pry the ends of the lever out of the brackets and remove the lever from the car. We install the new lever in the reverse order with the deflection down.
When to change shock absorbers on a Ford Focus II?
On average, shock absorbers on a Ford Focus II last about 90-100 thousand km. mileage However, it is necessary to take into account that these terms are relevant for the average intensity of vehicle operation; with more extreme driving, when driving on poor-quality road surfaces, the life of the shock absorber may noticeably decrease.
An accurate diagnosis of the condition of shock absorbers can only be carried out at a service station, however, there are signs that can quite accurately indicate a problem of wear or incorrect operation of the shock absorber:
- presence of oil leaks (if you have an oil shock absorber)
presence of extraneous knocking noises in the suspension when the vehicle is running
- inability to maintain trajectory when cornering sharply
All of the above signs may indicate the need to replace shock absorbers.
Replacing the lower front arm Focus
As in the case described above, we will need to remove the spring, remove the wheel and place an adjustable stop or a hydraulic jack under the lower arm at the junction of it with the trailing arm, and using the stop we raise the arms so that the rear suspension takes the “car on wheels” position. . Naturally, we do all this on a pit or overpass.
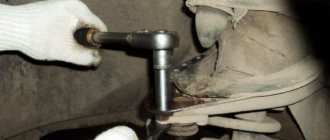
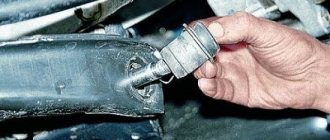
Then, using a 15mm wrench or socket, unscrew the bolt securing the lever to the trailing arm and remove the bolt. Similarly, unscrew the bolt securing the lever to the subframe and remove the bolt. Using a screwdriver, pry the ends of the lever out of the brackets and remove the lever. Photos for clarity are attached below.
Install the new lever in reverse order. In this case, it is worth considering one important point: the inscription “FRONT” on the lever should be directed towards the front of the car.
Which shock absorber should I choose for a Ford Focus?
In order for the shock absorber to work to its full potential and perform its functions efficiently, it is necessary to select parts only from trusted manufacturers. We recommend installation of shock absorbers from KAYABA (Japan), a leader in the development and production of automotive shock absorbers, steering systems and hydraulic equipment for automobiles. The company has 6 research and development bases, as well as 39 production bases around the world. A meticulous development process, state-of-the-art manufacturing technology and strict quality control ensure that every KYB part performs long and reliably. You can purchase Kayaba products at the IXORA store. Our catalogs contain only original Kayaba parts at manufacturer prices.
Replacing the lower rear arm Focus
The lower rear arms of the Ford Focus have spring support cups. The upper ends of the springs rest against the subframe cups. The cups have rubber gaskets. As in previous cases, we will need to remove the spring, plus unscrew the anti-roll bar. We place a stop under the rear lever (at the junction with the trailing lever).
The rear suspension has adjustable wheel toe angles, so we mark the position of the eccentric washer relative to the subframe so that when assembling and installing a new lever, the toe angles of the Ford Focus wheels are approximately maintained. In this case, the position of the adjusting bolt head does not need to be marked, only the washer relative to the subframe.
Using a 15mm socket, unscrew the bolt securing the lower rear arm to the trailing arm and remove the bolt. To be able to remove the adjusting bolt after unscrewing the nut, it is necessary to press the latch of the canister of the fuel vapor recovery system and move the canister away from the subframe.
Use a socket or a 18mm wrench to unscrew the nut, holding the adjusting bolt from turning with a 19mm wrench. Remove the eccentric washer and remove the adjusting bolt. The bolt has a groove for fixing the washer in a certain position.
Remove the lever from the car. Using a screwdriver, remove the rubber buffer from the lever and install it on the new lever. True, if the buffer is broken or has cracks and tears, it naturally needs to be replaced.
We install the lever in the reverse order, with the head of the bolt securing the lever to the subframe facing towards the front of the car. And the mark made on the eccentric washer should coincide with the mark on the subframe. The bolt securing the lever to the trailing arm and the nut of the eccentric bolt are finally tightened to the prescribed torques only under load, in the “car on wheels” position.
After replacing this lever, it is advisable to adjust the wheel alignment of the rear wheels.
Dacha48.ru
Even if this is not related to the topic of construction, which dominates this site, I still haven’t found a sensible manual for repairing the Focus rear suspension, collecting information in fits and starts on the forums. Hope it's useful to someone! Go…
All owners of second Focuses sooner or later face rear suspension repairs. The first thing that comes up is the idea of visiting a car service center, where for this procedure they will announce a price comparable to the purchase of a used Zhiguli. It’s not the service’s fault, the idea belonged to Henry Ford, who proposed selling cheap cars and expensive spare parts for them, but that’s not about that now. If the owner of the Focus has everything in order with his hands, tools and has a piece of land or a garage, then there is an option to save money and repair everything with your own hands. In this article, using my own example, I will show you how to do this. We will talk about the Ford Focus 2 pre-styling station wagon 2006.
First you need to prepare.
We will need the following tool:
- set of heads;
- a couple of sets of open-end wrenches;
- hexagons;
- a hammer just in case;
- three-legged puller;
- car jack;
- hydraulic jack;
- spring ties;
- vdshka or other similar slurry;
- in a bad situation, an angle grinder or, in common parlance, a “grinder” with a disc diameter of 125 mm!!! This is important because 115 is not available there;
- lithol;
- a device for pressing out oil seals (we will discuss this in more detail below);
- a bunch of scraps from boards. You will definitely need to add something. I have a construction site, so there were no problems with this;
- a couple of days of free time (maybe someone will do it faster, but that’s what I got);
We place the ties on the spring, compress it as much as the ties allow. Most likely, you will not be able to remove it, but this is not necessary.
Jack up the main lever on which the wheel is mounted
and unscrew the bolt that holds the spring-loaded lever.
We take out the spring, move the lever down so that it does not interfere.
We unscrew the upper and lower transverse arms, and at the same time the shock absorber from below.
Remove the handbrake cable from the hook.
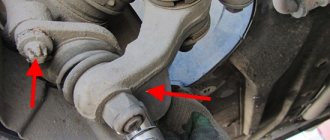
We unscrew the small bolt in the photo below, it is the wires going to the traction control system (ABS) sensor.
Disconnect the ABS terminal and unscrew the 2 bolts that hold the transverse arm.
We carefully move it to the side, trying very hard not to damage anything. We wipe the sweat from our foreheads and take a break. Now there is free access to the upper and lower transverse arms, it's time to replace them.
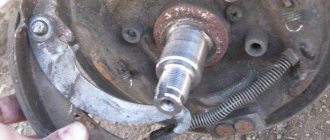
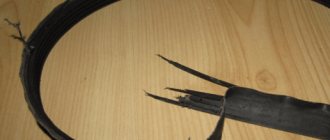
Here is the silent block of the rear trailing arm.
I even have it in good condition, but since I started replacing it, it needs to be changed. The trouble is that it needs to be pressed out. don't try to knock him out, it's useless. This is where we need a special device in the form of a metal cylinder. A turner I knew made it for me very inexpensively. I know that turners are in short supply these days, but they exist!
This is a cylinder with a diameter of 58 mm, a height of 70 mm, an internal diameter of 35 mm and a glass depth of 50 mm. Place the puller and gently press
The glass allows you to apply even pressure on the entire silent block and it slowly comes out
Here is the result. Extruded silent block
We replace the silent block with a new one and press it into its original place. Try to position it the same way as the old one. I mean the location of the “ears”. The photo below shows the final stage. Pay attention to the plates, I placed them so that the glass-device would stand level.
All that remains is to unscrew the spring lever. This was the most difficult action for me; both levers did not want to unscrew and I had to file them down. This is not very pleasant, especially lying under a car, but what can you do... you have to! The lever is attached to the beam with a bolt with an eccentric and you need to make two neat cuts between the lever and the beam. As a result, we get this old lever with a sawed-off bolt.
Next, we assemble everything in reverse order. I would recommend first preassembling everything without tightening it, placing a jack under the lever, as in the photo below. This will simulate a wheel on the road and the rubber bands will fall into place.
After this, you can stretch everything thoroughly. In this way, you can save a decent amount in a couple of weekends at the dacha. And have a good time!