Turn signal and repeater VAZ 2114. Replacement
In the lighting equipment of a car, the light bulbs that light up when the turn signal knob is switched on the right or left side of the car and inform oncoming and passing cars, as well as pedestrians, about the direction of movement of the car are called turn signals among motorists.
They are classified as warning lights and must show a yellow or bright amber signal, which is established by international regulations for cars in all countries. Turn signals VAZ 2114
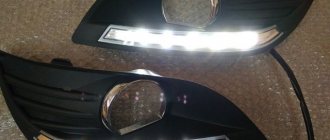
LED lamps - why they are better
Many foreign cars these days are equipped with LED lamps instead of the usual incandescent lamps. Such lamps are installed in rear lights as brake lights, side lights, and turn indicators. This is no coincidence. This light gives the driver behind him additional time to make decisions and make maneuvers. Advantages of LED lamps:
- longer service life, higher light output;
- The LED lights up many times faster than a conventional lamp. This is an additional 5-6 m at a speed of 100 km/h.
- Incandescent lamps fail earlier most often due to strong vibration, especially considering the quality of Russian roads. In terms of this indicator, LEDs are much more durable and vibration is not a problem for them.
LEDs in the rear lights of the VAZ 2110
Note. If you change incandescent lamps to LED lamps in the parking lights and brake lights with the control system turned on, it will show a break in the incandescent lamp filaments due to lower current in these circuits. In order for the system to be brought into compliance, it is necessary to modify the relay that monitors the health of the lamps.
Here is a video review that will be useful to watch. This shows the operation of the LED lights at the rear.
- carry out a thorough diagnosis;
- follow advice and recommendations for repairs;
- use high-quality factory-produced parts;
- check the operation of the machine systems after repair.
Note. You should not take on certain actions if the driver feels unsure of his abilities. In this case, it is better to resort to the services of a specialist, although he will charge a lot of money for services of this kind.
But there will be no problems if you do everything as the instructions advise. Today in stores the price of tail light bulbs, as well as the headlight kit itself, is not so expensive. So it’s important to try to replace it yourself.
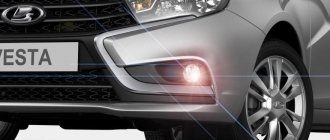
Turn signal lights VAZ 2114
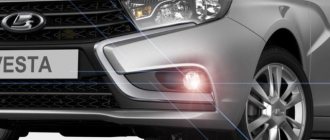
On the VAZ 2114, the turn signals are located next to the front light blocks and are built into the rear light blocks on the left and right sides of the car. Moreover, they are located on the outer edge of the block in order to clearly inform other road users about the driver’s intentions to perform any maneuver. In addition, the machine is equipped with side repeaters. They stand on each side of the front fenders. The basic configuration includes plastic or glass diffusers that cover the reflector with the light bulb - a rich yellow color.
The handle that controls the turn signals is usually called the turn signal lever and is located under the steering wheel for easy control of the signal lights. The electrical circuit of the VAZ 2114 provides for the simultaneous activation of all turn signals and repeaters using one button. This button is indicated by a red triangle and is called the “emergency stop signal”. Simultaneous flashing of all turn signal lights indicates an emergency situation on board the vehicle. Typically, this button is turned on to indicate the car when stopping in a place where it poses a danger to other cars, or in the event of an emergency on the road. It is also used while driving, for example, when a car is towed by another vehicle.
The frequency of operation of the light bulb is usually no less than 60 times per minute, more often is allowed, but no more than 120 times in 60 seconds. More frequent clicks of the turn signal indicate some kind of failure in this circuit. With the relays working normally, upon completion of the maneuver and the steering wheel returning to its original position, the flashing should stop and the light should go out. If this does not happen, then the reason must be sought in the return mechanism of the turn signal handle.
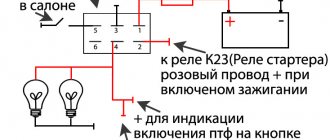
An important place in the operation of such a mechanism as a turn signal is occupied by turn signal lamps on the dashboard, turn relays and fuses:
- Green light bulbs are installed on the dashboard; when you turn the lever and turn on the turn signal, the light in the corresponding direction lights up and flashes, accompanied by audible clicks. These lights are installed for the driver as indicators of system functionality and reminders that the signal should be turned off if the turn is completed and the handle for some reason is not in the neutral position;
- The turn relay is located in the mounting block, has a square shape and is marked “K2”; this device is also called a relay breaker. It performs several functions. Passes electric current to the lamp that is needed, according to the position of the turn signal knob, ensures intermittent operation of the signal and produces characteristic clicks when the turn signal is on. Electronic relays 07.4747 are installed on the VAZ 2114. This relay is more reliable, it practically does not heat up, consumes minimal current and does not lose its characteristics over time;
- The fuses are located there, in the mounting block. There are two of them, labeled F2 - the turn signal fuse itself, the breaker and hazard warning relay, and F16 - it is called - the light bulbs on the dashboard, although in fact, in addition to them, the circuits of some other systems and devices, including turn signals, are tied to it.
How to check the lighting devices in the Chetyrka?
The verification procedure is carried out as follows:
- First you need to make sure that you are using a working fuse. The fuse box is located in the engine compartment, in the compartment between the engine and the windshield, opposite the driver's seat. Bend the latches and remove the cover, then carefully inspect the inside. It contains a diagram that will help you figure out which fuse is responsible for the operation of a particular equipment. Remove the fuse responsible for the functionality of the software and carefully inspect it - if the fuse inside is melted or damaged, the fuse must be replaced. But even if there is no visible damage, you need to insert another one with the appropriate rating into the socket of the removed fuse.
- If this does not help restore the software, then check the relay, it is located in the same block. Typically, the turn signal relay has a hazard warning symbol on it, you need to pull it out and replace it with a working one. To do this, it is not necessary to buy a new relay; you need to pull out another working device and install it. If the emergency lights and software do not work, then we continue checking.
- Now we need to diagnose the light bulbs, but such a check will be required if only part of the turns does not work. Open the hood or trunk and remove the headlight protection, then remove the light sources from their seats. Install a known working device in place of the removed lamp and check how it works. If there are no changes, we move on.
- It is necessary to check the integrity of electrical circuits. To do this, you will need a test lamp with two wires connected to it. One end should be connected to the negative of the battery or the body of the Four, and the second wire is connected to the contact of the electrical circuit being diagnosed. If, as a result of the connection, the lamp begins to light, this indicates that the section of the wire being tested is in good condition. The remaining circuits are checked in the same way. If you find a place where there is no current, then this indicates that there is a fault between the place being tested and the last point where the voltage was. Damaged wires must be replaced.
- You also need to check the quality of contacts on all electrical circuits. Check the contacts in the mounting block, on the base in the vehicle's optics, on the light alarm button and on the steering column switch. Often the cause of problems is oxidation; such contacts must be cleaned or replaced.
How to change a turn signal on a VAZ 2114
Quite often on VAZs some problems of various kinds arise related to turn signals or repeaters. Most often, you can figure them out yourself, without the intervention of auto electricians.
- The turn signal turns on but does not blink. Such a failure is most likely caused by problems with the breaker relay. It is necessary to replace it, and also check the contacts in the relay circuit - fuses.
- The turn signal light does not turn on. The driver can immediately understand this by the rapid blinking of the direction indicator light on the dashboard. First of all, you need to check the non-working light bulb, this is the most common failure scenario. If everything is in order with the light bulb, you need to check all the contacts in the circuit, right up to the turn switch. If there is poor contact on the switch, the entire side should not work.
If all the turn signals and hazard lights do not work at the same time, the fault should be looked for in the relay or fuses.
- The turn signal does not turn off. In this case, the cause must be sought in the indicator switch on the steering column.
- The turn signal flashes more frequently than usual. Most likely one of the turn signal bulbs has burned out. But perhaps the contacts in the lamp blocks have oxidized or the contact path in the mounting block has oxidized.
- Dim glow of turn signal lamps. Perhaps the bulbs do not meet the standard for the VAZ 2114. In addition, it is useful to check the contacts.
- The relay breaker clicks. The problem is most likely related to poor contacts in the mounting block or a defective relay, then it must be replaced.
- The fuse blows. There is a short circuit in the turn signal and most often this happens on the taillight circuit board. This is the weak point of the Zhiguli. The contact tracks oxidize, corrosion occurs and, as a result, a short circuit occurs.
Recently, many car enthusiasts, keen on improving the appearance of their car, have been purchasing white turn signals on the VAZ 2114. However, the opinions of car owners differ. Some people advocate replacing the turn signal headlight unit completely, while some, citing the high cost of the assembled spare part, advise replacing only the yellow glass with white, transparent glass. The dispute sometimes flares up in earnest, although in fact the price of white VAZ 2114 turn signals does not exceed 800 - 900 rubles, despite the fact that a full set of the same glasses reaches 500 rubles, and even the destruction of the integrity of the block and homemade gluing of the glass. This will not bring anything good for the optical properties of the flashlight.
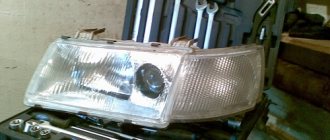
Replacing the VAZ 2114 turn signal is carried out in the following order:
- disconnect the battery from the on-board network, put on clean, preferably rubber gloves; if you stain the glass with greasy stains, this subsequently leads to clouding;
- disconnect the block with wires from the turn signals;
- release the spring tip;
- press the fastening latch, which is located between the main headlight and the turn signal, and pull out the block with the turn signal;
- Install yellow bulbs in the white turn signal and put it in the reverse order, observing all safety precautions.
After replacing the turn signals, be sure to check their functionality.
To watch online, click on the video ⤵
HOW TO REMOVE THE TURN SIGNAL AND REPLACE THE BULB ON A VAZ 2110, 2111, 2112, 2114, 2115, 2109 Read more
Replacing a VAZ 2110-2112 turn signal on your own Read more
VAZ 2115 diodes for turn signals. More details
Replacing headlights on a VAZ-2114 - Part No. 11 Read more
Removal - installation of turn signal repeater More details
VAZ 2114, E&R. Replacing turn signal indicators! More details
VAZ 2115 lamp replacement Read more
How to replace a turn signal Read more
VAZ 2115,2114-How to make the dimensions in the turn signals. Three s Read more
installation of turn signal repeaters on 2109 Read more
Replacing the light bulb in the peephole lamp of VAZ 2113, 2114, 2115 Read more
REAR LIGHTS UPGRADES. VAZ 2114 More details
HOW TO CHANGE A LIGHT BULB. VAZ 2114 More details
Changing the color of the dashboard backlight of a VAZ 2114, how to do everything yourself correctly and where to solder Read more
Illumination of buttons VAZ 2114 Read more
Replacing light bulbs on the dashboard of a VAZ 2114 Read more
LIGHTS BETTER THAN XENON (Episode 11) More details
VAZ 2105 - replacing P21W lamps with LED ones. Test comparison Read more
Tuning Mirrors for Any Car. With Your Own Hands. Under LED. More details
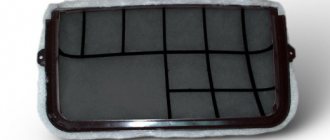
Replacing repeaters
If the turn signal on the car is changed to white, then the repeaters on the VAZ 2114 also need to be replaced. This procedure does not take much time.
Repeater VAZ 2114
The repeaters are made almost entirely of plastic and are very fragile, so when working with them you should not use much force to avoid breaking the part.
- Move the repeater body together with the rubber lining 0.5 cm forward.
- Remove the rear part of the part from the mounting location.
- Pull out the repeater completely, disconnect the electrical connector and remove the rubber gasket, moving it to the new repeater.
- Connect the terminals with wires to the connector of the new repeater and install it on the car.
Due to easy access to the car wiring through this channel, when installing an alarm system, it is not recommended to connect its contacts to repeaters. In this case, car thieves are deprived of the easy ability to disable the alarm by short circuiting.
Removal
Warning! When removing the pointer, do not use excessive force to avoid breaking the pointer spring clip, which is made of plastic.
2. By carefully moving the side turn signal indicator together with the sealing gasket forward by 2-3 mm, we move the rear part of the indicator away from the wing (at the same time we disengage the bracket-like protrusion of the indicator).
3. Remove the pointer and remove the rubber protective cover of the pointer from the hole in the front fender.
4. Remove the lamp socket together with the rubber protective cover from the pointer housing.
5. Remove the faulty lamp from the socket.
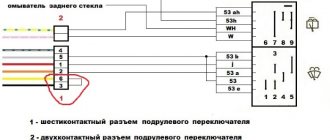
Replacing the turn switch on a VAZ 2113, VAZ 2114, VAZ 2115
Welcome! Turn switches - most of them are made mainly of plastic and therefore these switches very often break, in most cases, as happens, you stop somewhere, for example, you need to turn around and you immediately start turning the steering wheel sharply so as not to interfere with the movement and then bam and you hit it , this very switch and even with average force it breaks, but few people know how to replace it, but in fact everything is very simple, so so that you can easily replace these parts in the future, then in this case, read our article which is aimed at replacing the turn switch, as well as replacing another side switch (the windshield and rear window wiper switch of the car)
How to replace the steering switch on a VAZ 2113-VAZ 2115?
Note! Both switches are replaced absolutely identically, so we did not write instructions for replacing both switches, but wrote instructions only for replacing one of the most frequently broken ones, the turn switch!
Removal: 1) At the very beginning of the operation, remove the upper and lower casing from the steering column. (For information on how to remove the upper and lower casing, read the article entitled: “Replacing the steering column casing on a VAZ”)
2) Then, when the casing is removed, look for two plastic latches at the top and bottom thanks to which this switch is held in the saddle, so to speak (For more details about where these latches are located, see the bottom in the section: “For beginners!” they there are indicated by arrows in the photo), and when you find these latches, carefully take them by the bottom with your hand and press them to the side towards the very base of the switch and thereby simply pull it gently and it will come out.