If it was not possible to remove the timing belt pulley from the front seat of the crankshaft by hand or using improvised tools. After looking at many tips and trying many methods, I settled on a very easy and quick way to remove the timing belt pulley from the crankshaft. To do this, you need to naturally: remove the right front wheel, jack up the car, unscrew the bolt from the end of the crankshaft, remove the alternator belt drive pulley from the crankshaft, loosen the timing belt tension roller, remove the timing belt. Turn the crankshaft so that the mark on the toothed pulley rotates clockwise by approximately one tooth. Now comes the fun part. You need to make a thin chisel from high-carbon steel with a length of approximately 20 - 30 cm with a diameter at the working end of 6 - 7 mm (like a drill, tap, etc.) I used a spindle rod from a weaving or spinning machine or something like this for this purpose.
then use this chisel to make deep notches on the toothed pulley as in the diagram:
and finally, most importantly, we strike strictly in the center (if you drive the chisel further than the center of the pulley, you will most likely damage the seat and the oil seal itself in the front cover) into the cavity between the teeth. Yes, the pulley will crack easily, but it is not expensive.
I did great and I wish you good luck too!!
Sometimes it happens that when working on a car there is a need to dismantle the crankshaft. And if an experienced car enthusiast can do this work within an hour, then for a beginner such an operation can be a real discovery and surprise. Below we will describe to you in detail how to carry out such work correctly and in the shortest possible time.
Causes of VAZ 2110 crankshaft malfunction
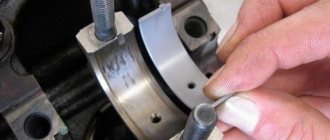
- One of the common malfunctions is when the liner literally “sticks” to the crankshaft, as a result of which the liner wears out and leaves circular marks on the crankshaft, contributing to wear of the crankshaft journal.
The causes of crankshaft failure are most often caused by neglect of the required level of oil in the engine, untimely replacement of it, and less often by prolonged operation of the engine at maximum speed, in particular, when it is not warmed up enough.
The process of replacing the crankshaft is complex and requires the technician to have deep knowledge of engine design, since it will have to be disassembled. Plus, it is necessary to replace the crankshaft bearings, which will require a very specific set of keys, as well as a mechanical winch to lift the engine onto.
If you have everything you need and are confident in your knowledge of motor design, then the instructions below will help you:
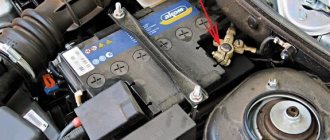
- We take out the battery.
- Drain the antifreeze and engine oil.
- Remove all attachments from the engine (air filter, carburetor, starter, etc.).
- We hang the engine with a hoist or use a lift.
- We disconnect the rear, front and right engine support of the VAZ 2110.
- Unscrew the clutch housing mounting nuts and remove the motor.
- We place the engine on the prepared workbench and completely disassemble it.
- We unscrew the mounting bolts of the covers that cover the main bearings, as well as the bolts of the covers that cover the connecting rods.
- We take out the crankshaft, determine the cause of the breakdown, the degree of wear of the crankshaft and liners.
To work you will need the following:
- keys and socket heads for 8, 10, 13, 17.19 mm;
- torque wrench;
- jack;
- container for draining oil;
- inspection hole or lift.
- flat screwdriver, hammer;
- main bearing shells VAZ 21080100010211;
- connecting rod bearings DMR 21010100010415;
- thrust bearing half ring Lada 21010100518300.
Drain the antifreeze and engine oil. We remove the front wheel drives from the gearbox axle shafts. Using a 10mm socket, unscrew the 16 bolts securing the oil pan and remove it.
Using a 19mm wrench, unscrew the bolt securing the generator drive pulley. Remove the generator drive pulley.
Using a 10mm socket, unscrew the six bolts securing the oil pump to the cylinder block.
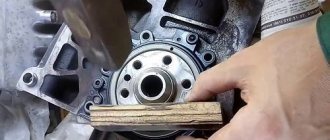
Use a screwdriver to pry up the oil pump and remove it. On the face there is a metal rounded wear from the crankshaft, due to the incorrect operation of one of the connecting rods and the failure of the thrust half rings.
Using a 13mm wrench, unscrew the two bolts securing the damper bracket to the gearbox housing.
Loosen the clamp and disconnect the gear shift rod from the gear selection hinge.
Using a 19mm wrench, unscrew the three bolts and one nut securing the clutch housing to the cylinder block, remove the gearbox from the engine and remove it.
Using a 8mm wrench, unscrew the six bolts securing the clutch housing to the flywheel.
Using a 17mm wrench, unscrew the six bolts securing the flywheel and remove it.
Using a 10mm wrench, unscrew the six bolts securing the crankshaft rear oil seal holder.
Using a screwdriver, pry off the holder and remove the holder and gasket.
Using a 14mm socket, unscrew the nuts securing the connecting rod cover (the connecting rod must be at BDC).
Using a 17mm socket, unscrew the ten bolts securing the crankshaft main bearing caps.
We take out the crankshaft of the VAZ 2110.
Traces of wear on the shaft journal were found.
We take a new crankshaft, already machined to the size of the liners.
We blow it out with a compressor.
Lubricate its necks with machine oil.
We remove the main bearing shells from the cylinder block beds and from the cover.
We take new main bearing shells.
We install new liners in place in the cylinder block. In the first, second, fourth and fifth beds of the cylinder block we install liners with grooves, and in the third bed - a liner without grooves (the same as in the cover).
We install and lubricate new bearing shells in the connecting rod heads.
We install new thrust half-rings in the grooves of the middle main bearing support
It is important that their recesses are located towards the crankshaft cheek
Lubricate the bearings with engine oil and place the crankshaft in bed.
When installing the main bearing caps, check the marks that are marked on their outer surface (the caps start from the timing belt drive side). The locks of the upper and lower shells of each bearing are located on one side.
Installation of the camshaft.
1. Clean the mating surfaces of the bearing housings and cylinder heads from the remains of old sealant and oil.
2. Lubricate the camshaft with engine oil. We place the camshaft in the cylinder head supports so that the convexities of the cams of the first cylinder are directed upward.
3. At the camshaft exit points, on the surface of the cylinder head, apply a thin layer of silicone sealant.
4. Install the beds and tighten the nuts evenly in two steps.
5. First, tighten the nuts in the sequence indicated in the diagram until the bed surfaces touch the cylinder head. The installed bed bushings must fit freely into their sockets.
6. Then tighten the nuts to a torque of 21.6 N•m (2.2 kgf.m) in the same sequence.
8. We will assemble in the reverse order of disassembly.
Engine tuning is carried out to increase the parameters and characteristics of the power and dynamics of the power unit. In this case, one important factor should be taken into account: it is necessary to replace all elements with sports ones, and not just one. First, let's replace the camshaft from standard to sports.
To remove the camshaft, you must remove the plastic alternator belt cover. After removing the casing, open the cylinder head cover. In this case, you should pay attention to the position of the crankshaft - TDC for the first cylinder.
When removing the camshaft, it is not recommended to touch the large crankshaft, as this may reset the factory settings, which will be impossible to restore yourself.
Next, remove the timing belt. At this time, the camshaft must be jammed using a mounting tool. In this case, the camshaft should be with a spike in front. When removing the timing belt, you should act carefully so as not to damage the cylinder head; it is recommended to place a wooden plate or something similar under the mount to prevent damage to the cylinder head.
After the timing belt has been removed, unscrew the camshaft mounting bolt and remove its toothed wheel and key.
It is best to mark the main bearing caps; this will help avoid confusion during installation. It is also necessary to mark the disc pushers if they are replaced. This completes the stage of removing the old camshaft. Installation of a new, sports camshaft is carried out in the reverse order. Thanks to the replacement of the standard camshaft with a sports one, the knocking of “fingers” will not be heard when the engine is running. This is achieved due to an increase in the detonation limit.
Welcome, friends, to the DIY car repair website. Many drivers have probably encountered such a problem when oil drips form near the camshaft oil seal.
At the same time, oil begins to fall on the timing belt, which is not good.
Why do you need to twist the crankshaft pulley?
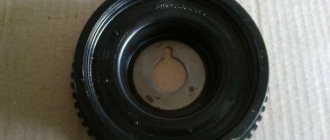
Removing the crankshaft pulley is performed for various reasons.
Crankshaft pulley
Most often it has to be removed when replacing the timing belt or replacing crankshaft seals. Usually the belt is changed either according to the regulations, or when defects are identified that require its replacement. Oil seals are replaced when oil leaks occur due to product wear.
On a VAZ 2114, the crankshaft pulley is secured with a bolt. During removal, a problem arises when unscrewing the mounting bolt. Firstly, it is inconvenient to get to. Secondly, at the factory they always tighten it very tightly so that it does not unscrew on the road. If a fastener comes loose while driving, it can result in costly repairs. During operation, thanks to the right-hand thread, the tightening is enhanced. In addition, coking and sticking of the part occurs. Thus, sometimes the bolt is very difficult to remove.
Tools
To successfully dismantle the VAZ 2114 crankshaft pulley and replace consumables, you should prepare the following tools:
- standard set of keys;
- jack;
- support or stump;
- socket head;
- extension;
- pulley puller;
- pry bar, screwdrivers.
It is more convenient to carry out work on a lift or ditch for inspection.
Stages of work
In order to remove the crankshaft pulley on a VAZ 2114, you need to dismantle some parts and components. The entire process of removing the crankshaft disc consists of the following steps:
- First, to dismantle the generator belt, you need to unscrew the locking bolt and loosen the tension bolt.
- Next, you need to lift the front of the car and remove the right front wheel.
- In the upper part of the engine compartment of the VAZ 2114, remove the air filter and the engine mud shield.
- Next, remove the alternator belt.
- To secure the flywheel from turning, you need to open the plug on the side of the VAZ 2114 clutch. Then insert a screwdriver or pry bar into the opened opening between the flywheel teeth.
Fix the flywheel and unscrew the bolt
Next we move on to unscrewing the fastener. To make it easier to unscrew, you need to apply special liquids to the threaded connection that corrode corrosion. For this purpose, special WD lubricant, brake fluid, and vinegar essence are suitable. Then the head of the key is put on and, using a lever, it is turned counterclockwise so as to tear the bolt from its original position.
We put the head on the bolt
If you are unable to unscrew the fastening element by hand, you can use the starter.
Unscrew the fastening bolt
Place the lever coming from the head against the spar or the floor in the direction of the shaft movement, and then turn the starter several times, giving the crankshaft a rotational impulse. After unscrewing the fastening element, you need to remove the crankshaft pulley. It is held in place by a key and is difficult to remove easily. You can use a special device with paws that cover the edges of the disk. If you don’t have a puller, you can use pry bars or screwdrivers by inserting them between the crankshaft and the pulley on each side, gradually moving the part to be removed away from the shaft. The touch point should be chosen closer to the crankshaft. Before removing the disk, it is advisable to tap it with a wooden hammer to avoid possible distortion. The part should be dismantled carefully so as not to damage the key and groove.
After completing the necessary replacement, when reinstalling the crankshaft pulley, the seats should be treated with grease so that the parts fit without effort. In this way, distortions can be avoided.
>Video “Replacing the crankshaft oil seal on a VAZ car”
In this video you can see how to unscrew the fastening nut and dismantle the crankshaft pulley.
Method 1
The first step is to try to remove the pulley bolt using the standard method. The set of tools for this procedure is as follows: heads, spanners, jack. The step-by-step removal process looks like this:
- Unscrew the right wheel and jack up the car;
- Remove the plastic protection (if any);
- Loosen the generator belt tension bolt and remove it;
- Reach the pulley and lock it in one position;
- Remove the timing belt;
- Place a socket or a 19mm spanner on the pulley nut and try to tear it off;
- If the fastening does not work, treat the nut with WD-40 or tap the pulley with a wooden block. Often this allows you to get rid of sticking.
How to remove the crankshaft on a VAZ 2114
4. We screw the crankshaft pulley mounting bolt into place and use a 17 mm
(on some cars
19 mm
) by turning the crankshaft clockwise, set the piston of the first cylinder to the lower position.
Tip: When unscrewing the nuts of the connecting rod caps, you can accidentally damage the oil level sensor, so it is advisable to remove it (see “Insufficient oil level sensor - check and replacement”).
14 mm socket wrench
unscrew the two nuts securing the connecting rod cover of the first cylinder.
6. Remove the connecting rod cover.
7. Having rested the hammer handle on the connecting rod, push it up.
8. Remove the piston assembly with connecting rod from the cylinder.
9. Remove the liners from the connecting rod and its cover.
Warning! When disassembling the connecting rod, do not press the bolts out of it.
10. Clamp the piston by the connecting rod in a vice.
11. Slightly spreading the ring lock, remove the upper compression ring.
12. Similarly, remove the lower compression ring.
13. Remove the oil scraper ring.
. and its expander.
Warning! The advisability of replacing the rings depends on the degree of wear of the cylinders (see “Piston and connecting rod - replacement”).
1. Thoroughly clean the piston from carbon and deposits. We inspect the piston and connecting rod. Cracks on them are unacceptable.
2. We select new rings in accordance with the diameter of the piston - nominal or repair size. There are no markings on the nominal size rings; the repair rings are increased in diameter by 0.4 or 0.8 mm, and are marked “40” and “80”, respectively.
3. Before installing new rings, use a set of feeler gauges to measure the gap between the piston ring and the wall of the groove in which the ring will be installed.
If the gap exceeds the maximum allowable, the piston must be replaced.
Table 8.1.4. Permissible clearances between groove walls and piston rings
. and install the upper compression ring with the words “VAZ” or “TOR” facing up.
We orient the lower compression ring so that its groove is directed downwards.
4. We put the rings on the piston as follows: having spread the ring lock (no more than is required to put the ring on the piston), we first place the lock on the piston, and then the back part of the ring.
We install new rings on the piston, starting with the oil ring expander. After installing the oil scraper ring, the expander lock should be rotated 180° relative to the ring lock.
After installing the rings on the piston, we rotate them with locks so that the lock of the upper compression ring is located at an angle of 45° to the piston pin axis, the lock of the lower compression ring is rotated 180°, and the lock of the oil ring is 90° relative to the lock of the upper compression ring.
5. Lubricate the piston, rings and inner surface of the cylinder with clean engine oil.
6. We put the mandrel on the piston and compress the rings with it, periodically lightly tapping the mandrel with the handle of a hammer to self-install the rings.
7. We wipe dry the places where the liners are installed in the connecting rod and the cover and install the liners in the lower head of the connecting rod.
8. Lubricate the inner surfaces of the bearings and the connecting rod journal of the crankshaft with clean engine oil. By turning the crankshaft, we move the journal to its lowest position.
9. Install the piston on the block and orient it so that the arrow on the bottom of the piston is directed towards the crankshaft pulley (see “Piston rings and connecting rod bearings - replacement”).
10. Pressing the mandrel against the block and tapping the piston bottom with the handle of a hammer, we recess it into the cylinder, while simultaneously monitoring the movement of the connecting rod to the crankshaft journal.
11. Install the cover assembly with the liner on the connecting rod and tighten the nuts securing it to a torque of 43.3-53.5 Nm (4.4-5.5 kgfm).
Warning! The connecting rod caps are not interchangeable. The connecting rod and its cover indicate the number of the cylinder in which the connecting rod must be installed. On the assembled connecting rod, the numbers should be located on one side.
We replace the rings of the other three pistons in the same way.
After installing all the pistons, we assemble the engine in the reverse order of disassembly.
On any car, crankshaft seals seal technical holes in the engine, on the one hand, preventing dirt from penetrating inside, and on the other, preventing oil leakage. Leaking oil seals manifests itself in oil leaks on the cylinder block housing from the timing belt side or the rear of the engine.
Replacing crankshaft oil seals is considered one of the most difficult types of repair of a VAZ 2114. To install the front one, you have to remove the timing belt, and the rear one - the gearbox. In car services, such repairs are expensive, but without a pit and an assistant, carrying out the procedure is almost impossible.
How the timing chain drive of the VAZ 2106 car works: review and replacement
The popular VAZ 2106 car, whose production began during the Soviet era, was equipped with three types of engines - with a displacement of 1300, 1500 and 1600 cm3. The design of the listed motors is the same, the difference is only in the sizes of the cylinder-piston group, crankshaft and connecting rods. On all power units, the timing gears are driven by a double-row chain. The latter gradually stretches out and needs periodic tightening; the minimum service life of the part is 100 thousand kilometers. When tensioning does not produce results, the entire chain drive is changed - along with the gears.
Pulley removal
Unscrewing a fastening bolt or nut is only half the battle. Next you need to pull the pulley out of the shaft. The pulley cannot be removed easily by hand unless its seat is broken. In addition, if the pulley fits tightly onto the shaft, it is also secured against turning by a key.
There are special pullers for removing the pulley from the shaft. There are mechanical and hydraulic pullers.
The design of a mechanical puller is simple. Usually it has three legs, with which you need to hook the pulley itself, and rest the central rod against the shaft. After which, you need to rotate the rod, the legs will straighten and pull the pulley towards you. There are even simpler pullers that you can make yourself. If there is no removable device for the pulley, then you can use pry bars. If one person is filming, then take turns, moving it a little on each side so that there is no distortion. If there are two, then at the same time, from different sides, the pulley is pressed out from the crankshaft with a sharp movement.
It also happens that when using a puller, the walls of the pulley grooves cannot withstand and break off. Therefore, when using pry bars, they must be engaged as close to the shaft as possible.
Crankshaft gear: structure and functions
The crankshaft gear is the gear through which the engine equipment rotates. Depending on engineering solutions, it has the shape of a gear with teeth for a chain or belt.
As a rule, timing gears (lower) and oil pump drives are installed on the crankshaft. The gears are mounted with a tight fit, fixed on the keyway, and pressed with threaded fasteners.
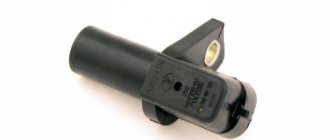
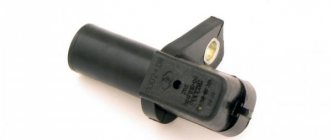
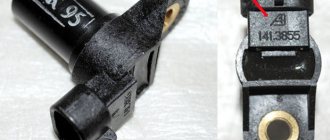
Replacing the crankshaft sensor on a VAZ 2114 with your own hands
Many drivers are not even aware of the existence of such a device as a crankshaft position sensor (CPS).
But, nevertheless, its importance cannot be overestimated. The VAZ 2114 crankshaft sensor is a miniature device that transmits data about the position of the crankshaft to the power unit computer
The correct functioning of the injectors responsible for supplying fuel and the ignition system of the VAZ 2114 depends on this small part. It rarely fails. But if you are planning a long trip, it would be good to have a spare one.
The shaft position sensors on the VAZ 2114 differ not only in their design, but also in their operating principle.
Inductive-type DPKVs have a metal rod with a magnet, which is needed to magnetize it. A copper winding is wound over the rod. The principle of its operation is to give a signal when a steel object is nearby.
DPKV of the second type works according to a different scheme. Inside such a device there is a hall sensor. If you bring a metal object to it, its state will change.
Pulse-type devices are also often used. They generate pulses of a specific frequency. If there is a metal object nearby, the generation frequency will also change.
Where does the belt slip and why?
Note! The belt can slip either towards the engine or in the opposite direction from it.
This happens regardless of how exactly it was installed in the middle of the gear, since the reason for this is not only the belt itself, but also the elements and mechanisms accompanying its operation. In order to solve this problem, you need to use the methods described below.
Timing belt
In modern times, in the automotive spare parts market, facts of counterfeits and low-quality products are becoming more and more common.
The top is the original timing belt and the bottom is a fake.
Specifically touching on the issue with the timing belt, we can talk about its uneven structure, increased elasticity (the ability to stretch excessively - approx.), as well as the presence of significant differences between the two edges (distortion - approx.).
The degree of straightness of the newly installed belt can only be determined on the mounted mechanism.
And, if even minor deviations are observed after starting the engine, then the reason is in the belt.
water pump
The timing belt can slip due to play in the pump (pump - approx.). It is very easy to determine its presence; you just need to grab the working surface of the gear with your hand, and if there is even the slightest play, the unit must be changed. In this case, read the material: “choosing a reliable pump for the VAZ-2114”
Leaks on the cylinder block from the timing side indicate that the pump has failed
Tension roller
The next element that needs to be diagnosed when the timing belt is slipping is the tension roller.
Although it may seem like a simple part, deviation from its performance specifications can significantly affect the overall correct operation of the part. In simple terms, a curved roller will not be able to provide the belt with linear movement , wearing out and moving it to the side.
Another reason for discussions on popular forums about the belt moving to the side is the installation of rollers of different types, because the analogue has a different, slightly modified design.
The difference between the rollers
The difference between these two spare parts is that the old side has a different shape, made of metal, while the new one is made of plastic.
Therefore, as the theory shows, a spare part made of plastic causes much less friction than its metal counterpart.
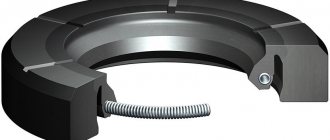
Why do you need to replace half rings and when is it necessary?
Half rings are consumables and are subject to wear. When they wear out, the crankshaft begins to move horizontally, which accelerates the wear of the half rings. Ultimately, the half rings become completely unusable (erased) and the crankshaft loses all fixation, creating a threat, first of all, to the entire piston group. In addition, the crankshaft can grind the cover that covers it and render the support bearings unusable. These parts are cast together with the block, which indicates a high probability of replacing the latter. To prevent this, it is necessary to carry out timely diagnostics of faults and, if necessary, change the half rings.
Diagnostics are performed after 120 thousand kilometers and begin with an external inspection of the engine. The presence of an oil leak is the first, but not the main sign. The fact is that when play appears, the crankshaft can squeeze out the oil seal, which will very quickly lead to a leak of engine oil. However, oil leaks do not always occur precisely for this reason. It is quite possible that the oil seal simply became unusable due to natural wear and tear.
Take the installation tool and, resting it on the generator, try to shake the crankshaft pulley. The permissible axial play should not exceed 0.35 mm. Also, have someone press the clutch pedal. If the crankshaft is pushed forward, then this is the most obvious sign of a malfunction of the crankshaft half rings.
Before carrying out the replacement, purchase new engine oil, as this may be an excellent opportunity to replace it, the oil pan gasket and the half rings themselves.
Work order
1. Place the car on a pit or overpass and prevent it from moving.
2. Unscrew the engine protection and remove it. Drain the engine oil.
3. Unscrew all bolts securing the oil pan and remove it along with the gasket.
4. Unscrew the bolts for securing the main bearing cap and remove it.
5. Install the new half rings so that its ends rest against the ends of the old one. To make the task easier, move the shaft with a screwdriver.
6. Push out the old element using the new one. The new part should fit in absolutely freely.
That's all. This completes the replacement of the crankshaft half rings. Reassemble all components in reverse order. When installing a new pan gasket, be sure to treat it with a sealant that can withstand high temperatures. After assembly, fill in new oil.
conclusions
After the pulley has been removed, you can begin installing a new part, before installing which the seat will need to be lubricated with grease. At this point, the work can be considered completed.
When carrying out repair work on the engine and engine-related parts, it is necessary to remove the pulley from the crankshaft, for example, to replace the pulley or to replace sealing seals in case of engine oil leakage. It would seem a simple task, but removing the pulley from the crankshaft poses difficulties and it is not so easy to remove it. Therefore, in this article we will look at how this can be done quickly.
Gas distribution system VAZ-2114
It will not be a secret to anyone that over time, any part will wear out and require replacement; for some, this period is measured in hundreds, for others, tens of thousands of kilometers.
Timing mechanism diagram
However, it should be noted that when replacing an old belt with a new one, a problem may occur such as the belt sliding out of its place, which in turn can lead to eating (wear - approx.) of the edge of the belt, which in the future will only contribute to its wear, break and another replacement.
We hasten to please you
The VAZ-2114 car was equipped only with an 8-valve engine, with a volume of 1.5 and 1.6 liters, which may indicate that when the timing belt breaks, the pistons and valves do not meet and the latter do not bend, which is certainly favorable affects not only subsequent repairs, but also the car owner’s wallet.
Belt life
The manufacturer promises us that we should start taking an interest in the condition of the belt drive after 50,000 km. Perhaps this is actually the case, but you still need to carry out diagnostic procedures on the belt from time to time, as it can slip. It may also receive the following defects:
- formation of cracks;
- corrosion of the structure due to oil getting on the surface;
- fraying of the ends.
the appearance of swelling on the surface;
All these defects indicate that this consumable has already served its purpose, and it’s time to replace it with a new one. A broken belt can cause serious problems. Judge for yourself: a break will lead to a collision between the valves and the pistons. Both of them become deformed because of this, which means that serious repairs to the vehicle’s propulsion system will have to be made. Then you will need to fork out money and shell out a tidy sum not only to purchase consumables, but also to pay the labor of the craftsmen who will repair the car.
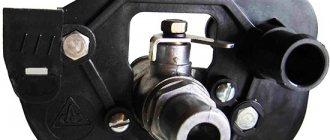
What is the thread on the VAZ 2110 generator pulley?
AHTUNG! IT IS NOT RECOMMENDED TO REPLACE THE ORIGINAL PULLEY WITH A VAZ PULLEY! (except to wait 100 km before the service) DUE TO THE ABSENCE OF AN OVERAGGING CLUTCH, THE BELT WILL OCCUR AND BE DESTROYED, WITH THE SUBSEQUENT TIGHTENING OF THE FRAGMENTS UNDER THE TIMING DRIVE STAR
This means that the rustling noise from under the hood completely bothered me, I even began to suspect the release valve... However, the smell of burnt rubber in traffic jams convinced me to turn my attention to the generator, its bearings and pulley. I took off the belt of the additional equipment and pronounced the verdict - generator bearings. It was lunch time, I removed the generator, brought it to the workshop and began to disassemble it. I’ll say right away, the generator is BOSCH.
The first obstacle was removing the pulley from the generator shaft. During creative searches, the following device was invented:
A 27mm nut is inserted inside the nut, then a 8mm hexagon is inserted into the shaft, the hexagon is held with a wrench or socket, and the nut is turned counterclockwise and unscrewed in this way. In this case, the generator must be gently clamped in a vice (and not as in my picture). The nut is unscrewed and the pulley is removed. During this procedure, I realized that I had also hit the pulley. Because it had a lot of play in the radial plane, and touched the generator housing, even rubbing small grooves from below.
Next comes the disassembly of the generator, unscrew everything that can be unscrewed from below (or behind) - positive contacts, cover, diode bridge, relay regulator with brushes, removed and placed nearby. Although actually it is not a relay as such, but a circuit with 3 transistors, but for brevity, let it be the old-fashioned relay regulator.
Next, the 4 bolts holding the generator halves together are unscrewed, and the lower (rear) part with the diode bridge is removed from the rotor. You can help yourself a little with a screwdriver, there is some force there, but not much.
Next you need to unscrew the 4 countersunk screws from the pulley side. They secure the front bearing thrust plate. After this, we take a three-legged puller of a suitable size, grab it under the front cover with its paws, rest against the shaft, and pull the cover off the bearing.
After this we will have a picture like this
Now you can inspect the bearings. The rear (small) one was not changed; no signs of wear were found. But the front one was simply worn out into rubbish. The bearing was purchased from a “tenth” generator, Vologda (VBF) for 110 rubles. Its catalog number is 6303, also known as 180303. The rear bearing seems to be 6003, in contrast to the “tenth” one, which is 6202. The difference is in the internal mounting diameter, ours is 17 mm, the external one is 35. The 6202 has an internal 15 mm, the external one is also 35.
At the same time, a 2110 17mm generator pulley was purchased. There are 2 varieties, 17 and 15, here 17 is our size. I also bought a “generator cover repair kit 2110”, but it was not useful.
The main problem was removing the front bearing. On top of it there is a spacer washer, quite rusty. It was impossible to get under it with a puller; it wouldn’t fit together with the bearing, so I had to carefully knock it down. Unfortunately, there are no photographs of this process, because at this point the phone was put on charge, but I will try to describe it in words. I poured WD40 liquid on it and turned it on the shaft a couple of turns using a chisel. The anchor is GENTLY clamped in a vice through the old belt. Next, I drove a chisel between the washer and the bearing, evenly and from different sides, until the washer began to move towards removal. Then I hooked it up with a puller and removed it. The bearing did not yield to the puller and was barbarously sawed off with a cutting machine, without however damaging the shaft. The sawn-off bearing came off easily.
Now comes the fun part - installing a new belt.
We check that all marks match. We first place the belt on the crankshaft and pump. Then we tighten the right descending branch of the belt and put it on the camshaft pulley and tension roller. We check all the marks again and tighten the belt with a roller. The tension is considered sufficient if, with the force of two fingers, you can twist the longest branch of the belt by a maximum of 90 degrees. It’s easier to take the right branch of the belt with two fingers and twist it, if more than 90 is not very bad, but less is very bad. An overtightened belt will wear out quickly and will also reduce the life of the pump.
How to unscrew the crankshaft pulley nut?
This procedure is easier to perform using a lever and an extension for it (you can use a relatively long piece of pipe), as well as a socket or socket wrench (38 or 36). A nut, called a “ratchet,” is usually used to secure pulleys on rear-wheel drive vehicles. Such a nut usually has special ledges.
To remove it, you need to get under the car and try to unscrew the element with a wrench and extension. In cases where it absolutely does not lend itself, the gearbox should be put in neutral, the spark plugs should be removed, the key and lever rested on the side member or floor, and an impulse should be given by turning the ignition switch. After this procedure, the nut easily comes off on the first or second try.
Let us add that a device for removing the crankshaft pulley makes the dismantling process easier. It consists of a nut with a pin with 2-3 grips attached to them (the pin rests on the center of the shaft, the grips are placed over the edges of the pulley). Such a “folk” puller makes it possible to pull the pulley off the shaft without any problems by turning the device clockwise.
Video of replacing the timing belt on a carburetor nine
Good luck on the roads.
No nail, no rod! Broken belt and how to set the timing belt of a VAZ 2109
Everyone should know how to exhibit
Timing belt VAZ 2109, because no one is insured against a broken belt. You are incredibly lucky if you become the owner of a car with a 1.5-liter 8-valve engine. For them, if the belt breaks, the valves remain unharmed; for others, unfortunately, the cylinder head will have to be repaired.
How to find out if the timing belt is broken? Quite easily, because the spark is lost, the engine does not start, and the crankshaft spins faster than usual. Naturally, how to set the VAZ timing belt 2109
That's right, you need to know when replacing the belt. Now let's look at > the myth and the case.
How to replace the front crankshaft oil seal on a VAZ 2114 8/16 valves
Determining the oil leakage of the front oil seal is a very labor-intensive procedure. To identify it, you must inspect the car with your hands in the area where the oil seal is located. In the future, you need to start the car, take a flashlight and see where the leaks form. Basically, during operation of the internal combustion engine, you can quickly see oil leakage, which proves that the oil seal is very worn.
Step-by-step process for completing the work of replacing the crankshaft oil seal on a VAZ 2114:
- To do this, the vehicle is placed in a pit and wheel chocks are placed under the rear wheels. Subsequently, it is necessary to lift the front right wheel and twist it using socket wrenches. Next, the protection from the internal combustion engine is removed.
- Then remove the cover from the timing belt. After this, it becomes possible to get to the crankshaft pulley, camshaft and timing belt.
- Before further actions, it is necessary to place one cylinder of the internal combustion engine at the top point. Therefore, the rotation of the camshaft and crankshaft will be in motion until the marks on the pulleys close with the markings on the timing case cover itself.
- Next, you need to loosen the timing belt to avoid subsequent damage and remove it. How to do this: initially remove the right fender liner from the vehicle using key number 10. And now access to the alternator belt and pulley is open. Then loosen the timing belt pulley and remove it without any problems.
- Then you should remove the crankshaft pulley, twist the cap and drain the old oil into a container. As a result, remove the engine pan; it is secured with sixteen bolts.
- Next, remove the oil pickup. It must be carefully examined to identify existing blockages and large amounts of contamination. If they are detected as a result, then it must be blown out with compressed air.
- Then you need to unscrew six screws and remove the oil pump.
- As often happens, a worn gasket under an oil pump greatly loses its original capabilities after a certain time. It can be removed using a regular flathead screwdriver.
- Then the crankshaft oil seal must be pulled out of its socket. If you can’t do it by hand, then it’s quite possible to use 2 flat slotted screwdrivers to pick it up from the opposite side along the edges.
- Then the socket for the new oil seal is carefully wiped. The purchased oil seal often does not fit into place the first time. For mandrel, it is best to use a thirty-two socket head. You need to hit it several times with a hammer.
- Ultimately, all the components are assembled in the reverse order, and oil is poured into the engine.
Replacement process
To carry out a repair of this complexity we will need:
- a set of screwdrivers with different tips;
- standard set of keys;
- jack;
- new consumables;
- set of rollers.
- So, first we place the car on a flat platform and put it on the handbrake.
- 3rd or 4th gear must be installed.
- Now you need to turn off the power to the car. To do this, disconnect the left terminal of the battery.
- The camshaft drive is protected by a special casing. To gain access to it, the cover will have to be removed. To do this, unscrew several bolts securing it.
- Now remove the crankshaft pulley. We remove it along with the strap, which will have to be loosened for this.
- We put the car in neutral.
- Now a very important stage, it concerns the alignment of marks. We begin to turn the crankshaft to the right. At the same time, we observe the flywheel and the location of the marks. We rotate the shaft until the mark on it corresponds to the average value of the scale.
- The mark on the pulley should be placed opposite the mark located on the housing. Slightly loosen the nut securing the tension roller. In general, you need to pay special attention to the video. Most likely, it will also have to be replaced. Even if it seems to you that it is still in good condition, backlashes may still form on it soon. Then it will definitely have to be changed, but because of this the entire mechanism will have to be disassembled again.
9. Now we begin to prepare the belt for removal. To do this, loosen the belt using a tension roller.
10. We remove the worn-out consumable and begin to pull the new product onto the crankshaft gear. 11. Now we pull it onto the camshaft gear. We do this carefully to avoid sagging of the belt drive. We put the belt on the tension roller.
12. Turn the crankshaft 2 turns to the right and set the marks. If they do not match exactly, the belt drive installation procedure will have to be repeated. 13. Return the generator pulley to its place and tighten the bolt securing it. 14. Turn the belt to the left to adjust its tension. The tension should be optimal - the belt should not be overtightened, but sagging should also be eliminated. 15. Put on the generator strap. 16. After this, all that remains is to return the remaining parts to their place and check the operation of the mechanism. To do this, start the engine and listen to how it works. If you don't hear any extraneous noise, we did an excellent job. Well, if you still hear a whistle or grinding sound, then the installation will have to be repeated.
Note: when installing the belt, pay attention to the fact that it must be installed in accordance with the arrows marked on it - the arrows must indicate the direction of movement. It may well turn out that your belt will have no arrows. Then look at the inscriptions - after installation they should not be upside down, they should be easy to read.
Signs of breakdown
You can determine that the sensor has failed by the following signs:
- Idling malfunctions, instability in engine operation is observed;
- The engine loses power;
- The engine accelerates chaotically or, conversely, slows down;
- Heavy plant;
- During high-speed movement and, especially during acceleration, dips are observed.
The main malfunctions may be the following:
- Mechanical deformation;
- Broken wires or shorted wires (this problem is especially common in used cars);
- Wear of the pulley and other parts.
Repairing the sensor is difficult and almost impossible at home. But replacement is not difficult, and it is not that expensive. Let's now find out how to replace the sensor on a VAZ-2014.