The crankshaft or crankshaft position sensor is an electromagnetic device that transmits data about the current position of the crankshaft to the electronic engine control unit. It is difficult to overestimate the importance of this device, since the correct operation of the injectors responsible for supplying fuel, as well as the entire ignition system as a whole, depends on its performance.
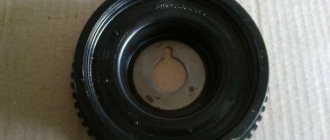
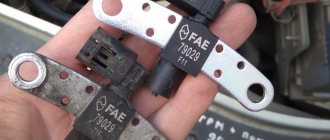
This is what the device looks like
Practice shows that the DC fails quite rarely. But experienced drivers note that such a malfunction can take you by surprise, at the most inopportune moment.
We advise you to always have a spare DC in your car. This is especially true for those who are going on a long trip.
Repair of wiring connector of the Crankshaft Position Sensor (CPS) VAZ.
Quite often, the cause of the car jerking and its complete stop is a break in the DPKV circuit (error P0335 or P0336).
A wire break most often occurs at the base of the sensor connector. The connector needs to be replaced with a new one. In the article we will look at how to do this most correctly, and you will also learn how you can repair the old sensor connector if you suddenly cannot purchase a new one.
Everything was done indoors, so the part with attaching the restored connector to the car wiring is for demonstration, that is, you need to do everything the same, only not on the table, but on the car).
We cut off the connector from the car wiring at a distance of 3-5 cm from the connector. We remove the plastic wire retainer (to be honest, it doesn’t really prevent the wires from breaking at the root - so you don’t have to put it back if you’re too lazy...)
Using a wire with a diameter of 0.8 mm (we used a piece of welding wire from a Kempy semi-automatic machine) we press the fixing stops of the contacts through a special groove (it’s enough just to insert the wire until it stops).
Use the remaining wires to pull the contacts out of the connector. They come out quite tightly due to the rubber seals. We open the contact petals around the rubber seals and break off the old wires at the root.
We find a couple of pieces of wire 10-15 cm long, suitable in cross-section and color. Don't forget to put rubber seals on the wires.
We strip the ends of the wires by 3-4 mm and carefully solder them to the contacts. We used a 25-watt soldering iron, POS-61 solder and active flux based on zinc chloride.
We clamp the rubber seals with the contact petals, slightly bend the contact latches....
We insert the contacts with the wires into the connector until the latch lightly clicks. We put the plastic wire clamp on the back of the connector. The connector has been restored!
Next, let's move on to the car. We strip the DPKV wire - no more than 5 cm. We bend the screen back, strip the white and green wires by 15 mm.
We put heat-shrinkable tubes on the connector wires and twist the corresponding wires with electrical twist.
We stretch the heat shrink onto the twists and heat it with whatever comes to hand - we came across a lighter. But if you have a hairdryer on hand, it will be better... at least according to Feng Shui, that’s how it’s supposed to be.
We twist the restored wires slightly together and wrap them with electrical tape, starting from the connector. We wrap the electrical tape with an overlap of at least 50% over the previous layer. The result is in the picture below - the twisting area is quite well protected from moisture and looks neat. All that remains is to connect the connector to the sensor and ALWAYS fix the DPKV wire on a special bracket on the lower bolt of the timing belt cover.
Of course, the reliability is lower than that of solid wires - but such a connection has worked for years - it has been tested. Not a single return in 5 years.
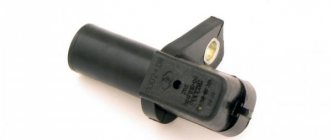
First, let's look at what a crankshaft position sensor is. The crankshaft position sensor of the VAZ 2114, like many other VAZ models, is an electromagnetic device that transmits information about the position of the crankshaft to the electronic “brains” of engine control. This sensor is very important; the correct operation of the fuel injectors and the ignition system depends on it. It doesn't break down often. But if you are going on a long trip, it is advisable to have a spare one.
Crankshaft position sensor VAZ 2114
How DPKV works, its types and operating principle
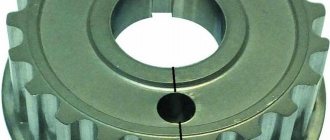
A small device that records information about the rotation of the crankshaft and transmits the data to the on-board computer - the VAZ 2114 crankshaft position sensor, is made of plastic or aluminum. This is a small device with a special eyelet for fastening.
The device has two main parts:
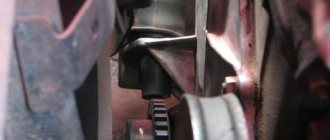
Where is the crankshaft sensor located on the VAZ 2114 - on the oil pump bracket, that is, in the right front corner under the hood. Even a novice car enthusiast can detect the device.
There are three types of DPKV VAZ 2114:
- electromagnetic or inductive ones are distinguished by such an internal structure - they contain an iron rod wrapped with copper wire. Reacting to the magnetic field of the crankshaft pulley, the rod changes the type of electromagnetic signal, the information is sent to the ECU. Thanks to the passing signals, an alternating current is generated, which helps the electronics to correctly calculate the position of the shaft and start the further process;
- frequency DPKVs are more complex in operating principle and design. They also have an electromagnetic rod, but the converter works differently - a frequency pulse is formed from the resulting alternating voltage. The electronic control unit receives pulse signals. Unfortunately, such devices are too susceptible to electromagnetic interference, which reduces their reliability;
- optical ones are equipped with a toothed disk, thanks to which the beam of light emanating from the LED to the receiver is blocked. Interruptions are recorded, which causes a voltage pulse to be sent directly to the electronic control unit.
The operating principle of crankshaft position sensors is very similar, but they are designed differently, which is why the first type has become more widespread - its design is simpler and its operation is more stable.
The crankshaft sensor operates on the following principle: the crankshaft gear has a gap equal to two teeth. When it passes the installed device located on the power unit near the pulley, the piston connecting rod is at the highest point.
The pulse is recorded, processed in the electronic control unit, and the gas distribution mechanism receives a signal allowing the air-fuel mixture to be supplied.
Sensor types
Sensors differ in operating principle and design features.
- inductive type. Inside there is a metal rod with a magnet at the outer end. It is designed to magnetize the rod. A winding of copper wire is wound around this rod, the ends of which are brought out in the form of connectors for connecting wires. The operating principle of the inductive type crankshaft position sensor: when a steel object is located next to the rod, a signal appears at the terminals.
- The operating principle of the next type of crankshaft sensor is slightly different. It has a hall sensor inside. When a metal object is brought close to it, its state changes (from logical zero to one and vice versa).
- frequency Let's look at how this type of crankshaft sensor works. The engine control unit generates pulses of a certain frequency. They are fed to the sensor and when a metal object is brought to the sensor, the generation frequency changes. By changing the frequency, the controller determines the presence of an object near the sensor. The sensor reacts to the metal of the crankshaft ring teeth (on some cars it is located on the flywheel).
Crankshaft sensor for VAZ 2114
Modern cars are rich in technical innovations that ensure stable operation of all systems. The VAZ 2114 crankshaft sensor plays an important role, and if trouble happens to it, you won’t be able to start the car.
Depending on how the crankshaft is positioned, the position of the piston system is calculated, and this affects the period of occurrence of a spark on the spark plugs and the supply of fuel to the combustion chamber of the cylinders. Errors in the operation of a miniature device can be critical.
Symptoms of a problem
Signs of a malfunction of the DPKV can be different. Often, dirt adheres to the end of the sensor itself, which can interfere with reading. Also, symptoms of a faulty crankshaft sensor may be as follows:
- The idle mode is unstable;
- Engine speed rises or falls spontaneously;
- Power drops;
- During acceleration, a “failure” is felt;
- The car doesn't start well.
In these cases, for the most part, the VAZ 2114 crankshaft position sensor is replaced.
In addition, the VAZ 2114 crankshaft sensor may well be in good working order. And on the “tidy” the DPKV error will appear (0335 or 0336). The reason for this may be a broken wire near the connector. This is easily determined visually; then it is enough to replace the connector without replacing the sensor itself.
If the owner notices signs of a malfunction of the crankshaft sensor on his car, then this is a “signal” about the need for diagnostics.
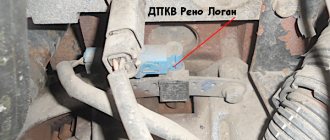
It’s not difficult to guess where the crankshaft sensor is located on a VAZ 2114 . Like many other VAZ models, it is attached to the engine, and more specifically to the oil pump, near the generator drive pulley, on its cover. The sensor is attached with one bolt, which is typical for many models of this family.
Here is the crankshaft sensor on the VAZ 2114
Typical causes of failure:
- Physical damage to the case;
- The interturn closure of the winding turns entails a change in the generation frequency transmitted to the control unit (frequency type sensors);
- Emergency wear or loss of pulley teeth.
How to check for sensor malfunction with the device?
Despite the fact that a sensor malfunction is usually determined by the above symptoms, this may not be enough for a correct diagnosis, since different types of breakdowns have the same symptoms. Dips during acceleration can also occur when other parts are deformed, such as the ignition system or braking system, and this also occurs when the engine itself malfunctions.
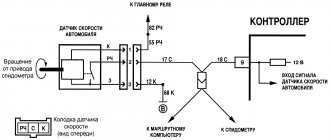
You can definitely check the sensor using the following method:
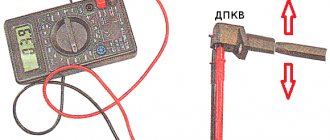
We buy a voltmeter (it’s easy to find in any car store) or a multimeter, which is even better. On the multimeter we turn on the voltmeter function, measuring 200 mV. Now we connect the probes to the sensor. And then the most interesting thing: take any screwdriver (necessarily with a metal rod) and hold the screwdriver close to the sensor. The data on the voltmeter will change, monitor its data: if the device shows 0.3 V, then the device is working properly; If the readings fluctuate, replace the sensor without a doubt.
Functionality check
If you decide to check the serviceability of the sensor yourself, treat this procedure responsibly and carry it out correctly. On a VAZ 2114 car, the crankshaft sensor is checked in several ways.
- Using a multimeter. The serviceability of the induction sensor can be assessed by the resistance of its coil. In a working product it is 500-700 Ohms.
- On the multimeter, set the measurement limit to 200 millivolts, connect the probes to the terminals (where the standard wires are connected). Pass a steel object several times in front of the core. The working sensor will “see” the metal and there will be voltage spikes on the multimeter display. If there are none, replace the part.
- But the most accurate results when checking are provided by an oscilloscope. When using this device, one hundred percent results can be guaranteed; it reads all the information from the sensor while the engine is running. It can be observed on the device screen. The engine, during tests, should operate at different speeds. They start with eight hundred revolutions, then two thousand, and raise it to six thousand. If the lines (on the device screen) are of different lengths, you need to look for the cause of the malfunction. Remove dirt, check the pulley for defects, and so on.
Oscillogram of a working sensor
Oscillogram of a working VAZ 2114 crankshaft sensor
It should be noted that these verification methods work on all VAZ models with DPKV. If you have any doubts about your own abilities, then contact the service. Thanks to specialized equipment, the result will be more accurate, and the check will not take much time.
Remove from the engine
The malfunction has been identified. Let's start eliminating it. Let's look at this operation using the VAZ 2114 as an example.
Turn off the car ignition. We open the hood, fix it firmly, and visually determine where the VAZ 2114 crankshaft sensor is located. Before removal, it is advisable to remove all contaminants in the area where it is located. Next, carefully remove the block with wires from the connector.
Connector DPKV VAZ 2114
Using a “10” wrench, unscrew the fastening bolt.
Removing the crankshaft sensor on a VAZ 2114
Removing the DPKV VAZ 2114
After dismantling the sensor, it is advisable to check the generator drive toothed pulley for defects. Since its damage can introduce errors into the operation of the entire system.
After we are convinced that there are no defects of any kind, we proceed to assembly. The seat must be clean. We install the new part in place and fasten it with a bolt (the tightening torque should not exceed 8-12 Newton meters). In this case we use adjusting washers. They are sold complete with a new sensor. Thus, using a special probe, we ensure that the gap between the pulley and the sensor core is one millimeter. The permissible error is 0.41 millimeters in the larger direction.
Symptoms of a problem
Your car may indicate in different ways that there is a problem with the DPKV or just the DC. Let's name the main ones.
- It is not uncommon for dirt to form on the end of the sensor, causing the device to transmit information incorrectly.
- At idle, the engine behaves unstable.
- The power level of the power unit drops noticeably.
- The revolutions can spontaneously increase or, conversely, fall.
- During acceleration, dips are noticeable.
- When you turn on the ignition, problems are felt and it can be difficult to start the car.
If you discover such problems, most likely you will have to replace the DPKV. In addition, we are talking about a consumable that will not cost you a fabulous amount of money.
This crankshaft position meter cannot be repaired.
Additionally, we advise you to pay attention to the error codes that appear. Codes with designations 0336 and 0335 indicate that a wire break may have occurred near the connector. This problem can be easily determined by visual inspection.
Location
Many VAZ 2114 owners prefer to carry out repairs with their own hands. This allows you to save significantly.
Functionality check
Don't rush to conclusions. You shouldn’t blame DPKV for all the troubles. Sometimes it turns out that the cause of the problem is completely different. Therefore, first you should check whether your DC is working or not.
There are several ways to check.
- Multimeter. Your task is to measure the coil resistance on the induction sensor. If it is working properly, then the indicator will be from 500 to 700 Ohms.
Multifunctional multimeter
- Set the measurement limit on the multimeter to 200 millivolts, connect the probes to the output and pass a metal object around the core several times. If the sensor is working, it will be able to detect this metal and a voltage spike will appear on the display. If there are no surges, the DC must be replaced.
- An oscilloscope. This verification method gives the most objective and accurate result, equal to almost 100%. Connect the device to the engine and read data in different modes. The engine will need to be started at different speeds - from 800 and above, up to 6 thousand. Look at the lines appearing on the screen. If they are of different lengths, you should look for the reason for the malfunction. Sometimes simple cleaning of dirt, checking the pulley for damage and other measures helps.
Dismantling and installation
So, you have determined that the DPKV has failed. Therefore, there is nothing left to do but replace it. To do this you will have to dismantle the old device.
- Turn off the ignition and open the hood. Securely secure it to avoid unpleasant blows to the back or head.
- Remove any dirt from around the sensor so that it can be removed and visually inspected.
- Disconnect the wiring block from the corresponding connector.
- Using a 10 mm wrench, you can easily remove the crankshaft sensor mount.
- Remove the damaged device.
- At the same time, be sure to check the generator drive timing pulley. It is not uncommon for damage to appear on it, due to which the device cannot operate correctly. These teeth cause error codes to appear on the on-board computer.
- If there are no defects and nothing prevents the installation of a new device, begin assembly.
- If necessary, clean the installation site of the DPKV.
- Place the new measuring device in the socket and tighten the mounting bolt. In this case, do not exceed a tightening torque of more than 12 N m.
- Be sure to use the adjusting washer, which is already supplied by responsible sensor manufacturers.
- Using a special feeler gauge, make sure that there is a gap of 1 millimeter between the pulley and the DPKV core.
- The gap error can be no more than 0.41 millimeters in the upward direction. Under no circumstances should the gap be less than the required 1 mm.
Maintain clearance
Price issue
As we have already noted, VAZ 2114 owners are not often faced with the need to change the DPKV. But always be prepared for such troubles.
You don’t have to spend a lot of money purchasing a new sensor. The price depends on the store and region where car parts are sold. On average, a recreation center costs about 200-400 rubles.
Replacement at a service station is still a cost around the cost of several sensors. Therefore, think about who exactly will do the work - you or the car service specialists.
Step-by-step instructions for replacing the sensor
If you strictly follow the instructions, the replacement procedure usually does not take much time.
- First of all, to make further work safe, turn off the ignition and raise the hood.
- We find the device and, if it is covered with dust and dirt, which is observed quite often in the practice of motorists, be sure to use a rag to clean both the sensor and its installation location, so that when installing a new device, there is no short circuit in the wires.
- Now we have access to the device. A positive point is the ease of removing the sensor, which cannot be said about other parts. But here it is very important to observe the subordination of actions: first, by bending the fasteners, remove the block and wires, then, after unscrewing the bolt, carefully, slowly, remove the DPKV
- Just in case, it is worth diagnosing the condition of the pulley; toothed parts are often deformed, which also causes a disruption in the fuel supply system and leads to errors in the data transmitted by the sensor, which can already be dangerous.
- We check that the installation site of the new part is clean.
- We mount the sensor.
Installation is carried out in the reverse order of dismantling: tighten the bolt, fasten the block, start the engine, check the sensor data.
The work is ready.
An important point during installation is to maintain the required gap, which should not exceed 1 mm. If the gap is too large, you should select a device of the appropriate size: do not try to fix the DPKV of the wrong type, as this connivance can lead to negative consequences.