Even a novice motorist who just bought a VAZ-2114 is trying to master the art of self-repairing a car. Replacing the valve cover gasket is the first step in learning how to repair an engine. This process is not complicated and will require 20-30 minutes of time.
Below is a detailed video about replacing the valve cover on a VAZ-2114
The video will tell you how to replace the valve cover gasket on a car, and also tell you about the nuances and subtleties of the process.
How to change the valve cover gasket on a VAZ 2114: when is it necessary and how to do it
Any car enthusiast makes sure that his car is in perfect condition. If there are any problems with transport, they must be resolved promptly. So, if you see that there is a leak between the valve cover and the engine block, then you should suspect that the cover gasket is leaky.
Such an element does not have a global function in the operation of the system. But if problems arise with the gasket, then you should not turn a blind eye to them, despite the fact that the motor will work properly.
The faulty part must be replaced, otherwise oil will leak from under it. This point can cause a number of problems. So the valve cover gasket of a VAZ 2114 can be replaced independently without the involvement of specialists. Some craftsmen are of the opinion that the gasket needs to be changed every time the cover is removed. This point must be taken into account when carrying out various works.
Price:
| Type of work: | Price |
| Removal/installation | from 600 rub. |
| Replacement with a c/o manifold | from 2500 rub. |
Addresses of car services in St. Petersburg:
Kupchino
- 245-34-84
Citizen
- 603-55-05
Bolsheviks
-
WhatAapp/Viber: 8-911-766-42-33
The Lada Granta valve cover gasket must be replaced when the service life recommended by the manufacturer has expired. The gasket is made of special heat-resistant rubber; it must withstand pressure, reaction with oil, and high temperatures. Over time, rubber loses elasticity and becomes cracked; in this case, it also needs to be replaced. Sometimes manufacturers do not provide for the production of a separate oil cap gasket, then it can be purchased as a kit. This happens more often when the lid is made of plastic rather than metal.
Timely replacement will help keep your engine clean, and will protect other gaskets and seals from premature wear.
If you don’t have the proper experience, you shouldn’t make the replacement yourself.
What is important here is the tightening force with a special torque wrench and the sequence of tightening the bolts. Incorrect replacement - threatens distortion
Plus, it won't fix the leak. In this case, we strongly recommend that you contact our service specialists in St. Petersburg.
The quality of new spare parts is also important. To be sure of the result of the replacement, we recommend purchasing it in our store
Addresses in St. Petersburg: Service station on Bolshevikov: st. Voroshilova, house 7, from 10 to 18, t., Sat, Sun - closed. Service station on Grazhdansky: st. Uchitelskaya, building 23, from 9.30 to 21.00, t. 8 (812) 603-55-05, seven days a week. Service station on Kupchino: st. Dimitrova, building 1, from 10 to 20.00, t., seven days a week.
Hi all! Tell me if oil is leaking from under the valve cover
Is it worth paying attention to this and will it be fixed under warranty? Lada Granta liftback, 2014. 127 motor
Mileage 20000
How do you brake on Kadiköy? By the way, sometimes they squeak and sometimes they are not quiet at all.
by Adminrive · Published 05/03/2017
- Comments 17
- Pingbacks 0
This is not a guarantee, buy a gasket for 100 rubles and replace it yourself. If it leaks, then only replacement will help; I don’t recommend sealant.
Thank you, how often do problems like this happen?
Andrey, very often, it doesn’t matter, pelvis or otherwise. They won't fix it under warranty, they'll say it's fogging, not leaking.
There is not a gasket, but a sealant, you need to remove the receiver and lift the slabs. In your case, it looks like both. Work in the area of 3t. You can pour oil on the areas where the oil is released, then they will do it under warranty
They won't fix it under warranty, they'll say it's fogging, not leaking. There is not a gasket, but a sealant, you need to remove the receiver and lift the slabs. In your case, it looks like both. Work in the area of 3t. You can pour oil on the areas where the oil is released, then they will do it under warranty.
Or don’t bother making sure that oil doesn’t leak into the spark plug wells. There is a disease on the scars from the factory
Andrey, after replacing the gasket at the maintenance service, I began to sweat a lot of oil, I came to them a month and a half later, they said I should have contacted them earlier, but now at your expense, they installed a new one again, tightened it to the limit and that’s it, 4500 km dry.
Andrey, I had it too, they did it. Go to it
Sergey, there is no gasket there. Two milled surfaces are placed on Lactide sealant.
Alexey, there's a gasket there
Maxim, the female gasket is of the obi type)))) but on a 16-valve car there are no gaskets, the sealant is applied correctly Alexey wrote, do not confuse it with an 8-valve engine, 127 is 16 bugs.
Take a book and read about them; they never had gaskets only on 8 valves. I work as a mechanic
Alexey, a shkolota laid out here a dimagogy about proklaku which does not exist))))
Anatoly, In the service they are being bred like children and they are also arguing)
I also have 17,000 miles
Alexey, sorry, it’s not clear, I had nothing to do with 16th grade, only 8th grade.
Anatoly, I meant 8th grade, I didn’t notice 16
ICE 21127. mileage 73tkm. sweats like this from 10-15tkm. I gave up on this, I’m not going to open it until it starts to leak. and, by the way, it is always better to coat both planes at once on 16V engines. There are simply bolts on the top cover that hold all three parts together. and when unscrewing them, you can accidentally displace the bottom layer of sealant and a leak will open from there
What do you need to know about the motor?
Before the valve cover of the VAZ 2114 is removed and the gasket is replaced, it is worth talking about the features of the engine. If you don’t know anything about design features, then the best solution would be to turn to specialists. Remember that to carry out such work you will need a certain tool.
Diagram of internal combustion engine components
| № | Detail number | Part name |
| 1 | 2108-1003298 | screw |
| 2 | 2108-1003278-01 | Washer |
| 3 | 2108-1003277-01 | Sleeve |
| 3 | 2108-1003277-02 | Sleeve |
| 4 | 2108-1003274 | Cover pin |
| 5 | 2111-1003260 | Cylinder head cover |
| 6 | 2108-1003271 | Bolt M12x1.25x135 |
| 7 | 2108-1003265 | Washer |
| 8 | 14328201 | Plug 10 cup |
| 9 | 14329101 | Plug 30 cup |
| 10 | 1118-1003011 | Cylinder head |
| 11 | 2101-1002042 | Sleeve |
| 12 | 14329201 | Plug 36 cup |
| 13 | 10158601 | Plug 16 spherical |
| 14 | 11183-1002011-10 | Cylinder block |
| 15 | 14234330 | Bolt M10x1.25x65 |
| 16 | 2108-1003284-10 | Ring sealing |
| 17 | 2111-1003284 | Ring sealing |
| 18 | 2111-1003286 | Bolt |
| 19 | 2111-1003288-10 | Stub |
| 20 | 10725911 | Nut M6 low |
| 21 | 11197773 | Conical spring washer 6 |
| 22 | 13541221 | Hairpin M6x22 |
| 23 | 2108-1003270-10 | Cover gasket |
| 23 | 2108-1003270-11 | Cylinder head cover gasket |
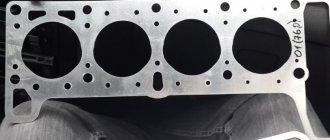
| 24 | 21083-1003020-10 | Head gasket |
| 24 | 21083-1003020-11 | Head gasket |
| 25 | 2112-3855020 | Knock sensor |
| 25 | 2112-3855020-01 | Knock sensor |
| 25 | 2112-3855020-02 | Knock sensor |
| 25 | 2112-3855020-03 | Knock sensor |
| 26 | 2101-1002040 | Sleeve |
In particular, a car enthusiast needs to have on hand the following details:
- ratchet with extension;
- head at 10;
- screwdriver with Phillips head.
Why do you need a gasket?
It is clear that without such a gasket the car will work as before. But you need to understand that it plays a certain role, even if it does not affect the technical features of the car. It is important that when a leak occurs, a number of serious problems can arise.
The gasket has a certain service life. It must be promptly replaced as it wears out.
If we consider the main task of this part, then it is worth saying that it is to ensure the tightness of the connection. In order for the connection between the valve cover and the engine part to be tight, a gasket is needed. You don’t need any special skills to find the cap, because it has a neck for filling engine oil.
LADA spark plugs: top 10 options
The rating contains 10 modifications of spark plugs, without division into specific car models.
10th place: ZZ A17 DVRM
The list of the best offers opens with an effective model that is in demand among a large number of buyers. Such prevalence is ensured by the stable quality of products. In the original packaging it is impossible to find a defective part or a spark plug with a broken gap. A significant advantage of the products is the ability to work actively even when the voltage drops to 6V in the on-board network. Similar spark plugs in the VAZ 2107 are often found due to their moderate cost.
The indicators are overshadowed by bad statistics - as of 2020, 35% of the kits on the market are fakes, which forces motorists to carefully select products in stores.
Advantages:
- reasonable price;
- durable;
- simple design.
Flaws:
- plenty of fakes.
9th place: TZ 17 DVRM
The next representative of the rating implies the presence of as many as three electrodes on the working part of the device. A large number of motorists install such spark plugs on a VAZ carburetor or even an injection type. Thanks to the use of advanced developments in design, the manufacturer has increased the service life of the electrode.
Pirate copies also play a role here - there are a large number of them, which makes buyers cautious about purchasing products.
Advantages:
- good performance;
- long period of operation;
- wide use.
Flaws:
- there are fakes.
8th place: DENSO W20EPR-U11
If you want to buy VAZ injector spark plugs, you can turn to the eighth position of the rating. Candles represent a compromise between high quality and moderate cost. Thanks to this symbiosis, such spark plugs are perfect for the VAZ 2106. Also, this model will be relevant for more modern versions. It uses technology to increase spark stability. The development significantly increases the service life of the part, which helps save on vehicle servicing. This also made it possible to reduce the maximum voltage drop to 6.5 V, which is less than that of Russian analogues, but thanks to stability, the spark plugs win positions.
Advantages:
- stable operation during voltage fluctuations in the on-board network;
- long service life.
Flaws:
- high price.
7th place: BRISK LR15YCY-1
The next contender for the title of best is distinguished by an increased overhang of the working part. The specified spark plugs for the VAZ 2107 carburetor are ideal. The standard eight-valve engine works great with the included model.
In terms of performance parameters, the model is a confident average and can be used even on used foreign cars with similar engines. The ability to work on a dead battery has also been developed. The product is capable of igniting the mixture even at 6.2 V within the network, which is significantly better than the performance of competitors’ analogues. Buyers consider the rather high cost to be the only serious disadvantage.
Advantages:
- increased resource;
- sufficient versatility;
- The gap fits well with classic engines.
Flaws:
- high price;
- difficult to find - not very common.
6th place: NGK BPR6 ES-11
The specified spark plugs for the Lada Granta are quite suitable. The model stands out among its competitors because it is manufactured in France. European quality did not suffer even with a fairly successful attempt to reduce the cost of products. The design and appearance of the part leaves much to be desired. Here you can find an unevenly soldered electrode or a damaged manufacturer’s logo.
On the other hand, the models work excellently for a long time and do not react significantly to piston wear - the spark plugs react normally even to oil getting on the working surface. A good and stable spark breaks through even on “smoky” electrodes.
Advantages:
- good performance on old and new engines;
- good quality at a reasonable price.
Flaws:
- a huge number of fakes.
5th place: BOSCH WR7DPX
The top five is topped by a model produced in China, but the quality has not suffered. The specified spark plugs and Lada X-ray are ideal for each other. The minimum thickness of the electrode, supplemented with high-quality metal, guarantees stable operation during critical battery drawdowns, and the reinforced insulator quickly removes excess heat from the site of arc formation. These parameters guarantee excellent performance in highly loaded engines operating at constant overheating and high crankshaft speeds.
Advantages:
- excellent stability;
- long service life;
- few fakes.
Flaws:
- high price;
- not suitable for simple motors.
4th place: Bosch Platinum WR7DP
The next representative of the German brand will be the correct answer to the question of which spark plugs are best for Lada of the latest generations. The plasma modification with platinum coating is capable of operating stably for up to 60,000 kilometers, which is unattainable when using standard varieties. The thin core is closely matched to the ceramic insulator, which allows you to quickly remove excess heat from the working area and stabilize the behavior of the engine at maximum speed. Such parameters are very much appreciated by fans of fast driving and heavy loads.
A significant advantage of candles is the excellent quality of production and a high degree of protection against counterfeiting.
Advantages:
- original design of the working part of the candle;
- excellent quality;
- high stability.
Flaws:
- overpriced.
3rd place: Brisk Extra Dr15Tc-1
Modern car enthusiasts often install these spark plugs on Lada Kalina and similar car models. The unique design of the working part, with three electrodes, ensures a complete absence of misfires even with a tired battery or when using second-grade fuel.
Another advantage of the design is the minimum number of counterfeits. Spark plugs are difficult to counterfeit due to the characteristics of their insulators and electrodes.
Advantages:
- tolerable price;
- few copies;
- sufficient stability.
Flaws:
- Not suitable for all cars.
2nd place: Denso PK20PR-P8
The product produced at Japanese factories falls slightly short of the leading position. The factor guarantees excellent workmanship and an extended service life.
Platinum soldering on both electrodes ensures stable spark penetration and resistance to corrosion and mechanical wear.
Advantages:
- optimal price-durability ratio;
- sufficient distribution.
Flaws:
- It will take a long time to choose from the model range.
1st place: NGK B9Eg-3530
The clear leader stands out because the brand's products are delivered to the factory's conveyor belt. Therefore, when asking which spark plugs are best for VAZ, it is recommended to pay attention to the brand’s products.
Nickel coating on the electrodes prevents scale formation and guarantees stable spark operation, which saves fuel and protects catalysts from premature wear.
Advantages:
- excellent workmanship;
- no fakes.
Flaws:
- not detected.
When to replace?
It is worth figuring out exactly when it is necessary to replace the valve cover gasket on a VAZ 2114. The plant tries to use only high-quality gaskets, which is why the initial part lasts for a long time. After a certain period of time, parts lose their elasticity and may harden. This is why cracks and leaks can form.
Even a small leak can cause dirt and dust to enter the motor. Many car enthusiasts change the part when changing the oil. This is an excellent solution to the problem, as leaks can be completely eliminated.
Cases when it is worth replacing include:
- We noticed a clear oil leak at the junction.
- The motor is undergoing routine repairs, in which case a replacement can be performed.
- Carrying out technical inspection.
- Removing the cover.
Why do many people have a hard time believing it?
Of course, many of us are accustomed to the deception or tricks of manufacturers, and therefore a fair question arises - why so many contacts, what do they really improve, maybe it’s just an empty overpayment?
Of course, the normal ignition cycle does not go anywhere. That is, the coil gives an impulse that is transmitted through wires or tires to the spark plug - later a spark passes between the contacts, which ignites the fuel. So it will be with one contact and three or four.
As we know that it is this distance between the electrodes that can be the cause of many engine problems, read the article for information. If it is too large or, on the contrary, too close, then the engine may not operate smoothly, and jolts or jerks will appear when accelerating.
But according to the creators, several contacts (electrodes) completely eliminate this problem. Here you can set several correct gaps at once and the spark will always be strong! Also, some manufacturers, such as NGK, claim that in some cases the spark hits two electrodes at once, which only increases the efficiency.
How to replace?
Domestic cars are not perfect; over time, you may notice that oil is leaking from under the gasket. In this case, it is simply necessary to make a replacement. Of course, you can try to tighten the bolts more tightly, but this is unlikely to help solve the problem. If you are wondering how to change the valve cover gasket on a VAZ 2114, then you should proceed sequentially. Anyone can cope with such a task as replacing the valve cover gasket 2114.
The sequence of your actions should be as follows:
- First you need to loosen the clamps and disconnect the hoses.
- The next step is to remove the locking plate and remove the end of the cable.
- You will need to unscrew the bolts that allow you to tighten the cable bracket.
- You will see two nuts that will also need to be unscrewed and removed, as well as the rubber bands that are used for the seal.
- The valve cover can be removed.
- The old part is removed and the new one is installed.
When the cover is removed, it is worth cleaning the oil separator screens. This manipulation can be done by unscrewing the bolt and removing the cover.
My review
Unfortunately, I do not have any photographs or video material from testing such candles. But I had experience. FOR a working VAZ 2111, multi-electrode options (three contacts) were purchased from the company BRISK, the name is EXTRA, if my memory serves me correctly. The price of the issue is approximately 180 - 200 rubles - a piece, they did not buy expensive NGK, for our old working VAZ, this is too much. The car traveled with them for about 40,000 kilometers, then another unit took it and I could not track it. According to the driver, starting in cold weather has improved (not even with a new battery), throttle response has increased slightly, consumption has dropped, slightly, but it has dropped - according to the on-board computer, this figure is approximately 0.3 - 0.4 liters, which is approximately 4% savings. After 20,000 kilometers, we unscrewed a couple of things and looked at what happened to them and you know, everything was in order, I know the mileage is small, but the first impressions were already formed. Therefore, they really have an effect. Also watch the video I made just for you, I found a worn version from BERU.
Self-replacement - what needs to be taken into account?
The replacement process is considered quite simple, but you need to understand that it is not always possible to carry out the work smoothly.
That is why when carrying out work you should follow simple tips that will help you avoid mistakes:
- When removing the lid, you should wash it in turpentine.
- The optimal solution would be to use high-quality gaskets.
- All parts used must be clean; when carrying out work, experts advise wiping the edges of parts to remove any existing oil.
- During installation, you can use a sealant; it is applied to the joints.
- After the replacement is completed, you need to check the oil level.
- To check the system, you need to start the car; carry out a second inspection after making the first trip.
- The groove under the gasket should be cleaned as thoroughly as possible.
Tips for quality work
Not in all cases, motorists are able to carry out the procedure without problems. Sometimes an oil leak forms almost immediately after several kilometers of driving. There may be several most popular reasons for this:
- use of low-quality gaskets;
- insufficient amount of sealant used, careless application of it to the surface;
- misalignment of the cover caused by improper tightening of the fasteners.
You need to know that for cars there are diagrams for tightening the bolts on the covers, which can be found in the car’s operating instructions.
The replacement must be carried out when the engine has cooled down so that thermal expansion does not negatively affect the performance result.
To work with fasteners, you usually need a 10mm wrench. After unscrewing all the bolts, you must thoroughly rinse the parts to remove any remaining grease or old sealant.
Application of sealant
It is advisable to tighten the bolts using a torque wrench. If there is no scheme according to which the operation is carried out, then it can be found on the official website of the manufacturer. In any case, the fasteners are tightened from the middle to the edges.
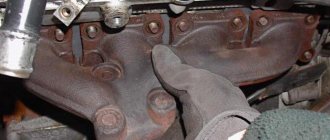
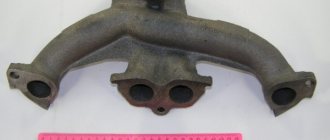
Valve cover replacement process
Valve cover removed from a VAZ-2114 engine
So, in order to replace the valve cover gasket on a car, you will need certain tools. What exactly is needed? Let's consider this question: a ratchet with an extension, a 10-mm socket, a screwdriver with a Phillips head.
Now that everything is ready, we buy a new gasket from the list recommended below and we can get to work.
Don't forget about the new sealant.
Let's consider the sequential stage of performing replacement operations:
- Loosen the clamps and remove the hoses shown below.
Shows which hoses need to be removed
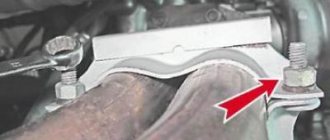
- After removing the locking plate, disconnect the accelerator cable.
Remove the locking plate and dismantle the throttle cable
- Unscrew the mounting bolts securing the accelerator cable bracket to the receiver.
The process of dismantling the accelerator cable bracket
- Unscrew the nuts securing the valve cover.
Unscrew the valve cover mounting bolts
- We remove the rubber seals.
When the nuts are unscrewed, it is necessary to remove the seals
- Remove the valve cover upwards.
Pull the lid up
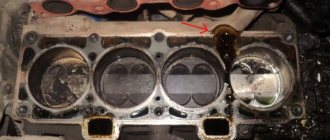
- Now you need to clean the oil separator screens. To complete the process, you need to unscrew the valve cover.
Unscrew the oil separator fasteners
Removing the oil separator cover
Oil separator screens that need to be cleaned If the screens are dirty, they need to be washed.
- If the nets are dirty, they need to be washed.
During the cleaning process
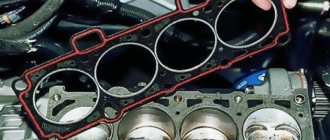
- We install a new gasket. When performing the process, we use a sealant.
Applying sealant
- If everything is tightened correctly, the gasket will fit perfectly and prevent oil leakage.
Place the gasket on the sealant
- We carry out the assembly in the reverse order.
Preparing for work
The valve cover gasket can be replaced in any convenient place - in an open area or in a garage. There is no need to drain engine lubricant or antifreeze. What tools will be needed for disassembly:
- a head with an extension and a knob, suitable in size to the cover mounting bolts;
- flathead and Phillips head screwdrivers;
- pliers;
- rags.
Work is carried out with the power unit cooled down to a comfortable temperature. If you don’t have time to wait for the engine to cool down, perform disassembly wearing cloth gloves that protect your hands from burns.
Before replacing, prepare the following consumables:
- a new gasket element selected according to the car model;
- O-rings for bolts (installed on certain brands of cars);
- high temperature sealant and degreaser such as white spirit.
The use of sealants to treat the seal before installation is not necessary. For example, on engines of classic VAZ 2101–07 models, the gasket does not require additional sealing. On 16-valve engines with a wider flange, the use of sealant is desirable, but not required.
Advice. Take your time to buy and change a gasket that leaks a little oil at one point. First, check and tighten the threaded connections - perhaps the seal has sagged and the bolts have become loose. If the operation does not help and drips still appear, the gasket element will have to be replaced with a new one.
Analogues (manufacturers)
Valve cover gasket made by Goetze
Of course, the manufacturer and many automotive experts recommend installing the original valve cover gasket, but, as practice shows, substitutes are often of higher quality and have a much longer service life.
So, let's look at which analogues of the original part are recommended for installation on a car:
| Manufacturer's name | Catalog number | Cost in rubles |
| Glaser | X08964-00 | 300 |
| Goetze | 50-025881-00 | 750 |
| Ajusa | 56021200 | 1000 |
| Trialli | GZ 101 7022 | 1500 |
As you can see, the cost of alternative gaskets is quite high, but as practice has shown, the service life of the parts is twice as long as the original.
Valve cover gasket made by Elring
Cylinder head repair
We mark all hydraulic compensators with numbers using an ordinary clerical touch and put them away. An ordinary magnet will help you pull them out. We dry out the valves and remove the oil seals (valve seals), the valves into scrap metal, the oil seals into the trash. We clean all channels. We take the head for grinding, just in case. After washing it again with kerosene after sanding and blowing it with air, we begin to assemble it.
We arrange the freshly purchased valves in the sequence in which they will stand in the cylinder head and begin to grind in one by one. Lubricate the valve stem with clean oil and apply lapping paste to the edge.
We insert the valve into place and put a valve grinding tool on the valve stem. The stores sell a device for manual lapping, but since this is the twenty-first century, we are mechanizing the process. We take the old valve and cut off the rod from it, select a rubber tube for it of such a diameter that it fits tightly. The rod is in a reversible drill, one end of the tube is on it, the other is on the valve being ground in. At low speeds we begin to grind the valve, constantly change the direction of rotation and periodically press it to the seat or weaken the force. On average, the valve takes about twenty seconds. We take it out and wipe it. The valve is considered ground in if a uniform gray strip of at least 1.5 mm wide appears on the chamfer.
The same stripe should appear on the valve seat.
Video of manually grinding valves
For a sixteen valve head, everything is the same, only there are twice as many valves. After lapping, all valves and seats are thoroughly wiped and washed with kerosene to remove any remaining lapping paste. We check for leaks. We tighten the old spark plugs and put all the valves in place. Pour kerosene and wait three minutes, if the kerosene does not run away all is well, otherwise we grind the valves on this cylinder.
We had to grind four valves again, after which the kerosene stopped flowing.
We stuff new valve seals.
We put the valves in place and dry them. Before doing this, lubricate the valve stems with clean oil. After lubricating it with clean oil, we put the hydraulic compensators in place and, covering them with a clean cloth, remove the head out of sight. We're done with the cylinder head.
Reasons for gasket failure
When all the processes have been sorted out and the choice of valve cover gasket has been decided, it is necessary to consider the reasons for the failure of this element:
- Wear. Perhaps the most common reason is that during use this element tends to crack because it is constantly exposed to hot oil.
- Stretching. Constantly high temperature negatively affects the rubber product, which loses its physical properties and stretches, which entails a loose connection and the passage of lubricant.
- Oil streams. Occurs due to gasket breakdown. This usually happens after the engine overheats severely.
Oil Creek
- Pressure. Excessively high pressure can squeeze the gasket out of its seat, which will cause oil to flow like a river.
Coolant
The main thing is to constantly check the fluid level in the expansion tank; it is installed under the hood. Coolant is added to the system through a plastic expansion tank. The expansion tank performs another important role, namely, it compensates for changes in volume and fluid pressure in the system when it heats up or cools down.
Antifreeze or antifreeze, depending on what is filled, evaporates over time during the operation of the machine, heating up to a high temperature. Do not allow the liquid to evaporate to a level below the “MIN” mark; however, do not fill above the “MAX” mark either, the excess will expand, then pour out through the valve of the expansion tank cap, and antifreeze or antifreeze, consisting of toxic chemicals, will evaporate from the burning engine into the passenger compartment the car further through our lungs into the blood, let’s not be distracted by this from the field of medicine.
Don't worry if you have to add fluid once every few months. If you have to constantly top up, then you need to start looking, wondering what the pump or radiator pipe is leaking.
Avoid overheating the engine in traffic jams or when driving at low speeds on a straight road, especially uphill; when you are skidding, monitor the temperature to prevent the engine from boiling. Just in case, you should keep at least one and a half liters of coolant in reserve. The operation of an overheated motor leads to deformation of its parts, and the consequences can be corrected only by having an expensive overhaul from a motor mechanic or by changing the engine.
Distilled water can be used as a cooling liquid in the summer. Before the onset of frost, the water must be drained immediately, then pour in antifreeze or antifreeze, depending on what is recommended in your instruction manual. As is known, water expands at subzero temperatures, which can cause irreparable damage to car parts. It is good to use coolant all year round.
Here we have looked at the main aspects of the cooling system that need to be monitored when operating the car. Let's move on to looking at photos of repair kits for coolant inlet and outlet pipes.
Photos of a repair kit for pipes for VAZ cars
VAZ-1118
The repair kit for the radiator pipes of the VAZ-1118 cooling system consists of three hoses of different shapes and sizes (see photo).
They have design numbers:
- 1. 1118-1303025-00P send. “leading” (number-1) quantity 1 piece.
- 2. 1118-1303008-01P “discharge” connecting hose (number 2) quantity 1 piece.
- 3. 1118-1303093P connecting hose for thermostat and water pump (number 3) quantity 1 piece.
VAZ-2112 and for VAZ-2170 st/sample
The set of radiator pipes for the VAZ-2112 cooling system consists of three hoses of different shapes and sizes (see photo). Suitable for the first Prior 2170 released.
Their design numbers:
- 1. 2112-1303025Р supply hose (number 1) quantity 1 piece.
- 2. 2112-1303010R outlet hose (number 2) quantity 1 piece.
- 3. 2109-1303093-01P hose “corner” of the thermostat to the water pump (number 3) 1 piece.
VAZ-2170 new/model
The set of radiator pipes for the cooling system for the VAZ 2170 consists of three hoses, two of which inlet and outlet are almost identical in shape and size, there is still a difference between them (see photo). The third hose, number 3 “corner” from the thermostat to the water pump, comes from the VAZ-2112 (see photo above).
They have design numbers:
- 1. 2170-1303010-10 sh. “discharge” (number-1) quantity 1 piece.
- 2. 2170-1303025-10 sh. “leading” (number-2) quantity 1 piece.
- 3. 2109-1303093-01P sh. “corner” of the thermostat to the water pump (number 3) 1 piece.
Consequences of untimely replacement
Dirty valve cover and filter elements
There are not many consequences, but they are quite compelling to change the gasket in time.
- Firstly, this is directly related to oil leakage, which reduces the volume in the engine. Even if the loss is insignificant, it may just be enough for the internal parts of the power unit to wear out faster.
- Secondly, air constantly gets under the valve cover, which can affect the quality of the air-fuel mixture and the engine will begin to “eat” a sufficient amount of fuel.
- Thirdly, dirt and foreign objects, as well as water during winter and rainy periods, can enter through the resulting cracks. This can negatively affect the operation of the power unit, cylinder head and other elements, as well as affect the performance of the entire system as a whole.
- Fourthly, leaked oil contaminates the outer part of the block, onto which dirt clings. It can also affect the operation of the power unit and other elements.
Engines "Lada Kalina"
Machines of this type are equipped with several types of engines. Each of them has its positive and negative sides. The first Lada Kalina produced by AvtoVAZ was equipped with an engine with eight valves. Its working volume was 1.6 liters. Then the car began to be produced with an engine with 16 valves, with a slightly smaller volume, only 1.4 liters. The most expensive model of the Kalina, which is a sports type, is equipped with an engine from the Priora, which has 16 valves and a volume of 1.6 liters. Three years ago, the brainchild of VAZ began to be equipped with a new engine. It, like the first engine, has 8 valves and a volume of 1.6 liters, but differs from its “brothers” in that it has a lighter piston system. As a result of this change, power increased and the engine began to behave more responsively. Today, this engine is mainly installed on the Grant, which replaced the Kalina Sedan. Perhaps in the future every Lada Kalina will be equipped with such an engine.
How to replace the cylinder head cover gasket on a VAZ 2114
Removal procedure:
Remove the decorative trim from engine 11183 (1.6i)
We disconnect the drive cable from the throttle valve and, together with the mounting bracket, move it towards the radiator
Using a Phillips screwdriver, loosen the clamps securing the three hoses of the crankcase ventilation system. Remove the hoses from the cylinder head cover pipes.
Using a 10 mm socket wrench, unscrew the two nuts securing the cylinder head cover
Remove the washer and rubber bushing from both studs.
Remove the cover.
Remove the gasket from the cover.
Flushing
Unscrew the oil filler plug.
Using a 10 mm socket wrench, unscrew the two bolts securing the oil separator housing.
We remove the body.
Remove the oil separator screens.
We wash the removed parts in kerosene, wipe with a rag and blow with compressed air (from a tire pump).
We assemble the oil separator in reverse order.