08.05.2012
As mentioned earlier, the crankshaft is a cast iron five bearing mechanism. It is possible to regrind the crankshaft journals during repairs by reducing the diameter by 0.25; 0.5; 0.75 and 1 mm.
Crankshaft
Two support half-rings limit the axial displacement of the crankshaft:
- A yellow ceramic-metal half-ring is placed on the rear side of the middle main bearing.
- The steel-aluminum half-ring is installed on the front side of the middle main bearing. There are two types of half rings: standard and enlarged half rings, the thickness of which is 0.127 mm.
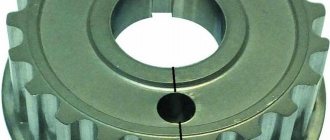
The dimensions of the crankshafts are shown in the figure.
Crankshaft sizes
The crankshaft bearing shells are a steel-aluminum thin-walled curved semicircular plate:
- The upper crankshaft bearings have a kind of groove, while the lower ones have nothing.
- The connecting rod bearings, both upper and lower, also do not have any grooves.
VAZ 2114 thrust half rings
Great guys, I decided to share my creativity from the BZ.
Peculiar hehe) I once decided to change the half rings, but there is not a lot of specific and understandable information on the Internet, so I described in detail what kind of rings they are, where they are and why they are needed)
Where and why?
The thrust half-rings are located on the sides of the support cover of the third main bearing, i.e. Simply put, half rings are installed between the block support and the crankshaft cheeks. The half rings keep the crankshaft from axial movement and play.
Why do they need to be changed?
Over time, the half rings become thinner and the play increases, but this is not the most dangerous thing; over time, the rings can wear out to such an extent that they stop holding on and one or both fall out into the oil pan... What happens in this case? When there is nothing between the crankshaft and the block cover, the crankshaft begins to grind the support cover.
The whole unpleasantness of the situation that has arisen is that the block bearing support cover is cast together with the block to increase accuracy. Simply put, if you don’t notice crankshaft play in time, you may end up having to replace the block and the crankshaft itself... In addition, increased crankshaft play leads to constant squeezing out of the crankshaft rear oil seal and oil leaks, the rear oil seal is located behind the flywheel, and to replace it you will have to do a huge amount of work . How to determine?
Yes, very simple.
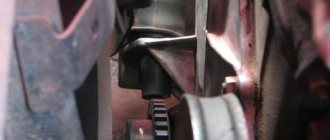
We take the mounting tool in our hands, press it into the body on one side, and with the other press on the generator pulley on the crankshaft; the axial clearance of the crankshaft should not exceed the maximum permissible - 0.35 mm. Also, have someone press the clutch while you watch the crankshaft. If you notice severe play, you must urgently replace the half rings, because if the half ring falls out, the crankshaft will grind off the groove on the bearing cover and the new half ring simply will not hold. I recommend checking the play after 120,000 miles. How to replace?
Quite simple. First you need to buy: the half rings themselves, the oil pan gasket, sealant. Since it will be necessary to drain the oil from the engine, the work of replacing the half rings can be combined with changing the oil; you can also clean the pan and oil receiver. Half rings are available in three sizes: standard 2.31; first repair 2,437; the second repair 2.56, produced by ZMZ. It is noteworthy that at the factory the half rings are installed differently - a steel-aluminum half ring is installed on the front side of the bearing (On the timing drive side), and a metal-ceramic (yellow) half ring is installed on the rear side.
ONCE AGAIN ABOUT THE THRUST HALF RINGS
ONCE AGAIN ABOUT THE THRUST HALF RINGS
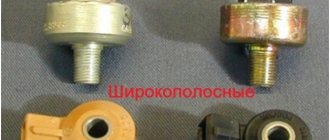
The article “Don't mix up the details” in the September issue of the magazine aroused great interest among readers. In addition to what was published, its author A. NIKOLAEV from Ufa clarifies information about the interchangeability of crankshaft thrust half-rings of VAZ engines.
There are six half rings in the photo. Of these: a and b - 2101–1005183, steel-aluminium, nominal size, shown from the working and non-working sides, respectively; c — repair half-ring 2101-1005183-20 of the old model (the marking “0.127” is stamped on the non-working surface - the size of the repair thickening); d - the modern repair half-ring 2101-1005183-20 differs from the half-ring “c” in that the marking has become shorter (“P” - “repair”); d and f - metal-ceramic (bronze-graphite) half-ring 2106–1005183, shown from the working and non-working sides, respectively. The repair cermet half-ring 2106-1005183-20 looks exactly the same and has no additional markings. It can be distinguished from the nominal one only by measuring the thickness with a caliper - it should be 2.437–2.487 mm (0.127 mm more).
By the way, in recent years, a yellow bronze-graphite ring has been installed in the engines of all VAZ cars, including Samara, 2110 and Oka - it secures the crankshaft from the flywheel side.
How to replace bearings without removing the engine?
To replace the liners successfully, it is not at all necessary to dismantle the motor. If you are assured that it is impossible to get to them without removing and pulling the engine out of the hood, urgently change the car service center. But be sure to take into account one condition - the crankshaft (CV) should not be worn out. Otherwise, you won’t be able to do without removing the engine and completely disassembling it!
Without dismantling the power unit, it is easier to change the connecting rod bearings; it is more difficult to change the main bearings. For the latter case, you need to loosen the fastenings and release the crankshaft by 10-15 cm. Although there is another method, adopted by our grandfathers from ship motorists. The main bearings are pushed out using a soft rivet or bolt, which is inserted into the desired lubrication passage and rotated clockwise. The main thing is that the size of the aluminum insert should be slightly smaller than the hole and not scratch the crankshaft.
After removing the half rings, it is imperative to evaluate their condition. If there are no visible scuffs or damage, you can get by with a simple replacement. However, if it is very worn, polishing the HF is mandatory. Therefore, you will have to remove it from the mounts, and to do this, pull out the motor.
More information about condition assessment:
- pits or pockets - fatigue wear;
- scratches and ingrained dirt - low-quality motor oil;
- worn surface - insufficient amount of lubricant;
- chamfers on the edge - taper of the necks.
What are crankshaft thrust half rings?
The engine crankshaft consists of individual elements that cannot be connected together. This design creates additional problems with its placement in the internal part of the block and contributes to the appearance of axial play. If the play increases, the crankshaft will begin to move around the engine and may disrupt the operation of the connecting rods, which will lead to accelerated wear of the entire piston group.
In addition, the design of some engines is designed in such a way that the freely moving crankshaft can touch any other element of the engine compartment with its pulley. An example is a radiator - sensitive to external influences. Damage to the radiator will immediately cause coolant to leak quickly, which will be an additional expense when repairing the car.
To reduce or eliminate the possibility of movement of the crankshaft, special half rings began to be used on engines. They are made of metal and are installed between the block support and the crankshaft cheeks. In this way, the crankshaft is fixed in a horizontal plane and avoids any movement.
Crankshaft repair
Repairing or replacing a crankshaft is a labor-intensive process. As a rule, it requires almost complete disassembly of the engine, inspection and troubleshooting of all its components and mechanisms. The crankshaft is removed and axial runout is measured. In case of acceptable wear, the surfaces of the crankshaft journals and connecting rods are ground to fit the repair dimensions of the bearings. The bed with workings is also subject to mechanical processing with “one installation” on a special machine. Boring the crankshaft allows you to install the liner of the next repair size.
Grooving the crankshaft bed Grinding the crankshaft
Neck sizes have repair tolerances. Simply grinding the crankshaft will not help if the wear or damage is too severe. The crankshaft is not a cheap part, and if we are talking, for example, about large-sized agricultural machinery, the amount will be impressive. Even heavily worn friction surfaces can be restored. The thickness of the excavation is compensated by surfacing using submerged arc welding, plasma spraying of hard alloys, thermal gas spraying, etc. Then the crankshaft is ground and “brought” to the required repair dimensions. This is a technologically complex process, it is better to entrust it to specialists.
Automated gas-thermal spraying of crankshaft journals and balancers
High-quality restoration and grinding of the crankshaft can ensure 100% of its service life. It should be taken into account that with an increase in the repair size, the crankshaft may move from its factory seat. Precise installation of the crankshaft with a selection of bearings will be required. A crankshaft with critical damage or axial bending will have to be replaced.
How to check the crankshaft? Experienced motorists can detect the characteristic knocking sound of the crankshaft by ear using a medical stethoscope. During scheduled maintenance, you can remove the pan, visually inspect the crankshaft for cracks and chips, and use a feeler gauge to check the gaps between the half rings.
Measuring axial displacements of the crankshaft using a feeler gauge Set of measuring steel plates of feeler gauges
An increased content of metal shavings in the filter and pan indicates wear of the friction pairs. In such cases, it is urgent to find the reason for the formation of such chips.
The diameter of the crankshaft journals can be measured with a regular micrometer. The parameters of unbalance, runout and axial play of crankshafts are determined using special indicators. To do this, you need to either place the shaft on a special stand or machine, or install an indicator with a magnetic stand on the engine block. The measurement is performed while rotating.
A stand with a dial indicator installed for measuring crankshaft runouts. A dial indicator installed on the engine block.
To determine the gap between the crankshaft journals and the bearings, a calibrated plastic wire and a paper template with a special scale are used. The method is quite simple and accessible. A piece of wire is placed on the degreased surface of the crankshaft journal. To fix it, you can use a small amount of thick lubricant. The journal is then covered with a bearing and a cap. The covers are tightened, the wire inside is crushed on the plane of the neck (threaded connections must be tightened with a torque wrench). Unscrew the bolts and remove the cover. Next, it remains to measure the width of the flattened strip with a template. The value will correspond to a fairly accurate gap value.
Measuring the gaps between the journal and the bearing using a calibrated wire and a template
Why do you need to replace half rings and when is it necessary?
Half rings are consumables and are subject to wear. When they wear out, the crankshaft begins to move horizontally, which accelerates the wear of the half rings. Ultimately, the half rings become completely unusable (erased) and the crankshaft loses all fixation, creating a threat, first of all, to the entire piston group. In addition, the crankshaft can grind the cover that covers it and render the support bearings unusable. These parts are cast together with the block, which indicates a high probability of replacing the latter. To prevent this, it is necessary to carry out timely diagnostics of faults and, if necessary, change the half rings.
Diagnostics are performed after 120 thousand kilometers and begin with an external inspection of the engine. The presence of an oil leak is the first, but not the main sign. The fact is that when play appears, the crankshaft can squeeze out the oil seal, which will very quickly lead to a leak of engine oil. However, oil leaks do not always occur precisely for this reason. It is quite possible that the oil seal simply became unusable due to natural wear and tear.
Take the installation tool and, resting it on the generator, try to shake the crankshaft pulley. The permissible axial play should not exceed 0.35 mm. Also, have someone press the clutch pedal. If the crankshaft is pushed forward, then this is the most obvious sign of a malfunction of the crankshaft half rings.
Before carrying out the replacement, purchase new engine oil, as this may be an excellent opportunity to replace it, the oil pan gasket and the half rings themselves.
When choosing half rings, consider the make and model of the car, as well as the engine characteristics. A set of half rings are made individually for engines of different volume and power.
Work order
1. Place the car on a pit or overpass and prevent it from moving.
2. Unscrew the engine protection and remove it. Drain the engine oil.
3. Unscrew all bolts securing the oil pan and remove it along with the gasket.
4. Unscrew the bolts for securing the main bearing cap and remove it.
5. Install the new half rings so that its ends rest against the ends of the old one. To make the task easier, move the shaft with a screwdriver.
6. Push out the old element using the new one. The new part should fit in absolutely freely.
That's all. This completes the replacement of the crankshaft half rings. Reassemble all components in reverse order. When installing a new pan gasket, be sure to treat it with a sealant that can withstand high temperatures. After assembly, fill in new oil.
Source
Signs of a leaking crankshaft oil seal
The main sign by which ordinary VAZ 2114 owners and illiterate servicemen “sentence” oil seals is an oil leak. Indeed, an oily sump and block on the timing side are a sign of a front oil seal leak, and leaks in the flywheel area are a sign of a rear seal leak. But there are two “buts”.
Signs of oil leakage through the front oil seal
Firstly, oil leaks can be caused by other reasons, and, secondly, leaking oil seals can be a consequence of a more serious malfunction.
Common causes of oil leaks around the seals include:
- Oil pressure sensor or oil filter bracket: Oil may drip from them onto the drive and scatter around.
- Leaking from the oil channel plug under the cylinder head casing.
- Leaking from the camshaft seal.
- A special feature of the VAZ 2114 with an 8-valve engine: the hole of the first manifold stud on the front side of the engine passes through the oil channel. When replacing the gasket on the inlet, this pin must be lubricated with sealant, otherwise a leak will occur.
Replacing crankshaft half rings
The crank support of the connecting rods, which creates torque, is not a flat or single piece, but several individual elements connected together. Due to this design, strong axial play appears inside the block, which can disrupt the operation of the motor. To eliminate it and stabilize the rotation, the designers came up with the idea of locking the device with special sliding bearings. The crankshaft half rings , as they are called, take on heavy loads, so they wear out soon.
When is it necessary to replace crankshaft bearings?
The HF engine experiences heavy loads. Just look at the vibration on the axis, which invariably occurs during the operation of the crankshaft. It is clear that the sliding bearings also suffer, because they take the blow first.
- Physical wear is the main reason when an engine liner needs to be replaced. The surfaces of parts wear out, backlash and vibration increase. Naturally, in such conditions the engine is in danger of knocking.
- Rotation is the second reason. More details about this are written below.
Thus, replacement of liners is required in several cases. Problems can be judged by various signs. For example, by the absence or presence of abrasive inside the lubricant. Also, a symptom of half-ring wear is low interference when installing the connecting rod cap.
Regarding factors that lead to wear or turning:
- dirty or too viscous lubricant - impurities and abrasive particles reduce the properties of the lubricant, and in general its cleanliness is one of the key rules of prevention;
- constant overload of the internal combustion engine - you cannot drive for a long time at high speeds, from time to time you need to pause, slowing down to 80-90 km/h;
- incorrect installation of half rings during a previous repair - as a rule, this occurs due to weak tension (insufficient clamping torque), so tightening must be carried out using a torque wrench.
Purpose, where they are located
Half rings or crescents, washers - they are called differently, they have a special purpose. They keep the crankshaft from axial displacement or longitudinal play. Essentially, these are special type bearings that establish the required clearance.
In a classic 4-cylinder engine, the crankshaft has a minimum of 5 bearing points or journals. Their contact area is quite large. This increases the friction force, which becomes even greater when the cheeks touch the supports. To minimize structural imbalance, the necks are made wider than the supports. But such a solution causes longitudinal play, which is a priori unacceptable, since the crankshaft parts begin to fail prematurely as a result.
Metal stoppers in the shape of a crescent are precisely the most effective solution that allows you to maintain the classic design, while eliminating axial displacement. This bearing differs from the standard liner in the presence of side stops or shoulders. The surfaces of the areas where the crankshaft comes into contact with them are also modified. In particular, they are made to fit a ring.
To reduce longitudinal play, washers are also suitable - one-piece rings that are installed strictly in a place specially designed for them. However, such locking elements are rarely used, since lock bearings adhere more tightly to surfaces, wear out more evenly, and are easier to install and remove. And the most important thing is that the washer is installed only on the rear main journal, and the crescents can be placed on any journal.
In what cases is replacement necessary?
Half rings are consumable material. When worn out they need to be replaced. Otherwise, the gradually increasing horizontal play of the connecting rod support will further accelerate the breakdown. The parts will finally wear out and stop performing their functions. And this already threatens breakdowns in the piston group. It also happens that the cylinder block breaks due to strong play in the cranked part. Therefore, replacement of the crankshaft half rings should be carried out on time as soon as the symptom appears.
The second danger of wear is that without lock washers, the shaft will begin to grind the support cover, which is cast together with the BC. Noticeable damage to the block or cover is an additional but mandatory repair. Therefore, it is so important to promptly repair damage, or rather wear, of locking parts. For example, when grinding adjacent zones of the BC, the installation of crankshaft half rings will end with their rapid abrasion. It’s good that not very noticeable damage to the necks can be eliminated by boring, and the seat can be removed by cleaning with a scraper. The large axial gap can be compensated for by repair washers, the thickness of which is 0.127 mm greater than the standard ones.
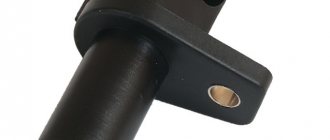
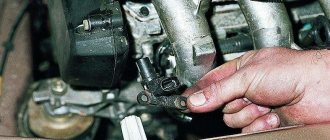
How to replace the VAZ 2114 phase sensor yourself.
But replacing it is a very easy job. It is located at the end of the cylinder head next to the air filter.
Replacing the phase sensor begins by disconnecting the power from the battery. In this case, the control unit memory will be reset.
If this is not done, it will continue to operate in the same mode as with a faulty phase sensor. Normal operation will begin after a few engine starts.
The tool that will be needed is just a ten key and sealant. Next, disconnect the wires from the phase sensor and remove it using a key.
The new sensor needs to be coated with sealant, the layer should be small, and it should be left for about five minutes before installation. We install it on the seat and connect the wires.
Next, connect the battery, start the engine and see if the check engine light comes on. If it no longer lights up, then the sensor is installed correctly.
That's all the work was done, as they say, for ten minutes. Yes, the price of the sensor itself is around $15, depending on the region.
Fault diagnosis
Diagnosis of thrust parts is usually carried out after the 120,000th mileage of the engine. It consists of three steps.
- Visually inspect the internal combustion engine for oil leaks. If they are present, this is already an indirect sign. A poorly fixed crankshaft squeezes out the oil seal responsible for sealing. And the lubricant begins to flow out.
- Loosen the generator pulley with a mounting blade, resting one end of the tool against the body. The permissible axial play should not exceed 0.35 mm.
- Press the clutch pedal from inside the car. The crankshaft should not move forward. Otherwise, this is the surest sign of breakage of the thrust half-rings.
Axial movements of the crankshaft cause a loud, irregular knock, which experienced mechanics can distinguish.
Step-by-step procedure for removing the crankshaft pulley on a VAZ-2114
Before you begin dismantling the crankshaft pulley, you need to unscrew some components and parts on the VAZ-2114.
- First of all, we park the car and ensure it is stationary.
- Next, loosen the generator belt tension bolt and completely remove the locking bolt.
All bolts are indicated by red arrows.
Insert the screwdriver into the hole indicated by the mark.
When the flywheel is secured, you can proceed to dismantling the crankshaft pulley.
The marks are indicated by red arrows.
This work should be carried out very carefully.
It is more convenient to pry off the crankshaft using a pry bar.
Causes of wear, loss of half rings
It happens that when disassembling the engine, thrust washers are found in the crankcase pan. On the crankshaft, in the place where these parts should be located, wear is noticeable. Parts may fall out due to the following:
- recently carried out a major overhaul of the engine, without following the sequence of installation of the elements;
- after assembly, the main support covers are mixed up;
- The rear semi-ring is severely worn out because the metal-ceramic and steel-aluminum types of parts were installed incorrectly in places - this also happens when the quality of the thrust half-moons is poor, the material of which does not correspond to the technical documentation.
In general, the main wear of the half rings occurs when the clutch is squeezed out. Especially on a cold engine in winter and sitting for a long time under a traffic light with the clutch depressed. Thus, the cause of wear may be due to insufficient qualifications of the car driver.
The fact is that squeezing the clutch transfers the entire load from the fork to the corresponding crankshaft half-ring. There are even drivers with extensive experience who constantly keep their foot on the clutch. But for this there is a special platform where the left leg should rest.
Why do you need a phase sensor (PF)?
Before talking about repairs, you need to find out what this sensor is needed for. It determines the operating cycles of the internal combustion engine. The camshaft cams drive the valves, and the DF determines which valve is open.
This is an integrated control unit, that is, it includes a sensitive element and a signal conversion system. There is a Hall element there - data is taken based on changes in the magnetic field.
The converter has a bridge circuit, a converter block, and an output stage. The work is that the DF determines the intake and exhaust phases of the 1st cylinder.
For carburetor engines it is not needed because the spark is supplied at the moment of compression and at the end of the exhaust gases. DPKV is sufficient for this.
Roughly speaking, the VAZ 2114, 2115 phase sensor functions as a fuel injection system. If it breaks down, the work of sparking falls on the crankshaft position sensor. The designs that are used on 16-valve cars differ from eight-valve ones.
Now let's try to explain in simple words how the phased injection system works. It turns out something like this: the DF gives a signal to the electronic engine control system (ECM), and it, in turn, gives a command to inject fuel, while the intake valve begins to open, and after it has opened, air is sucked in and mixed with gasoline to form a mixture.
When not running, fuel can be supplied to two cylinders simultaneously. If there is a breakdown, the on-board computer displays error 0340 or 0343, which indicates a faulty phase sensor.
The following signs may also be observed:
- When the starter rotates for four or five seconds, the engine starts and the check engine light comes on. This means that the ECU is waiting for a signal from the DF and, not receiving it, writes off the data from the crankshaft position sensor.
- Fuel consumption increases quite decently, by 15 percent.
- Self-diagnosis mode does not work.
- Engine dynamics drop.
Phase sensor malfunctions are difficult to determine at home. So its diagnosis needs to be carried out at special service stations, since the equipment for its diagnosis is quite expensive.
Required tools + consumables
Mandatory tools that will be needed during the work:
- set of wrenches and sockets;
- set of screwdrivers;
- torque wrench for proper tightening of bolts;
- a flat feeler gauge for measuring axial play, or even better, a special indicator with a scale;
- clean rag.
- new half rings;
- pan gasket;
- sealant.
Replacing the support half-rings is usually accompanied by updating the engine oil, installing a new oil pan gasket and other related operations.
There are three sizes of thrust washers available on the market. Standard at 2.31, first repair and second repair (2.437 and 2.56, respectively). Therefore, you must first clarify which dimensions are suitable for your car’s engine. Typically, parts of standard or nominal sizes are installed on new or slightly worn motors. And repair ones, with increased thickness - to compensate for worn parts of the support and shaft, that is, for old and fairly worn-out internal combustion engines.
Which half rings are better, types
Parts of different materials are usually installed standardly - on the timing side there is a steel-aluminum or bronze ring, and on the flywheel side - metal-ceramic (yellow), bronze, copper. As a rule, the metal-ceramic version is more common on sale. If the product is original production, then one thrust washer is covered with an anti-friction layer.
Experts recommend installing bronze products. But the choice depends solely on the preferences of the owner himself. The main thing is to pay attention to the slots that should be on the parts. They are designed to allow free flow of oil to the crankshaft.
And here is some more information on the material of manufacture:
- solid bronze ones - do not need a protective coating;
- steel-aluminium, coated with aluminum alloy;
- metal-ceramic with bronze-graphite coating.
The choice of product should also imply an obligatory nuance - not only the thrust element, but also the surface of the crankshaft is subject to wear during engine operation. Therefore, it is extremely important to be able to select the correct stopper size, type and serial number. It is imperative that the parts fully meet the standard requirements and are covered with a special protective layer.
As a rule, the exact size is determined before the actual replacement process. However, this can only be done by a specialist who has been able, based on indirect evidence, to create a picture of what reigns inside the block. In other words, how worn are the mounting sockets, and what size washers should be installed. Therefore, under normal conditions, when the installation is done by hand, you have to determine this during the work. If, after installing the half-rings, a measurement with a flat feeler gauge shows a play value higher than the standard - 0.06-0.26 mm or 0.35 mm, the locking elements must be changed one size higher.
Functionality check
If you decide to check the serviceability of the sensor yourself, treat this procedure responsibly and carry it out correctly. On a VAZ 2114 car, the crankshaft sensor is checked in several ways.
- Using a multimeter. The serviceability of the induction sensor can be assessed by the resistance of its coil. In a working product it is 500-700 Ohms.
- On the multimeter, set the measurement limit to 200 millivolts, connect the probes to the terminals (where the standard wires are connected). Pass a steel object several times in front of the core. The working sensor will “see” the metal and there will be voltage spikes on the multimeter display. If there are none, replace the part.
- But the most accurate results when checking are provided by an oscilloscope. When using this device, one hundred percent results can be guaranteed; it reads all the information from the sensor while the engine is running. It can be observed on the device screen. The engine, during tests, should operate at different speeds. They start with eight hundred revolutions, then two thousand, and raise it to six thousand. If the lines (on the device screen) are of different lengths, you need to look for the cause of the malfunction. Remove dirt, check the pulley for defects, and so on.
Oscillogram of a working sensor
It should be noted that these verification methods work on all VAZ models with DPKV. If you have any doubts about your own abilities, then contact the service. Thanks to specialized equipment, the result will be more accurate, and the check will not take much time.
Remove from the engine
The malfunction has been identified. Let's start eliminating it. Let's look at this operation using the VAZ 2114 as an example.
Turn off the car ignition. We open the hood, fix it firmly, and visually determine where the VAZ 2114 crankshaft sensor is located. Before removal, it is advisable to remove all contaminants in the area where it is located. Next, carefully remove the block with wires from the connector.
Using a “10” wrench, unscrew the fastening bolt.
Let's take it out.
After dismantling the sensor, it is advisable to check the generator drive toothed pulley for defects. Since its damage can introduce errors into the operation of the entire system.
After we are convinced that there are no defects of any kind, we proceed to assembly. The seat must be clean. We install the new part in place and fasten it with a bolt (the tightening torque should not exceed 8-12 Newton meters). In this case we use adjusting washers. They are sold complete with a new sensor. Thus, using a special probe, we ensure that the gap between the pulley and the sensor core is one millimeter. The permissible error is 0.41 millimeters in the larger direction.
We connect the block with wires into place.
After installation and checking the gap, we try to start the engine. With a confident start and stable operation of the engine, we can say that the repair was carried out successfully.
Despite the fact that the breakdown of the synchronizing sensor is not frequent, knowledge of its symptoms and consequences, as well as methods of elimination, will be useful to the car enthusiast.
New sensors are available in almost any auto parts store. The price of DPKV can vary between 200-400 rubles. How much a VAZ 2114 crankshaft sensor costs depends on your region, the location of large spare parts stores nearby (usually cheaper there) and the greed of the seller. Can be ordered in the online store. When purchasing, take the old one with you so as not to make a mistake in choosing a model. To avoid defects and repeated purchases, it is advisable to purchase from well-established sellers.
Welcome, friends, to the DIY car repair website. The VAZ 2114, VAZ 2115 phase sensor is one of the main sensors with which the controller calculates engine operating parameters on Russian-made injection engines.
I would like to immediately say that DF is also found on other VAZ brands, such as Ten, Kalina, Priora, and so on, but in this article we are looking at its description using the example of these models.
This sensor detects the position of the camshaft. It is also called DPRV. The DF is installed on 16-valve VAZ units and on eight-valve ones with EURO-3 toxicity standards, since it saves fuel.
For history buffs, phase sensors began to be installed in mass production at VAZ factories in 2007.
Replacement process
To correctly carry out the replacement, you must act strictly according to the instructions, performing the steps sequentially:
- put the car on a pit or overpass, stop the wheels;
- remove the engine protection;
- drain the engine oil;
- unscrew the bolts and remove the crankcase pan along with the gasket - it is held on by 16 fasteners;
- pull out the middle main bearing cover - it is secured with bolts;
- install new washers, lubricated with a small amount of engine oil, with grooves towards the thrust surfaces of the crankshaft, pushing out the old half rings with them;
- put the cover back, tighten with a torque wrench the torque corresponding to this unit (given in the technical literature for each engine);
- check the axial clearance of the shaft with a flat feeler gauge - it should not exceed 0.06-0.26 mm.
To facilitate installation, you need to move the crankshaft with a screwdriver and at the same time rest the new half-rings with their ends against the old parts. This way you can squeeze them out faster, and the spare parts of the repair kit will fit into place.
When installing the half rings, their slots or recesses should face inward, towards the crankshaft.
Replacing oil seals
If the crankshaft oil seals have been squeezed out due to axial displacement, both will have to be replaced with new ones. One is installed on the pulley side, the second on the flywheel. It is extremely important to replace the first seal, which is on the timing side. Because oil will leak out and get on the belt. And this is a serious risk of slipping one or several teeth or even worse - breaking. What will happen is known: it will be necessary to change the valves, since the rods will be bent or broken when they meet the pistons.
The front oil seal can be replaced from the gas distribution mechanism side. It will be necessary to remove the protective casing, belt, and crankshaft toothed pulley. Then remove the cuff and install a new one. But the rear oil seal is more difficult to change. It is necessary to dismantle the gearbox and clutch. After removing the cuff, thoroughly clean the seat, and only then install a new product.
It is imperative to make sure that the half rings are assembled and installed correctly at the final stage. To do this, the crankshaft is turned by hand - rotation should continue automatically (0.5 turns), be smooth, without any jamming.
Source