About the oil seal
The oil seal is one of the most common and long-invented sealing devices for moving mechanisms. This part is widely used due to its simple design.
It should be noted that the oil seals used in VAZ cars have a direction and need to be installed only in the designated direction of shaft rotation.
Device
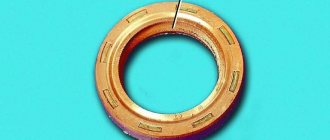
The oil seal is made of special rubber, which does not lose its properties when in contact with oil. This kind of rubber is called oil-resistant .
Structurally, the oil seal is similar to a ring; inside the oil seal there is a so-called “box”. Which, under the influence of oil pressure, is pressed against the working part of the shaft and creates a tight seal.
The oil seal also has a spring that presses its working part against the shaft ensuring tightness.
Dimensions of the oil seal distributed by VAZ
The dimensions of the oil seal installed on the camshaft of VAZ cars are the same only for front-wheel drive Lada cars. It should also be noted that the dimensions of the oil seal do not differ depending on the type of engine, that is, if the engine has 16 valves, then the oil seals for each camshaft will be the same.
Oil seal size: 28*42*7
Where is
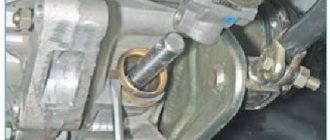
The oil seal is located under the timing belt boot, behind the camshaft gear.
The oil seal must be replaced if engine oil leaks through it. This leak can lead to oil getting onto the timing belt, which is strictly prohibited. Oil can damage the belt and lead to its breakage, which on 16-valve engines can lead to valve bending.
Replacing the oil seal
The replacement process is simple, but quite long. To carry out the work, it is necessary to remove the timing belt and camshaft gears, and in models with a 16-valve engine, it is necessary to remove the timing rollers and the rear part of the timing boot cover.
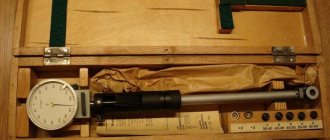
Required tool:
Step-by-step replacement instructions
- The first thing you need to do is remove the timing belt. How to do this can be studied in detail in our article “Replacing the Timing Belt”. It is first recommended to loosen the camshaft pulley mounting bolt with a 17mm wrench, since this will be much more difficult to do after removing the belt.
- We wipe the seat and shaft from debris.
- We install a new oil seal, lubricating the shaft with clean engine oil. This will ensure easier sliding and movement of the oil seal along the shaft.
As a mandrel, you can use the head from the tool kit; you need to select the head in such a way that part of it rests against the metal part of the oil seal, but not against the working part.
- Using a hammer, lightly install the oil seal into its place.
- The replacement is completed, we carry out the assembly process in reverse order.
Tools
It is worth paying attention to preparing all the necessary tools. This will somewhat simplify and speed up the repair process. So, you will need:
- Set of heads and knobs;
- Slotted screwdriver;
- Spanners;
- Wheel chocks;
- Mandrel for oil seal.
Before starting work, be sure to set the car to the handbrake; wheel chocks will also come in handy.
This will improve work safety. Be sure to keep in mind that to replace the rear oil seal on the crankshaft, you will need to remove the gearbox. It’s better to do this in a pit, it will be much more convenient. If this is not possible, then you can simply make simple entries to gain access to the bottom of the car.
Oil seals
What is an oil seal? This page showed oil seals by size for VAZ cars and catalog numbers, role and purpose...
Greetings to all readers on the RtiIvaz.ru blog. The page shows photographs of crankshaft oil seals as a set for the gearbox of a family of classic rear-wheel drive cars, as well as gearboxes of front-wheel drive eights and a dozen VAZs. The cuff of the rear gearbox, also called the rear axle, is installed in rear-wheel drive “Classic” cars.
In fact, there are many of them different in shape, size, and purpose. Some hold oil, antifreeze or antifreeze, others hold air, water pressure, all are designed to protect car parts from dirt, dust and other factors.
For example, the crankshaft seal and the camshaft keep oil from flowing between the joints of the camshaft journal and the seat of the engine block. The same role is played by the cuffs of the gearbox, gearbox, and axle shaft. The hub is protected from dirty water and dust from leaking antifreeze or antifreeze into the pump.
Where is the camshaft oil seal located?
In order to see it, firstly, you will have to remove the timing cover (it is easy to remove, we will tell you in more detail a little later) and the camshaft pulley as well, but in principle you don’t have to remove the pulley, but in this case the oil seal will be difficult to see (If replacing the oil seal, the pulley must be replaced), therefore, in the photo we have given below, this pulley has already been removed, and the oil seal itself is indicated for clarity by a red arrow.
Note! In general, from time to time it is recommended to remove this cover and look at the condition of the timing belt, firstly, you can also pay attention to the condition of the oil seal (True, you won’t be able to look at the condition of the oil seal, because the pulley is in the way there, but you can still see if there is It won’t be difficult for you to leak oil through the oil seal or not, so remove this cover more often and pay attention to whether the timing mechanism is dirty in the oil; if it is dirty, then change the oil seal)!
Step-by-step instruction
If your engine is knocking and you decide to replace the camshaft, then prepare everything you need in advance. It is difficult to carry out this work without relevant experience, so it is good if you are assisted by a more experienced partner.
Required Tools
- a set of keys;
- Screwdriver Set;
- torque wrench;
Torque wrench
- sealant.
Stages of work
- The first step is to remove the camshaft pulley VAZ 2114 8 cl.
- We take out the pulley key located in the camshaft groove.
- Unscrew the nut that secures the rear cover of the timing belt.
- Unscrew the nuts that secure the bracket to the cable.
- Having loosened the screws of the hose clamps responsible for ventilation of the crankcase gases, we remove them.
- Having loosened the clamp of the hose through which the crankcase gases are ventilated, remove it.
- After unscrewing the nuts, remove the valve cover.
- We remove the gasket.
- After unscrewing the nuts and bolts, remove the plug.
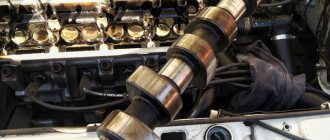
- In several circles (to reduce the spring pressure), unscrew the 10 nuts securing the camshaft bearing housing.
- We remove the camshaft housings VAZ 2114 8 cl.
- After the rear timing belt drive cover is removed from the cylinder head, remove the camshaft.
- Remove the camshaft oil seal.
- Before installing a new shaft, it is necessary to clean the contacting surfaces of the cylinder head and bearings if any sealant or grease remains on them.
- Lubricate the bearing journals and cams with fresh grease.
- We place the shaft in the cylinder head supports so that the cams of the 1st cylinder are oriented upward.
- We apply sealant to the cylinder head planes that come into contact with the bearings.
- We install the bearing housings and tighten the nuts in 2 circles.
- First, we do not completely tighten them as shown in the photo until the bearing housing and the cylinder head are in contact.
- Going in the same sequence around the second circle, we tighten the nuts to a torque of 2.2 kgf/m.
- Remove the leaked sealant.
- We insert the oil seal.
- We install the camshaft toothed pulley and belt drive.
- We turn the crankshaft clockwise to place the same alignment marks on the camshaft pulley and the rear cover of the timing belt drive.
- Rotate the crankshaft about fifty degrees (2-3 teeth on the camshaft pulley).
- Using a feeler gauge, check the gaps at the 1st and 3rd camshaft cams.
- The distance between the cams and washers should be 0.20 millimeters for the intake valves and 0.35 millimeters for the exhaust valves. The error should not exceed 0.05 mm.
- After adjusting the remaining valves, the work can be considered completed.
When do you need to change the camshaft seal?
If you start to notice oil leaks through the cap (Although this is unlikely, but still if a lot of oil leaks through the oil seal, it will drip onto the asphalt, so look under the car from time to time, but still do not remove any you won’t really see any leaks), and also if you notice a high oil consumption compared to what it was before, then you need to check the condition of all oil seals (But we don’t look at all oil seals, we only look at one) and if through this camshaft oil seal you If you see that oil is leaking and leaking out, then it needs to be replaced immediately.
Causes and symptoms of malfunction
It is believed that the planned replacement of the crankshaft sealing rings on the VAZ 2114 should be carried out after three years. But you can change it earlier if an oil leak appears, for example, after the engine overheats. Causes of oil seal destruction:
- natural wear and tear during operation;
- improper installation may cause cracks to appear on the surface of the ring;
- mechanical damage;
- low-quality consumables - fake.
If oil consumption has increased due to the fact that it comes out and at the same time traces of oil are observed on the front part of the engine, then the front crankshaft seal needs to be changed. The need to replace the rear one can be determined by clutch slipping, which is caused by oil getting on the basket and clutch release plate.
Replacing the camshaft oil seal step by step with photos
Having prepared the necessary tools, you can get to work.
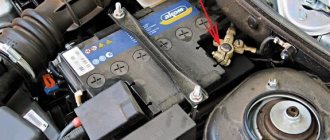
- First of all, disconnect the negative terminal from the battery on your VAZ 2114.
- Move the piston of the first cylinder to top dead center.
- Remove the pulley from the camshaft.
- The key is then removed from the camshaft.
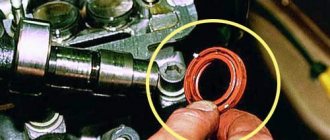
- The seal is easy enough to install. You just need to pry it off with a flat screwdriver.
- Before installing the new device, pay attention to the inner edges on both sides. They should be free of all kinds of damage, dents, rubber sagging, etc.
- The working edge must be lubricated with simple motor oil. This will allow the element to easily settle into a new place and also protect it from premature wear.
- If problems arise with the reverse pressing of the oil seal, its seating edge can be processed with a file or fine sandpaper.
- Inside the block head, the element is installed with its working edge. A regular wooden stick will help you carefully place the element in its place on the camshaft. Just do not use metal elements for pressing.
- It should be pressed in until it stops.
- Perform the assembly reassembly procedure.
- The camshaft pulley is installed as a protruding element of the hub in relation to the power unit. Be sure to adjust the camshaft belt tension level.
At this point, the installation procedure for the camshaft oil seal can be considered complete. The most difficult stage is rightly considered to be the disassembly stage. Replacement is quite simple. Every VAZ 2114 owner is able to cope with such a task with his own hands.
Video: expert advice on replacement on the 14th model
- When trying to put a new oil seal in place using a mandrel and a hammer, in no case should you hit it too hard, as the mandrel will simply cut the oil seal.
- Before reinstalling the oil pump, the outer edge of the new oil seal must be generously lubricated with oil.
- Before installing a new gasket under the oil pump, it is necessary to apply a thin and even layer of graphite grease to it on both sides.
- Before installing the pan in place, its gasket must be thoroughly wiped with a rag. After this, a thin layer of sealant should be applied to it.
- motorltd.ru
- nadomkrat.ru
- avtozam.com
- avtozam.ru