Why do you need DPKV?
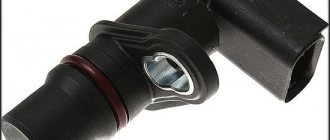
The crankshaft position sensor is necessary to determine the location of the pistons, namely when they are at TDC. This is necessary to supply a spark to the combustion chamber and ignite the fuel-air mixture.
The sensor operates on the Hall effect. The DPKV is connected to the crankshaft pulley, which has a crown with one missing tooth and helps determine the TDC sensor.
There is a magnet inside the sensor, which is a sensitive element and helps to read readings from the pulley. As soon as the magnetic connection between the sensor and the pulley is lost and the ECU receives a signal that it is necessary to apply a spark to the cylinder, which is now at TDC.
Kinds
Depending on the design and operating principle, there are three main types of crankshaft sensors. Let's look at the features of each of them in the table.
| Sensor type | Design Feature | How does it work |
| Inductive | Inside it is a metal rod with a magnet at the outer end. It magnetizes the rod. There is a copper winding around the rod, and its ends are connectors for connecting wiring | When a steel object is near the rod, signals appear on the terminals |
| With Hall sensor | The internal design of this type of sensor includes a Hall sensor | When a metal object approaches it, the state changes from zero to one and vice versa |
| Frequency | The design is based on reading pulse frequencies that are generated by the ECU | Pulses of a certain frequency are supplied to the sensor. When you bring a metal object, the generation frequency changes. By changing frequencies, the DC determines the presence of objects near it. The reaction occurs due to the metal teeth of the crankshaft crown |
Reasons for failure
Sensor failures can be attributed to several reasons due to which the sensor most often fails.
- Time factor;
- Mechanical damage;
- Damage to the power circuit;
- Magnet contamination;
- Pulley damage;
Now more about each reason.
- Time factor. The main reason for the failure of the DPKV is its aging; the sensor is located very low, which quite often exposes it to humidity, dust and dirt. Such impacts damage the sensor connector and its magnet.
- Mechanical damage. As mentioned above, the sensor is located very low, which exposes it not only to contamination, but also to damage. When driving on country roads, stones or the like may enter the sensor. items. The sensor can also fail due to damage to the crankshaft pulley.
- Damage to the power supply. A special shielded wire is used to power the sensor, which helps remove interference generated during engine operation. Quite often, the sensor’s power cable becomes frayed or its insulation dries out over time, which leads to interference in the power circuit or even to its breakage.
- Magnet contamination. A magnet tends to attract any metal shavings, and when working with rubbing parts, these shavings are inevitable. Quite often, a large amount of metal shavings adheres to the sensitive part of the sensor, which dulls the sensitivity of the sensor.
- Pulley failure. The pulley is involved in the operation of the sensor and its curvature or separation from the damper can lead to improper operation of the sensor.
Symptoms of a problem
Your car may indicate in different ways that there is a problem with the DPKV or just the DC. Let's name the main ones.
- It is not uncommon for dirt to form on the end of the sensor, causing the device to transmit information incorrectly.
- At idle, the engine behaves unstable.
- The power level of the power unit drops noticeably.
- The revolutions can spontaneously increase or, conversely, fall.
- During acceleration, dips are noticeable.
- When you turn on the ignition, problems are felt and it can be difficult to start the car.
If you discover such problems, most likely you will have to replace the DPKV. In addition, we are talking about a consumable that will not cost you a fabulous amount of money.
This crankshaft position meter cannot be repaired.
Additionally, we advise you to pay attention to the error codes that appear. Codes with designations 0336 and 0335 indicate that a wire break may have occurred near the connector. This problem can be easily determined by visual inspection.
Location
Many VAZ 2114 owners prefer to carry out repairs with their own hands. This allows you to save significantly.
But in order to replace the DPKV, you need to find out exactly where it is located.
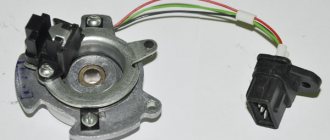
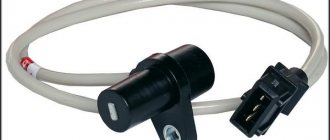
The desired object is located on the engine. To be more precise, on the oil pump in the immediate vicinity of the generator drive pulley. Look for the sensor on the pump cover. Fastening is carried out with one bolt.
DPKV location
Reasons for failure
There are several main reasons why the DPKV may eventually fail and lose its functionality.
- Physical deformation of the body has occurred. It is made of plastic, so such breakdowns are not uncommon.
- A short circuit may occur between the turns of the winding, which changes the generation frequency, which is transmitted to the electronic control unit. Such a breakdown is typical if a frequency-type DC is used.
- Simple wear or breakage of pulley teeth is another common reason why the crankshaft sensor needs to be replaced.
Pulley failure
The pulley affects the operation of the sensor and, therefore, the operation of the entire engine as a whole. Its curvature can lead to incorrect readings and, as a result, improper operation of the engine.
There are two types of pulleys: cast and with damper. A cast pulley is more reliable and durable, but the second type of pulley with a damper rubber insert is often damaged.
One of the most common failures of this pulley is the rotation of the crown relative to the crankshaft. Such a breakdown leads to displacement of the crown and incorrect determination of TDC by the sensor.
Using an Oscilloscope
This method is the most reliable and with its help you can be 100% sure of the current state of the sensor. To do this, you need to turn on the oscilloscope to a limit of 10 ms and an amplitude of 1 V/div. And try to start the engine with the starter. In this case, on a well-charged battery, the engine should be accelerated by the starter to 800 rpm, this will correspond to a frequency of 200 Hz and a corresponding period of 5 ms/div. You should observe impulses, one period of which occupies two cells.
Examination
The check must be carried out both externally and using diagnostic devices. Sometimes just a visual inspection is enough to determine the problem, so let's start there.
Sensor check
This is done by checking the sensing element for contamination. If the sensor magnet has a lot of chips on it, this indicates that it is not working properly. The sensor must be cleaned and reinstalled.
Next, the connector and power circuit are checked and there should be no traces of carbon deposits, rust or other types of damage.
Pulley check
The pulley must be inspected for its integrity and evenness.
Instrument testing
Such a check can only be carried out using special diagnostic equipment. Diagnosing DPKV in this way will be effective only when the check light on the car’s dashboard is on.
How to change the crankshaft sensor
Once you know how to test the crankshaft sensor, don't rush into purchasing expensive measuring gadgets. Such a part is inexpensive, and it is usually much easier to immediately remove and install a new one than to find out whether there really are problems with it.
Replacing the VAZ 2114 crankshaft sensor will only require a ten-size ratchet wrench. Sometimes it’s worth getting an extension cord for it to make dismantling more convenient.
- You need to turn off the ignition and open the hood of the car. To avoid any trouble, it is advisable to securely fix it.
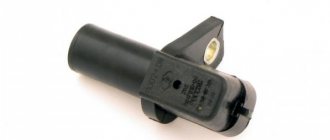
- Under the hood, the DPKV is located at the generator pulley, holds its bolt, connecting the device to the oil pump cover. You can recognize it by its long wire and characteristic shape.
- If contamination is found around, it must be removed first.
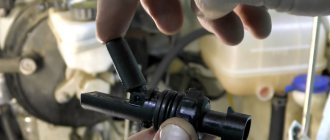
- First you need to disconnect the chip that provides connection to the wiring.
- After this, use a ten-millimeter wrench to unscrew the fasteners.
- Next, the device can be easily removed from its seat.
After dismantling the sensor, you need to pay attention to the toothed pulley. If there are any damages that interfere with the correct operation of the device, they must be repaired. The absence of defects means that the sensor is responsible for the problem. The new one is installed in the same way; nothing complicated is expected in the process.
After installing the device in place, attach and screw in the mounting bolt. It is not recommended to exceed the tightening torque. Optimal - 12 Nm.
Having secured the device in its intended place, you need to make sure that the gap remains at least a millimeter; its error cannot exceed 0.41 on the larger side.
Computer diagnostics in a service center helps to more accurately determine the need to replace a device and evaluate its performance. Most often, sensors need to be cleaned or replaced.
When characteristic symptoms are observed, even a beginner can determine whether the crankshaft sensor 2114 8 valves is working properly. If there is even the slightest suspicion, it is worth ordering a new device.
Replacement
Replacing the sensor is a fairly simple job that even the most distant person from cars can handle. The job involves unscrewing one screw and removing the connector from the sensor.
It is best to carry out work from the inspection hole, but if there is none, then replacement can be done by removing the front right wheel.
Let's start replacing
- Remove the connector from the sensor
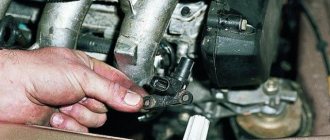
- Unscrew the fastening bolt using a 10mm wrench
- We take out the sensor. This may be difficult to do, but since we no longer need the old sensor, we can take it with pliers and turn it in the mount.
- Install the new sensor in reverse order.
Input impedance measurement
The easiest way is to check the dpkv with a multimeter and measure the resistance of its winding. To do this, you need to have an appropriate device that can cope with this. If there is no such device, then you will have to resort to amateur radio. So, having switched your multimeter to resistance measurement mode and set the limit switch to 2 kOhm, securely install the probes of the device onto the sensor contacts, and they must be clean.
To achieve this, you can wash it with alcohol or gasoline. This may be the cause of the problem. Having installed the probes on the contacts, we observe the readings of the device, which should fit into the range from 550 to 750 Ohms. If this is the case, then the sensor is most likely working. But this can be stated with a probability of 50%, because during breakdowns and short circuits the resistance may change. And if the new one had 750 Ohms, and when checked it turned out that it was 500 Ohms, then this means that it is faulty. And he had an interturn short circuit.
This leads to a decrease in the pulse level that is detected by the controller. Therefore, to be sure of its 100% serviceability, you need to refer to the passport data, which will indicate its exact resistance and inductance. Based on this, you can check the inductance of the sensor winding. To do this, you need to switch your device to inductance measurement mode, if of course there is one. The readings on a working sensor should be up to 400 mH with a resistance of 750 Ohms. If, according to the passport, the sensor has a resistance of 500 Ohms, then accordingly its inductance will be 200 mH. If so, then the sensor is working.
In addition, the condition of the sensor insulation should be checked. To do this you need to have a megohmmeter. Although the multimeter has a mode for measuring high resistance, it is measured with low voltage and high error, while the megohmmeter produces voltage up to 500 V and is a separate device. So, having set the measurement voltage on the device to 500 V and the measurement accuracy to 10% under normal conditions (20-22 0), we place one end of the probe on the sensor body, and the other on the contact. The resistance should not be less than 20 MOhm.
VAZ 2115 sensors, their purposes and malfunctions. List and tips
- the calculation of the duration of permissible fuel injection is based on them;
- TPS data is the basis for setting the ignition timing;
- They are used to determine the operating mode of the motor, acceleration and many other related parameters.
- On VAZs, the TPD is made in the form of a polymer film, onto which graphite tracks are sprayed, and a slider runs along them. The tracks have a clearly calculated resistance, and the stability of the sensor depends on the coherence of the system. However, the designers did something wrong - either in the material or in the technology. As a result, TPS is the sensor that most often fails. Most often, the path gets worn out, and when the slider hits a “bald” area, trouble begins;
- When the gas pedal is held steadily, the car jerks;
- The operating power drops noticeably;
- There are dips and sharp jerks during acceleration;
- There is virtually no engine braking.
- the engine is frankly dull;
- fuel consumption increases;
- problems of various kinds with startup;
- sudden stops at higher power levels.
AutoFlit.ru