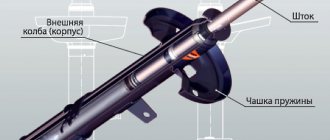
Design
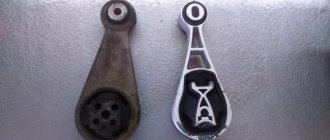
Structurally, the ball joint is not complicated. There is a housing that is either bolted to the suspension arms, or is part of the design of the arm itself. A finger is placed inside this body.
The part of the pin protruding beyond the body has a conical shape, and a thread is cut at the end to secure the pin in the hub.
Inside the body, the finger has a spherical or mushroom-shaped shape.
Between the body and the latter there are plastic bushings that act as sliding bearings.
A boot placed on the body protects the ball from dust getting inside.
Thanks to this design, the finger can not only rotate around an axis, but also change its angle relative to the body. This allows the wheel to turn.
Ball joint diagnostic instructions
It is necessary to find out the cause of unusual car sounds as early as possible. If the thought arises that the problem is in the ball joint, then you should first remove the manual lock. Now, with sharp short jerks, rock the steering wheel, now to the left, now to the right, with the engine turned off.
The presence of serious damage will be accompanied by a characteristic tapping sound. The main point is to identify the direction from which they are heard more clearly. It is this support that will have a design defect.
Insignificant wear cannot be detected in this way. In this case, contacting specialists from the technical center would be most appropriate. They will be able to check not only the steering rods and ends, but also the complete serviceability of all ball joints.
Symptoms of a problem
The simplicity of the design provides the ball joint with sufficient reliability, but it also has its own service life, which depends on the operating conditions of the car.
Significant shock loads that occur when driving over uneven surfaces can quickly wear out this suspension element.
In general, the service life of a ball joint can vary from 15 to 150 thousand km, it all depends on the careful driving and the roads on which the car is driven.
With significant wear of this element, certain signs begin to appear indicating the need for replacement:
- Knocking from the suspension when driving over uneven surfaces;
- Car wobbles when driving;
- Uneven tire wear on wheels.
Increased effort on the steering wheel, additionally accompanied by creaking from the suspension;
These signs are a consequence of critical wear of the ball joint, accompanied by an increase in the gap inside the element.
If you do not carry out restoration work in a timely manner and continue to operate the car, this will ultimately lead to the pin popping out of the body - the hub will become disconnected from the suspension, the wheel will go sideways and the car will “land” on the body. As a result, repairs will be very expensive.
If signs indicating wear of the support appear, the condition should be checked to determine what caused the appearance - the ball or other suspension elements.
Checking status
You can check the condition of the support yourself. First you need to examine it carefully. If upon inspection it is discovered that the boot is damaged and there are cracks on it, then it is better to replace it immediately, even if the condition of the element is satisfactory.
It’s just that over time, more and more dust and sand will get inside, leading to intense wear, and eventually you will still have to replace it.
If the boot is intact, then the element will be checked for play. There are several ways to do this.
First way.
The simplest is to insert a pry bar on top of the lever near the support so that the end of the pry bar rests against the body or subframe.
Then rock the mount with force, creating shock loads on the lever. If the ball is worn out, you will hear a distinct knock.
Second way.
You can also jack up the wheel from which the knocking or squeaking sound is coming. Then ask an assistant to depress the brake pedal to block the wheel, and then rock it.
Significant wheel play will indicate wear of the element we are considering.
The most time-consuming check is to remove the ball joint and assess its condition. If the finger moves freely in the body, there is axial play - the part must be replaced.
You can, of course, carry out the test using special equipment or stands, although the simple diagnostic methods indicated above are often sufficient.
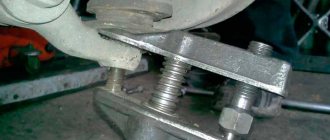
Wedge type puller (or fork)
The illustration shows the factory version. Working with such a puller requires physical effort. The longer the lever, the easier it is to dismantle the hinge.
The principle of operation is simple: a wedge is driven between the ball body and the suspension arm, then the lever is used to tear off the shank from the seat.
A serious drawback of the device is the possibility of damage to the suspension arm. The ball joint boot also breaks, so it cannot be reused.
Such a puller can be made from a 12-16 mm steel circle. You will need a welding machine and the work of a blacksmith. It is better to give the wedge-shaped “fork” using forging: if you simply grind off the metal, the strength will be lost.
After final processing of a homemade puller, it must be hardened. The steel is heated to a crimson color and immersed in water or oil.
Replacement on classic VAZ models
Next, we’ll look at how to replace ball joints on different cars. The examples will be different models of VAZ cars.
The first will be the classic models - VAZ 2106-07. In fact, in all classic models, from model 2101 to 2107, this operation is performed identically.
The suspension design of these cars is such that it includes two ball joints - upper and lower.
It should be noted that if at least one element wears out, you will have to replace them all, on both sides.
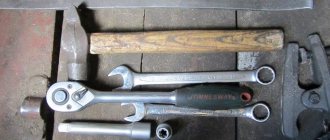
But the replacement operation itself is not particularly complicated. Tools and accessories you will need:
- A set of ring and open-end wrenches (keys for 12, 13, 14, 22 are required);
- Puller for ball joints and steering ends;
- Hammer;
- Mount;
- Chisel;
- WD-40.
Naturally, new supports, both upper and lower, will be needed. Having all this, you can start working.
The sequence of actions is as follows:
- The car is installed on a flat surface or in a garage. On the side where the replacement will be made, the car is jacked up and placed on supports, then the wheel is removed.
- To provide access to the support nuts, you need to unscrew the steering wheel in the appropriate direction (if it is changed from the left, then the steering wheel is turned all the way to the left; changing from the right side is accompanied by twisting it to the right).
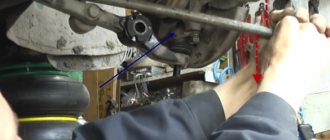
- To change the upper support, first unscrew the pin nut with a 22 wrench.
Then, using 13mm wrenches, unscrew the nuts securing the support to the upper arm. To make it easier to unscrew them, you must first treat the nuts with WD-40.
- Next, a puller is used. With its help, the pin is pressed out of its seat in the hub.
- Using a pry bar, resting against the hub, the upper lever is raised so that the pin is completely removed from the seat. The hub is then gently pulled towards itself to release the part. Often the ball sticks strongly to the lever, so you will need to knock it down with a hammer.
- In place of the worn part, a new one is installed in the lever and immediately secured with fastening bolts.
- The hub is then lifted and the pry bar is installed again to lift the arm and place the hub in the correct position.
- Next, the pin is driven into the seat and secured with a nut.
The sequence for replacing the lower support is slightly different. Due to the characteristics of the hub, it will not be possible to completely unscrew the pin nut. Therefore, it is first unscrewed as much as possible (key 22).
The puller then comes into play to free the finger.
After this, the spring will press the lever down. To continue work, you need to put something under the lever so that it no longer moves down.
The pin fastening nut is unscrewed completely. Then the nuts securing the support to the lever are unscrewed, and it is knocked out.
A new one is installed in place of the removed support and reassembled.
Below are a few nuances when replacing supports on these cars.
If there is no puller.
The finger can be knocked out, but this will require help. The tools you will need are a hammer or a small sledgehammer, an attachment and a pry bar.
An assistant must drive the pry bar between the lever and the hub and create a pull-out force.
At this time, you need to use a hammer and a guide according to special ebbs in the hub near the pin seat.
The blows must be powerful and biting. Usually 3-4 hits are enough for the finger to pop out.
Don't forget about lubrication.
Some motorists advise that before installing a new support, remove the retaining ring and boot from it, and put Litol lubricant inside it.
Also, during assembly, it is recommended to lubricate all bolted joints with Litol, so that during future replacements of this element the bolts will be easier to unscrew.
Lever puller
Unlike a screw, the fixture uses both the force of the thread and the lever.
The operating principle is visible in the illustration:
The lever arm relative to the hinge axis increases the force on the thread at least twice. The ball pin breaks off more evenly. Thanks to the offset hexagon, the suspension elements will not interfere with the wrench handle when tightening the bolt.
You can make a lever puller for ball joints yourself, but this will require more materials. The simplest option is two thick steel plates held together with a bolt.
A sleeve is placed in the middle: as a spacer axis of rotation (by analogy with a clothespin). With some care, the device works normally.
If you have a welding machine, it is better to make a design similar to an industrial design. The dimensions are selected in accordance with the design of your pendant.
An old open-end wrench can be useful as a donor (20-30 years ago they didn’t skimp on the quality of the metal for the tool).
Homemade ball joint remover, drawing with dimensions - video
Replacement for VAZ 2109, 2110, 2114
Next, let's look at how to replace the ball joint on more modern models - VAZ 2109, 2110, 2114.
Structurally, the suspension in them is similar, and its design uses only one support - on the lower arm.
To carry out the operation you will need:
- Open-end and spanner wrenches (required for 13, 14, 17, 19);
- Puller for supports;
- Mount;
- Hammer;
- WD-40.
The sequence of work is as follows:
The car is placed in the garage, on the side on which this element will be changed, it is jacked up and the wheel is removed. For ease of access, you can turn the steering wheel in the desired direction.
Use an open-end wrench to unscrew the pin nut. You should also immediately unscrew the bolts securing the support to the lever.
Use a puller to press out the finger.
Then use a pry bar to press the lever down to release the pin and remove the support.
The new support is put in place and everything is put back together.
If there is no puller, then the finger can be pressed out. To do this, a pry bar is installed between the hub and the lever and a force is created to push the lever down.
In this case, at the end of the lever, where the mounting hole for the finger is made, sharp blows are applied with a hammer until the finger comes out.
As stated earlier, before installing a new element, it is recommended to put grease in the boot, as well as lubricate the bolts and nuts.
Do-it-yourself restoration of hinges
As previously mentioned, the ball joint is located in the front suspension of the vehicle. In some cases, the front ball joint can be repaired on its own. This applies to those hinges that can be disassembled. The plastic insert in them must be replaced, after which the hinge is assembled and then installed in its place.
WATCH THE VIDEO
On Zhiguli cars they still practice restoring the hinge by installing an additional thick rubber washer under the plastic insert.
Advice! Between the finger and the plastic cracker there must be a lubricant like ShRB or a similar replacement.
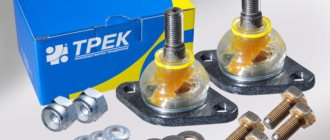
Features of choosing a new element
An important condition for a good service life of the ball joint of any car is not the correctness of its replacement, but the quality of workmanship.
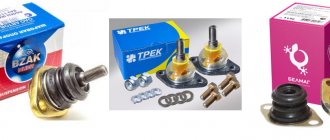
Now the car market offers a large number of supports for all VAZ models from a wide variety of manufacturers, both famous and little-known.
Naturally, well-known companies producing spare parts are more preferable than unknown ones. The best are considered to be domestic manufacturers who supply spare parts to the manufacturing plant.
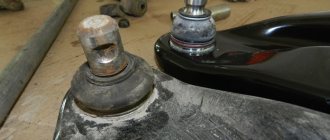
When choosing a ball joint, it is important to inspect it thoroughly. First of all, you should pay attention to your finger. It should be gray in color, indicating that it has been forged, and there should be no paint on its surface.
He must walk in the body with considerable effort. Its slight movement will indicate poor quality assembly.
You need to pay attention to the completeness. In addition to the support itself, the kit should include all fasteners and a boot.
Types of pullers
The auto tools market offers a wide selection of such removable mechanisms, which can be divided into two types:
Screw pullers are considered universal and are suitable for working with almost any car.
The force in them is created by screwing the bolt into the puller body. The housing itself is put on the support eye, and when tightened, the bolt rests against the support pin and presses it out of the socket.
Lever removable mechanisms are no less effective, but they are larger in size, so they may not be suitable for every car.