On VAZ-2114 cars, the ball joint is replaced when the suspension breaks down. The hinge is necessary for the normal operation of the front strut and its connection to the lower arm. Thanks to this simple design, the wheels on the car turn.
After all, the strut and hub are fixed at the bottom on a ball joint, at the top on a support bearing. Approximately in the middle of the rack there is a steering knuckle, which is connected to the steering rack via rods. By the way, the latter also have a ball joint - a tip.
Ball joint for VAZ 2114: originals, analogues, articles, prices
| vendor code | Price, rub.) | Art. | Price |
| Original | |||
| 2114-2904192 | from 350 | 2114-2904185 | —/— |
| 21114-2904192-00 | —/— | 21114-2904192-00 | —/— |
| 21114-2904185-01 | —/— | 21114-2904192 | —/— |
| Analogs | |||
| AYWIPARTS AW1320063LR | from 350 – 450 | AS METAL 10LD1500 (VAZ 2114) | —/— |
| FORMPART 1604002 | —/— | LYNXauto C1031LR | —/— |
| LEMFÖRDER 15456 02 | —/— | PATRON PS3101 | —/— |
| BIRTH CX0738 | —/— | FENOX BJ10110E7 | —/— |
| BIRTH CX0099 (VAZ 2114) | —/— | DENCKERMANN D110112 | —/— |
| TRW JBJ156 | —/— | SIDEM 19989 | —/— |
| MOOG LABJ0063 | —/— | BIRTH CX0997 | —/— |
Design features of the VAZ 2114 ball joint
Unlike a number of foreign brands, the ball joint on the VAZ 2114 is mounted independently, without being pressed into the suspension arm. The process of replacing the support is shortened, since there is no need to additionally dismantle the lever with silent blocks.
Considering the method of fixing the ball joint, be extremely careful when overcoming road obstacles and potholes so as not to damage the chamfer of the metal pin. Otherwise, use a grinder to remove damaged threads.
The most common causes of failure of VAZ 2114 suspension elements
- failure by the owner of the car to comply with the terms of technical inspection;
- the consequences of saving on high-quality, original spare parts, as a result of which the parts do not maintain the proper service life;
- aggressive driving style of the VAZ 2114. First of all, this is a passenger car, and not a racing car with the appropriate characteristics;
- third-party mechanical damage to the steering knuckle, caliper, hub, support bearing, resulting in deformation of the ball joint;
- violation of installation technology.
Before starting repair work, service station technicians recommend carrying out a comprehensive diagnostic of the vehicle in order to study the general condition, identify breakdowns, and correctly calculate the number of spare parts and consumables. A preliminary inspection will help to accurately identify the location of the breakdown and detect the faulty part.
The process of self-diagnosis is not at all complicated; there is no need for special equipment or tools. A standard set of car keys, a crab-shaped puller, is enough. It is extremely difficult to press out a metal tip without a puller.
Step-by-step diagnostic process:
- We take a partner to help, he will press his hands on the wing, simulating the car getting into a pothole. The owner identifies the source by ear from under the bottom;
- if the first method does not bring the desired result, we will use the old, proven old-fashioned method: using a mount we check the condition of the fastenings of the suspension elements, hub, and steering knuckle.
In good condition there should be no third-party sounds, creaks, or grinding sounds. Otherwise, the units must be replaced with new ones.
The manufacturer in the operating instructions indicates a maximum free play of the ball joint pin of 0.8 mm. Without special equipment, it is impossible to check the permissible gap.
In parallel with the diagnosis and replacement of suspension elements, we inspect the steering knuckle, hub, support bearing, and brake caliper. We assess the general condition and decide on the advisability of replacing worn parts.
Since the work is carried out near the shock absorber and spring, we check for the presence of oily streaks and depressurization of the shock absorber cylinder. Finally, we diagnose the support bearing located in the engine compartment.
Advice from experienced motorists
Every car owner becomes more literate, understands more about his own and other cars, and can carry out repairs with his own hands as he gains experience.
Some repair work involves disassembling certain components. And the ball joint is no exception. Experienced motorists give some practical advice on this matter, with the help of which you can kill two or even more birds with one stone.
- Inspect the condition of the entire underbody once you have climbed under the car.
- Check the quality of the cable tension from the handbrake, and also make sure that the cable itself is intact.
- Check the car for oil, lubricant, and coolant leaks.
- Make sure the sump and engine crankcase protection are intact.
- Check each unit for mechanical damage, cracks, and chips.
- Inspect the tensioner nut from the steering column. It has to be pulled up periodically. Once you are under the car, this is a good time to do this kind of work.
- Look into the transmission structure to make sure the transmission oil is at the correct level.
Of course, no one forces you to carry out all these related checks and preventative work. But think about who needs this in the first place? Of course you. This is your car, the integrity, serviceability and efficiency of which are your personal interest.
Plus, any independent repair, each small inspection is a coin into your own treasury of personal experience. With it you can perform much more complex procedures than replacing a ball joint.
Don't forget one more important point . Self-repair of many components means saving the family budget. With the money you save, you can take your family somewhere or buy something useful for your home. Or purchase a set of new high-quality tires, wheels, and do some tuning work. Indeed, technically, thanks to your efforts, the car is in excellent condition.
Replacing a ball joint on a VAZ 2114
After completing the comprehensive diagnostics, we proceed to replacing the ball joint:
- For convenience, we use an inspection hole or a lift. We do not consider a platform or a road overpass due to impracticality;
- We carry out basic safety measures: install wheel chocks, squeeze the parking brake lever, turn on first gear to provide stability;
- unscrew the mounting bolts and remove the wheel;
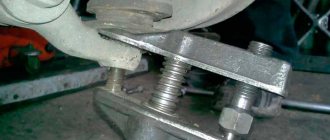
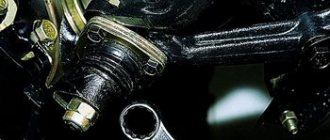
- Unscrew the two “14” bolts that secure the upper part of the ball joint to the steering knuckle;
- By analogy, unscrew the lower nut securing the pin;
- Next, using a crab-shaped puller, press the finger out of the base. We do this very carefully so as not to damage the thread pitch. We put a wooden spacer for safety;
- lower the edge of the beam down and remove the ball joint from its seat.
We carry out preventive maintenance, troubleshooting, and clean the surface from lubricant residues, metal shavings, and corrosion layers. Apply a thin layer of graphite grease to the eyelet.
If there are no comments on the operation and condition of other parts, we begin assembling the structure again. By analogy, we complete the replacement on the opposite side. Subsequent maintenance after 15,000 km, replacement no earlier than after 35 - 40 thousand km. Do-it-yourself replacement of the ball joint is completed. About how much the service costs at a service station, check directly with the specialists.
Which manufacturer of ball joints is better? There are no fundamental differences, the main thing is that the catalog articles completely coincide with the data in the instruction manual.
Checking status
Before changing the ball joint, make sure that this element has actually failed and is the cause of the car's inappropriate behavior.
There are two ways to check - simple and more complex.
First way
To check you will need to do the following:
- When driving, listen for knocking noises coming from the front of the car. The malfunction of the ball joint becomes especially noticeable when the wheel falls into a hole;
- If, when hitting a hole, there is a dull impact from one of the front wheels, the ball joint should be changed;
- There is another way - put your foot on top of the front wheel, and then start pushing it towards the second front wheel. If you hear a dull thump during manipulation, it is better to check the condition of the ball in more detail using the second method.
Verification procedure
Second way
The second testing method is more accurate, but will require a pit and additional equipment.
- Place the car over the inspection hole.
- Turn on the handbrake and place chocks under the wheels for your own safety.
- Raise the front of the car with a jack. Make sure the car is supported securely as you will have to wobble the car.
- After lifting the wheels off the ground with a jack, begin testing.
- Place one hand on the top point of the wheel, and the other, respectively, on the bottom.
- Using gentle but sharp movements, loosen the wheel from top to bottom.
- If you don't hear any knocks, check the second wheel as well.
- If extraneous sounds appear, you need to ask a friend to place two fingers on the area where the suspension arm connects with the ball pin, as well as on the SHO body. If you feel with your fingers that the ball joint pin is moving inside the body, the ball joint has outlived its usefulness and requires replacement.
Dismantling process
- To work, you will need an inspection pit or a lift. But if they are not there, you can get by with a regular jack.
- Remove the wheel that has a ball joint problem.
- Thoroughly clean all elements from accumulated dirt, treat fastening components with WD40 so that the rust comes off and you can carry out dismantling work without any problems.
- Using a 19mm wrench, unscrew the nut securing the ball joint to the suspension arm of the VAZ 2109.
- Armed with a puller, press the SHO pin out of the suspension arm.
- If you don’t have a puller, you don’t need to go to a car service center. There is another way. You need to not completely unscrew the ball joint nut. The tension is created by a pry bar and several targeted, strong blows on the lever with a hammer. In 99% of cases, the finger comes out without any problems.
- Do not remove the pry bar too far, since it should now be used to move the suspension arm slightly downward, freeing the ball joint pin from the lever.
- Having picked up the 17 head, it is necessary to dismantle the pair of bolts responsible for connecting the steering wheel with the steering knuckle.
- Remove the worn ball joint.
- Check the condition of the boot and support. In some cases, it is enough to replace the boot. But if the ball joint is worn out and shows all signs of failure, install a new ball joint and reassemble the unit in the reverse order.
- Make sure there is a spacer on the pin. If it has been removed, do not forget to return the element to its place. Otherwise, the new support will not work properly.
- Be sure to lubricate the rubber boot with grease before reinstalling it. The lubricant is also applied to the place in the support where the boot is mounted.
An important point in replacement is the tension of the fastening nuts. After replacing the ball, tighten the nuts tightly, but not completely. Then you need to rock the car several times, and only then tighten the fasteners completely.
In this case, the lower SHO nut is tightened with a torque of 80-96 Nm, and a pair of bolts securing the support to the lever - with a torque of 50-63 Nm.
Recommendations for suspension maintenance and increasing the service life of mechanisms
- purchase spare parts and components exclusively from certified points of sale, dealers, and official representative offices;
- do not buy parts when their cost is uncharacteristically low, which indicates a fake, not original;
- take a moderate driving style as a rule;
- Operate primarily at medium speeds in the range of 80 – 95 km/h. This will increase the total resource of nodes by 15 - 20%;
- If you do not have personal experience in servicing, use the services of proven service stations and auto repair shops, where they provide a quality guarantee for the work performed.
Take a comprehensive approach to diagnosing and repairing breakdowns, replace all worn-out elements and components. Use handicraft services to a lesser extent. In order to prevent sudden breakdowns, conduct a quick inspection of the VAZ 2114 every day, check the levels of oil, antifreeze, and washer fluid in the washer reservoir.
Do-it-yourself replacement of lower ball joints (for beginners)
Attention, before installing the balls, lubricate them with CV joint or grease under the rubber, which is included when purchasing a pair of balls, otherwise they may soon squeak!
They were changed about a couple of years ago. Then I made the replacement with my brother. I remember we had a terrible time with him. This time I did everything myself. I decided to describe in detail how to do what. We will need: - a wrench - a pipe - heads for 19, 17, 13 - mounting (crowbar) - a jack - a bolt After you have raised the car, put something under the wheels to prevent it from rolling, unscrewed the wheel and placed it under the car, you can start working on the ball ones themselves. First we unscrewed the nut to 19.
If there is a puller, then completely, if there is none, then half.
If there is no puller, then insert a crowbar between the lower lever and the ball, press down and tap with a hammer at the place of the lever where the ball pin is inserted.
After you have been able to tear off the support, unscrew the bolts to 17 (2 pcs).
Then pull the lever down and take out the ball. If you are not too strong, then it would be best to unscrew the stabilizer from the body. But there is a chance that the studs will break off after you start tightening the stub. But with the stabilizer unscrewed, it is easier to pull the lever down and pull out the ball joint.
But, as I progressed, I found another way out of this situation! We simply take and place something solid under the brake disc (bars, bricks, blocks, etc.). I used the boards that cover the hole in the garage. Then we lower the car. As a result, the hub rises and the lower arm will move away from it, and you can easily get the ball joint.
You can also lift the disk with a second jack, but this is dangerous; the jack may come off. Be careful, don't rush! I tore a new boot on the ball.
But installing the ball this way is difficult! It’s still easier to unscrew the stabilizer from the body. It’s easier and you’ll save a lot of time (if you don’t break the stub studs). Reassemble everything in reverse order.
Now a few words about how I steamed with the stub.
I unscrewed it, but it’s not enough to put the power back on. It's about to break! Then we take what can be placed under the brake disc. Again I used boards. We line it up longitudinally under the car (as the engine stands) and use a crowbar to pull the stub mount up and try to get into the studs.
It is better to start with the stud that is closer to the rear of the car. We tighten the nut, and the other fastener will be pulled into place.
We unfold the crowbar and tighten the fastening on the other side and again screw on the other stabilizer nut.
I also want to add 1 more method, which is the simplest. To make it easiest to put the stabilizer back, you simply lower the car from the jack with the wheels screwed on. It will fall into place on its own and you can easily screw it on without additional tools.
Look like that's it. If anyone doesn't understand something, ask.
Carrying out replacement
Now the crucial moment has come, it is necessary to remove the old ball joint of the VAZ 2114 and install a new one in its place. First, using a 19mm wrench, unscrew the nut that secures the ball joint pin to the front wheel hub. After this, you need to install the puller so that the small ball on its bolt is clearly in the middle of the hinge pin.
Carefully screw in this bolt until the pin comes off the wheel hub. After this, you need to use a key “17” to unscrew the bolts that secure the joint cage to the suspension arm of the VAZ 2114. That’s all, the dismantling is complete. Now all that remains is to install a new hinge, which it is advisable to pre-lubricate with Litol. To be honest, I also used CV joint type lubricant for this purpose.
I haven’t noticed much of a difference; the ball joints have been working without problems for three years now
Please note that when installing a new joint, you may have to install several blocks of wood under the arm and lower the body so that the ball pin fits into the hole in the hub. But this work can be done with the help of a good mount.. This completes the repair, good luck on the roads and fewer breakdowns!
The repair is complete, good luck on the roads and fewer breakdowns!
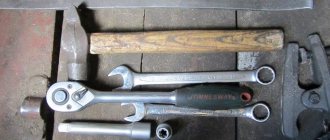
Given the quality of Russian roads and the components supplied to spare parts stores, ball joints on VAZ 2114-2115 cars have to be changed quite often, although there are exceptions, and they last 50-70 thousand kilometers. You can make the replacement yourself, but you should have all the necessary tools at hand, a full list of which is given below:
- jack
- hammer and spatula
- key for 17 and 19
- sockets and ratchets for greater convenience
- special ball joint remover
The first thing we should do is slightly loosen the front wheel mounting bolts, and then jack up the front of the car. Now you can remove the wheel, having first unscrewed all the bolts completely. It is also advisable to play it safe and place stops under the bottom, as well as put the car on the handbrake.
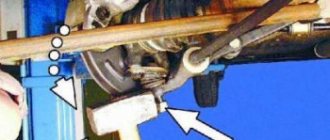
Next, you can unscrew the nut securing the ball joint to the lever, using a regular spanner wrench or a socket with a wrench:
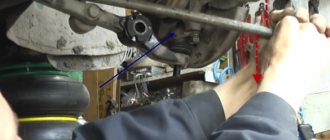
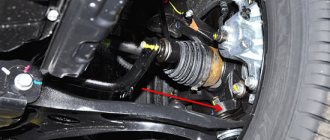
After this, we insert our puller under the rubber (boot) of the support and unscrew the bolt of the puller until the action of the device lever causes the finger to jump out of its seat:
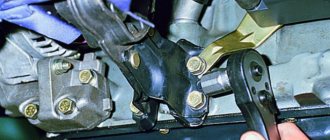
Then you need to unscrew the two bolts securing the VAZ 2114-2115 ball from the top side, as shown in the photo below:
As you can see in the above photo, from the factory it is bolted with TORX profile bolts, but the store comes with a set of supports that come with regular 17mm wrench bolts. Now the support is almost free for removal. To gain access to dismantling, you can place a brick under the brake disc and carefully lower the jack, thereby freeing up space for removal:
Then we take a new ball, remove the boot and be sure to push lubricant inside, such as lithol:
We put the boot in place and replace the support in the reverse order. There may be difficulties during installation, but with a mount and a lot of effort, you can handle it all. The price of new ball joints for VAZ 2114-2115 varies depending on the manufacturer, around 300-450 rubles per piece.
Sources
- https://www.help2drivers.ru/zamena-sharovjyh-opor-vaz-2114/
- https://vaz-remzona.ru/sharovye-opory-vaz-2114-zamena/
- https://zarulemvaz.ru/zamena-sharovyx-opor-na-vaz-2114-2115/
Signs of a bad ball joint
- The occurrence of knocking from the wheels when the car is moving (especially for locations with holes and uneven surfaces).
- Can occur at any speed conditions. As a rule, it is observed when crossing ditches, sharp turns and braking. Sometimes it is one-time, and sometimes permanent.
- The appearance of changes in the camber and toe system . Most often, it is not visible to the human eye and is revealed only when the volume of rubber around the edge of the wheels is reduced. For this reason, it often requires contacting car services for diagnostic work.
- The presence of uncontrolled “wobbling ” when moving. If there is play inside the ball joint, the wheel may wobble while driving. For this reason, the car is not able to keep a smooth ride, despite any type of road surface. An increase in speed accompanies an increase in the effect, but it is not always possible to notice it.
- The appearance of a squeaking sound when turning the wheels at the front.
- Uneven wear on front tires. Damage to the structural element in the form of a ball joint causes the steering wheel to lack a strictly vertical position. Due to the resulting angle of inclination, the tread wears unevenly, which can be checked by normal visual inspection.
- When braking, the trajectory changes . Sometimes, almost when the VAZ 2114 car stops moving, along with braking, a slight unplanned turn is made. Along with this, clicking sounds are usually observed, which begin to intensify over time.
Dangers of a worn ball
Most “experts” believe that the ball joint should be rigid and clamped. That is, it should move, but always with great effort. This is a completely false statement. Yes, the correct ball moves heavily in the cage, but with little effort, otherwise it won’t bite. This is fraught with increased wear of the support itself.
The main point that will show that the part needs to be replaced is vertical play. That is, the ball should not knock. If she knocks, sooner or later the finger will simply be torn out of the clip. And if we take into account the fact that in our country there is only one law in force - the law of meanness, then this will happen at the most unpleasant and inopportune moment.
The next danger that lies in a worn ball joint is its lateral play. Most modern front-wheel drive cars have zero toe-in of the front wheels, that is, they are parallel to each other. The initial play in the ball gives a wheel travel of 2-3 millimeters, which does not have a positive effect on the geometry of the wheels. And this, in turn. Leads to danger when driving, and there is also a risk of losing one of the tires in a very short mileage.
Necessary tool
- The jack (hydraulic or pneumatic to choose from) is designed to raise the machine to the desired level to simplify the process of checking and further replacing the VAZ 2114 ball joint if necessary.
- A set of wrenches allows you to loosen the tightening on the desired part and unscrew the bolts and nuts.
- A ball joint remover will be needed to remove them.
- Wheel chocks are used to be placed under the rear of the car. Sometimes a brick base is used here to simplify the task.
- Supports under the car to improve interaction with the jack, to ensure safety during the operation. In addition, sometimes a block of wood is also used.
Installation
Step by step steps:
- Under the boot of the purchased product, if it is not secured, place a little special long-fiber lubricant for ball joints, although ordinary multifunctional ones also work well.
Put grease under the boot
- In closed samples with a non-removable boot, the lubricant is already present in the required quantity.
Installing a new part will not cause any difficulties. You just need to make sure that the housing bolts and the pin nut are tightened to the nominal torque, for which it is advisable to have a torque wrench.
Methods for checking ball joints yourself
How to check the ball joint on a VAZ 2114 is described below. It is clear that most car owners are thinking about visiting services. But you can carry out a full check of this structural element yourself without unnecessary trips and financial costs.
Without removing the wheel
To quickly check the ball joints on a VAZ 2114, it is not necessary to remove the wheel about which you have doubts and questions about a potential malfunction. But it is worth stocking up on a small amount of time and it is advisable to invite one more person, since together you can perform the diagnosis with a greater degree of accuracy.
A quick check comes down to listening to the ball joint of the VAZ 2114. To do this, you need to swing the car in directions perpendicular to the main one for the car. At the same time, you should listen carefully to the sounds that arise from the ball joint and suspension.
With the wheel removed and on a jack
For a more accurate and detailed check of the VAZ 2114 ball joints, you will need to remove one of the wheels using a hydraulic or pneumatic jack. But as mentioned above, in order to increase safety (especially in cases with subsequent installation), it is necessary to think about stronger and more stable supports.
Thus, if uncertainty arises when performing the quick check from the previous point, it is worth using a jack. To do this, you need to lift the VAZ 2114 from the side where you want to check the condition of the ball joint. The wheel is rocked in the same way: in directions perpendicular to the movement. Using this approach, play in the bearing system can be confirmed or eliminated.
Using the same principle, after checking the VAZ 2114 ball joint, you can dismantle and install a new part. But in this case, you must first select and purchase it.
Is it possible to drive with a broken ball joint?
Many car enthusiasts who are faced with a similar problem for the first time are interested in the question: if the ball joint is knocking, is it possible to drive with such a breakdown? The answer depends on the degree of wear and damage of the specified unit. If the knocking noise from the ball joint while driving has just appeared and the car is not yet “driving” on the road, it does not knock when turning, that is, there are only early signs, then you can still drive such a car. However, make sure that the driving speed is not high, and also try to avoid potholes and uneven surfaces. And, of course, you still need to think about the upcoming renovation. After all, the sooner it is done, the cheaper it will be, firstly, and secondly, the car can be operated safely!
If the breakdown of the ball joint has already reached such an extent that the car “fidgets” on the road and the knock of the ball joint while driving is clearly audible, then it is better to refuse to operate such a car until repairs are carried out. As a last resort, you can drive it at low speed and following the rules of safe driving to a car service center or garage, where you will have to replace it (usually the ball joint cannot be repaired and is only replaced with a new one).
Source
Signs of a faulty ball joint VAZ 2114
If, while driving over bumps or small irregularities, you hear a knocking sound in the front suspension of a VAZ 2109, 2114, then this is a reason to start looking for a fault! There are two ways to check the ball joint of a VAZ 2109 - 2114 for a malfunction.
The first method does not require an inspection hole, but a jack is required. We hang the front wheel on a jack and sharply pull it toward and away from us. If the ball joint is faulty, it will make a sound and the wheel will have play.
If you have a garage with an inspection hole or overpass, then inspect the ball joint boots for damage. If the boot is torn, this is a sign of wear on the ball joint of the VAZ 2114 and it is better to replace such a ball joint even if it does not knock yet. Place a crowbar or pry bar between the ball and lever. Place one end on the lever and the other on the bolt or ball housing and try to move them apart. For convenience, you can turn the steering wheel towards the wheel being tested. If there is play, the ball must be replaced.
Many people wonder: can a ball joint fly out on a VAZ 2109? Answer: Yes! Maybe! Therefore, if there are signs of a malfunction of this part, do not delay repairs. Moreover, it is not difficult. Next, I will tell you how to replace the VAZ 2109 - 2114 ball joint with your own hands.
Requirements for a new ball
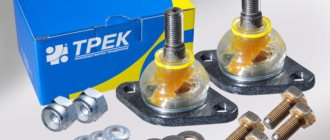
Make sure that the new ball joint boot is in good condition - there should be no cracks or damage. The new ball joint should have a grayish color to the finger. There should be no defects on the clip. The ball pin is not allowed to rotate freely - this indicates that the element is of poor quality.
For good elements, it either does not rotate in the cage at all, or does so very tightly. Try to purchase domestic products, “Track”, “Trial”, “Kedr”, “Nadezhda”, “BZAK”. You should not trust manufacturers from China or Turkey - practice shows that such elements are very unreliable and have a short lifespan.
How to replace a ball joint on a VAZ 2114
To replace the ball joint of a VAZ 2109, 2114, place the car on a jack and remove the wheel. Now unscrew one nut securing the ball joint to the lever and two bolts securing the ball joint to the hub.
If you have a ball joint remover
If you have a puller, place it as shown in the photo and remove the ball.
Preparation for replacement and tools
To carry out the repair you will need the following tools:
- Ball joint remover. The price of such a tool is about 350-400 rubles. I advise you to purchase it, as it will definitely be useful to you in the future.
- Standard set of wrenches and screwdrivers.
- Litol type lubricant.
- Jack and reliable supports.
- Wheel chocks, which are placed under the rear wheels to prevent the car from rolling away.
That's all, now you need to prepare the car for repair. To do this, you need to install wheel chocks, loosen the wheel bolts, lift the side being repaired using a jack and install it on a support. Wooden blocks can be used as support, but it is not advisable to use materials such as bricks, cinder blocks, and the like. They are fragile and the car can simply fall during repairs. If necessary, treat all threaded connections with a penetrating lubricant such as WD-40.