Print this article Font size 16
The desire of every driver is to be able to get from one point to another without any problems. But such a wish does not always come true.
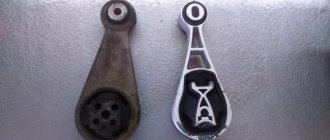
One of the most annoying problems that can occur on the road is the suspension. When something is broken in it, the car begins to behave badly and does not obey the steering wheel. Each suspension system mechanism brings its own surprises and troubles. Today we’ll talk about ball joints, their choice, as well as how to replace this element yourself.
Let's say right away that a ball is a reliable, durable and at the same time structurally simple element, which is used when it is necessary to fix a part rotating in a vertical plane.
Checking the condition of ball joints
There are several ways to check ball joints, and we will look at all of them, because there are only three of them.
- We hang the car on a jack, having previously placed the wheel chock under the diagonally opposite rear wheel, and it is better to put the car on the handbrake. We take the wheel with our hands in its upper and lower parts. We are actively swaying and trying to catch the play. There may be a catch here, since the wheel bearings can cause horizontal play in the front wheel. Just in case, let's check the bearing. To do this, shake the wheel in a vertical plane. If there is no obvious play, then the support is still to blame.
- A more effective way to check the condition of the ball joint is to check it visually. To do this, you need to either have an inspection hole or raise your ten on a lift. Using a pry bar or pry bar of adequate size, you need to pry the steering knuckle in the place where it is connected to the lever by means of a ball joint. Thoughtfully leaning with a spatula on the lower arm, and prying the steering knuckle with the toe of the spatula, we try to calculate the play in the ball joint. If it is there, you won't need to make a big effort to see it.
- The third method of checking the condition of the ball joint is suitable if we are selecting a replacement support, and it must be in our hands. If you hold the support in a vice and try to move the support pin without using tools, just with your bare hands, then a good support will not give way. The finger will not move. If the support is already tired, then the finger will rotate in it quite freely. We write off such support on the shore, since they are not restored in a civilized way.
Examination
Since the ball joint is constantly under load (the weight of the car, pressure from the anti-roll bar and the front arm), to check the condition we will need to unload the car wheel, that is, hang it. Then we take the wheel with both hands by the top and bottom and try to swing it in opposite directions.
Let's listen to the knock
Not every knock indicates that the ball joint needs to be replaced. You should call an assistant and ask him to press the brake pedal - if the knocking noise disappears, it means that the play belongs to a worn wheel bearing.
Then we take a pry bar, insert it between the lever and the longitudinal rod - swing the lever in a vertical plane, listen to the knock, or put your free hand on the support cup and try to record small impacts.
Fix the gap between the finger and the liner
Description
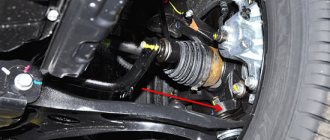
This element is located in the front part of the car's suspension, on the front arms.
Ball joint location
In addition to the fact that during vertical movements of the wheels, the ball joints must ensure their fixed position in the horizontal plane, the support pin must have a certain degree of freedom to rotate in the bowl bushing and at the same time could move at a slight angle to the sides.
Finger movement directions
Symptoms of a problem
While operating the vehicle, it is necessary to periodically “listen” to the operation of its suspension.
It is especially worth paying attention to the following symptoms of support failure:
- The steering wheel began to rotate a little tighter or an extraneous sound (creaking) appeared when turning;
- At low speeds, when overcoming minor obstacles (tram tracks, paving stones), a knock is heard in the front of the car;
- Slight runout of the front wheels when moving straight;
- Uneven tread wear, with the side of the tire wearing out more.
Reasons for failure
The root causes of failure are impacts and friction. Factors leading to a sad result:
- Driving through seemingly small obstacles at “indecent” speeds (tram rails, potholes);
- Lack of lubrication. The lubricant simply dries out or freezes, losing its properties;
- Destruction of the support boots and, as a result, water and dirt getting into the gap between the pin and the plastic liner.
Results
If you follow the above recommendations, you can fix the problem and change the ball joint yourself. Do not allow the ball joint to wear out completely. In this case, it may lead to an accident.
When operating a car on bad roads, the ball joint can quickly fail. At low speeds, a worn part will create a knocking noise, and at high speeds the car will become difficult to control . Also, a worn part will cause the tire to wear unevenly. It also affects the fact that other suspension parts will begin to wear out heavily.
It would be dangerous to drive such a car.
How to replace a ball joint on a VAZ 2110-VAZ 2112?
Removal: 1) There is really nothing complicated about this, the main thing is that there is a desire, in general, to remove it, first hang the desired wheel and then remove it from the car, if you do not know how to remove the wheel correctly, then in this case, read our detailed article on its replacement, it is called: “Correct replacement of a wheel on most VAZ cars.”
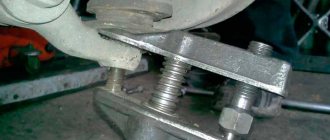
2) Then climb under the bottom of the car and there completely unscrew the central nut securing the lever to the ball joint (Indicated by a blue arrow), then loosen the two side bolts slightly, which are indicated by red arrows (Unfortunately, one bolt is not visible, but you will immediately find it when you replace the support on your car) and a little later you will have to completely unscrew these bolts, so remember their location.
3) Now install a special puller (Indicated by a red arrow) in exactly the same way as shown in the figure below, or install it in the same way as it is written in your instructions for it, then screwing the lower nut of the puller, make sure that the ball joint pin is pressed out of the lever and so that the ball joint can be easily removed from the car, by the way, as soon as the pin is pressed out, completely unscrew those same two side bolts and then completely remove the support from the car.
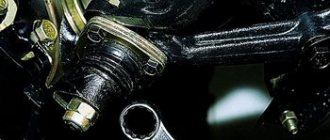
Note! If you don’t have such a puller, then in principle you can do without it, but only for this you will need a hammer and a crowbar, in general, insert a crowbar between the lever and between the CV joint as shown in the two photographs below (In the small and large photos, by the way, a crowbar indicated by green arrows), and one more thing, screw the lower nut back into place (Just a little) if you are removing the ball joint in this way (It is indicated by a red arrow in the small photo), then use the crowbar as a lever and press it , wait until the ball joint pin is pressed out of the lever and only then remove it, but there is one more But! During this operation, hit the place indicated by the blue arrow with a hammer until the ball pin comes out of engagement with the lever and until the lever itself rests on the nut, which is indicated by the red arrow in the small photo; as soon as the lever rests on the nut, unscrew it and then completely remove the support by unscrewing in addition those same two side bolts securing the ball joint to the steering knuckle!
Installation: Everything is installed in its place in the reverse order of removal, but without any pullers. By the way, when installing a new ball joint, be sure to lubricate it inside; to do this, apply grease like ShRB-4, or Litol-24, to the ball end of the pin (see photo 1) and then place it in the inside of the boot itself.
Additional video clip: So that you can clearly understand how the ball joint is removed, carefully watch the video just below in which all this is shown in detail, but only in that video the removal of the support occurs with the lever removed, while the lever itself will be present and therefore not much wonder why in the video the car is missing one part, but you have it.
Timely replacement of ball joints on a VAZ 2110 is the key and guarantee of high-quality operation of the front suspension of the “ten”, the safety and compliance of tires with the established service life.
The ball joint is a suspension assembly that connects the hub and control arm on a drive-type wheelset. The task of this part is to transmit turning movement in the vertical plane to the hub while maintaining the horizontal position of the car.
The failure and subsequent replacement of a VAZ 2110 ball is considered a simple repair, but given the vulnerability of this part to road conditions, especially in Russia, such a suspension unit requires close attention.
Let's summarize
To independently replace the supports on the right and left, you will need no more than an hour of time, and the price of replacing a ball at a service station is from 700 to 1200 rubles.
I also purchased a ball puller for 400 rubles.
I didn’t like the puller, it’s not convenient, the hole is too small, you’ll be stuck in it. On the new ball joint, I removed the boot and filled it with lithol.
I removed the old ball joint in five minutes. For some reason, it pressed out without a characteristic click.
The old ball joint turned out to be in order, no play, except that the finger moved too easily.
I thought it would be possible to change the ball joint quickly and without problems, but it turned out as always. When trying to pull the new ball joint onto the steering knuckle, the drive was pulled out of a grenade. As it turned out, it was very difficult to push the drive back in alone. The easiest way would be to remove the grenade from the hub; to do this, unscrew the hub nut.
But this creature was stuck tightly, even with the help of a meter-long pipe I couldn’t get it off, I just broke the knob.
I had to take “help from a friend.” With two people, you can push the drive in without removing the grenade; one presses the lower lever, and the second pushes the drive into the grenade. Getting into the hole is difficult but possible. As a result, the two of us pushed the drive into place in about ten minutes, and in one minute, I stuffed the grenade with new lubricant.
The ball was put in place in just a couple of minutes.
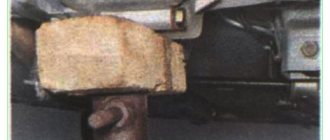
Conclusions: As it turned out, the cause of the knock was not the ball, but the engine protection. Note to yourself, for the future, never try to change balls and grenades alone. Together, this is done much easier and faster.
Price: 700 ₽ Mileage: 183,000 km
Home page » replacing a VAZ 2110 ball joint without a puller 05/12/2018 VAZ 2110 The front suspension of McPherson-type front-wheel drive VAZ cars does not cause as much trouble as in traditional 2101-2107. The design of the linkage front suspension of the Zhiguli is more vulnerable to the lack of road surface due to its design features. But even on front-wheel drive cars it is necessary to monitor the condition of the suspension components, since they are not endless. First, it goes to the ball joints.
Why is a ball joint needed?
If you don't know what the suspension of a front-wheel drive car looks like, then look carefully at the picture. It shows that the base is a strut with a shock absorber. From above, the shock absorber rod is connected to the body; the rotation of the strut is ensured by the upper support bearing. The ball joint of the VAZ-2110 car is located at the bottom, at the place where the strut and hub are attached. With the help of these moving elements, the movement of the rack around its vertical axis is ensured. Consequently, this allows the hub and the wheel mounted on it to rotate.
What is a ball joint? The base is a clip made of metal. It is hollow inside and has a perfectly flat surface. This part is attached to the hub using two bolts. There is a finger inside the clip. Its shape is conical at the top and sphere at the bottom for mounting in a holder. Between the pin and the clip is durable plastic that ensures smooth rotation without jamming. The pin is installed in the hub hole and secured with a nut.
Lever pullers.
Lever pullers are a tool consisting of a pair of levers connected to each other in the middle. They also have a coupling bolt on one side. In the process of acting on the ball joint, this bolt is unscrewed, bringing the ends of the levers together, one of which is located between the support and the eye, the second - under the finger.
Such pullers are also quite effective, but they are larger in size, so they may not be applicable everywhere.
Replacing the ball joint
Now let's look at how to replace a ball joint correctly with your own hands.
Advice! Don't forget to set the parking brake and install wheel chocks.
- On a VAZ 2110, replacing the ball joint begins with raising the car. This is done using a jack and stand.
- Then, using a balloon tool, unscrew the wheel mounting bolts and remove it.
- Take a metal brush and clean the area around the ball joint to make it easier to unscrew.
- Spray the ball pin with HP spray to make the nut easier to unscrew.
- Take a 19mm socket and a long wrench. Unscrew the ball pin nut completely.
- Now we need a ball joint remover. Place the connection between the suspension arm and the ball joint into the puller and unscrew the rod until the pin comes out of the arm.
Replacement of ball VAZ 2110
Advice! Tap the suspension arm with a hammer periodically - the vibration will help remove the pin.
- If you can’t get such a puller, you can remove the ball joint using a hammer and a pry bar.
- The pry bar must be placed between the lever and the steering knuckle, rest against the fist and press on the lever to create pressure.
- At this time, it is necessary to apply clear and strong blows to the suspension arm with a hammer until the finger pops out.
- Next, using a pry bar, in the same position, you need to bend the lever and move the ball pin away.
- Using a 17mm socket, unscrew the two bolts securing the ball joint to the steering knuckle.
- Remove the ball.
Ready!
https://youtube.com/watch?v=RNvEEiKFluI
Preparing a new ball
You can just install a new ball joint, but it would be better to apply some tips:
- Lubrication. Clamp the new ball joint into the planks.
- Remove the nut and boot.
- Place a wrench (a small tube of suitable diameter) onto the ball joint pin.
- Take Litol or other lubricant and fill the ball joint housing with it.
- In this case, you should make rotational movements with the finger of the ball joint so that the lubricant is better distributed in the housing.
- Lubricate the ball-to-knuckle bolts.
- Drive the threads on the bolts with at least nuts.
Remember! Do not lubricate the ball pin, because it will rotate when you try to tighten the nut directly on the car.
- First of all, clean the seat for the ball joint on the steering knuckle.
- Screw the ball back to the knuckle using a 17mm socket.
- Using a pry bar, bend the suspension arm and place the finger of the ball joint into the hole in the arm.
- Tighten the ball joint pin nut.
Attention! If the finger scrolls, then it is necessary to create a load. This is done with the same mount, only the pressure needs to be created in the opposite direction
Then put the car wheel back in place.
It doesn't matter on which side of the car you change the ball joint - it's done the same way. In the same way as the replacement of ball VAZ 2110 is done, it is done on other models of this family. Apply these tips from the article, look at the process in the photo and this will make your repair as fast and high-quality as possible!
Replacement
You have decided that you will carry out the replacement work yourself. Well, that's right. Extra money saved is never a bad idea.
Today, the service for replacing ball joints costs an average of 2-3 thousand rubles.
Replacement consists of two stages:
- Dismantling old ball joints;
- Installation of new elements.
Dismantling stage
We will start, of course, with the removal:
- Put the car on the handbrake, disconnect the negative terminal on the battery, place anti-roll bars under the wheels and lift the car using a jack on the problem wheel. You need to think about safety first if you are doing car repairs yourself;
- Loosen the wheel mounting bolts and then remove it;
- Remove the nut that holds the ball pin;
- Using a puller, press the support pin out of its seat. If you don't have a puller, use a pry bar and a hammer. The support is pryed up with a pry bar, several blows are applied with a hammer, as a result of which the problematic part comes out;
- Using any strong lever you can find in the garage, move the suspension arm down a little;
- Now the ball is easily removed from its place. This stage requires the presence of an assistant, since it is quite difficult to complete the entire range of dismantling work with two hands. To be more precise, it is inconvenient.
Internal lubrication
That's it, the old ball joint has been dismantled, so you can start installation. We can say that the installation takes place in a clear reverse order. But there are some nuances here.
When choosing a support, inspect it carefully for defects. This is especially true for the boot, since the service life of the support as a whole depends on it. The average price of a ball is 300-500 rubles.
Ball joint, device and principle of operation
Ball joint location
When driving, the driving wheels of a vehicle perform two functions. The first is to ensure the vehicle moves along the road. The second is that they allow you to perform maneuvers, that is, turn left or right. To ensure driving and maneuvering, a number of requirements are imposed on the position of the wheels relative to the road: the wheels must be securely fastened, easily controlled by the steering wheel, stand straight and roll backwards or forwards
Compliance with these conditions is ensured by the suspension, where the ball joint occupies an important place
Finger movement directions
The design of the ball joint is quite simple. This includes the following structural elements:
- A metal rod or “finger” with a ball-shaped tip on one side and a thread on the other.
- The boot is an elastic rubber element that makes the rod work airtight.
- A pressure washer securing the polymer liner.
- A polymer liner, which, as a rule, consists of two parts - the upper (stop) and the lower (cup).
- A cylindrical body made of metal, with a wide hole on one side and a narrow hole on the other.
- Rolling the washer clamp is the bottom of the ball joint.
Ball joints are marked in red
Practical advice
When purchasing a new product, it is necessary to test the technical condition of the purchase, namely the rigidity of the finger stroke and the presence of a protective cover included with the product. However, the video for replacing ball “tens” allows you to see all this. If a cover is not available, it should be purchased separately, as well as technical grease.
More than half of the boot should not be filled with lubricant, otherwise it will put pressure on the walls of the boot, which can lead to defects and damage to the integrity of the rubber body.
To increase the service life of the ball joint, careful monitoring of the tightness of the protective cover of the product is required; if it is damaged, it is recommended to immediately replace the cover with a new product without defects.
Every driver wants his journey from point A to point B to be as comfortable and safe as possible. This is also helped by the car’s suspension, which helps the driver take turns, smoothes out bumps on the road and performs many other functions.
However, any mechanism can become unusable. And today we will analyze such a malfunction as the breakdown of ball joints on a VAZ 2110.
In general, a ball joint is used when there is a need to secure a part that can rotate in a vertical plane. A ball joint is a very simple and reliable mechanism, but, like everything else, it sometimes fails.
Which puller is better?
In the video you can see several options for ball pullers , among them the screw one , but only it must be made with high quality.
Its analogue in the form of a fork is universal, since it can be used not only for ball joints, it also helps when removing steering ends. However, its work can negatively affect the anthers.
There are difficult cases when you have to work with a puller and a hammer in pairs: first, the supports are pushed apart with a screw, and then you need to strike with a sledgehammer.
How to diagnose a ball joint
This can be done in two ways - listening and feeling. Let's look at each separately.
Aurally:
- This method does not require any additional equipment.
- Place the car on a level surface and in as quiet a place as possible so that sounds can be heard better.
- Place your foot on top of either front wheel.
- Rock the car from side to side.
- If, when rocking, the car makes dull metal impacts on one side, then there is a possibility that the ball joint on the side of the emanating sound has become unusable.
Advice! Of course, the words “there is a possibility” only indicate a possible malfunction. To diagnose an exact breakdown, it is best to use the second method.
To the touch:
- First, the car should be raised so that the front wheel can rotate freely.
- First, lift it with a jack, then support something and lower the car onto this object.
- You can substitute bricks, a wooden block or other thing at hand.
- Rock the wheel from top to bottom.
- Again, when rocking, dull sounds should be produced.
- To be sure, you need to place your hand (two fingers) at the junction of the lever and the ball joint.
- With your fingers you will feel the knock that the ball joint pin creates.
Advice! If there is even a slight knock in the ball joint, it is better to replace it. Never delay car repairs - in the end, even your life may depend on it.
Do the same operation with the second wheel. If any problems are found, make appropriate repairs.
Dynamic diagnostics:
- In this case, it is necessary to listen to extraneous sounds directly while the car is moving.
- The malfunction of the ball joint will be especially audible when the wheel hits the slightest hole on the road.
- A knock will be heard from the side of the faulty ball joint.
- In this way, you can determine whether the VAZ 2112 ball joints need to be replaced or not.
- But this method also does not fully guarantee that it is the ball joint that has failed!
How to make a ball joint remover with your own hands? lever and screw options
Homemade ball joint remover: 19 photos of step-by-step DIY production.
We bring to your attention a homemade device - a puller for ball joints made by craftsman Alexander Pankov.
- A piece of pipe.
- The channel section is 140 mm.
- Hairpin - 12 mm.
- Nuts for stud - 2 pcs.
- Coupling for hairpin - 1 pc.
We take the pipe and end it on one side.
From a piece of channel I cut out two plugs for the pipe.
I welded a plug on one side.
I cut a piece 10 cm long from the pipe and cut out a wall in the piece.
I made a second plug from a piece of the plate and cut out a groove for the “ball pin” in it, and in the already welded plug I made a hole for the coupling.
The coupling was welded on both sides.
I cut off the excess metal to fit the shape of the pipe and scalded it.
Welded a couple of nuts.
Here is a do-it-yourself puller for ball joints, the device has been tested in use, and I am satisfied with the homemade product.
Do-it-yourself ball joint remover - manufacturing options
When repairing the steering and chassis, almost every car owner is faced with a problem (tire rod ends), which is quite problematic to solve without a special tool.
The reason is the design features of the named elements: their fingers have a cone-shaped shape, with which they enter the mounting sockets; over time, the place of this entry becomes dirty, oily, rusty, making the connection of the surfaces too dense, almost uniform, that is, one that cannot be separated by simple physical force . You need an assistant - a ball joint remover - a tool that greatly simplifies pressing out.
It is not difficult to become its owner: to do this, you need to go to the nearest auto store and purchase it there, or make a ball joint remover with your own hands using any of the methods presented below, which we have grouped depending on how the force is created in them.
Author Auto mechanic
Ball joint design 2110
The service life of the suspension of front-wheel drive cars, as in the photo, depends on operating conditions
True, in the VAZ 2110 and other front-wheel drive models the unit no longer has such strategic importance as on the classics, where a loose support could lead to complete destruction of the suspension, and fives and kopecks lying teeth on the asphalt with the wheels turned out were constant attributes of bad roads. You still need to be able to bring the suspension to this state. In both front-wheel drive and classic models, the task of the support is simple - to provide an articulated rotary connection between the knuckle and the upper or lower arm, and the design of the unit has remained virtually unchanged, except for the landing planes.
A ball joint is a cone-shaped pin with a ball or mushroom-shaped end that can rotate and change angle through the range of operation of the suspension. The ball is placed in a plastic liner and pressed on both sides with a metal case with a top and bottom cover. At one time they produced supports with a collapsible body, but later this idea was abandoned. There were too many factors influencing the wear of the support - here was the quality of assembly during repairs, the quality of the liners, and the quality of lubrication. And the unit had quite a strong influence on traffic safety, and besides, it was more profitable to sell the entire support than to just replace the pins and bushings. Therefore, collapsible supports are practically never found. They are all welded, assembled at the factory, and lubricated there with lubricant, which, however, must be added immediately when installing a new part.
Video on replacing a ball joint on VAZ family cars
The quality of the support depends not only on the design. It just doesn't differ in variety. The support can be of only two types - with a metal-ceramic bearing, they are used as lower supports, and a filler one. The latter are installed on the upper arms of the front suspension and work only on compression, so there is little demand for them. And the main load falls on the lower supports with a metal-ceramic plain bearing. Visually, they differ in the shape of the hole for the finger and the shape of the boot, which protects the sliding bearing from dirt and moisture.
Causes of malfunction
During driving, the ball joint is subjected to heavy loads. It accounts for the bulk of the vehicle's weight. Wear will be especially rapid when driving for a long time on uneven surfaces.
The most common failure is wear of the contacting components. During operation, the gap between the finger and the body constantly expands. In normal condition, the pin should simply rotate, but when worn, it begins to move from side to side. If the problem is not solved, then after some time the support may fall out of the body, the support will no longer hold the wheel and the bottom of the car will fall onto the asphalt.
Need I say what consequences this will lead to at high speed?
If you haven't replaced your ball joint in a while, use extreme caution when making sharp turns or driving over obstacles. However, even a new support can suddenly fall out. This risk arises if a fast-moving car hits a hole with its wheel. The hinge instantly experiences a heavy load and literally breaks out of its socket.
Article on the topic: Repair of a vacuum brake booster - how to find a common language with the system?
Remember - the support must be inspected periodically. If water gets under the protective cover, corrosion will begin. Dirt causes abrasive wear. In combination with dynamic loads, this leads to serious damage.
Diagram of a ball joint for VAZ cars
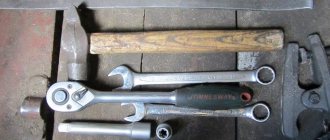
Replacement Tools
To make repairs you will need:
- Head and collar.
- Liquid WD-40 or similar. It will help unscrew the mounting bolts.
- A puller for removing the ball joint itself.
- ShRB-4 lubricant. It will be needed to lubricate the seats. Since you only need a little of it, you don’t have to buy a whole package.
- Hammer.
Removal process (exact algorithm) on a VAZ-2112
Subsequence:
- Initially, you need to hang the wheel on the side where the ball is worn. Then it will need to be removed from the car.
- Then you need to unscrew the central nut that secures the support to the rack. To do this you need to crawl under the car.
- Next, you will need to unscrew two more bolts that secure the lever to the hub. Initially, you don’t need to completely unscrew them, you just need to let them go. Then they will be removed completely.
- Then, using a puller, the ball is pressed out. After pressing out the pin, you need to unscrew the two bolts that were previously released.
- After this, the support is completely removed from the car.
In the event that a puller is not at hand, you can use a regular crowbar.
It will need to be inserted between the CV joint and the lever. In this case, the crowbar should be used as a lever. You need to press on it until the finger comes out of its seat.
Also, during this procedure, you can lightly hit the place where the finger sits with a hammer. This must be done sensitively so as not to damage the hub.
Installing a new ball joint
Next, the ball is replaced with a new one and assembly is performed. There is no need for a puller here.
To install the pin in place, it must be placed in the socket and pressed with the central bolt until the pin fits into place. To facilitate the landing procedure, you can use lubricant. You also need to lubricate the inside of the ball joint first.
Change the ball joint on time!
When this spare part fails, severe wear of the tires begins, the car stops holding the road, the wheel can fall on its side, making it difficult to drive the car.
If you do not replace a worn-out spare part in time, it will negatively affect the entire operation of the chassis, and will also cause other components to fail.
Replacement process
When is a puller required?
During operation of a car, support parts are exposed to corrosion, friction and high temperatures. As a result, the components are tightly “glued” to one another. This happens especially often with a cone and a socket.
Previously, the problem was solved simply - with a sledgehammer and a gas torch. It is not recommended to use this method, as the steering rods can easily be damaged. A ball joint remover will help you avoid problems. It is recommended to have it on the farm - this will greatly simplify the task.
Ball joint remover in working order
- key to 17;
- key to 19;
- puller;
- hammer;
- penetrating lubricant;
- jack.
This bolt must be unscrewed first.
Let's get started
- Raise the front of the car with a jack.
- We remove the wheel, behind which the required ball joint is located.
- Apply penetrating lubricant to the fastening bolts and nuts.
- Unscrew the lower nut securing the pin using a 19mm wrench.
- We install the puller and use it to squeeze out the ball pin.
- We unscrew the two bolts that secure the ball joint. One of them is in front, the other is on the opposite side.
- We press the lever and remove the support.
- Lubricate the ball pin and put on the boot if you plan to install the same support, or install a new product.
- Align the hole in the support with the thread, screw in the bolts. We repeat the steps performed during dismantling in reverse order. The work is completed.
Video: How to change ball joints on a VAZ 2110
Be sure to change ball joints in a timely manner - this way you will protect both yourself and your car.
Home →
Maintenance and Repair → Repair →
Malfunctions
The ball is not particularly friendly with dirt, so getting it on the part can lead to unpleasant consequences. To protect against contamination, the design of the element includes a boot, with the help of which dirt and sand practically do not penetrate inside.
Actually, it is the boot that is the weakest point of the ball joint, due to which it is often necessary to completely replace it. This is all due to the poor quality of the material from which the boot is made and the harsh operating conditions. As a result, the boot cracks, bursts, dirt gets inside, and the support fails.
Worn element
Verification methods
To determine that the ball joint is the culprit for your car’s slightly “inappropriate” behavior on the road, you need to check this point.
To do this, there are three main verification methods, each of which has its own characteristics.
| Way | Actions |
| The car is being jacked up | In this case, firmly grasp the wheel and wobble it. If there is noticeable play, the ball is worn out and requires replacement. |
| Place the car on the inspection pit | A pry bar is inserted into the gap between the suspension arm and the ball from below. By the movement of the wheel, you can immediately notice the presence of play. Replacement required |
| Send your car to a service center | Specialists using the appropriate equipment will conduct diagnostics, determine the degree of wear of the support, and come to the appropriate conclusion about the need for replacement. You can change it there too |
https://youtube.com/watch?v=B6zdKgkjvvk
Why is replacement required?
Operating a vehicle with a faulty ball joint can not only reduce ride comfort, but also seriously affect the safety of the driver, his passengers and other road users.
Initially, a faulty ball joint only makes unpleasant knocking noises, but at any moment you can simply lose the wheel. You understand what consequences this can lead to if you drive at high speed.
If you find signs of a suspension malfunction, immediately go to a service station or look for the cause and fix it yourself.
Spare part selection
So, to start replacing the ball joint on your VAZ 2110, you will first need to purchase a new part. This is not difficult to do, since the current range is very diverse and wide.
Although it is this diversity that often becomes the reason for difficult choices. Among so many options, you need to settle on just one. But your task is to find the highest quality and reliable spare part that can serve for more than one season.
In this regard, we invite you to familiarize yourself with the principles for choosing a high-quality ball in our table.
| Element | Requirement |
| Frame | The ball body is welded in two parts. Moreover, on one side the seam should be noticeable, and on the other - not |
| Finger | Inspect the ball pin. It should be hardened, gray in color with scale. Make sure there are no traces of paint on the part. On quality parts, rolled threads are used |
| Scrolling | When scrolling, you need to apply a lot of force and watch for the absence of snagging. This is a sign of a quality part. It is not uncommon that turning by hand is too difficult and requires a wrench. This is normal and even good |
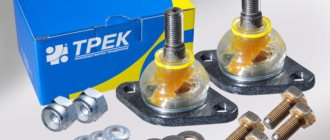
| Equipment | In addition to the ball itself, responsible manufacturers include a nut and boot in the packaging. If these elements are not available, you should refuse to purchase. |
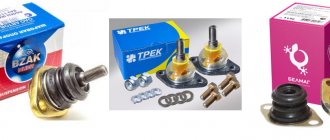
| Brand | In fact, there are many good manufacturers, but most VAZ 2110 owners choose supports manufactured by Trial-Lux, BelMag, and the most popular ones are Trek |
Which of the options on the market is better is up to you to decide. But be sure to focus on the selection criteria presented above.
Choosing a quality ball
You can buy any ball joint at the nearest store and drive it for quite a long time, but this is a matter of chance. Therefore, let's look at what a high-quality ball should be:
- Ball joint housing. It must be welded in two parts. The seam should be visible on one side, but not on the other.
- Ball joint pin. Must be hardened, gray in color, must have scale and no paint on it. Rolled thread.
- The ball should rotate with great effort, but not bite. It is often very difficult to turn the finger with your hands - you have to take a knob.
- The kit should include a boot and a nut.
- Remember - most VAZ 2110 owners install Track balls on their car. Also good options are BelMag, Trial-Lux and others.