Print this article Font size 16
It is no secret that a car owner must carefully monitor the condition of his vehicle. This also applies to ball joints. If you do not keep track of their failure and continue to drive a car with defective elements, this can lead to serious consequences. A faulty ball joint causes the wheel to simply fly off and the car to become uncontrollable. It is hardly worth describing further what could happen.
We don’t want to scare you, but simply encourage you to keep an eye on the supports on your car. The procedure for replacing a ball joint on a VAZ 2114 is quite simple; you do not need any special skills. Of course, experience in car repair will only benefit you, as it will allow you to get the job done faster and even better than some auto repair shops.
How to remove a ball joint
To change the ball joint on a VAZ-2114, you need to decide on the choice of replacement method. There is one point in the procedure - pressing the cone lever out of the steering knuckle socket. The choice of technique determines the amount of tools that you need to stock up on. You should focus on the simplest method, suitable for most motorists:
- Place the car on a flat surface.
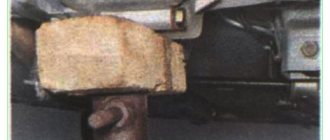
- Place the wheel on the desired side using a jack.
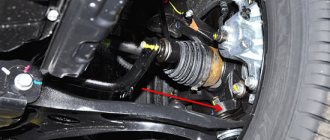
Raise the front of the car with a jack
- Remove the wheel and unscrew the ball stud nut.
Unscrew the nut on the ball joint pin
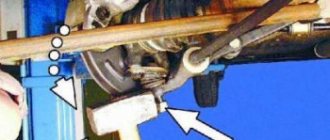
- Install the ball joint remover with a fork under the boot, on the reverse side of the lever relative to the nut. The finger should fit into the recess on the puller's foot.
Installing the ball joint remover
- When tightening the puller bolt, tighten the conical connection of the pin in the socket as much as possible.
Tighten the puller bolt
- Sometimes the finger comes out on its own, otherwise there is no need to be zealous with tightening the working thread of the device: the puller itself will break. In a tense position, it is necessary to apply several sharp blows either from below on the puller’s paw to the end of the finger, or from the side on the eye. Usually the finger then pops out with a click.
- You must be careful; a weakened device will fall and cause injury.
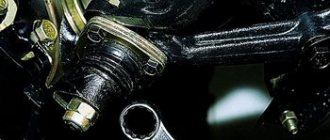
- Unscrew the two screws securing the housing and remove the worn part.
Unscrew the ball joint mounting bolts
Experienced craftsmen do without a puller. Either a conical impact fork is used, or tension is created on the finger with a pry bar, after which a strong blow is applied to the eye.
Removing the ball joint without a special puller
Without skill, this is unlikely to happen; it’s easier to purchase a puller.
Is it possible to restore the support?
This element has 2 types of faults. Most often you may encounter the depletion of lubricant in the housing. With this development of events, restoring the ball joint to working condition is easy. Using a special syringe, the amount of lubricant in the housing is updated. Experienced craftsmen prefer graphite lubricant, but you can use another type of it, preferably with similar values. I advise you to read the article - how to lubricate a ball lubricant.
If the performance of the ball was restored using the above method, it is worth considering that it will not be possible to extend it for a long time. In cases where there is a high degree of wear, adding lubricant will not change the situation. A replacement part will be required.
The condition of most domestic roads means that car suspensions cannot last for a long time, as a result of which regular and frequent replacement of its elements is required. As for the ball joint, removing it without a puller is not a big problem. This process requires a minimal set of auxiliary tools. At the same time, the absence of a professional tool will not have a negative impact on the parts of the mechanism.
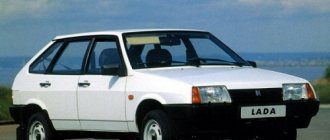
Replacement of ball joint VAZ 2107, 2109, 2110, 2114
Sealant for muffler types, DIY repair instructions
ball joint" src="/sites/default/files/img/zamena_sharovoy_opory.jpg" title="Replacing the ball joint" />
You're driving along, you're driving a car, and suddenly your wheel hits some snag lying on the road, you plow up an open and unfenced sewer manhole, or, after staring, you crash your wheels onto the curb with all your might. Well, sometimes you get distracted, fall in love with a girl, think about the eternal, or your eyes become dark from a toothache. In general, a familiar picture, voiced in the end with selected and varied obscenities, like a Christmas tree hung with toys. The result, as a rule, is obvious - you need to replace the ball joint, which you quite successfully broke by inattentive driving over obstacles.
Moreover, you may not notice anything right away, but after a day or two a disgusting knock appears in the wheel area, which over time turns into a constant and very intrusive noise. It’s time to contact the mechanics for service, but no, the toad is choking you to give away extra money and then you begin to remember how it all works, how much spare parts cost and what the replacement technology is. This is where the enlightenment of the mind comes, because saving on the one hand adds a lot of hassle on the other. This is where it all begins...
Materials, tools and related accessories
You don’t need much for a quality repair, but you should take it seriously and relaxed, otherwise not a damn good thing will come of it. And you will need the following repair kit, which exists in the garage and in the inner consciousness of any motorist:
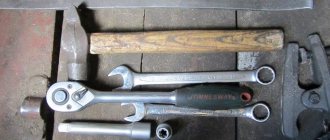
- A set of wrenches (spanners and lug wrenches).
- New ball.
- Locksmith's hammer.
- Reliable jack.
- Favorite music to make it more fun.
- For beer lovers, several bottles of this wonderful drink.
- Maybe a girl in a short skirt to hand over the keys from above.
The last two or three points are not at all obligatory, but are desirable for many, and therefore should not be ignored if you can combine the pleasant and the very pleasant.
Ball repair (replacement) process
If you are not a girl with very blond hair, then you probably know very well how to remove the wheel. However, for blondes, let us clarify that the car needs to be raised on a jack, and the wheel mounting bolts must be unscrewed with a wheel wrench, having first loosened them before lifting. You should put some kind of stops under the wheels standing on the ground so as not to rely on the strength and power of the parking brake. For convenience and comfort, turn the steering wheel in the direction corresponding to the side where the ball joint is being replaced. In order not to heavily load the jack, it is best to additionally support the car with sawhorses, this will be much more reliable.
Everything that concerns domestic cars such as VAZ 2110, 2107, 2114 and other models can be safely called an unprecedented success, because dealing with foreign cars is a little more difficult. In the Russian version, the next action after lifting and fixing should be to unscrew the ball joint nuts with a regular open-end wrench. Having tightened the nuts, we take a sip of beer, take a hammer from the hands of a girl in a miniskirt and knock out a finger with it (not our own, of course). After knocking out the pin, unscrew the ball joint, removing the fastening nut from it, and then remove it from the lever completely.
Having freed the car from the “dead” part, take a brand new ball joint and put it back on the lever, having previously lubricated the threads. In the last act of this play, you tighten the bolts tightly into place and insert your finger (not your own, of course). Thus, the replacement of the ball joint with a new one was modestly completed
You can take out the sawhorses, lower the car on a jack and drive on, being somewhat careful in overcoming various obstacles on the road. By the way, when choosing and purchasing a new part, give preference to well-known manufacturers and do not deny the truth about the miser who pays twice. https://youtube.com/watch?v=MfJSamvlg4Y
https://youtube.com/watch?v=MfJSamvlg4Y
Recovery
Replacing the ball joint for VAZ 2109, 2114
Necessary equipment:
- Emery or grinder.
- Extruder.
- An electric drill with a large chuck (so you can hold your finger in it to sand the ball with sandpaper).
- Metalwork yews.
- Welding machine (preferably semi-automatic).
- Compressor.
Restoration of supports can occur in two ways:
- Converting a non-separable hinge into a collapsible one, grinding the pin ball and replacing the liners.
- Repair by injecting softened plastic into the gap between the ball and the body using an extruder.
Of course, you shouldn’t buy equipment for a one-time repair, but you can quickly make a simple extruder with your own hands from an old brake master cylinder by attaching a lever to it to press the piston. You can heat it to soften the plastic with a torch or blowtorch.
Carrying out work
Repair and restoration in the first way begins with dismantling the supports. To disassemble a body welded from two cups, you need to drill out welding points on one of the cups and separate the cups using a chisel and hammer. On a body with an inserted bottom, grind off the flared edges using emery or a grinder, and knock out the bottom with a hammer to the end of the finger. An insert with a finger is inserted into the body of two cups, the halves are pressed against each other and several tack welds are made, trying not to overheat the insert. For a case with the bottom removed, measure the outer and inner diameters and make a steel ring in accordance with these dimensions, about 10 mm high with a thread inside and a plug screwed into it. Weld the ring to the body, cool, insert the insert with the pin into the body, screw in the plug, press the liner with it, drill a Ø 2 mm hole in the ring close to the plug and secure it with a cotter pin.
Article on the topic: Rating of the best batteries for cars
Do-it-yourself repair and restoration using the second method usually takes place without disassembling the unit.
A hole with a diameter of about 6 mm is drilled in the bottom of the body, its size depends on which extruder is available to you. The gap between the ball and the liners is cleared of dirt and blown with compressed air to remove sand and chips. Through a hole drilled in the bottom, using an extruder, softened plastic is injected into the gap between the pin ball and the body. Let it cool and the repair is ready. The disadvantage of this method is that you cannot see whether the geometry of the ball has been preserved and you cannot polish it to remove traces of corrosion, so the restoration results will be short-lived.
replacement and diagnostics of Remzon VAZ
In this article we will talk about how to repair the suspension on a VAZ 2114 car, and more specifically, about replacing ball joints. These are the elements that fail most often, despite the fact that they are practically eternal. Judging by the instructions for use. But the service life of ball joints is affected by the driver’s driving style, the quality of the road surface, and most importantly, the initial quality of the product. Unfortunately, more and more often you can find low-quality products on the market, refurbished ones, which will last very little. There is an opinion that restored ball joints can work for quite a long time. But is there any point in restoring such a simple and fairly cheap mechanism?
The cost of a ball joint for a VAZ 2114 car, as well as for most front-wheel drive models, is no more than 500 rubles. Moreover, for such a price you will get a very high quality product. But let’s get closer to the topic of the article, namely, repairing a car’s suspension.
Diagnosis of ball joint malfunction
Identifying the breakdown is quite simple; to do this, you just need to sit in the front seat of the car. If a peculiar crunch appears from the suspension, we can talk about a malfunction of the VAZ 2114 ball joint. You don’t even need to try to look for any other reasons, the malfunction is in this particular joint. Moreover, a peculiar crunch can be observed when the car is moving slowly. During acceleration it usually disappears, but this depends on the degree of wear of the mechanism.
And the second diagnostic method is to pull the car wheel in a vertical plane with your hands. If there is a breakdown, you will definitely hear a crunch. A similar phenomenon occurs when using a mount. It must be installed between the suspension arm and the wheel hub. If you move the mount sharply, you can still hear the same nasty sound.
To be sure, you can even drive the car onto a viewing hole or overpass. Grasp the suspension arms and pull them down several times. A good knock, as they say, will come out. And if you put your palm on the body of the VAZ 2114 ball joint, you can feel a slight vibration from the inside.
Preparation for replacement and tools
To carry out the repair you will need the following tools:
- Ball joint remover. The price of such a tool is about 350-400 rubles. I advise you to purchase it, as it will definitely be useful to you in the future.
- Standard set of wrenches and screwdrivers.
- Litol type lubricant.
- Jack and reliable supports.
- Wheel chocks, which are placed under the rear wheels to prevent the car from rolling away.
That's all, now you need to prepare the car for repair. To do this, you need to install wheel chocks, loosen the wheel bolts, lift the side being repaired using a jack and install it on a support. Wooden blocks can be used as support, but it is not advisable to use materials such as bricks, cinder blocks, and the like. They are fragile and the car can simply fall during repairs. If necessary, treat all threaded connections with a penetrating lubricant such as WD-40.
Carrying out replacement
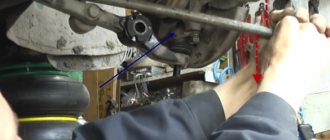
Now the crucial moment has come, it is necessary to remove the old ball joint of the VAZ 2114 and install a new one in its place. First, using a 19mm wrench, unscrew the nut that secures the ball joint pin to the front wheel hub. After this, you need to install the puller so that the small ball on its bolt is clearly in the middle of the hinge pin.
Carefully screw in this bolt until the pin comes off the wheel hub. After this, you need to use a key “17” to unscrew the bolts that secure the joint cage to the suspension arm of the VAZ 2114. That’s all, the dismantling is complete. Now all that remains is to install a new hinge, which it is advisable to pre-lubricate with Litol. To be honest, I also used CV joint type lubricant for this purpose.
I haven’t noticed much of a difference; the ball joints have been working without problems for three years now
Please note that when installing a new joint, you may have to install several blocks of wood under the arm and lower the body so that the ball pin fits into the hole in the hub. But this job can be done with a good pry bar. The repair is complete, good luck on the roads and fewer breakdowns!
The repair is complete, good luck on the roads and fewer breakdowns!
Requirements for a new ball
Make sure that the new ball joint boot is in good condition - there should be no cracks or damage. The new ball joint should have a grayish color to the finger. There should be no defects on the clip. The ball pin is not allowed to rotate freely - this indicates that the element is of poor quality.
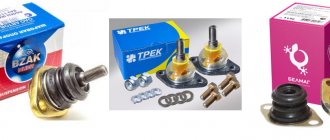
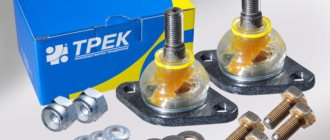
For good elements, it either does not rotate in the cage at all, or does so very tightly. Try to purchase domestic products, “Track”, “Trial”, “Kedr”, “Nadezhda”, “BZAK”. You should not trust manufacturers from China or Turkey - practice shows that such elements are very unreliable and have a short lifespan.
Carrying out replacement
Now the crucial moment has come, it is necessary to remove the old ball joint of the VAZ 2114 and install a new one in its place. First, using a 19mm wrench, unscrew the nut that secures the ball joint pin to the front wheel hub. After this, you need to install the puller so that the small ball on its bolt is clearly in the middle of the hinge pin.
Carefully screw in this bolt until the pin comes off the wheel hub. After this, you need to use a key “17” to unscrew the bolts that secure the joint cage to the suspension arm of the VAZ 2114. That’s all, the dismantling is complete. Now all that remains is to install a new hinge, which it is advisable to pre-lubricate with Litol. To be honest, I also used CV joint type lubricant for this purpose.
I haven’t noticed much of a difference; the ball joints have been working without problems for three years now
Please note that when installing a new joint, you may have to install several blocks of wood under the arm and lower the body so that the ball pin fits into the hole in the hub. But this work can be done with the help of a good mount.. This completes the repair, good luck on the roads and fewer breakdowns!
The repair is complete, good luck on the roads and fewer breakdowns!
Given the quality of Russian roads and the components supplied to spare parts stores, ball joints on VAZ 2114-2115 cars have to be changed quite often, although there are exceptions, and they last 50-70 thousand kilometers. You can make the replacement yourself, but you should have all the necessary tools at hand, a full list of which is given below:
- jack
- hammer and spatula
- key for 17 and 19
- sockets and ratchets for greater convenience
- special ball joint remover
The first thing we should do is slightly loosen the front wheel mounting bolts, and then jack up the front of the car. Now you can remove the wheel, having first unscrewed all the bolts completely. It is also advisable to play it safe and place stops under the bottom, as well as put the car on the handbrake.
Next, you can unscrew the nut securing the ball joint to the lever, using a regular spanner wrench or a socket with a wrench:
After this, we insert our puller under the rubber (boot) of the support and unscrew the bolt of the puller until the action of the device lever causes the finger to jump out of its seat:
Then you need to unscrew the two bolts securing the VAZ 2114-2115 ball from the top side, as shown in the photo below:
As you can see in the above photo, from the factory it is bolted with TORX profile bolts, but the store comes with a set of supports that come with regular 17mm wrench bolts. Now the support is almost free for removal. To gain access to dismantling, you can place a brick under the brake disc and carefully lower the jack, thereby freeing up space for removal:
Then we take a new ball, remove the boot and be sure to push lubricant inside, such as lithol:
We put the boot in place and replace the support in the reverse order. There may be difficulties during installation, but with a mount and a lot of effort, you can handle it all. The price of new ball joints for VAZ 2114-2115 varies depending on the manufacturer, around 300-450 rubles per piece.
Sources
- https://www.help2drivers.ru/zamena-sharovjyh-opor-vaz-2114/
- https://vaz-remzona.ru/sharovye-opory-vaz-2114-zamena/
- https://zarulemvaz.ru/zamena-sharovyx-opor-na-vaz-2114-2115/
How to change it yourself: step-by-step instructions
There are two methods for replacing a ball joint on a Renault Logan - with and without removing the lever. In the first case, it is more convenient to dismantle the faulty ball joint, in the second - there is less assembly and disassembly work. In the instructions we consider both options. Basic steps:
- remove the wheel;
- remove the caliper;
- unscrew and knock out the ball joint;
- remove the lever (with the first method);
- press out the old support;
- press in a new one;
- assemble in reverse order.
Article on the topic: Repair and replacement of the gas tank on a VAZ 2108/09/14/15: how to do it quickly, accurately and with your own hands
Let's take a closer look at each point.
- There shouldn't be any problems removing the wheel.
But when removing the caliper, you need to unscrew the two 18mm mounting bolts, and then release the brake pads. This can be done using a screwdriver or a small pry bar. To decompress, rest not against the disc, but against the pad. After dismantling, hang the caliper higher on the suspension spring using wire or rope. Remove the caliper - Now we have access to the ball joint.
It is secured with a bolt and nut. Immediately unscrew the nut and knock out the bolt or gradually unscrew it, pressing from the reverse side. At the mounting point on the steering knuckle there is a special slot into which you need to drive a large screwdriver (like a wedge). After which you can pull out the ball. Drive a screwdriver into the slot of the steering knuckle and remove the ball - The next step depends on the replacement method you choose.
If you decide to try to pull out the support without removing the lever, then you need to select a suitable piece of pipe or other spacer. The main conditions are that the length allows one end of the device to rest against the ground, and the other end against the suspension arm. And the diameter should be slightly larger than the bottom of the ball, so that when knocked out it will fall inward. If the boot remains intact, it is better to remove it. It may come in handy in the future, since the anthers are not supplied separately (some install them from the Gazelle, but you will have to struggle with installation). If the old boot is intact, it is better to keep it - Next, knock out the old part with a hammer. Be sure to check for the presence of a retaining ring on the ball housing. The original supports do not have them, but some “analogs” are included. If any are found, remove the ring and then knock it out.
- To install a new spare part, a 34 or 36 head is suitable. Use it as a spacer, resting it on the lower part of the support.
The splines of the ball must match the splines of the lever. There is no need to rush at this stage. If the new support enters the lever at an angle, you will not be able to press it in correctly. What’s worse is that in this case the seat in the lever is deformed, and you will have to buy the lever assembly. Therefore, proceed carefully. Be careful when working with the ball seat - The replacement procedure is much more convenient to do with the lever removed. To do this, you will have to unscrew the nut and pull out the bolt securing the lever to the subframe, front and rear silent block. And also unscrew and pull out the connecting rod and stabilizer link.
- We reassemble in reverse order, not forgetting to check the condition of the fastening bolts. If they are damaged (mechanically or by corrosion), be sure to replace them with new ones.
- Don't forget to put the plastic washer that is installed on top of the boot. Without it, the service life of the ball joint is reduced by a third.
Article on the topic: Replacing the cylinder head gasket with your own hands
Recommendations for suspension maintenance and increasing the service life of mechanisms
- purchase spare parts and components exclusively from certified points of sale, dealers, and official representative offices;
- do not buy parts when their cost is uncharacteristically low, which indicates a fake, not original;
- take a moderate driving style as a rule;
- Operate primarily at medium speeds in the range of 80 – 95 km/h. This will increase the total resource of nodes by 15 - 20%;
- If you do not have personal experience in servicing, use the services of proven service stations and auto repair shops, where they provide a quality guarantee for the work performed.
Take a comprehensive approach to diagnosing and repairing breakdowns, replace all worn-out elements and components. Use handicraft services to a lesser extent. In order to prevent sudden breakdowns, conduct a quick inspection of the VAZ 2114 every day, check the levels of oil, antifreeze, and washer fluid in the washer reservoir.
How to check the ball joint on your car
In more than a hundred years since the appearance of the first cars, thousands of changes have been made to their design. In the pursuit of perfection, developers rejected some technical solutions and replaced them with others.
Gradually, step by step, a modern car was formed, consisting of many components and assemblies, the reliability of which has been tested over the years. One of these units is the ball joint.
This detail has taken root in the chassis design of many cars. Technologically simple and reliable, it provides the car wheel with a high degree of mobility. Its serviceability is equally important for the operation of both the suspension and steering.
Dangers of a worn ball
Most “experts” believe that the ball joint should be rigid and clamped. That is, it should move, but always with great effort. This is a completely false statement. Yes, the correct ball moves heavily in the cage, but with little effort, otherwise it won’t bite. This is fraught with increased wear of the support itself.
The main point that will show that the part needs to be replaced is vertical play. That is, the ball should not knock. If she knocks, sooner or later the finger will simply rip out of the clip
And if we take into account the fact that in our country there is only one law in force - the law of meanness, then this will happen at the most unpleasant and inopportune moment
The next danger that lies in a worn ball joint is its lateral play. Most modern front-wheel drive cars have zero toe-in of the front wheels, that is, they are parallel to each other. The initial play in the ball gives a wheel travel of 2-3 millimeters, which does not have a positive effect on the geometry of the wheels. And this, in turn. Leads to danger when driving, and there is also a risk of losing one of the tires in a very short mileage.
The most common causes of failure of VAZ 2114 suspension elements
- failure by the owner of the car to comply with the terms of technical inspection;
- the consequences of saving on high-quality, original spare parts, as a result of which the parts do not maintain the proper service life;
- aggressive driving style of the VAZ 2114. First of all, this is a passenger car, and not a racing car with the appropriate characteristics;
- third-party mechanical damage to the steering knuckle, caliper, hub, support bearing, resulting in deformation of the ball joint;
- violation of installation technology.
Before starting repair work, service station technicians recommend carrying out a comprehensive diagnostic of the vehicle in order to study the general condition, identify breakdowns, and correctly calculate the number of spare parts and consumables. A preliminary inspection will help to accurately identify the location of the breakdown and detect the faulty part.
The process of self-diagnosis is not at all complicated; there is no need for special equipment or tools. A standard set of car keys, a crab-shaped puller, is enough. It is extremely difficult to press out a metal tip without a puller.
Step-by-step diagnostic process:
- We take a partner to help, he will press his hands on the wing, simulating the car getting into a pothole. The owner identifies the source by ear from under the bottom;
- if the first method does not bring the desired result, we will use the old, proven old-fashioned method: using a mount we check the condition of the fastenings of the suspension elements, hub, and steering knuckle.
In good condition there should be no third-party sounds, creaks, or grinding sounds. Otherwise, the units must be replaced with new ones.
The manufacturer in the operating instructions indicates a maximum free play of the ball joint pin of 0.8 mm. Without special equipment, it is impossible to check the permissible gap.
In parallel with the diagnosis and replacement of suspension elements, we inspect the steering knuckle, hub, support bearing, and brake caliper. We assess the general condition and decide on the advisability of replacing worn parts.
Since the work is carried out near the shock absorber and spring, we check for the presence of oily streaks and depressurization of the shock absorber cylinder. Finally, we diagnose the support bearing located in the engine compartment.
Signs of ball failure
There is only one symptom of a faulty ball joint - a characteristic knocking sound. Moreover, it can be confused with the one coming from grenades. It’s just that the CV joints crunch when turning (only with severe wear will they constantly make unpleasant sounds). And the ball joints knock when driving slowly, even on a flat road. When hitting bumps, the sound intensifies. To make sure that the element is faulty, you need to place a crowbar between the lever and the steering knuckle of the hub and make several jerks - a knock will appear immediately.
Preparation for replacement and tools
To carry out the repair you will need the following tools:
- Ball joint remover. The price of such a tool is about 350-400 rubles. I advise you to purchase it, as it will definitely be useful to you in the future.
- Standard set of wrenches and screwdrivers.
- Litol type lubricant.
- Jack and reliable supports.
- Wheel chocks, which are placed under the rear wheels to prevent the car from rolling away.
That's all, now you need to prepare the car for repair. To do this, you need to install wheel chocks, loosen the wheel bolts, lift the side being repaired using a jack and install it on a support. Wooden blocks can be used as support, but it is not advisable to use materials such as bricks, cinder blocks, and the like. They are fragile and the car can simply fall during repairs. If necessary, treat all threaded connections with a penetrating lubricant such as WD-40.
Device and purpose
The ball joint allows for a reliable movable connection between the wheel hub and the suspension arm. The assembly includes a housing, a ball pin, and an insert made of plastic. The body most often has a welded structure - two parts with a stamped spherical recess for the finger are connected using spot welding.
Essentially, this element is a thick-walled glass made of metal into which an insert with a finger is then inserted. To make the housing structure non-separable, its edges are flared. Often the liner is not manufactured separately, but the area between the walls of the housing and the ball surface of the finger is filled with a special polymer material. To protect the unit from dirt and water, a boot is placed on top.
It should be noted that active wear of the ball joint begins after the boot is damaged. Until this happens, the unit is practically not subject to wear. Thus, if you monitor the condition of this element and replace it in a timely manner, you can significantly increase the life of the unit.
Checking status
Before changing the ball joint, make sure that this element has actually failed and is the cause of the car's inappropriate behavior.
There are two ways to check - simple and more complex.
First way
To check you will need to do the following:
- When driving, listen for knocking noises coming from the front of the car. The malfunction of the ball joint becomes especially noticeable when the wheel falls into a hole;
- If, when hitting a hole, there is a dull impact from one of the front wheels, the ball joint should be changed;
- There is another way - put your foot on top of the front wheel, and then start pushing it towards the second front wheel. If you hear a dull thump during manipulation, it is better to check the condition of the ball in more detail using the second method.
Verification procedure
Second way
The second testing method is more accurate, but will require a pit and additional equipment.
- Place the car over the inspection hole.
- Turn on the handbrake and place chocks under the wheels for your own safety.
- Raise the front of the car with a jack. Make sure the car is supported securely as you will have to wobble the car.
- After lifting the wheels off the ground with a jack, begin testing.
- Place one hand on the top point of the wheel, and the other, respectively, on the bottom.
- Using gentle but sharp movements, loosen the wheel from top to bottom.
- If you don't hear any knocks, check the second wheel as well.
- If extraneous sounds appear, you need to ask a friend to place two fingers on the area where the suspension arm connects with the ball pin, as well as on the SHO body. If you feel with your fingers that the ball joint pin is moving inside the body, the ball joint has outlived its usefulness and requires replacement.
Dismantling process
- To work, you will need an inspection pit or a lift. But if they are not there, you can get by with a regular jack.
- Remove the wheel that has a ball joint problem.
- Thoroughly clean all elements from accumulated dirt, treat fastening components with WD40 so that the rust comes off and you can carry out dismantling work without any problems.
- Using a 19mm wrench, unscrew the nut securing the ball joint to the suspension arm of the VAZ 2109.
- Armed with a puller, press the SHO pin out of the suspension arm.
- If you don’t have a puller, you don’t need to go to a car service center. There is another way. You need to not completely unscrew the ball joint nut. The tension is created by a pry bar and several targeted, strong blows on the lever with a hammer. In 99% of cases, the finger comes out without any problems.
- Do not remove the pry bar too far, since it should now be used to move the suspension arm slightly downward, freeing the ball joint pin from the lever.
- Having picked up the 17 head, it is necessary to dismantle the pair of bolts responsible for connecting the steering wheel with the steering knuckle.
- Remove the worn ball joint.
- Check the condition of the boot and support. In some cases, it is enough to replace the boot. But if the ball joint is worn out and shows all signs of failure, install a new ball joint and reassemble the unit in the reverse order.
- Make sure there is a spacer on the pin. If it has been removed, do not forget to return the element to its place. Otherwise, the new support will not work properly.
- Be sure to lubricate the rubber boot with grease before reinstalling it. The lubricant is also applied to the place in the support where the boot is mounted.
An important point in replacement is the tension of the fastening nuts. After replacing the ball, tighten the nuts tightly, but not completely. Then you need to rock the car several times, and only then tighten the fasteners completely.
In this case, the lower SHO nut is tightened with a torque of 80-96 Nm, and a pair of bolts securing the support to the lever - with a torque of 50-63 Nm.
Advice from experienced motorists
Some repair work involves disassembling certain components. And the ball joint is no exception. Experienced motorists give some practical advice on this matter, with the help of which you can kill two or even more birds with one stone.
- Inspect the condition of the entire underbody once you have climbed under the car.
- Check the quality of the cable tension from the handbrake, and also make sure that the cable itself is intact.
- Check the car for oil, lubricant, and coolant leaks.
- Make sure the sump and engine crankcase protection are intact.
- Check each unit for mechanical damage, cracks, and chips.
- Inspect the tensioner nut from the steering column. It has to be pulled up periodically. Once you are under the car, this is a good time to do this kind of work.
- Look into the transmission structure to make sure the transmission oil is at the correct level.
Plus, any independent repair, each small inspection is a coin into your own treasury of personal experience. With it you can perform much more complex procedures than replacing a ball joint.
Don't forget one more important point. Self-repair of many components means saving the family budget. With the money you save, you can take your family somewhere or buy something useful for your home. Or purchase a set of new high-quality tires, wheels, and do some tuning work. Indeed, technically, thanks to your efforts, the car is in excellent condition.